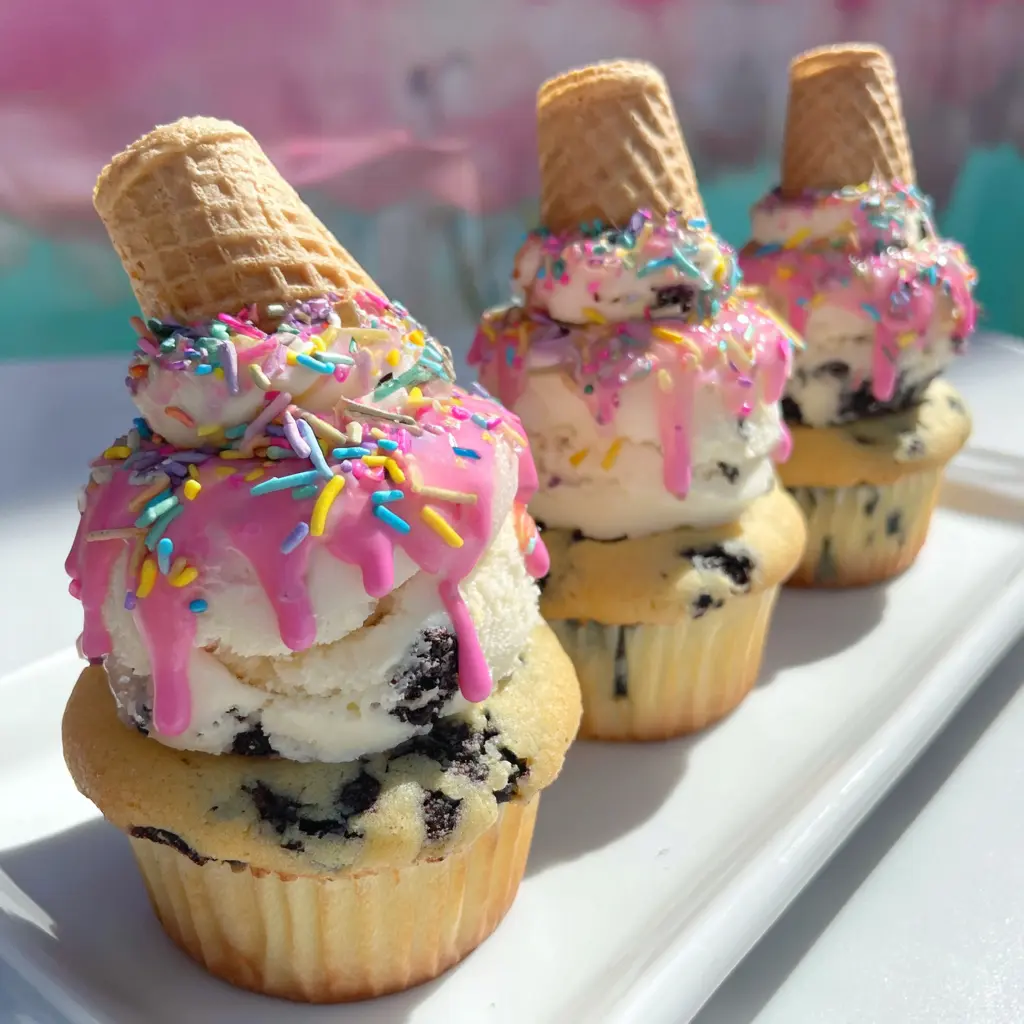
Imagine a cupcake that captures all the magic of a soft bakery treat topped with a luscious scoop of cookies-and-funfetti frosting. Now add an upside-down mini ice cream cone on top that looks like melting ice cream but is actually all cake and frosting—no mess, no melting, just pure whimsy. These playful treats combine visual wow-factor with irresistible flavors and textures that make them perfect for any celebration or just brightening up your day.
These Ice Cream Cone Cupcakes are designed to delight both kids and adults alike with their fun appearance and customizable options. Whether for a birthday, baby shower, summer party, or simply Pinterest-worthy content, they bring joy without requiring expert decorating skills. If you can frost a cupcake and press a cone on top, you’re all set to create these irresistible cupcakes bursting with personality.
- They look absolutely insane and eye-catching, perfect for parties and social media.
- Super easy to make without complicated decorating skills—anyone can do it.
- Highly customizable with flavors, colors, and sprinkles to suit any theme.
- Kids and adults alike go crazy for the “melting” cupcake illusion.
Ingredients
- Vanilla cake mix: Use a box mix or your favorite homemade vanilla cupcake recipe for a soft, bakery-style base.
- Eggs: Required by the cake mix to bind ingredients and add structure to the cupcakes.
- Vegetable oil: Keeps the cupcakes moist and tender during baking.
- Water: Helps mix the batter to the right consistency and ensures even baking.
- Mini chocolate chips: Optional, but add delightful pockets of melty chocolate throughout the cupcake.
- Rainbow sprinkles: Mixed into the batter for a festive, confetti-like appearance inside each cupcake.
- Unsalted butter (softened): The base of the frosting, whipped fluffy to create a creamy texture.
- Powdered sugar: Sweetens the frosting and thickens it to hold shape when scooped.
- Heavy cream or milk: Adds richness and smoothness to the frosting consistency.
- Vanilla extract: Provides warm, aromatic flavor to the frosting.
- Crushed chocolate sandwich cookies: Folded into the frosting for a cookies-and-cream vibe and added texture.
- Rainbow sprinkles (for frosting): Adds colorful, fun bursts within the frosting mimicking real ice cream inclusions.
- Mini ice cream cones (flat-bottom preferred): Served upside down to create the melting ice cream cone appearance.
- Pink candy melts or tinted white chocolate: Melted and dripped to simulate melting ice cream dripping down the cupcake.
- Extra sprinkles: For decorating the drip and cone to maximize the party vibe.
Instructions
- Prepare the cupcake batter
Start by preheating your oven and lining a muffin tin with cupcake liners. Prepare the vanilla cake mix according to package directions, usually combining cake mix, eggs, oil, and water. Gently fold in mini chocolate chips and rainbow sprinkles right before baking to evenly distribute them without deflating the batter.
- Bake and cool the cupcakes thoroughly
Fill each liner about ¾ full to allow room for rising. Bake according to the package instructions, usually 18 to 22 minutes. Once done, let the cupcakes cool completely on a wire rack. This step is crucial because warm cupcakes will cause the buttercream to melt and slide when frosted.
- Make the cookies-and-funfetti frosting
Beat softened butter on medium speed until fluffy and pale, about 2 to 3 minutes. Gradually add powdered sugar one cup at a time while beating to incorporate air and sweetness. Add vanilla extract and heavy cream or milk, then whip until the frosting is thick and scoopable. Gently fold in crushed chocolate sandwich cookies and rainbow sprinkles to give the frosting that ice cream-like chunky texture and colorful appeal.
- Apply the frosting mound
Using a large cookie scoop, spoon a generous mound of frosting onto each cooled cupcake. Avoid smoothing the frosting too much; a slightly uneven, rustic look mimics the imperfect scoop of ice cream and enhances the melting illusion.
- Create the melting drip effect
Melt pink candy melts or tinted white chocolate slowly and allow to cool to a thick yet pourable consistency. Carefully spoon small amounts around the top edges of each frosting scoop to create drip lines down the sides. This step simulates melting ice cream and adds stunning visual texture.
- Attach the mini ice cream cones
Gently press a mini ice cream cone upside down into the center-top of each frosted cupcake. Apply only light pressure so the cone stays perched on top without sinking. Quickly sprinkle extra rainbow sprinkles over the drip and cone while still soft to maximize color and festivity.
- Make sure cupcakes are completely cooled before frosting to prevent sliding and messy results.
- Adding the cones just before serving avoids sogginess and keeps the cones crisp.
- Melted candy drips are best poured thick and slow for realistic melting ice cream effects.
Storage Tips
Store cupcakes in an airtight container at room temperature if serving within a day. If refrigerating, keep them covered and add mini cones just before serving to prevent sogginess. Allow refrigerated cupcakes to come to room temperature for about 20 minutes for best texture.
Serving Suggestions
Display these cupcakes on a white serving tray to make the vibrant colors and sprinkles pop. They look stunning when photographed in natural light, making them perfect for parties and social media posts. Serve slightly chilled or at room temperature to enjoy the creamy texture of the frosting and tender crumb.
- Customize by using chocolate or strawberry cupcakes instead of vanilla to suit your theme.
- Add food coloring to frosting or sprinkles for coordinating party colors.
- Experiment with filling cupcakes with jam or ganache for delightful surprise centers.
- Using flat-bottom mini cones ensures stability when perched atop the frosting.
FAQs
- Do the cones get soggy?
Yes, if stored for a long time in the fridge, cones can soften. It’s best to add the cones the same day you’re serving for maximum crunch.
- Can I use store-bought frosting?
You can, but homemade frosting holds its shape better, tastes richer, and allows you to add mix-ins like crushed cookies and sprinkles.
- Can I make these for outdoor parties?
Yes! Just keep them shaded and out of direct sun, as buttercream doesn’t do well in heat and will melt quickly.
- How can I make them look more “melty”?
Add extra candy melt drips and let the melted candy run longer down the cupcake liners to exaggerate the melting effect.
- Can I swap the cupcake or frosting flavors?
Absolutely! Chocolate cupcakes or strawberry frosting work beautifully and allow customization to fit any event or preference.
Ice Cream Cone Cupcakes
Equipment
- 1 mixer for frosting
- 1 cupcake pan
- 1 cookie scoop
Ingredients
- 1 box vanilla cake mix or homemade vanilla cupcake batter
- Ingredients listed on cake mix box typically eggs, oil, water
- 1/2 cup mini chocolate chips optional
- 2 tablespoons rainbow sprinkles for batter
- 1 cup unsalted butter softened
- 3 to 4 cups powdered sugar
- 2 to 3 tablespoons heavy cream or milk
- 1 teaspoon vanilla extract
- 1/4 cup crushed chocolate sandwich cookies
- 2 tablespoons rainbow sprinkles for frosting
- Mini ice cream cones flat-bottom preferred
- Pink candy melts or tinted white chocolate
- Extra sprinkles for decoration
Instructions
- Preheat oven and prepare cupcake liners. Fill each about 3/4 full with batter mixed with chocolate chips and sprinkles if using.
- Bake cupcakes according to package directions, then cool completely before frosting.
- Beat softened butter until fluffy. Gradually add powdered sugar one cup at a time.
- Add vanilla extract and heavy cream, then whip frosting until thick and scoopable.
- Fold crushed cookies and sprinkles into the frosting for a chunky texture.
- Scoop large mounds of frosting onto cooled cupcakes with a cookie scoop for a natural ice cream look.
- Melt pink candy melts and let cool slightly until thick but pourable.
- Spoon candy melts gently around the edges of frosting to create melting drip effect.
- Press mini ice cream cones upside down into the frosting, then immediately add extra sprinkles.
- Chill cupcakes slightly to set frosting and serve at room temperature for best texture.
Notes
- Store cupcakes tightly covered; add cones the day of serving to avoid sogginess.
- Use homemade frosting for better texture and flavor.
- Keep cupcakes shaded outdoors to prevent frosting meltdown.
- Try variations with chocolate cupcakes or colored frosting to match themes.
- Fab for kids and adults alike, perfect for celebrations.