What the heck is this?
Okay, let’s be real — sourdough bread is having a moment. And by “moment,” I mean it’s been the star of the show for literally thousands of years, but suddenly everyone’s acting like they discovered fire. Here’s the thing though: making your own sourdough isn’t just trendy Instagram content (though it definitely is that too). It’s about creating something magical with just flour, water, salt, and time. This isn’t your average sandwich bread — we’re talking about crusty, golden perfection with a tangy flavor that’ll make you question every store-bought loaf you’ve ever settled for. Plus, there’s something deeply satisfying about nurturing a starter like it’s your pet and then turning it into edible gold.
Why You’ll Love This Recipe
- It’s basically edible science — fermentation is pure magic
- No commercial yeast needed (your starter does all the heavy lifting)
- That crust though — crispy outside, chewy inside perfection
- Keeps way longer than regular bread without going stale
- Makes your house smell like a French bakery
- Bragging rights for days (seriously, people will be impressed)
- Each loaf has its own personality and character
The Good Stuff You’ll Need
For Your Active Starter:
- 100g active sourdough starter (bubbly and doubled in size)
- (Don’t have a starter? You’ll need to make one first — it takes about a week)
For the Bread:
- 375g warm water (about 80°F)
- 500g bread flour (high-protein is your friend here)
- 10g salt (use good sea salt or kosher salt)
For the Magic:
- Extra flour for dusting
- A bit of olive oil
- Patience (seriously, this is an ingredient)

Let’s Do This (The Long Game)
Day 1 – Evening: Make the Dough Mix your active starter with warm water in a large bowl until it’s well combined. Add the flour and mix until you have a shaggy, rough dough. Cover and let it rest for 30 minutes (this is called autolyse — fancy, right?).
Add the salt and mix it in thoroughly. The dough will feel sticky and weird — that’s totally normal.
The Stretch and Fold Dance: Over the next 4 hours, you’ll do 4 sets of stretch and folds every 30 minutes. Wet your hands, grab one side of the dough, stretch it up, and fold it over to the other side. Rotate the bowl and repeat 3 more times. This builds strength without kneading.
Day 1 – Night: First Rise After your final stretch and fold, cover the bowl and let it rise at room temperature for 2-4 hours until it’s increased by about 50%. Then pop it in the fridge overnight (or up to 3 days).
Day 2 – Morning: Shape and Final Rise Turn your dough onto a lightly floured surface. It should feel smooth and slightly jiggly. Shape it into a round by folding the edges toward the center, then flip it seam-side down.
Let it rest for 20-30 minutes, then do your final shaping. Create tension by pulling the dough toward you on the counter. Place seam-side up in a banneton or bowl lined with a floured kitchen towel.
Cover and let it rise for 2-4 hours until it feels light and jiggly when you poke it gently.
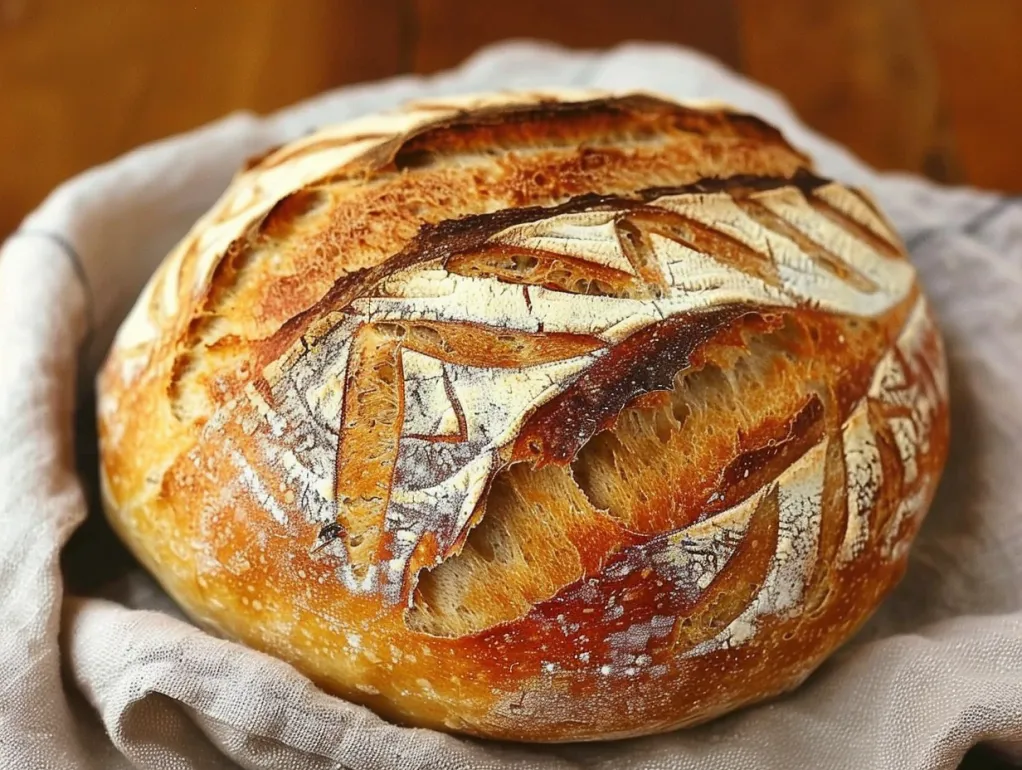
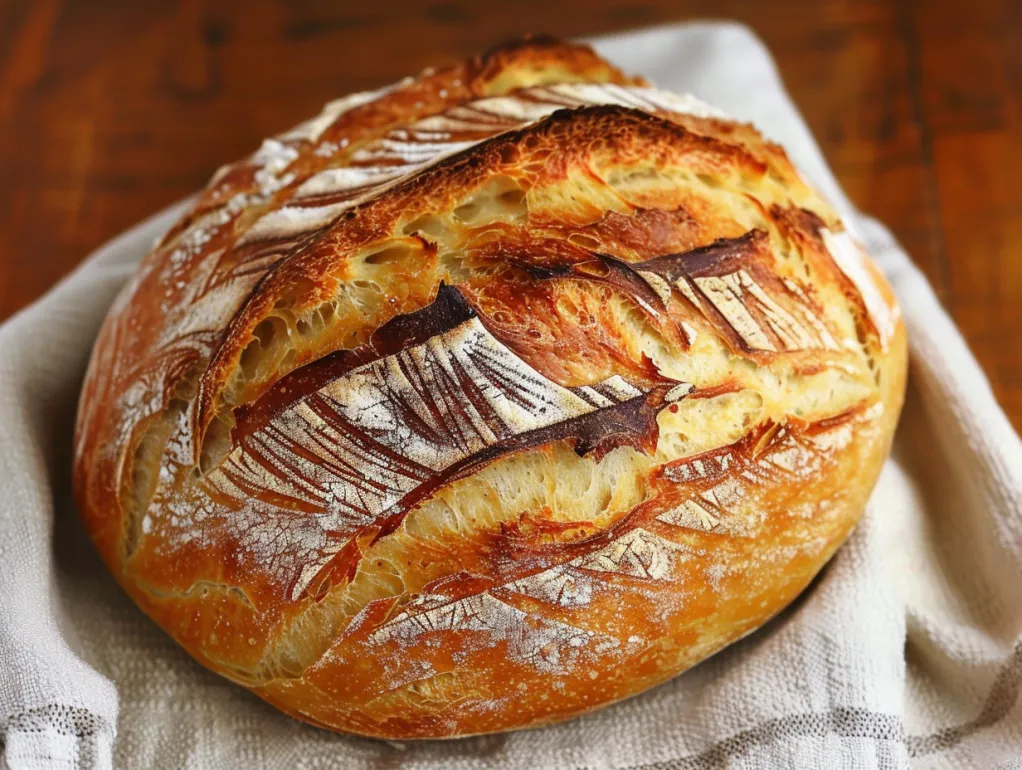
The Grand Finale: Baking Preheat your Dutch oven to 475°F for at least 30 minutes. Carefully turn your dough onto parchment paper, score the top with a sharp knife or lame (make it pretty!), and lower it into the hot pot.
Bake covered for 20 minutes, then remove the lid and bake another 20-25 minutes until deep golden brown. It should sound hollow when you tap the bottom.
Serving Suggestions
- Let it cool completely before slicing (I know, torture, but it’s still cooking inside)
- Thick slices with good butter and flaky salt
- Perfect for avocado toast that doesn’t suck
- Makes killer grilled cheese sandwiches
- Breadcrumbs from day-old sourdough are chef’s kiss
Switch It Up
Whole Wheat: Replace up to 100g of bread flour with whole wheat flour Seedy Goodness: Add sunflower seeds, pumpkin seeds, or everything bagel seasoning Herb Infusion: Fold in fresh rosemary or thyme during shaping Sweet Version: Add a touch of honey and cinnamon
Troubleshooting Like a Pro
Dense bread? Your starter might not have been active enough, or you under-fermented. Flat loaf? Could be over-proofed or your shaping needs work. Gummy inside? You probably sliced it too soon — patience, grasshopper. No oven spring? Check your scoring technique and make sure your Dutch oven was properly preheated.
The Starter Situation
You’ll need an active, bubbly starter for this. If you don’t have one, you can make it from scratch (flour + water + time) or get some from a friend. Starters are like friendship bread — people love sharing them.
Feed your starter regularly, and it’ll be your bread-making buddy for life. Seriously, some people have starters older than their kids.
Questions People Actually Ask
Q: Can I speed this up? A: You can use a warmer spot for faster fermentation, but slow fermentation = better flavor. Trust the process.
Q: What if I don’t have a Dutch oven? A: You can use any heavy pot with a lid, or even bake on a stone with a pan of water for steam.
Q: Why is my crust not crispy? A: Steam during the first part of baking is crucial. Keep that lid on for the first 20 minutes.
Q: Can I freeze this? A: Absolutely! Slice it first, then freeze. Toast straight from frozen.
PrintHomemade Sourdough Bread: The Ancient Art That’ll Make You Feel Like a Kitchen Wizard
- Total Time: 30 minutes
- Yield: 1 gorgeous loaf (about 12–16 slices) 1x
Description
Okay, let’s be real — sourdough bread is having a moment. And by “moment,” I mean it’s been the star of the show for literally thousands of years, but suddenly everyone’s acting like they discovered fire. Here’s the thing though: making your own sourdough isn’t just trendy Instagram content (though it definitely is that too). It’s about creating something magical with just flour, water, salt, and time. This isn’t your average sandwich bread — we’re talking about crusty, golden perfection with a tangy flavor that’ll make you question every store-bought loaf you’ve ever settled for. Plus, there’s something deeply satisfying about nurturing a starter like it’s your pet and then turning it into edible gold.
Ingredients
For Your Active Starter:
- 100g active sourdough starter (bubbly and doubled in size)
- (Don’t have a starter? You’ll need to make one first — it takes about a week)
For the Bread:
- 375g warm water (about 80°F)
- 500g bread flour (high-protein is your friend here)
- 10g salt (use good sea salt or kosher salt)
For the Magic:
- Extra flour for dusting
- A bit of olive oil
- Patience (seriously, this is an ingredient)
Instructions
Day 1 – Evening: Make the Dough Mix your active starter with warm water in a large bowl until it’s well combined. Add the flour and mix until you have a shaggy, rough dough. Cover and let it rest for 30 minutes (this is called autolyse — fancy, right?).
Add the salt and mix it in thoroughly. The dough will feel sticky and weird — that’s totally normal.
The Stretch and Fold Dance: Over the next 4 hours, you’ll do 4 sets of stretch and folds every 30 minutes. Wet your hands, grab one side of the dough, stretch it up, and fold it over to the other side. Rotate the bowl and repeat 3 more times. This builds strength without kneading.
Day 1 – Night: First Rise After your final stretch and fold, cover the bowl and let it rise at room temperature for 2-4 hours until it’s increased by about 50%. Then pop it in the fridge overnight (or up to 3 days).
Day 2 – Morning: Shape and Final Rise Turn your dough onto a lightly floured surface. It should feel smooth and slightly jiggly. Shape it into a round by folding the edges toward the center, then flip it seam-side down.
Let it rest for 20-30 minutes, then do your final shaping. Create tension by pulling the dough toward you on the counter. Place seam-side up in a banneton or bowl lined with a floured kitchen towel.
Cover and let it rise for 2-4 hours until it feels light and jiggly when you poke it gently.
The Grand Finale: Baking Preheat your Dutch oven to 475°F for at least 30 minutes. Carefully turn your dough onto parchment paper, score the top with a sharp knife or lame (make it pretty!), and lower it into the hot pot.
Bake covered for 20 minutes, then remove the lid and bake another 20-25 minutes until deep golden brown. It should sound hollow when you tap the bottom.
Notes
- Let it cool completely before slicing (I know, torture, but it’s still cooking inside)
- Thick slices with good butter and flaky salt
- Perfect for avocado toast that doesn’t suck
- Makes killer grilled cheese sandwiches
- Breadcrumbs from day-old sourdough are chef’s kiss
- Prep Time: 30 minutes
Nutrition
- Calories: ~140 kcal per serving
- Protein: ~5g