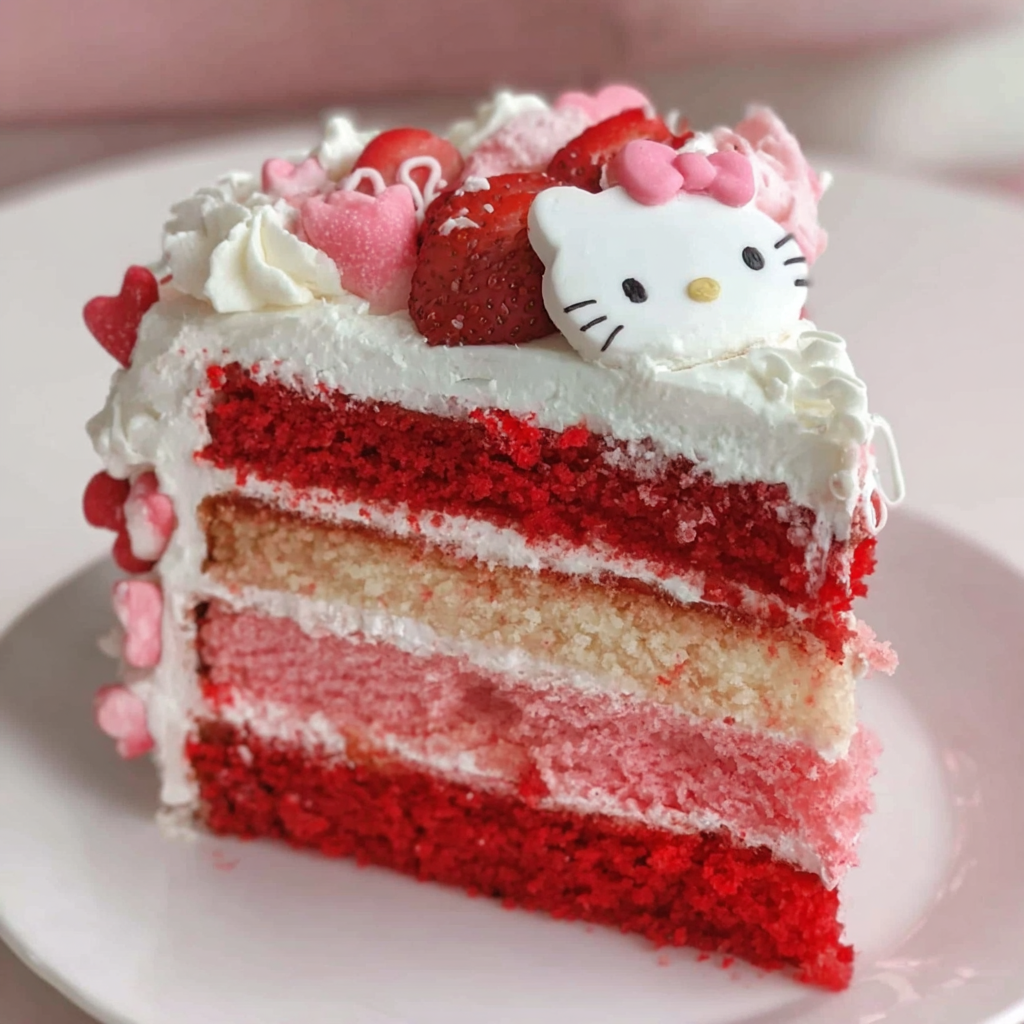
Celebrate Valentine’s Day with a delightful Hello Kitty Valentine’s Cake that’s as charming as it is delicious. This cake combines classic flavors with festive colors and whimsical decoration to bring joy to your celebrations or special occasions.
Crafted by Julia Marin, this cake features tender, moist layers colored in vibrant red and pink, complemented by smooth buttercream and playful fondant details that perfectly capture Hello Kitty’s iconic look.
- Themed decoration adds a fun, festive flair perfect for Valentine’s Day or Hello Kitty fans.
- Moist and fluffy cake layers with classic flavors anyone will enjoy.
- Easy to customize with color choices and fondant decorations.
Ingredients
- All-purpose flour: Provides the base structure for soft, tender cake layers essential for this dessert.
- Sugar: Adds sweetness and helps to create a light, fluffy crumb texture throughout the cake.
- Unsalted butter: Adds richness and moisture while contributing to the cake’s tender texture.
- Large eggs: Bind ingredients together and help the cake rise with a light, airy feel.
- Milk: Moistens the batter and improves softness and tenderness of the final cake.
- Baking powder: Acts as a leavening agent to ensure the cake rises perfectly during baking.
- Vanilla extract: Imparts warm, aromatic flavor enhancing the overall taste of the cake.
- Red and pink food coloring: Provides festive Valentine’s Day colors dividing the batter into two cheerful hues.
- Fondant for decoration: Used to create detailed Hello Kitty features with smooth, professional-looking designs.
- Buttercream frosting: A creamy and sweet layer to cover the cake and help fondant adhere smoothly.
Instructions
- Preheat and Prepare Pans
Set the oven to 350°F (175°C) and grease two 9-inch round cake pans thoroughly to prevent sticking. Lightly flour the pans to ensure the cakes release easily after baking.
- Cream Butter and Sugar
Using a mixer, beat the unsalted butter and sugar together until the mixture becomes light and fluffy. This aeration process is essential for a soft, spongy cake texture.
- Add Eggs Gradually
Incorporate the eggs one at a time, mixing well after each addition. This gradual process keeps the batter smooth and prevents curdling, helping with even cake rise.
- Mix Wet Ingredients
Stir in the milk and vanilla extract, ensuring they blend evenly into the batter. These ingredients add moisture and flavor complexity to the cake layers.
- Combine Dry Ingredients
In a separate bowl, whisk the all-purpose flour with baking powder. This ensures the leavening agent is evenly distributed and avoids lumps in the batter.
- Incorporate Dry Into Wet
Gradually fold the flour mixture into the wet ingredients, mixing until fully combined without overmixing. Overmixing can lead to a dense cake.
- Divide and Color Batter
Split the batter equally into two bowls. Add red food coloring to one and pink to the other, blending well until you reach vibrant and even colors.
- Bake the Cake Layers
Pour each colored batter into the prepared pans. Bake for 25 to 30 minutes until a toothpick inserted comes out clean, indicating the cakes are fully baked.
- Cool Completely
Allow the cakes to cool fully on wire racks to room temperature before frosting. Cooling prevents the buttercream from melting when applied.
- Decorate with Buttercream and Fondant
Spread an even layer of buttercream frosting between layers, around the sides, and on top. Use fondant with a Hello Kitty face template for detail, carefully applying decorations for a professional finish.
- Using a cake template for Hello Kitty’s face ensures accurate and charming decoration.
- Chilling the cake before decorating helps the buttercream set and makes handling easier.
- Customizing the red and pink colors can adapt the cake to other themes beyond Valentine’s Day.
Storage Tips
This cake is best stored in an airtight container in the refrigerator for up to 3 days. Allow it to come to room temperature before serving to enjoy the best flavor and texture.
Serving Suggestions
Serve slices with a side of fresh strawberries or a glass of cold milk for a delightful pairing. This colorful cake is perfect for birthday parties or festive gatherings.
- For sharper fondant designs, use small, precise cutters or molds for Hello Kitty features.
- Chill the cake layers before applying buttercream to minimize crumbs and achieve a smooth finish.
- Consider using gel food coloring for more vibrant colors without altering batter consistency.
FAQs
- Can I make this cake gluten-free?
Yes, substitute all-purpose flour with a gluten-free baking blend, ensuring it contains xanthan gum for proper texture.
- How long can I store the decorated cake?
Decorated cakes can be refrigerated for up to 3 days; keep it covered to prevent fondant from drying out.
- Can I prepare the cake layers ahead of time?
Yes, bake layers up to 2 days ahead and store wrapped in plastic wrap at room temperature or refrigerated.
- What if I don’t have fondant?
You can alternatively use piped buttercream decorations or edible images printed on frosting sheets.
- How do I prevent the colors from bleeding?
Use gel food coloring instead of liquid, and avoid mixing colored batters to maintain distinct shades.
- Is this cake suitable for children’s parties?
Absolutely, it’s visually appealing and uses familiar flavors that kids love, making it perfect for celebrations.
- Can I make this cake vegan?
You would need to substitute eggs and dairy with plant-based alternatives; however, texture and flavor may vary.
Hello Kitty Valentine’s Cake
Equipment
- 2 9 inch round cake pan
- 1 mixer for creaming butter and sugar
- 1 mixing bowls
Ingredients
- 2 cups all-purpose flour
- 1 ½ cups sugar
- 1 cup unsalted butter
- 4 large eggs
- 1 cup milk
- 2 tsp baking powder
- 1 tsp vanilla extract
- Red food coloring
- Pink food coloring
- Fondant for decoration
- Buttercream frosting
Instructions
- Preheat the oven to 350°F (175°C).
- Grease and flour two 9-inch round cake pans.
- Cream together butter and sugar until light and fluffy.
- Add eggs one at a time, mixing well after each addition.
- Stir in milk and vanilla extract.
- In a separate bowl, combine flour and baking powder.
- Gradually add dry ingredients to wet ingredients and mix until combined.
- Divide batter into two bowls; color one with red food coloring and the other with pink.
- Pour each batter into prepared pans and bake for 25 to 30 minutes.
- Let cakes cool completely before applying buttercream frosting.
- Decorate with buttercream frosting and fondant to create the Hello Kitty design.
Notes
- Use a Hello Kitty face template for precise decoration.
- Chill the cake before decorating for easier handling.
- Adjust colors to match your theme.