
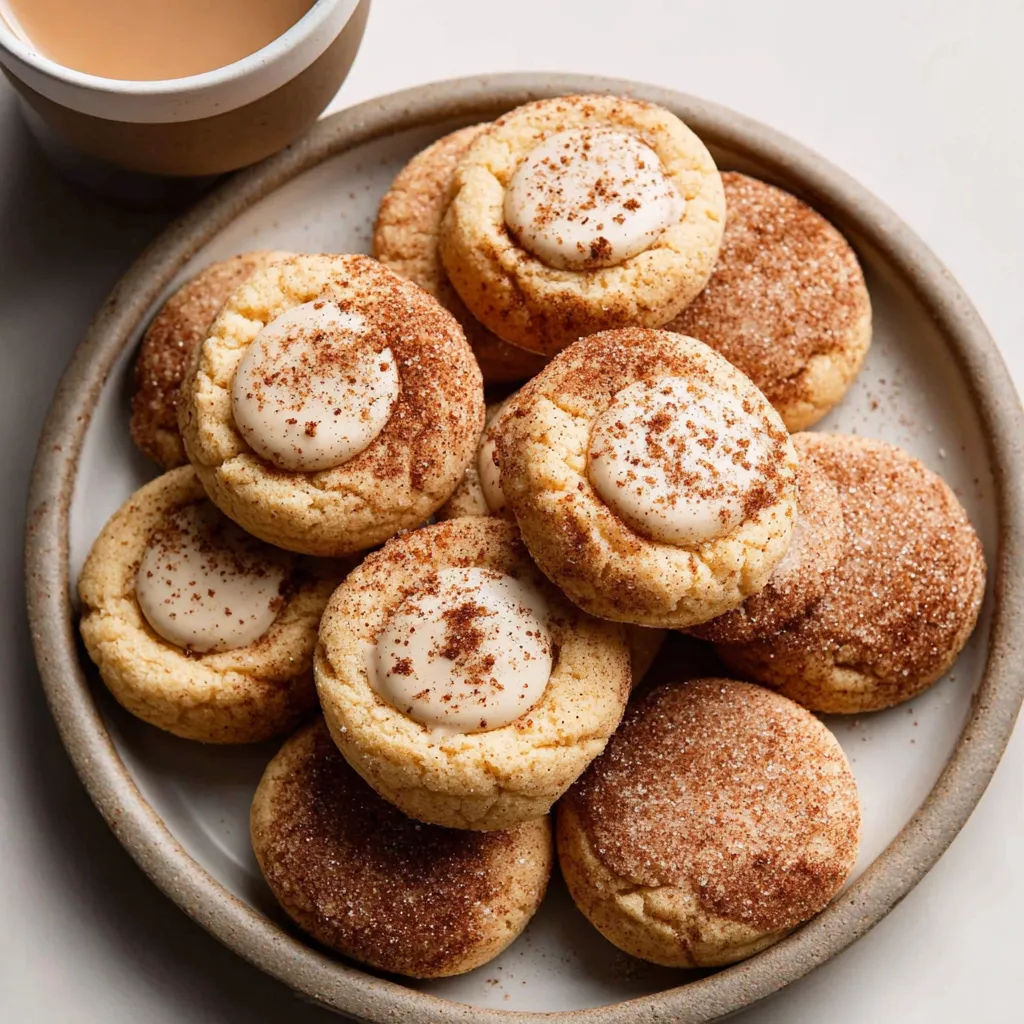
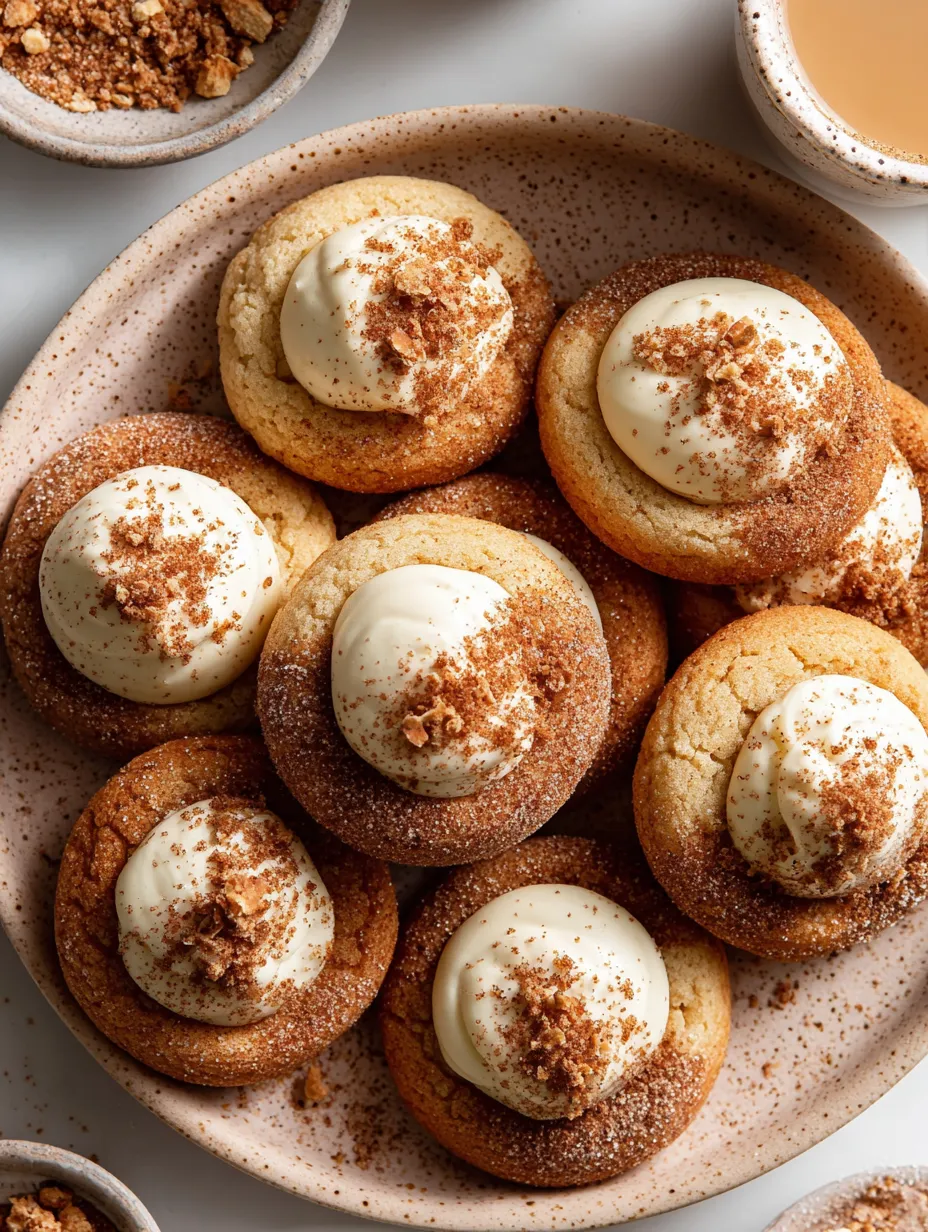
Okay, so someone looked at snickerdoodles—which are already perfect—and eggnog—which is divisive but beloved—and said “what if we combined these AND added a creamy filling?” And somehow, SOMEHOW, this insane idea resulted in these absolute showstoppers. Eggnog Snickerdoodle Thumbprint Cookies are basically soft, cinnamon-sugar cookies with warm holiday spices, pressed with your actual thumb (hence the name, genius), then filled with a silky eggnog buttercream that tastes like Christmas in a piping bag. They’re soft, spiced, sweet, festive, and so pretty you’ll want to photograph them from every angle before eating them. I made these for a holiday potluck once and someone accused me of buying them from a fancy bakery and lying about it. Another person ate five and then asked if I was single. These cookies have POWER.
Why You’ll Love This Recipe
Holiday flavor explosion. Cinnamon, nutmeg, eggnog—it’s like drinking a spiked latte in cookie form (minus the spike, unfortunately).
Visually stunning. That thumbprint filled with creamy frosting is Instagram gold. You’ll get compliments before anyone even tastes them.
Soft and chewy. These stay soft for days thanks to the cream cheese in the dough. No dry, hard cookies here.
Eggnog buttercream. If you’ve never had eggnog frosting, prepare for a religious experience. It’s happening.
Not too sweet. The spiced cookie balances the sweet filling perfectly. You can actually eat more than one without a sugar coma.
Impressive but doable. These look like you went to pastry school. Actually just requires thumbs and a piping bag.
The Good Stuff You’ll Need
For the Cookie Dough:
- 2 3/4 cups all-purpose flour
- 2 tsp cream of tartar
- 1 tsp baking soda
- 1/2 tsp salt
- 1/2 tsp ground nutmeg
- 1/4 tsp ground cinnamon (plus more for rolling)
- 1 cup (2 sticks) unsalted butter, softened
- 1 1/2 cups granulated sugar
- 2 large eggs
- 1 tsp vanilla extract
- 1/2 tsp rum extract (optional but adds authentic eggnog flavor)
- 2 oz cream cheese, softened (secret ingredient for soft cookies)
For the Cinnamon-Sugar Coating:
- 1/3 cup granulated sugar
- 1 1/2 tbsp ground cinnamon
- 1/4 tsp nutmeg
For the Eggnog Buttercream:
- 1/2 cup (1 stick) unsalted butter, softened
- 3 cups powdered sugar
- 3-4 tbsp eggnog (store-bought is fine)
- 1/2 tsp vanilla extract
- 1/4 tsp rum extract (optional)
- 1/4 tsp ground nutmeg
- Pinch of salt
For Garnish:
- Extra cinnamon or nutmeg for dusting
- Optional: tiny pinch of edible gold dust if you’re feeling EXTRA fancy
Equipment:
- Cookie scoop (2 tablespoon size)
- Baking sheets
- Parchment paper
- Your thumbs (you already have these, hopefully)
- Piping bag with star tip, or a zip-top bag
Let’s Do This
Step 1: Make the Cookie Dough
Preheat oven to 350°F (175°C). Line two baking sheets with parchment paper.
In a medium bowl, whisk together flour, cream of tartar, baking soda, salt, nutmeg, and 1/4 tsp cinnamon. Set aside.
In a large bowl (or stand mixer), beat softened butter, cream cheese, and sugar on medium-high speed for 3-4 minutes until light and fluffy. This is crucial—don’t skip the beating time.
Add eggs one at a time, beating well after each addition.
Mix in vanilla extract and rum extract (if using).
Add the dry ingredients to the wet ingredients and mix on low speed until just combined. Don’t overmix or your cookies will be tough.
The dough should be soft but not sticky. If it’s too sticky to handle, chill for 15-20 minutes.
Step 2: Prep the Cinnamon-Sugar
In a shallow bowl, mix together 1/3 cup sugar, 1 1/2 tbsp cinnamon, and 1/4 tsp nutmeg.
This is what gives these cookies that signature snickerdoodle look and flavor.
Set it aside near your work station—you’ll be rolling a lot of balls through this.
Step 3: Shape and Coat
Using a cookie scoop or spoon, portion out dough balls about 1 1/2 tablespoons each.
Roll each portion between your palms to create smooth balls.
Roll each ball generously in the cinnamon-sugar mixture, coating completely. Don’t be shy—really get that coating on there.
Place on prepared baking sheets about 2 inches apart. They spread slightly but not much.
Step 4: Make the Thumbprint
Here’s where it gets fun. Using your THUMB (or the back of a rounded tablespoon if your thumbs are tiny), press firmly into the center of each cookie ball.
Press down enough to create a good-sized indent—about halfway through the cookie. Don’t be timid. Really commit to that thumbprint.
The edges will crack slightly—that’s totally normal and part of the rustic charm.
If the dough sticks to your thumb, dip your thumb in the cinnamon-sugar mixture between presses.
Step 5: Bake
Bake for 10-12 minutes until the edges are set and the cookies have puffed slightly around the thumbprint.
The centers should still look soft—they’ll firm up as they cool.
DO NOT OVERBAKE. These should be soft and chewy, not crispy and crunchy.
Remove from oven and IMMEDIATELY re-press the centers if they puffed up during baking. Use the back of a teaspoon while they’re still hot.
Let cool on the baking sheet for 5 minutes, then transfer to a wire rack to cool completely before filling.
Step 6: Make the Eggnog Buttercream
While cookies cool, make your frosting. This is the star of the show.
In a large bowl (or stand mixer), beat softened butter on medium speed until creamy, about 2 minutes.
Add powdered sugar one cup at a time, mixing on low speed between additions to avoid a sugar cloud explosion.
Add 3 tablespoons eggnog, vanilla extract, rum extract (if using), nutmeg, and salt.
Beat on medium-high speed for 3-4 minutes until light and fluffy. If it’s too thick, add more eggnog a teaspoon at a time. If too thin, add more powdered sugar.
The consistency should be thick enough to hold its shape when piped but soft enough to spread easily.
Transfer to a piping bag fitted with a star tip (or a zip-top bag with the corner snipped off).
Step 7: Fill Those Thumbprints
Once cookies are completely cool, pipe or spoon the eggnog buttercream into each thumbprint.
Fill generously—you want that frosting mounding up slightly above the cookie for maximum impact.
If using a star tip, pipe in a swirl motion for that bakery-style look.
Dust lightly with cinnamon or nutmeg for the final touch.
Try not to eat them all immediately. This is the hardest step in the entire recipe.
Serving Suggestions
These are basically perfect as-is, but here are some ways to flex even harder:
- Arrange on a tiered stand for a holiday dessert table centerpiece
- Serve alongside hot chocolate, eggnog, or coffee
- Package in clear boxes tied with ribbon for holiday gifts
- Add to a cookie platter with other festive treats
- Serve at cookie exchanges and watch them disappear first
- Pair with mulled wine or hot apple cider for an adult holiday party
- Dust with edible gold or silver for New Year’s Eve elegance
Switch It Up
Classic Snickerdoodle Thumbprints: Skip the eggnog buttercream and fill with caramel, dulce de leche, or vanilla buttercream.
Chocolate Snickerdoodle: Add 1/4 cup cocoa powder to the dough and reduce flour by 1/4 cup. Fill with chocolate ganache.
Gingerbread Style: Add 1 tsp ground ginger and 1/2 tsp ground cloves to the dough for more spice.
Pumpkin Spice: Replace eggnog in the frosting with heavy cream and add 1 tsp pumpkin pie spice.
Cream Cheese Filling: Make a cream cheese frosting instead of eggnog buttercream for a tangier filling.
Salted Caramel: Fill the thumbprints with salted caramel and top with flaky sea salt.
Nutella Filled: Skip the frosting entirely and fill with Nutella or chocolate hazelnut spread.
Chai Spice: Add chai spice blend to both the cookie dough and the frosting for a tea-inspired version.
Storage and Make-Ahead Tips
These keep beautifully, which makes holiday prep so much easier.
Room temperature: Store unfilled cookies in an airtight container for up to 1 week. Fill just before serving.
Filled cookies: Store in an airtight container in the fridge for up to 5 days. Let come to room temp before serving for best texture.
Freeze the dough: Scoop, roll in cinnamon-sugar, and freeze on a baking sheet. Transfer to freezer bags for up to 3 months. Bake from frozen, adding 2 extra minutes.
Freeze baked cookies: Freeze unfilled cookies for up to 3 months. Thaw, then fill with fresh buttercream.
Buttercream: Make the frosting up to 3 days ahead and refrigerate. Re-whip before using to restore the fluffy texture.
Pro tip: These actually taste BETTER after sitting overnight. The flavors meld and the cookies soften even more.
Why This Works So Damn Well
These cookies hit every note perfectly because of smart ingredient choices.
Cream of tartar creates that signature snickerdoodle tang and slight chewiness. It’s not optional—it’s what makes snickerdoodles SNICKERDOODLES.
Cream cheese in the dough is the secret to keeping these cookies soft for days. It adds moisture and richness without making them cakey.
Rolling in cinnamon-sugar before baking creates a crispy, sweet-spiced shell that contrasts beautifully with the soft interior.
The thumbprint technique creates a perfect vessel for frosting while also making the cookies look intentional and professional.
Re-pressing after baking ensures you have enough room for a generous amount of filling. Cookies puff during baking and you need to reclaim that indent.
Eggnog in the buttercream adds that holiday flavor without making it too liquidy. The nutmeg and rum extract boost that eggnog taste even more.
Cooling completely before filling prevents the buttercream from melting into the cookie and losing that beautiful piped shape.
When to Make These
Holiday Cookie Exchange: These win. Every time. Accept your crown.
Christmas Morning: Set these out with coffee and watch your family’s faces light up.
Cookie Platters: These add color, height, and holiday flavor to any assortment.
Teacher Gifts: Package a dozen in a festive tin and become the favorite parent/student.
Office Parties: Bring these and prepare for promotion rumors. (Okay, maybe not, but you’ll definitely get compliments.)
New Year’s Eve: Dust with edible gold and serve them as fancy midnight snacks.
Any Winter Gathering: From Thanksgiving through Valentine’s Day, these work.
Questions People Actually Ask
Q: My thumbprints puffed up during baking and disappeared. Help! A: This is super common. Just re-press them immediately when they come out of the oven while they’re still hot and soft.
Q: Can I make these without cream of tartar? A: Technically yes, but they won’t have that true snickerdoodle flavor and texture. Cream of tartar is really important here.
Q: The cookies spread too much. What happened? A: Your butter was too soft or melted. Make sure it’s softened but still holds its shape. Also, chill the dough if it feels too soft.
Q: Can I use non-alcoholic eggnog? A: YES. Store-bought regular eggnog is perfect. The rum extract is optional and just boosts the flavor.
Q: My buttercream is too runny. How do I fix it? A: Add more powdered sugar, 1/4 cup at a time, until it thickens. If it’s too thick, add more eggnog a teaspoon at a time.
Q: Can I fill these with jam instead of buttercream? A: Absolutely! Raspberry or apricot jam would be delicious. Just fill before baking and reduce bake time slightly.
Q: I don’t like eggnog. Can I still make these? A: Yes! Replace the eggnog in the frosting with heavy cream and make regular vanilla buttercream. Still delicious.
Q: The cookies are too hard. What did I do wrong? A: You overbaked them. These need to come out when they still look slightly underdone in the center. They firm up as they cool.
Q: Can I freeze these already filled? A: Not recommended. The buttercream texture gets weird after freezing. Freeze unfilled cookies and add fresh buttercream after thawing.
PrintEggnog Snickerdoodle Thumbprint Cookies
- Total Time: 37 minutes
- Yield: 36–40 cookies 1x
Description
Okay, so someone looked at snickerdoodles—which are already perfect—and eggnog—which is divisive but beloved—and said “what if we combined these AND added a creamy filling?” And somehow, SOMEHOW, this insane idea resulted in these absolute showstoppers. Eggnog Snickerdoodle Thumbprint Cookies are basically soft, cinnamon-sugar cookies with warm holiday spices, pressed with your actual thumb (hence the name, genius), then filled with a silky eggnog buttercream that tastes like Christmas in a piping bag. They’re soft, spiced, sweet, festive, and so pretty you’ll want to photograph them from every angle before eating them. I made these for a holiday potluck once and someone accused me of buying them from a fancy bakery and lying about it. Another person ate five and then asked if I was single. These cookies have POWER.
Ingredients
For the Cookie Dough:
- 2 3/4 cups all-purpose flour
- 2 tsp cream of tartar
- 1 tsp baking soda
- 1/2 tsp salt
- 1/2 tsp ground nutmeg
- 1/4 tsp ground cinnamon (plus more for rolling)
- 1 cup (2 sticks) unsalted butter, softened
- 1 1/2 cups granulated sugar
- 2 large eggs
- 1 tsp vanilla extract
- 1/2 tsp rum extract (optional but adds authentic eggnog flavor)
- 2 oz cream cheese, softened (secret ingredient for soft cookies)
For the Cinnamon-Sugar Coating:
- 1/3 cup granulated sugar
- 1 1/2 tbsp ground cinnamon
- 1/4 tsp nutmeg
For the Eggnog Buttercream:
- 1/2 cup (1 stick) unsalted butter, softened
- 3 cups powdered sugar
- 3–4 tbsp eggnog (store-bought is fine)
- 1/2 tsp vanilla extract
- 1/4 tsp rum extract (optional)
- 1/4 tsp ground nutmeg
- Pinch of salt
For Garnish:
- Extra cinnamon or nutmeg for dusting
- Optional: tiny pinch of edible gold dust if you’re feeling EXTRA fancy
Equipment:
- Cookie scoop (2 tablespoon size)
- Baking sheets
- Parchment paper
- Your thumbs (you already have these, hopefully)
- Piping bag with star tip, or a zip-top bag
Instructions
Preheat oven to 350°F (175°C). Line two baking sheets with parchment paper.
In a medium bowl, whisk together flour, cream of tartar, baking soda, salt, nutmeg, and 1/4 tsp cinnamon. Set aside.
In a large bowl (or stand mixer), beat softened butter, cream cheese, and sugar on medium-high speed for 3-4 minutes until light and fluffy. This is crucial—don’t skip the beating time.
Add eggs one at a time, beating well after each addition.
Mix in vanilla extract and rum extract (if using).
Add the dry ingredients to the wet ingredients and mix on low speed until just combined. Don’t overmix or your cookies will be tough.
The dough should be soft but not sticky. If it’s too sticky to handle, chill for 15-20 minutes.
In a shallow bowl, mix together 1/3 cup sugar, 1 1/2 tbsp cinnamon, and 1/4 tsp nutmeg.
This is what gives these cookies that signature snickerdoodle look and flavor.
Set it aside near your work station—you’ll be rolling a lot of balls through this.
Using a cookie scoop or spoon, portion out dough balls about 1 1/2 tablespoons each.
Roll each portion between your palms to create smooth balls.
Roll each ball generously in the cinnamon-sugar mixture, coating completely. Don’t be shy—really get that coating on there.
Place on prepared baking sheets about 2 inches apart. They spread slightly but not much.
Here’s where it gets fun. Using your THUMB (or the back of a rounded tablespoon if your thumbs are tiny), press firmly into the center of each cookie ball.
Press down enough to create a good-sized indent—about halfway through the cookie. Don’t be timid. Really commit to that thumbprint.
The edges will crack slightly—that’s totally normal and part of the rustic charm.
If the dough sticks to your thumb, dip your thumb in the cinnamon-sugar mixture between presses.
Bake for 10-12 minutes until the edges are set and the cookies have puffed slightly around the thumbprint.
The centers should still look soft—they’ll firm up as they cool.
DO NOT OVERBAKE. These should be soft and chewy, not crispy and crunchy.
Remove from oven and IMMEDIATELY re-press the centers if they puffed up during baking. Use the back of a teaspoon while they’re still hot.
Let cool on the baking sheet for 5 minutes, then transfer to a wire rack to cool completely before filling.
While cookies cool, make your frosting. This is the star of the show.
In a large bowl (or stand mixer), beat softened butter on medium speed until creamy, about 2 minutes.
Add powdered sugar one cup at a time, mixing on low speed between additions to avoid a sugar cloud explosion.
Add 3 tablespoons eggnog, vanilla extract, rum extract (if using), nutmeg, and salt.
Beat on medium-high speed for 3-4 minutes until light and fluffy. If it’s too thick, add more eggnog a teaspoon at a time. If too thin, add more powdered sugar.
The consistency should be thick enough to hold its shape when piped but soft enough to spread easily.
Transfer to a piping bag fitted with a star tip (or a zip-top bag with the corner snipped off).
Once cookies are completely cool, pipe or spoon the eggnog buttercream into each thumbprint.
Fill generously—you want that frosting mounding up slightly above the cookie for maximum impact.
If using a star tip, pipe in a swirl motion for that bakery-style look.
Dust lightly with cinnamon or nutmeg for the final touch.
Try not to eat them all immediately. This is the hardest step in the entire recipe.
Notes
These are basically perfect as-is, but here are some ways to flex even harder:
- Arrange on a tiered stand for a holiday dessert table centerpiece
- Serve alongside hot chocolate, eggnog, or coffee
- Package in clear boxes tied with ribbon for holiday gifts
- Add to a cookie platter with other festive treats
- Serve at cookie exchanges and watch them disappear first
- Pair with mulled wine or hot apple cider for an adult holiday party
- Dust with edible gold or silver for New Year’s Eve elegance
- Prep Time: 25 minutes
- Cook Time: 12 minutes
Nutrition
- Calories: ~140 kcal
- Sugar: ~12g
- Sodium: ~95mg
- Fat: ~7g
- Carbohydrates: ~19g
- Protein: ~2g


