
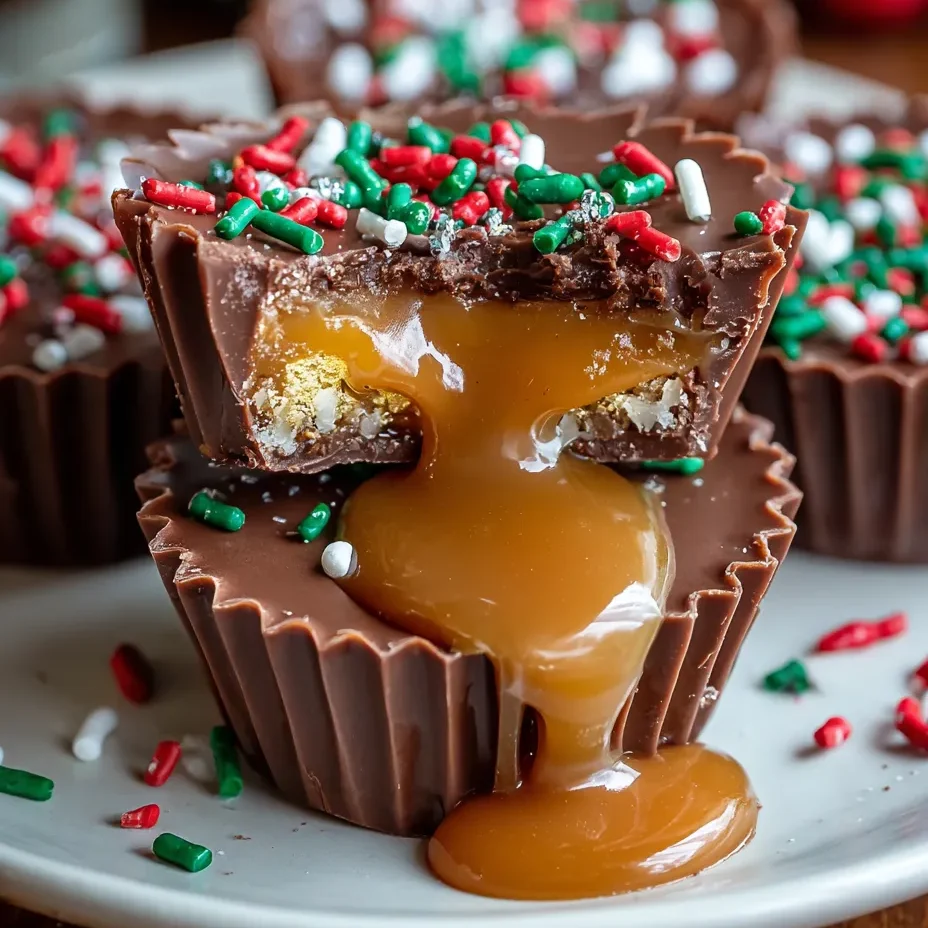
Okay, so imagine if a Reese’s peanut butter cup and a Rolo had a baby during the most magical Christmas party ever, and that baby decided to be filled with gooey caramel and topped with festive sprinkles and M&Ms. That’s what we’re dealing with here. Christmas Chocolate Caramel Cups are basically homemade chocolate cups filled with silky caramel, then decorated with holiday M&Ms, sprinkles, and sometimes a snowflake on top because we’re extra like that. They’re like store-bought candy but a thousand times better because you made them, they’re fresh, and you can control exactly how much caramel goes in (spoiler: it’s a LOT). I made these for a Christmas party once and someone literally gasped when they bit into one and the caramel oozed out. Another person asked if I was secretly running a chocolate shop. Reader, I made these in my kitchen while listening to Mariah Carey’s “All I Want for Christmas.” These cups create holiday magic and caramel-induced joy.
Why You’ll Love This Recipe
Better than store-bought. Homemade chocolate cups taste fresher, richer, and you get to customize everything.
That caramel center. Gooey, buttery, salted caramel that oozes when you bite in. This is the dream.
Looks bakery-fancy. Those festive toppings make them look like they came from an expensive chocolate shop.
Only 3 main ingredients. Chocolate, caramel, decorations. That’s it. Simplicity at its finest.
Make-ahead champion. These actually need time to set, so making them ahead is built into the process.
Perfect for gifts. Package in a cute box and you’re everyone’s favorite person this holiday season.
The Good Stuff You’ll Need
For the Chocolate Cups:
- 16 oz (about 2 2/3 cups) milk chocolate chips or chopped chocolate
- 1 tbsp coconut oil or shortening (makes the chocolate smooth and shiny)
- OR use dark chocolate, semi-sweet, or even white chocolate
For the Caramel Filling:
- 20-25 soft caramels, unwrapped (like Kraft caramels)
- 2 tbsp heavy cream
- Pinch of sea salt
- OR 1 cup homemade caramel if you’re feeling ambitious
- OR 1 cup store-bought caramel sauce, slightly thickened
For Topping:
- Holiday M&Ms (red and green)
- Christmas sprinkles
- Crushed candy canes (optional)
- White chocolate for drizzle (optional)
- Edible snowflakes (optional but adorable)
- Flaky sea salt (optional but highly recommended)
Equipment:
- Mini muffin tin
- Mini cupcake liners (or silicone molds)
- Small spoon or pastry brush for chocolate
Let’s Do This
Step 1: Prep Your Station
Line a mini muffin tin with mini cupcake liners. You should get about 24 cups.
Unwrap all your caramels if using store-bought. This is tedious but necessary. Do it while binge-watching something.
Have your decorations ready and within reach. Once you start assembling, you’ll want to move quickly.
Step 2: Melt the Chocolate
Melt chocolate chips with coconut oil in a double boiler or microwave (30-second bursts, stirring between each) until smooth and completely melted.
Let it cool slightly—if it’s too hot, it’ll be too thin. You want it warm but starting to thicken slightly.
Step 3: Make the Chocolate Shells
Spoon about 1 tablespoon of melted chocolate into each cupcake liner.
Use the back of a small spoon or a pastry brush to spread the chocolate up the sides of the liner, creating a cup shape. Make sure there are no thin spots or gaps.
The chocolate layer should be thick enough to hold the caramel—aim for about 1/4 inch thick on the bottom and sides.
Place the muffin tin in the freezer for 10-15 minutes to set the chocolate completely.
Step 4: Make the Caramel Filling
In a microwave-safe bowl, combine unwrapped caramels and heavy cream.
Microwave in 30-second bursts, stirring between each, until the caramels are completely melted and smooth.
Stir in a pinch of sea salt. The mixture should be thick but pourable. If it’s too thin, let it cool a bit. If too thick, add a tiny splash more cream.
Let the caramel cool for about 5 minutes—you don’t want it hot when you add it to the chocolate cups or it’ll melt them.
Step 5: Fill and Seal
Remove the chocolate cups from the freezer. They should be completely solid.
Spoon about 1-2 teaspoons of caramel into each chocolate cup, leaving about 1/4 inch space at the top for the chocolate seal.
Don’t overfill or the caramel will overflow when you add the top layer.
Return to the freezer for 5 minutes to firm up the caramel slightly.
Step 6: Top and Decorate
Spoon more melted chocolate over each caramel-filled cup, spreading to the edges to completely seal the caramel inside.
Smooth the tops with the back of a spoon.
IMMEDIATELY (before the chocolate sets) add your decorations: press holiday M&Ms into the chocolate, sprinkle with Christmas sprinkles, add crushed candy canes, whatever your festive heart desires.
If adding sea salt, sprinkle it on now while the chocolate is still wet.
Place the muffin tin back in the fridge for at least 30 minutes to set completely.
Step 7: Optional Finishing Touches
Once the cups are set, you can drizzle with melted white chocolate for a snowy effect.
Add edible snowflakes or dust with powdered sugar for extra holiday vibes.
Carefully peel off the cupcake liners (or pop them out of silicone molds).
Store in the fridge until ready to serve or package.
Serving Suggestions
These are basically perfect as-is, but here are some ideas:
- Serve on a festive platter with other holiday treats
- Package in clear boxes or bags tied with ribbon for gifts
- Serve alongside coffee or hot chocolate at holiday gatherings
- Arrange in a candy dish as part of your holiday decor (they’re too pretty not to display)
- Pair with champagne or dessert wine for adult gatherings
- Give as teacher gifts, neighbor gifts, or party favors
Switch It Up
Peanut Butter Filling: Use peanut butter mixed with powdered sugar instead of caramel for Reese’s-style cups.
Dark Chocolate: Use dark chocolate for the shells for a less sweet, more sophisticated cup.
White Chocolate Cups: Use white chocolate for the shells and milk chocolate drizzle for contrast.
Nutella Center: Fill with Nutella instead of caramel for a chocolate-hazelnut situation.
Cookie Butter: Use cookie butter (Biscoff spread) as the filling. Mind-blowing.
Layered: Add a layer of peanut butter AND caramel for ultimate decadence.
Turtle Cups: Add chopped pecans to the caramel filling for turtle candy vibes.
Boozy Version: Add 1 tsp of bourbon or rum to the caramel for adults-only treats.
Storage and Gift-Giving Tips
These store beautifully and actually taste better after sitting for a day (the flavors meld).
Store in an airtight container in the refrigerator for up to 2 weeks.
Let them sit at room temperature for 5-10 minutes before eating for the best texture—the caramel softens and becomes more gooey.
Freeze for up to 2 months in an airtight container. Thaw in the fridge overnight.
For gifting: Package in clear cellophane bags, decorative tins, or small gift boxes lined with tissue paper.
Add a festive ribbon, gift tag, or label that says “Homemade with Love” or something equally cheesy but effective.
Keep refrigerated until giving to prevent the chocolate from melting or getting soft.
Why This Works So Damn Well
Christmas Chocolate Caramel Cups work because they hit every pleasure center at once. The chocolate shell provides structure and that satisfying snap when you bite through. The caramel center is gooey, buttery, and slightly salted, creating the perfect sweet-salty balance. The festive toppings add textural contrast and visual appeal.
The key is tempering your expectations—these aren’t going to be as perfectly uniform as mass-produced candy, and that’s actually what makes them special. The handmade look is part of the charm. The chocolate-to-caramel ratio is perfect because you control it. Store-bought candies often skimp on filling—yours don’t.
Adding coconut oil to the chocolate makes it smoother and easier to work with, plus it creates a shinier finish. The heavy cream in the caramel makes it smooth and prevents it from being too thick or sticky. Letting each layer set before adding the next prevents the layers from mixing together.
The salt is crucial. It brightens all the flavors and prevents the cups from being too sweet. Sweet + salty = perfection. And let’s be real, the festive decorations take these from “nice homemade candy” to “THESE ARE ADORABLE AND I NEED TWELVE.”
When to Make These
Christmas Gifts: Package in cute boxes and give to neighbors, teachers, coworkers, friends, family, the mailman, everyone.
Holiday Parties: Bring these on a platter and watch them disappear in minutes.
Cookie Exchange: These count as cookies. Fight me. Bring them to the exchange.
Stocking Stuffers: Make mini versions and add them to stockings for a homemade touch.
Office Treats: Bring these to work and become everyone’s favorite coworker instantly.
Baking with Kids: Kids love decorating these. Let them go wild with the sprinkles.
Questions People Actually Ask
Q: Can I use chocolate bars instead of chocolate chips? A: Yes! Chopped chocolate bars actually work better—they melt smoother. Just avoid chocolate chips marketed as “baking chips” which have stabilizers.
Q: My chocolate cups cracked when I added the caramel. What happened? A: The caramel was too hot and melted the chocolate shell. Let the caramel cool for at least 5 minutes before filling.
Q: The caramel leaked out the bottom. Help! A: You had a thin spot or hole in the chocolate shell. Make sure to brush chocolate up the sides evenly and check for gaps.
Q: Can I make these without caramel? A: Absolutely! Fill with peanut butter, Nutella, cookie butter, marshmallow fluff, or even ganache.
Q: The chocolate is too thick to work with. What do I do? A: Add a bit more coconut oil (1 tsp at a time) and reheat gently until it’s the right consistency.
Q: Can I use store-bought caramel sauce? A: Yes, but it’s often too thin. Let it simmer on the stove for a few minutes to thicken, or add a bit of powdered sugar to thicken it up.
Q: How do I get the cups out of the liners cleanly? A: Make sure they’re completely set (at least 30 minutes in the fridge), then peel gently. The chocolate should pop right out.
Print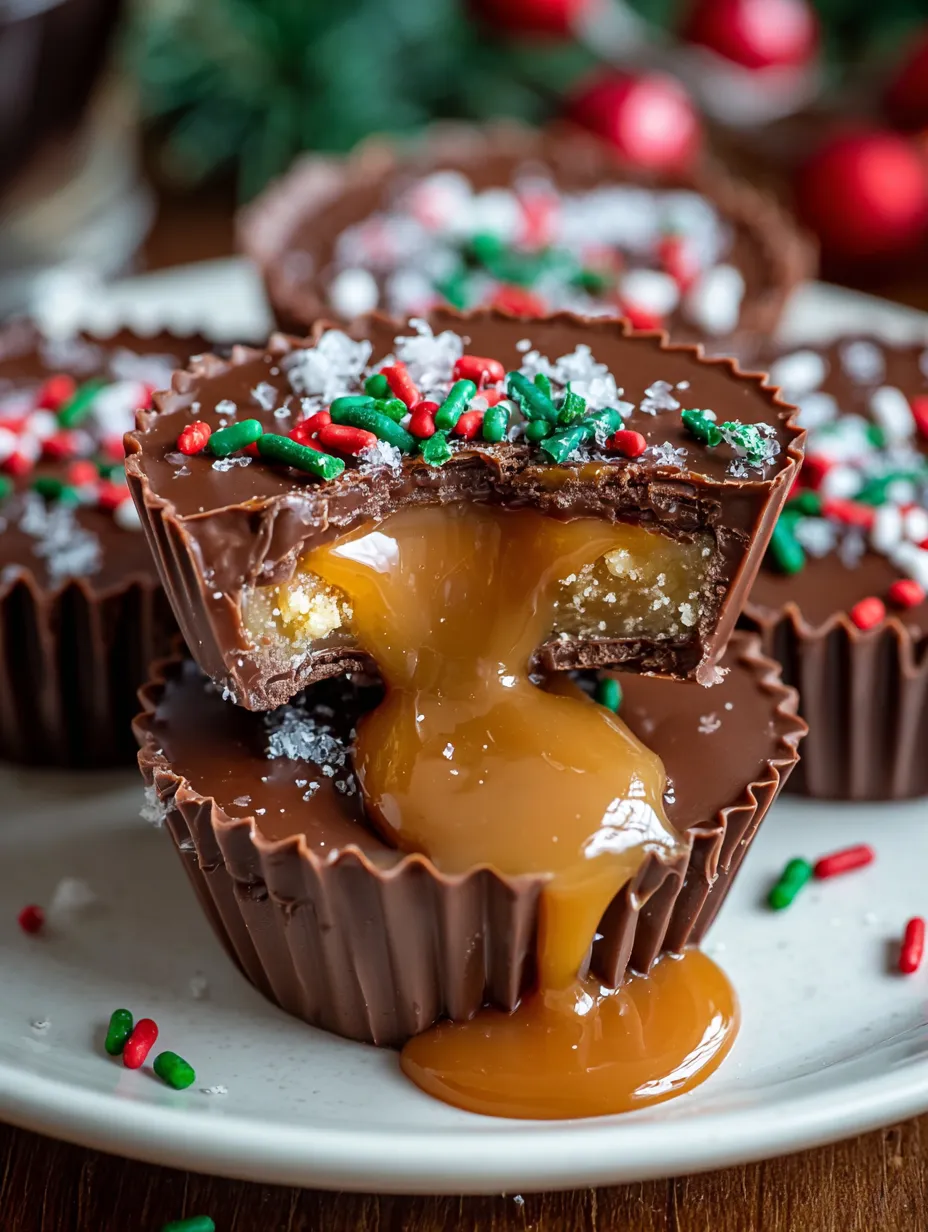
Christmas Chocolate Caramel Cups
- Total Time: 45 minutes
- Yield: 24 cups 1x
Description
Okay, so imagine if a Reese’s peanut butter cup and a Rolo had a baby during the most magical Christmas party ever, and that baby decided to be filled with gooey caramel and topped with festive sprinkles and M&Ms. That’s what we’re dealing with here. Christmas Chocolate Caramel Cups are basically homemade chocolate cups filled with silky caramel, then decorated with holiday M&Ms, sprinkles, and sometimes a snowflake on top because we’re extra like that. They’re like store-bought candy but a thousand times better because you made them, they’re fresh, and you can control exactly how much caramel goes in (spoiler: it’s a LOT). I made these for a Christmas party once and someone literally gasped when they bit into one and the caramel oozed out. Another person asked if I was secretly running a chocolate shop. Reader, I made these in my kitchen while listening to Mariah Carey’s “All I Want for Christmas.” These cups create holiday magic and caramel-induced joy.
Ingredients
For the Chocolate Cups:
- 16 oz (about 2 2/3 cups) milk chocolate chips or chopped chocolate
- 1 tbsp coconut oil or shortening (makes the chocolate smooth and shiny)
- OR use dark chocolate, semi-sweet, or even white chocolate
For the Caramel Filling:
- 20–25 soft caramels, unwrapped (like Kraft caramels)
- 2 tbsp heavy cream
- Pinch of sea salt
- OR 1 cup homemade caramel if you’re feeling ambitious
- OR 1 cup store-bought caramel sauce, slightly thickened
For Topping:
- Holiday M&Ms (red and green)
- Christmas sprinkles
- Crushed candy canes (optional)
- White chocolate for drizzle (optional)
- Edible snowflakes (optional but adorable)
- Flaky sea salt (optional but highly recommended)
Equipment:
- Mini muffin tin
- Mini cupcake liners (or silicone molds)
- Small spoon or pastry brush for chocolate
Instructions
Step 1: Prep Your Station
Line a mini muffin tin with mini cupcake liners. You should get about 24 cups.
Unwrap all your caramels if using store-bought. This is tedious but necessary. Do it while binge-watching something.
Have your decorations ready and within reach. Once you start assembling, you’ll want to move quickly.
Step 2: Melt the Chocolate
Melt chocolate chips with coconut oil in a double boiler or microwave (30-second bursts, stirring between each) until smooth and completely melted.
Let it cool slightly—if it’s too hot, it’ll be too thin. You want it warm but starting to thicken slightly.
Step 3: Make the Chocolate Shells
Spoon about 1 tablespoon of melted chocolate into each cupcake liner.
Use the back of a small spoon or a pastry brush to spread the chocolate up the sides of the liner, creating a cup shape. Make sure there are no thin spots or gaps.
The chocolate layer should be thick enough to hold the caramel—aim for about 1/4 inch thick on the bottom and sides.
Place the muffin tin in the freezer for 10-15 minutes to set the chocolate completely.
Step 4: Make the Caramel Filling
In a microwave-safe bowl, combine unwrapped caramels and heavy cream.
Microwave in 30-second bursts, stirring between each, until the caramels are completely melted and smooth.
Stir in a pinch of sea salt. The mixture should be thick but pourable. If it’s too thin, let it cool a bit. If too thick, add a tiny splash more cream.
Let the caramel cool for about 5 minutes—you don’t want it hot when you add it to the chocolate cups or it’ll melt them.
Step 5: Fill and Seal
Remove the chocolate cups from the freezer. They should be completely solid.
Spoon about 1-2 teaspoons of caramel into each chocolate cup, leaving about 1/4 inch space at the top for the chocolate seal.
Don’t overfill or the caramel will overflow when you add the top layer.
Return to the freezer for 5 minutes to firm up the caramel slightly.
Step 6: Top and Decorate
Spoon more melted chocolate over each caramel-filled cup, spreading to the edges to completely seal the caramel inside.
Smooth the tops with the back of a spoon.
IMMEDIATELY (before the chocolate sets) add your decorations: press holiday M&Ms into the chocolate, sprinkle with Christmas sprinkles, add crushed candy canes, whatever your festive heart desires.
If adding sea salt, sprinkle it on now while the chocolate is still wet.
Place the muffin tin back in the fridge for at least 30 minutes to set completely.
Step 7: Optional Finishing Touches
Once the cups are set, you can drizzle with melted white chocolate for a snowy effect.
Add edible snowflakes or dust with powdered sugar for extra holiday vibes.
Carefully peel off the cupcake liners (or pop them out of silicone molds).
Store in the fridge until ready to serve or package.
Notes
These are basically perfect as-is, but here are some ideas:
- Serve on a festive platter with other holiday treats
- Package in clear boxes or bags tied with ribbon for gifts
- Serve alongside coffee or hot chocolate at holiday gatherings
- Arrange in a candy dish as part of your holiday decor (they’re too pretty not to display)
- Pair with champagne or dessert wine for adult gatherings
- Give as teacher gifts, neighbor gifts, or party favors
- Prep Time: 30 minutes
Nutrition
- Calories: ~145 kcal
- Fat: ~8g
- Carbohydrates: ~18g
- Protein: ~2g


