

Alright, so you want Halloween treats that look absolutely spooky and fancy but are ridiculously easy to make? Meet Spider Web Brownies — basically the cutest, most elegant way to serve chocolate brownies that’ll have everyone thinking you’re some kind of dessert artist. We’re talking rich, fudgy brownies decorated with white chocolate spider webs and a little candy spider that make them look like they belong in a fancy bakery window. The web design might look complicated, but it’s literally just piping white chocolate in a pattern — if you can make a squiggly line, you can make these. Perfect for Halloween parties, spooky gatherings, or just because October is the best month for themed treats.
Why You’ll Love This Recipe
- Stunning presentation but surprisingly easy to make
- Rich, fudgy brownies are the perfect base
- White chocolate web design is simpler than it looks
- No advanced decorating skills required
- Perfect for Halloween parties and gatherings
- Make-ahead friendly — decorate day-of or night before
- Guaranteed to impress and delight
The Good Stuff You’ll Need
For the Brownies:
- 1/2 cup unsalted butter
- 4 oz unsweetened chocolate, chopped (or 3/4 cup cocoa powder)
- 1 cup granulated sugar
- 1/2 cup brown sugar, packed
- 3 large eggs
- 1 tsp vanilla extract
- 1/2 cup all-purpose flour
- 1/4 cup unsweetened cocoa powder
- 1/2 tsp salt
- 1/4 tsp baking powder
For the Spider Web Topping:
- 8 oz white chocolate, chopped
- 2 tsp coconut oil or shortening
- 12 small candy spiders (or gummy spiders)
- Or use black licorice rolled into a spider shape
Optional Spider Details:
- Small candy eyes
- Black frosting for spider details
- Edible glitter for sparkle

Let’s Do This
Step 1: Prep the Pan
Preheat your oven to 350°F.
Line a 9×9 baking pan with parchment paper, leaving some overhang on the sides.
Grease lightly with butter or cooking spray.
Step 2: Melt the Chocolate
In a microwave-safe bowl, combine butter and unsweetened chocolate.
Microwave in 30-second intervals, stirring between each, until completely melted and smooth.
Don’t overheat or the chocolate will seize up.
Let cool slightly.
Step 3: Mix the Wet Ingredients
In a large bowl, whisk together granulated sugar and brown sugar.
Add eggs and vanilla extract, whisking until well combined.
Pour in the melted chocolate mixture and whisk until smooth and glossy.
Step 4: Combine Dry Ingredients
In another bowl, whisk together flour, cocoa powder, salt, and baking powder.
Fold the dry ingredients into the wet ingredients until just combined.
Don’t overmix — stop as soon as you don’t see streaks of flour.
Step 5: Bake Those Brownies
Pour batter into prepared pan and spread evenly.
Bake for 20-25 minutes until a toothpick inserted in the center comes out with just a few moist crumbs.
Don’t overbake — fudgy is the goal!
Let cool completely in the pan before decorating (this is important!).
Step 6: Make the White Chocolate
Once brownies are completely cool, chop white chocolate finely.
Place in a microwave-safe bowl with coconut oil.
Microwave in 15-20 second intervals, stirring between each, until smooth and pourable.
If too thick, add a bit more coconut oil. If too thin, let it cool for a minute.
Step 7: Create the Spider Web Pattern
Transfer melted white chocolate to a piping bag or zip-top bag with the corner snipped off.
Create concentric circles by piping white chocolate in circles from the center outward (or draw circles however you like).
Starting from the center, drag a toothpick or thin knife through the lines toward the edge, then back toward the center.
Repeat all around the brownie to create that gorgeous spider web pattern.
Work quickly before the chocolate sets.
Step 8: Add Your Spiders
While the white chocolate is still slightly wet, place a candy spider in the center or on the web.
You can also position spiders along the web pattern for maximum spookiness.
Let the white chocolate set completely before cutting (about 30 minutes at room temperature or 10 minutes in the fridge).
Step 9: Cut and Serve
Using a sharp, hot knife (dip in hot water and wipe clean between cuts), cut into 9 or 16 squares.
The hot knife helps prevent the web design from cracking.
Arrange on a spooky platter and watch people lose their minds!
Serving Suggestions
Display on a Halloween-themed plate or platter.
Perfect for Halloween parties, trick-or-treating neighbors, or classroom treats.
Serve with milk, hot cocoa, or cold cider for the full fall experience.
Great for photo ops — these are seriously Instagram-worthy!
Switch It Up
Dark Chocolate Web: Use dark chocolate for the web instead of white for a darker look.
Milk Chocolate: Use milk chocolate for a sweeter web design.
Colorful Webs: Use colored melting chocolate (orange, purple, or green) for Halloween colors.
Different Spider: Add candy eyes to make the spiders extra detailed, or use licorice for legs.
Caramel Drizzle: Drizzle caramel over the brownies before the web for extra richness.
Fancier Spiders: Use fondant or modeling chocolate to create custom spiders.
Make-Ahead Magic
Bake brownies up to 3 days ahead, store in an airtight container.
Create the spider web pattern the day you want to serve them (the chocolate sets best on cool brownies).
Decorated brownies keep for 3-4 days at room temperature in a covered container.
If the white chocolate cracks, you can touch it up with a tiny bit more melted chocolate.

Questions People Actually Ask
Q: Can I use a different brownie recipe? A: Absolutely! Any fudgy brownie recipe works. Just make sure they’re completely cool before decorating.
Q: My web looks wonky — does it matter? A: Not at all! Wonky webs actually look more authentically spidery. Spiders aren’t perfect!
Q: What if my white chocolate won’t pipe? A: It might be too thick. Add a few more drops of coconut oil and try again. Or just drizzle it with a spoon.
Q: Can I use chocolate chips instead of baking chocolate? A: Sure, but the brownies might not be quite as fudgy. Use about 3/4 cup chocolate chips.
Q: Where do I find candy spiders? A: Most craft stores, party supply stores, or online retailers have them. Dollar stores often carry them around Halloween.
Q: Can I make these without spiders? A: Absolutely! Just the white chocolate web design is stunning on its own.
Print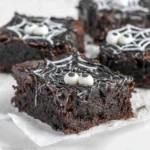
Spider Web Brownies
- Total Time: 45 minutes
- Yield: 9–16 brownies 1x
Description
Alright, so you want Halloween treats that look absolutely spooky and fancy but are ridiculously easy to make? Meet Spider Web Brownies — basically the cutest, most elegant way to serve chocolate brownies that’ll have everyone thinking you’re some kind of dessert artist. We’re talking rich, fudgy brownies decorated with white chocolate spider webs and a little candy spider that make them look like they belong in a fancy bakery window. The web design might look complicated, but it’s literally just piping white chocolate in a pattern — if you can make a squiggly line, you can make these. Perfect for Halloween parties, spooky gatherings, or just because October is the best month for themed treats.
Ingredients
For the Brownies:
- 1/2 cup unsalted butter
- 4 oz unsweetened chocolate, chopped (or 3/4 cup cocoa powder)
- 1 cup granulated sugar
- 1/2 cup brown sugar, packed
- 3 large eggs
- 1 tsp vanilla extract
- 1/2 cup all-purpose flour
- 1/4 cup unsweetened cocoa powder
- 1/2 tsp salt
- 1/4 tsp baking powder
For the Spider Web Topping:
- 8 oz white chocolate, chopped
- 2 tsp coconut oil or shortening
- 12 small candy spiders (or gummy spiders)
- Or use black licorice rolled into a spider shape
Optional Spider Details:
- Small candy eyes
- Black frosting for spider details
- Edible glitter for sparkle
Instructions
Preheat your oven to 350°F.
Line a 9×9 baking pan with parchment paper, leaving some overhang on the sides.
Grease lightly with butter or cooking spray.
In a microwave-safe bowl, combine butter and unsweetened chocolate.
Microwave in 30-second intervals, stirring between each, until completely melted and smooth.
Don’t overheat or the chocolate will seize up.
Let cool slightly.
In a large bowl, whisk together granulated sugar and brown sugar.
Add eggs and vanilla extract, whisking until well combined.
Pour in the melted chocolate mixture and whisk until smooth and glossy.
In another bowl, whisk together flour, cocoa powder, salt, and baking powder.
Fold the dry ingredients into the wet ingredients until just combined.
Don’t overmix — stop as soon as you don’t see streaks of flour.
Pour batter into prepared pan and spread evenly.
Bake for 20-25 minutes until a toothpick inserted in the center comes out with just a few moist crumbs.
Don’t overbake — fudgy is the goal!
Let cool completely in the pan before decorating (this is important!).
Once brownies are completely cool, chop white chocolate finely.
Place in a microwave-safe bowl with coconut oil.
Microwave in 15-20 second intervals, stirring between each, until smooth and pourable.
If too thick, add a bit more coconut oil. If too thin, let it cool for a minute.
Transfer melted white chocolate to a piping bag or zip-top bag with the corner snipped off.
Create concentric circles by piping white chocolate in circles from the center outward (or draw circles however you like).
Starting from the center, drag a toothpick or thin knife through the lines toward the edge, then back toward the center.
Repeat all around the brownie to create that gorgeous spider web pattern.
Work quickly before the chocolate sets.
While the white chocolate is still slightly wet, place a candy spider in the center or on the web.
You can also position spiders along the web pattern for maximum spookiness.
Let the white chocolate set completely before cutting (about 30 minutes at room temperature or 10 minutes in the fridge).
Using a sharp, hot knife (dip in hot water and wipe clean between cuts), cut into 9 or 16 squares.
The hot knife helps prevent the web design from cracking.
Arrange on a spooky platter and watch people lose their minds!
Notes
Display on a Halloween-themed plate or platter.
Perfect for Halloween parties, trick-or-treating neighbors, or classroom treats.
Serve with milk, hot cocoa, or cold cider for the full fall experience.
Great for photo ops — these are seriously Instagram-worthy!
- Prep Time: 20 minutes
- Cook Time: 25 minutes
Nutrition
- Calories: ~185 kcal
- Fat: ~9g
- Carbohydrates: ~24g
- Protein: ~3g