Description
Someone looked at s’mores—already a perfect combination of graham crackers, chocolate, and marshmallows—and thought “what if we turned this into bars that we could eat indoors year-round without setting anything on fire?” and honestly, that person changed the summer-dessert-turned-anytime-treat game forever. These are buttery graham cracker crusts topped with layers of melted chocolate and finished with toasted marshmallows that get golden and slightly charred on top. It’s what happens when you take a campfire classic and make it civilized, cuttable, and completely impossible to stop eating.
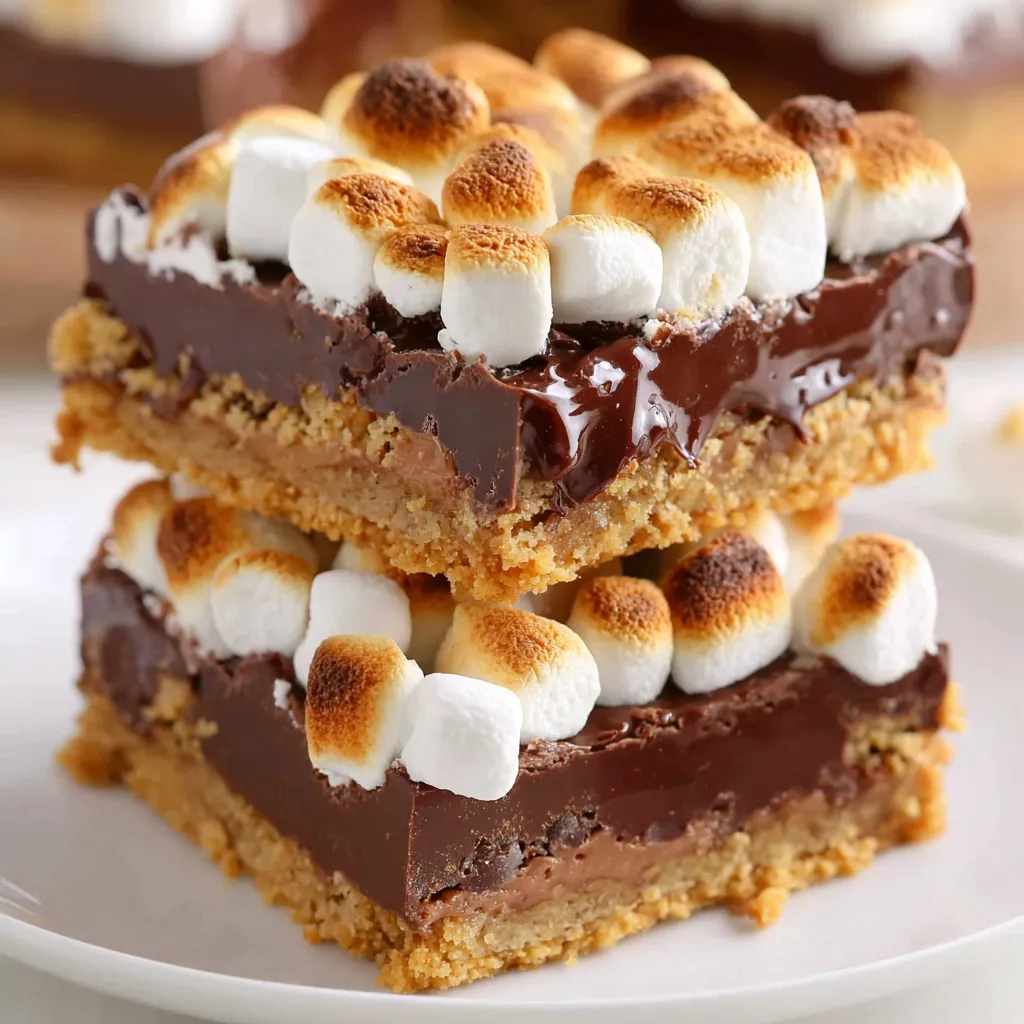
This isn’t some sad approximation of actual s’mores. This is s’mores UPGRADED—better chocolate, more marshmallows, a sturdier crust that doesn’t crumble all over your lap. The graham crust is thick and buttery with chocolate chips mixed in. The chocolate layer is rich and melty. The marshmallows get torched to golden perfection with those signature burnt spots. It’s everything good about s’mores but in a form that doesn’t require outdoor seating or awkward stick-roasting.
This is campfire energy without leaving your kitchen. It’s what happens when you want nostalgia and convenience in the same dessert. It’s bars that taste like summer memories but can be made in February.
Ingredients
For the Graham Cracker Crust:
- 2 1/2 cups graham cracker crumbs (about 18–20 full crackers, crushed)
- 1/2 cup (1 stick) unsalted butter, melted
- 1/4 cup granulated sugar
- 1/4 teaspoon salt
- 1 cup mini chocolate chips (mixed into the crust)
- Optional: 1 teaspoon vanilla extract
For the Chocolate Layer:
- 2 cups semi-sweet chocolate chips (or milk chocolate if you prefer sweeter)
- 1 can (14 oz) sweetened condensed milk
- 2 tablespoons butter
- 1 teaspoon vanilla extract
- Pinch of salt
For the Marshmallow Topping:
- 4–5 cups mini marshmallows (or large marshmallows cut in half)
- OR: 1 jar (7 oz) marshmallow fluff/creme
Optional But Highly Recommended:
- Extra chocolate for drizzling after torching
- Sea salt flakes for sprinkling on top
- Graham cracker crumbs for sprinkling
- Chocolate syrup for drizzling
- Crushed graham crackers mixed with melted chocolate for extra layers
Special Equipment:
- 9x13 inch baking pan
- Parchment paper (for easy removal)
- Mixing bowls
- Kitchen torch (for toasting marshmallows) OR broiler
- Offset spatula
- Sharp knife for cutting clean bars
Instructions
Preheat your oven to 350°F. Line a 9×13 inch baking pan with parchment paper, leaving some overhang on the sides—this is your ticket to easy removal and clean cuts later. Spray the parchment lightly with cooking spray just to be safe.
In a large bowl, mix the graham cracker crumbs, melted butter, sugar, and salt until the mixture resembles wet sand and holds together when squeezed. Fold in the mini chocolate chips—these create pockets of chocolate throughout the crust. Press this mixture firmly and evenly into the bottom of the prepared pan. Use the bottom of a measuring cup or glass to really pack it down. You want it compact so it doesn’t crumble when you cut the bars.
Bake the crust for 10-12 minutes until it’s set and lightly golden around the edges. You’ll smell that toasty graham cracker aroma. Remove from the oven and let it cool for 5 minutes while you make the chocolate layer. Keep the oven on—you’ll need it again.
In a microwave-safe bowl or on the stovetop in a double boiler, combine the chocolate chips, sweetened condensed milk, and butter. Microwave in 30-second intervals, stirring between each, until completely smooth and melted. Or stir over low heat on the stove until smooth. Add the vanilla and salt, stir to combine. The mixture should be glossy, thick, and pourable.
Pour the chocolate mixture over the baked graham crust, spreading it evenly to cover the entire surface. Use an offset spatula to smooth it out into an even layer. Make sure you get into the corners. The chocolate layer should be thick and luxurious—this is not the time for restraint.
Return the pan to the oven for just 5 minutes to help the chocolate layer set slightly. You don’t want it fully baked, just warmed and starting to set. Remove from oven. Let it cool at room temperature for 10 minutes, then refrigerate for at least 1 hour until the chocolate is firm. This step is crucial—you need a solid chocolate layer to support the marshmallows.
Once the chocolate layer is firm and set, arrange the mini marshmallows on top in tight rows, covering the entire surface. Pack them in—you want full coverage with marshmallows touching each other. If using large marshmallows, cut them in half and place them cut-side down. If using marshmallow fluff, spread it evenly over the chocolate layer with an offset spatula.
If you have a kitchen torch, this is its moment to shine. Hold the torch about 4-6 inches from the marshmallows and move it back and forth in a sweeping motion, toasting the marshmallows until they’re golden brown with some darker charred spots. Don’t stay in one place too long or you’ll burn through them. The goal is that campfire look—golden with signature burnt edges.
If you don’t have a torch, turn your oven’s broiler to high. Place the pan on the top rack (but not too close to the heating element) and broil for 1-3 minutes, watching CONSTANTLY. Like, don’t leave the kitchen. Don’t even blink. Marshmallows go from perfect to charcoal in seconds. Rotate the pan if needed for even browning.
Once the marshmallows are perfectly toasted, let the pan cool at room temperature for 15 minutes, then refrigerate for another 30 minutes. This helps everything set so you can cut clean bars. If you cut them while warm, you’ll have a melty mess (which still tastes good, but isn’t as pretty).
Use the parchment paper overhang to lift the entire slab out of the pan onto a cutting board. Using a large, sharp knife, cut into 12-16 bars. Wipe the knife clean between cuts for the cleanest edges—warm the knife under hot water, dry it, then cut. This prevents dragging marshmallow through the chocolate.
If you want to go extra, drizzle melted chocolate over the toasted marshmallows. Sprinkle with crushed graham crackers. Add a pinch of flaky sea salt on each bar. Make them look like something from a fancy bakery even though you made them in your kitchen while wearing sweatpants.
Pick up a bar and take a bite through all the layers. Notice the buttery, crunchy graham crust with chocolate chip surprises. Taste the rich, smooth chocolate ganache layer. Feel the toasted marshmallow—crispy on the outside, soft and gooey on the inside. Experience all three components working together in perfect s’mores harmony. Immediately reach for another bar because one is never enough.
Notes
Pack That Crust: Really compress it into the pan. Loose crust = crumbly bars.
Chill the Chocolate Layer: Don’t skip this step. The marshmallows need a firm base or they’ll sink into warm chocolate.
Fresh Marshmallows: Use fresh, soft marshmallows. Old, stale ones don’t toast well.
Watch the Broiler: Seriously, DO NOT walk away. Marshmallows burn in literal seconds under the broiler.
Cut Cold: Warm bars are messy. Cold bars cut clean. Patience pays off.
Warm the Knife: Hot water on the knife between cuts = clean slices through chocolate and marshmallow.
- Prep Time: 20 minutes
- Cook Time: 15-20 minutes
Nutrition
- Calories: ~340 kcal
- Fat: ~16g
- Carbohydrates: ~46g
- Protein: ~4g