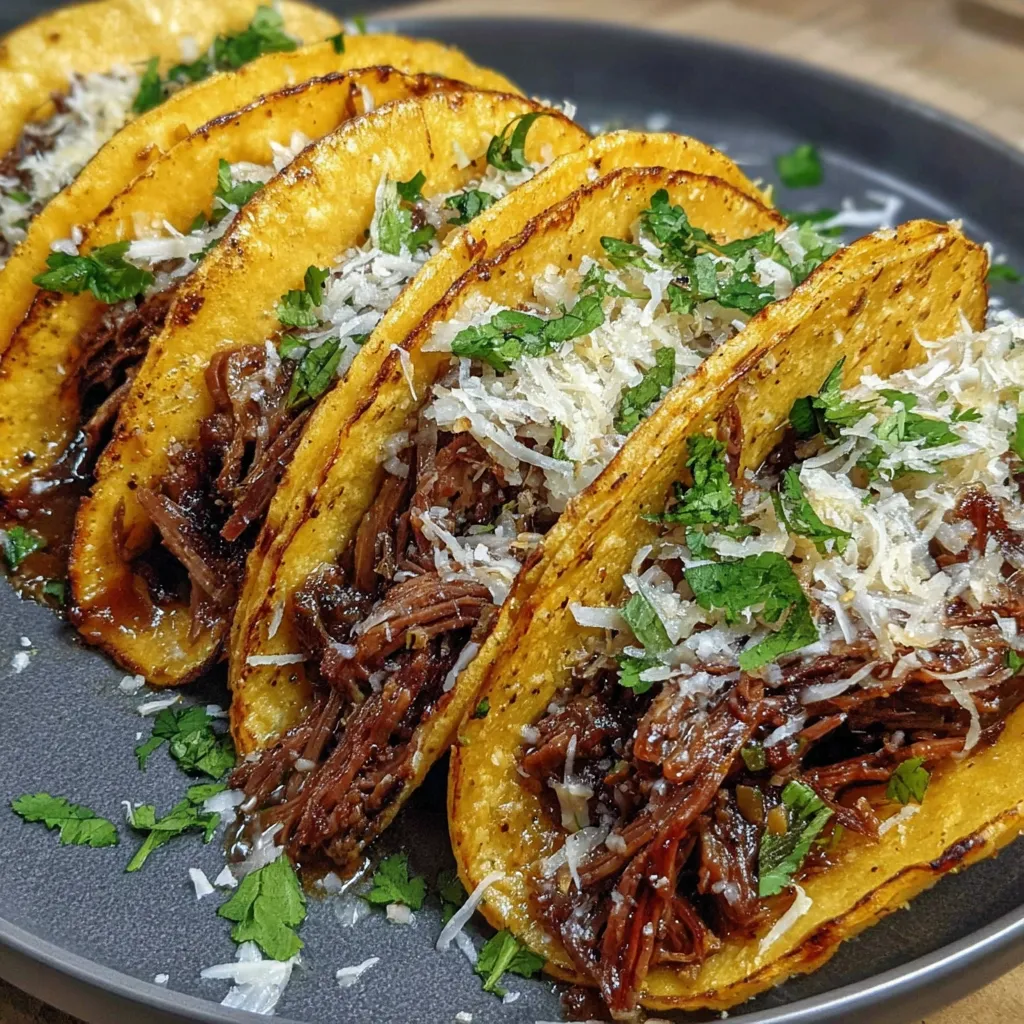
Imagine if a taco and your dreams had a baby, and that baby was raised by the world’s most patient slow cooker that turned tough beef into fork-tender, flavor-bomb shreds that are so good you’ll want to eat them straight from the pot with a spoon. That’s what we’re dealing with here. These Slow Cooker Shredded Beef Tacos are basically the holy grail of taco night—impossibly tender beef that’s been slow-cooked until it falls apart if you look at it wrong, stuffed into crispy-on-the-outside, soft-on-the-inside cheese-crusted tortillas that are so good they should probably be illegal. The beef is seasoned with smoky, spicy, savory perfection, the cheese gets all melty and creates these crispy lacy edges, and when you bite into one, you experience that perfect textural contrast that makes your brain light up like a Christmas tree. I made these for Taco Tuesday last month and my husband literally said “we’re never ordering takeout tacos again.” My teenage son, who claims to be “too cool” for family dinner, suddenly appeared like a taco-seeking missile and ate seven. SEVEN. My best friend came over, took one bite, and texted her husband “you’re on your own for dinner, I’m not leaving.” These tacos make people feral in the best possible way.
Why You’ll Love This Recipe
Set it and forget it magic. Throw everything in the slow cooker in the morning, go live your life, come home to your house smelling like a Mexican restaurant. It’s basically witchcraft.
Melt-in-your-mouth tender. This beef is so tender it shreds with a fork. No knife needed. It practically falls apart when you breathe on it. That’s the slow cooker superpower.
Flavor that goes DEEP. Hours of slow cooking means the spices penetrate every fiber of that beef. Every bite is packed with flavor, not just seasoned on the outside.
Crispy cheese skirt situation. We’re pan-frying these tacos with cheese on the outside, creating that restaurant-style crispy cheese crust that’s worth fighting over.
Feeds a crowd or meal preps like a boss. One batch makes enough for a party, or portion it out for easy weeknight dinners all week long.
Customizable as hell. Everyone can build their taco exactly how they want it. Picky eaters, spice lovers, veggie people—everyone wins.
Budget-friendly fancy. Using cheap cuts of beef that the slow cooker transforms into something that tastes like you spent $30 per pound. Your wallet will thank you.

The Good Stuff You’ll Need
For the Shredded Beef:
- 3-4 lbs beef chuck roast (or brisket, or beef shoulder—whatever’s on sale)
- 1 large onion, roughly chopped
- 6 cloves garlic, smashed (don’t even bother peeling them perfectly)
- 2 cups beef broth (or use bouillon cubes, I won’t judge)
- 1 can (14 oz) diced tomatoes with green chiles (Rotel is perfect here)
- 3 tablespoons tomato paste
- 2 tablespoons chili powder
- 1 tablespoon ground cumin
- 2 teaspoons smoked paprika
- 2 teaspoons dried oregano (Mexican oregano if you can find it)
- 1 teaspoon ground coriander
- 1 teaspoon onion powder
- 1 teaspoon garlic powder
- 1/2 teaspoon cayenne pepper (more if you like heat, less if you’re scared)
- 2 teaspoons salt
- 1 teaspoon black pepper
- 2 bay leaves
- 2 tablespoons lime juice
- 2 tablespoons apple cider vinegar (secret ingredient for tang)
For the Tacos:
- 16-20 small corn tortillas (or flour if you prefer, no judgment)
- 3 cups shredded cheese (Mexican blend, Monterey Jack, or Oaxaca cheese)
- Neutral oil for pan-frying (vegetable, canola, whatever)
For Toppings (go wild):
- Diced white onion
- Fresh cilantro, chopped
- Lime wedges (NON-NEGOTIABLE)
- Sliced radishes
- Pickled jalapeños
- Sour cream or Mexican crema
- Guacamole or sliced avocado
- Salsa verde or pico de gallo
- Hot sauce (I like Valentina or Cholula)
- Shredded cabbage for crunch
Equipment:
- 6-quart slow cooker (minimum)
- Large skillet or griddle
- Two forks for shredding
- Tongs
- Cutting board
- Sharp knife
Let’s Do This
Step 1: Prep That Beef Like You Mean It
Take your beef out of the fridge and let it sit at room temperature for 20-30 minutes. Cold meat straight from the fridge won’t sear properly.
Pat the beef completely dry with paper towels. Like, BONE DRY. Moisture is the enemy of browning. This step is crucial even though you’re tempted to skip it. Don’t.
Cut the beef into 3-4 large chunks. This increases surface area for flavor and helps it cook more evenly. Don’t worry about trimming all the fat—some fat is good. It melts during cooking and keeps everything moist. Just cut off any gigantic fatty chunks.
Season the beef generously on all sides with salt and pepper. When I say generously, I mean be aggressive. Big meat needs big seasoning.
Step 2: Sear It (Or Don’t, But You Should)
This step is technically optional—the slow cooker will do its thing either way—but searing creates deep, caramelized flavor that you can’t get any other way. It’s worth the extra 10 minutes. Trust me.
Heat a large skillet over medium-high heat. Add a tablespoon of oil. When it’s shimmering hot, add your beef chunks. Don’t move them. Let them sear for 3-4 minutes per side until deeply browned.
You’re not cooking the beef through—you’re just creating a flavorful crust. Get nice color on at least two sides of each chunk.
Transfer the seared beef to your slow cooker. Don’t clean the skillet—all those brown bits are flavor gold.
If you’re skipping the sear: Just put the seasoned beef directly in the slow cooker. It’ll still be delicious, just not AS complex. No shame either way.
Step 3: Make the Magic Sauce
In that same skillet with all the beef drippings (or a clean one if you skipped searing), add the chopped onion and cook for 3-4 minutes until softened. Add the smashed garlic and cook for another minute until fragrant.
Add the tomato paste and cook for 1-2 minutes, stirring constantly. This caramelizes the tomato paste and takes away any metallic taste.
Add all the spices—chili powder, cumin, smoked paprika, oregano, coriander, onion powder, garlic powder, cayenne, salt, and pepper. Toast them in the pan for about 30 seconds, stirring constantly. You’ll smell them wake up. That’s the good stuff.
Pour in about 1/2 cup of the beef broth and scrape up all the brown bits stuck to the bottom of the pan. This is called deglazing and it’s where flavor lives.
Pour this mixture into the slow cooker over the beef.
Add the remaining beef broth, diced tomatoes with their juices, bay leaves, lime juice, and apple cider vinegar to the slow cooker.
Give everything a gentle stir to distribute the spices and liquid. The beef doesn’t need to be completely submerged—it’ll release its own juices as it cooks.
Step 4: Walk Away and Let Time Do Its Thing
Put the lid on the slow cooker. Set it to LOW for 8-10 hours or HIGH for 4-6 hours.
Now walk away. Go to work. Run errands. Take a nap. Binge-watch something. The slow cooker’s got this.
Your house is going to smell absolutely INSANE in a few hours. Prepare yourself. Also prepare for neighbors to suddenly want to be your best friend.
The beef is done when it’s fall-apart tender. You should be able to shred it easily with a fork with basically no resistance.
Step 5: Shred That Beef
Transfer the beef chunks to a large cutting board or bowl. They’ll be so tender they might fall apart on the way. That’s perfect.
Using two forks, shred the beef into bite-sized pieces. This should be ridiculously easy. If you’re struggling, it needs more time.
Remove and discard the bay leaves from the cooking liquid. Taste the liquid—it’s basically liquid gold at this point.
Here’s the move: Skim off and discard most of the fat floating on top of the cooking liquid, then return some of that liquid to the shredded beef—maybe 1-2 cups worth. This keeps it juicy and adds back all those concentrated flavors. Don’t add too much or your tacos will be soggy. You want moist beef, not soup beef.
Taste the beef and adjust the seasoning. It might need more salt, a squeeze of lime, or a splash more vinegar for brightness. Fix it now.
Pro move: If you have time, spread the shredded beef on a baking sheet and broil it for 3-5 minutes to get crispy edges. This is next-level but totally optional.
Step 6: Crispy Cheese Taco Assembly
Heat a large skillet or griddle over medium heat. You need good temperature control here—not too hot or the cheese burns before the tortilla crisps.
Add a tiny bit of oil to the pan—just enough to barely coat it.
Sprinkle a small handful of shredded cheese (about 2-3 tablespoons) in the shape of a tortilla directly onto the hot pan. Let it start to melt and sizzle.
Place a tortilla directly on top of the melting cheese. Press down gently with a spatula.
Add a generous spoonful of shredded beef to half of the tortilla. Don’t overstuff or you won’t be able to fold it.
Sprinkle a little more cheese on top of the beef (because more cheese is always the answer).
Let it cook for 2-3 minutes. The cheese on the bottom should be getting golden and crispy. You’ll hear it sizzling. That’s the sound of deliciousness happening.
Fold the tortilla in half over the filling, creating a half-moon taco. Press down gently to seal.
Cook for another 1-2 minutes on each side until both sides are golden and crispy with that beautiful cheese skirt attached.
Transfer to a plate and repeat with remaining tortillas and beef. Work in batches—don’t try to cram too many in the pan or they’ll steam instead of crisp.
Step 7: Toppings Bar Time
Set out all your toppings in little bowls like you’re running a taco stand.
Let people build their own tacos with whatever toppings they want. This prevents fights and makes everyone happy.
Squeeze fresh lime over everything at the end. This is mandatory. The acid brightens all the flavors and makes everything taste more alive.
Stand back and watch people lose their minds over your tacos.
Serving Suggestions
These tacos are a complete meal on their own, but here’s how to make taco night even more epic:
Mexican rice: The classic sidekick to any taco situation Refried beans: Black or pinto, doesn’t matter, both are perfect Elote (Mexican street corn): Creamy, spicy, charred perfection Chips and guacamole: Start with this while the tacos are cooking Mexican street corn salad: All the elote flavor in a bowl Cilantro lime rice: Light, fresh, and doesn’t compete with the tacos Black bean salad: Protein-packed and refreshing Horchata or Mexican Coke: The only acceptable beverages for taco night Tres leches cake: If you need dessert after all those tacos
Switch It Up
Birria-Style: Add 2 dried guajillo chiles and 1 dried ancho chile (rehydrated and blended) to the sauce for authentic birria flavor. Serve the cooking liquid as consommé for dipping.
Barbacoa Version: Add 3 chipotle peppers in adobo, 1 tablespoon of the adobo sauce, and increase the cumin. Game-changer.
Coffee-Rubbed: Add 1 tablespoon instant coffee or espresso powder to the spice mix for deep, complex flavor that doesn’t taste like coffee.
Beer-Braised: Replace 1 cup of beef broth with Mexican beer (like Modelo or Corona). Adds malty richness.
Citrus Variation: Add orange juice (1 cup) to the cooking liquid for a brighter, more complex flavor.
Extra Spicy: Double the cayenne, add diced jalapeños, and use hot Rotel instead of mild.
Taco Bowl: Skip the tortillas entirely and serve over rice with all the toppings for a burrito bowl situation.
Loaded Nachos: Use the beef to top nachos with cheese, jalapeños, sour cream, and guacamole.
Quesadillas: Use the beef in quesadillas with lots of cheese. Crisp them in a pan until golden.
Taco Salad: Serve over lettuce with tortilla strips, cheese, salsa, and sour cream.
Storage and Make-Ahead Tips
This beef actually gets BETTER after sitting, which makes it perfect for meal prep and advance planning.
Refrigerator: Store the shredded beef in an airtight container with some of the cooking liquid for up to 5 days. Reheat gently on the stovetop or in the microwave.
Freezer: Freezes beautifully for up to 3 months. Portion it into freezer bags with some liquid, flatten them for easy stacking, and freeze. Thaw overnight in the fridge.
Make-ahead timeline:
- 3 months ahead: Make and freeze the beef
- 5 days ahead: Make the beef and refrigerate
- Day of: Reheat beef and assemble tacos fresh
Meal prep strategy: Make a big batch on Sunday, portion into individual containers with toppings, and you’ve got easy dinners or lunches all week. Just assemble and crisp the tacos when you’re ready to eat.
Reheating tips: Add a splash of beef broth or water when reheating to keep it moist. Don’t overheat or it can dry out. Reheat just until warmed through.
Assembly tip: Always make the crispy cheese tacos FRESH right before eating. They lose their crispiness if they sit. The beef can be prepped ahead, but taco assembly should be last-minute.
Why This Works So Damn Well
The science and technique behind this recipe is what makes it consistently incredible.
Chuck roast is the secret to tender shredded beef. This cut has lots of connective tissue (collagen) that breaks down into gelatin during long, slow cooking. That’s what makes it tender and gives the meat that rich, silky texture. Lean cuts would dry out and get tough.
Low and slow is the only way. The low temperature allows collagen to break down gradually without the muscle fibers seizing up and getting tough. High heat would make it stringy and dry. Time + low heat = tender magic.
Acidic ingredients tenderize and brighten. The vinegar, lime juice, and tomatoes all add acid that helps break down tough fibers and adds brightness that cuts through the richness of the beef.
Searing creates Maillard reaction. That browning isn’t just for color—it creates hundreds of complex flavor compounds that you can’t get from just slow cooking. It’s the difference between good and mind-blowing.
Toasting spices wakes them up. Heating spices in fat releases their aromatic oils and intensifies their flavors. Raw spices taste flat and dusty by comparison.
The cheese skirt is texture genius. Frying cheese until crispy creates textural contrast—you get creamy cheese inside and crunchy cheese outside. Your brain loves textural variety.
Corn tortillas + cheese = stability. Corn tortillas get crispy in a way flour tortillas don’t, and the cheese glues everything together, preventing structural failure mid-bite.
When to Make This
Taco Tuesday: Obviously. This is the taco Tuesday recipe to end all taco Tuesday recipes. Game Day: Set up a taco bar and watch people go absolutely feral. Busy Weeknight: Come home to dinner already done. It’s like having a personal chef. Meal Prep Sunday: Make once, eat all week in various forms. Casual Dinner Party: Low-effort for you, high-impact for guests. Let people build their own. Cinco de Mayo: Way better than going out to an overcrowded restaurant. Summer BBQ Alternative: When you’re tired of burgers and hot dogs. Cold Winter Night: Warm, comforting, and makes your house smell amazing. Potluck Champion: Bring the beef in a slow cooker, bring toppings, be the hero.
Questions People Actually Ask
Q: Can I use a different cut of beef?
A: Yes. Brisket, beef shoulder, or even short ribs work great. Avoid lean cuts like sirloin—they’ll dry out and get tough. You need a cut with fat and connective tissue.
Q: Can I make this on the stovetop or in the oven instead?
A: Absolutely. For stovetop: Use a Dutch oven, bring to a simmer, then cook on the lowest heat for 3-4 hours. For oven: 300°F for 3-4 hours in a covered Dutch oven. Both work great.
Q: My beef is tough. What went wrong?
A: It didn’t cook long enough. Keep cooking. Sometimes tough cuts need 10+ hours on low. If it’s tough, it’s not done. Be patient.
Q: Can I use chicken or pork instead?
A: Sure. Pork shoulder works exactly the same way. For chicken, use thighs (not breasts) and reduce cooking time to 4-6 hours on low. Breasts will get dry and stringy.
Q: The cooking liquid is too thin. How do I thicken it?
A: After shredding the beef, pour the liquid into a saucepan and simmer it over medium-high heat until it reduces and thickens, about 10-15 minutes. Or just use less liquid on the beef—you don’t need to thicken it.
Q: Can I make this less spicy?
A: Skip the cayenne and use mild Rotel instead of hot. The rest of the spices add flavor without much heat.
Q: Do I have to do the crispy cheese taco method?
A: No, but you’re missing out on life if you don’t. You can just heat tortillas and fill them normally. Still delicious, just not AS delicious.
Q: My cheese burned before the tortilla got crispy. Help!
A: Your heat was too high. Use medium or even medium-low heat. It takes a little longer but you won’t burn the cheese.
Q: Can I use flour tortillas?
A: Of course. They won’t get AS crispy but they still work great. Street taco-size flour tortillas are perfect.
Q: How much beef should I put in each taco?
A: About 2-3 tablespoons per small taco. Don’t overstuff or they’re impossible to fold and eat. Make more tacos instead of fat tacos.
Slow Cooker Shredded Beef Tacos
- Total Time: 33 minute
- Yield: 16–20 tacos 1x
Description
Imagine if a taco and your dreams had a baby, and that baby was raised by the world’s most patient slow cooker that turned tough beef into fork-tender, flavor-bomb shreds that are so good you’ll want to eat them straight from the pot with a spoon. That’s what we’re dealing with here. These Slow Cooker Shredded Beef Tacos are basically the holy grail of taco night—impossibly tender beef that’s been slow-cooked until it falls apart if you look at it wrong, stuffed into crispy-on-the-outside, soft-on-the-inside cheese-crusted tortillas that are so good they should probably be illegal. The beef is seasoned with smoky, spicy, savory perfection, the cheese gets all melty and creates these crispy lacy edges, and when you bite into one, you experience that perfect textural contrast that makes your brain light up like a Christmas tree. I made these for Taco Tuesday last month and my husband literally said “we’re never ordering takeout tacos again.” My teenage son, who claims to be “too cool” for family dinner, suddenly appeared like a taco-seeking missile and ate seven. SEVEN. My best friend came over, took one bite, and texted her husband “you’re on your own for dinner, I’m not leaving.” These tacos make people feral in the best possible way.
Ingredients
For the Shredded Beef:
- 3–4 lbs beef chuck roast (or brisket, or beef shoulder—whatever’s on sale)
- 1 large onion, roughly chopped
- 6 cloves garlic, smashed (don’t even bother peeling them perfectly)
- 2 cups beef broth (or use bouillon cubes, I won’t judge)
- 1 can (14 oz) diced tomatoes with green chiles (Rotel is perfect here)
- 3 tablespoons tomato paste
- 2 tablespoons chili powder
- 1 tablespoon ground cumin
- 2 teaspoons smoked paprika
- 2 teaspoons dried oregano (Mexican oregano if you can find it)
- 1 teaspoon ground coriander
- 1 teaspoon onion powder
- 1 teaspoon garlic powder
- 1/2 teaspoon cayenne pepper (more if you like heat, less if you’re scared)
- 2 teaspoons salt
- 1 teaspoon black pepper
- 2 bay leaves
- 2 tablespoons lime juice
- 2 tablespoons apple cider vinegar (secret ingredient for tang)
For the Tacos:
- 16–20 small corn tortillas (or flour if you prefer, no judgment)
- 3 cups shredded cheese (Mexican blend, Monterey Jack, or Oaxaca cheese)
- Neutral oil for pan-frying (vegetable, canola, whatever)
For Toppings (go wild):
- Diced white onion
- Fresh cilantro, chopped
- Lime wedges (NON-NEGOTIABLE)
- Sliced radishes
- Pickled jalapeños
- Sour cream or Mexican crema
- Guacamole or sliced avocado
- Salsa verde or pico de gallo
- Hot sauce (I like Valentina or Cholula)
- Shredded cabbage for crunch
Equipment:
- 6-quart slow cooker (minimum)
- Large skillet or griddle
- Two forks for shredding
- Tongs
- Cutting board
- Sharp knife
Instructions
Step 1: Prep That Beef Like You Mean It
Take your beef out of the fridge and let it sit at room temperature for 20-30 minutes. Cold meat straight from the fridge won’t sear properly.
Pat the beef completely dry with paper towels. Like, BONE DRY. Moisture is the enemy of browning. This step is crucial even though you’re tempted to skip it. Don’t.
Cut the beef into 3-4 large chunks. This increases surface area for flavor and helps it cook more evenly. Don’t worry about trimming all the fat—some fat is good. It melts during cooking and keeps everything moist. Just cut off any gigantic fatty chunks.
Season the beef generously on all sides with salt and pepper. When I say generously, I mean be aggressive. Big meat needs big seasoning.
Step 2: Sear It (Or Don’t, But You Should)
This step is technically optional—the slow cooker will do its thing either way—but searing creates deep, caramelized flavor that you can’t get any other way. It’s worth the extra 10 minutes. Trust me.
Heat a large skillet over medium-high heat. Add a tablespoon of oil. When it’s shimmering hot, add your beef chunks. Don’t move them. Let them sear for 3-4 minutes per side until deeply browned.
You’re not cooking the beef through—you’re just creating a flavorful crust. Get nice color on at least two sides of each chunk.
Transfer the seared beef to your slow cooker. Don’t clean the skillet—all those brown bits are flavor gold.
If you’re skipping the sear: Just put the seasoned beef directly in the slow cooker. It’ll still be delicious, just not AS complex. No shame either way.
Step 3: Make the Magic Sauce
In that same skillet with all the beef drippings (or a clean one if you skipped searing), add the chopped onion and cook for 3-4 minutes until softened. Add the smashed garlic and cook for another minute until fragrant.
Add the tomato paste and cook for 1-2 minutes, stirring constantly. This caramelizes the tomato paste and takes away any metallic taste.
Add all the spices—chili powder, cumin, smoked paprika, oregano, coriander, onion powder, garlic powder, cayenne, salt, and pepper. Toast them in the pan for about 30 seconds, stirring constantly. You’ll smell them wake up. That’s the good stuff.
Pour in about 1/2 cup of the beef broth and scrape up all the brown bits stuck to the bottom of the pan. This is called deglazing and it’s where flavor lives.
Pour this mixture into the slow cooker over the beef.
Add the remaining beef broth, diced tomatoes with their juices, bay leaves, lime juice, and apple cider vinegar to the slow cooker.
Give everything a gentle stir to distribute the spices and liquid. The beef doesn’t need to be completely submerged—it’ll release its own juices as it cooks.
Step 4: Walk Away and Let Time Do Its Thing
Put the lid on the slow cooker. Set it to LOW for 8-10 hours or HIGH for 4-6 hours.
Now walk away. Go to work. Run errands. Take a nap. Binge-watch something. The slow cooker’s got this.
Your house is going to smell absolutely INSANE in a few hours. Prepare yourself. Also prepare for neighbors to suddenly want to be your best friend.
The beef is done when it’s fall-apart tender. You should be able to shred it easily with a fork with basically no resistance.
Step 5: Shred That Beef
Transfer the beef chunks to a large cutting board or bowl. They’ll be so tender they might fall apart on the way. That’s perfect.
Using two forks, shred the beef into bite-sized pieces. This should be ridiculously easy. If you’re struggling, it needs more time.
Remove and discard the bay leaves from the cooking liquid. Taste the liquid—it’s basically liquid gold at this point.
Here’s the move: Skim off and discard most of the fat floating on top of the cooking liquid, then return some of that liquid to the shredded beef—maybe 1-2 cups worth. This keeps it juicy and adds back all those concentrated flavors. Don’t add too much or your tacos will be soggy. You want moist beef, not soup beef.
Taste the beef and adjust the seasoning. It might need more salt, a squeeze of lime, or a splash more vinegar for brightness. Fix it now.
Pro move: If you have time, spread the shredded beef on a baking sheet and broil it for 3-5 minutes to get crispy edges. This is next-level but totally optional.
Step 6: Crispy Cheese Taco Assembly
Heat a large skillet or griddle over medium heat. You need good temperature control here—not too hot or the cheese burns before the tortilla crisps.
Add a tiny bit of oil to the pan—just enough to barely coat it.
Sprinkle a small handful of shredded cheese (about 2-3 tablespoons) in the shape of a tortilla directly onto the hot pan. Let it start to melt and sizzle.
Place a tortilla directly on top of the melting cheese. Press down gently with a spatula.
Add a generous spoonful of shredded beef to half of the tortilla. Don’t overstuff or you won’t be able to fold it.
Sprinkle a little more cheese on top of the beef (because more cheese is always the answer).
Let it cook for 2-3 minutes. The cheese on the bottom should be getting golden and crispy. You’ll hear it sizzling. That’s the sound of deliciousness happening.
Fold the tortilla in half over the filling, creating a half-moon taco. Press down gently to seal.
Cook for another 1-2 minutes on each side until both sides are golden and crispy with that beautiful cheese skirt attached.
Transfer to a plate and repeat with remaining tortillas and beef. Work in batches—don’t try to cram too many in the pan or they’ll steam instead of crisp.
Step 7: Toppings Bar Time
Set out all your toppings in little bowls like you’re running a taco stand.
Let people build their own tacos with whatever toppings they want. This prevents fights and makes everyone happy.
Squeeze fresh lime over everything at the end. This is mandatory. The acid brightens all the flavors and makes everything taste more alive.
Stand back and watch people lose their minds over your tacos.
Notes
These tacos are a complete meal on their own, but here’s how to make taco night even more epic:
Mexican rice: The classic sidekick to any taco situation Refried beans: Black or pinto, doesn’t matter, both are perfect Elote (Mexican street corn): Creamy, spicy, charred perfection Chips and guacamole: Start with this while the tacos are cooking Mexican street corn salad: All the elote flavor in a bowl Cilantro lime rice: Light, fresh, and doesn’t compete with the tacos Black bean salad: Protein-packed and refreshing Horchata or Mexican Coke: The only acceptable beverages for taco night Tres leches cake: If you need dessert after all those tacos
- Prep Time: 30 minutes
- Cook Time: 4-6 hours
Nutrition
- Calories: ~280 kcal
- Sugar: ~1g
- Sodium: ~420mg
- Fat: ~14g
- Carbohydrates: ~15g
- Protein: ~22g