What the heck is this?
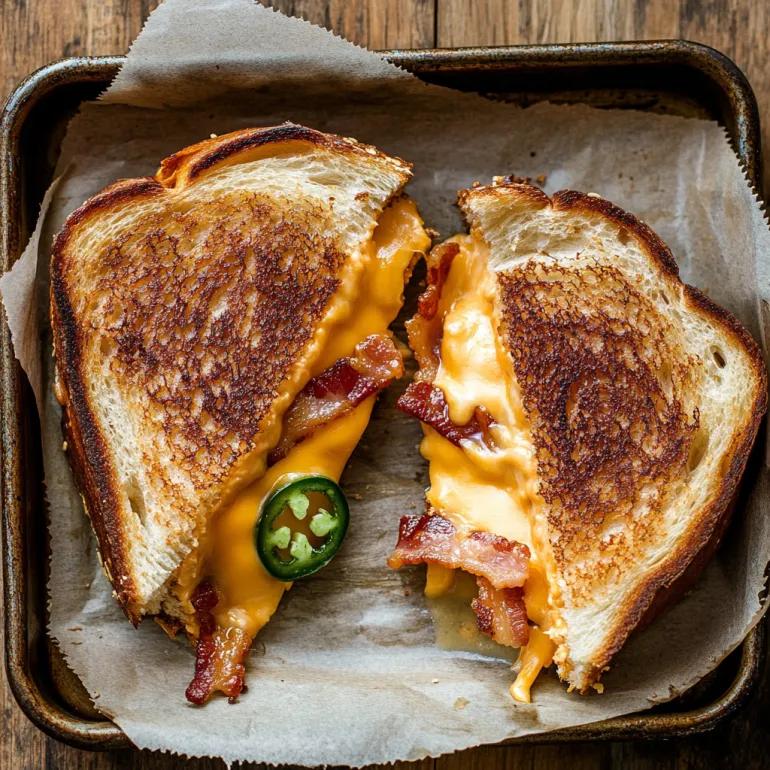
Take everything you love about jalapeño poppers — the creamy, cheesy, spicy, smoky situation — and smash it between two slices of golden, buttery bread. Now imagine that whole spicy-creamy-crunchy dream getting the grilled cheese treatment. Yeah, we’re doing that. This Roasted Jalapeño Popper Grilled Cheese is what happens when your favorite bar snack and your childhood comfort food decide to make delicious magic together. It’s gooey, it’s bold, it’s got heat and crunch and a kiss of smoke, and it’s absolutely not your average grilled cheese. Honestly? It might just ruin regular grilled cheese for you forever (sorry, not sorry).
Why You’ll Love This Recipe
The cream cheese and cheddar combo = melty magic.
Roasted jalapeños bring the heat and the flavor (not just fire for the sake of fire).
Buttery, golden crust on the outside.
Bacon. (Need we say more?)
Totally customizable — mild to wild depending on how you like it.
It’s a grilled cheese… but dressed up for a flavor party.
The Good Stuff You’ll Need
For the Filling:
4 oz cream cheese, softened
1/2 cup sharp cheddar cheese, shredded
1/2 cup Monterey Jack or mozzarella, shredded (melty and mild FTW)
2–3 roasted jalapeños, skins peeled, seeds removed, chopped (or keep some seeds if you’re spicy like that)
2 slices cooked bacon, crumbled (optional but highly encouraged)
Pinch of garlic powder
Pinch of smoked paprika (optional, but so good)
For Assembly:
4 slices thick sourdough or your favorite sturdy sandwich bread
2–3 tbsp butter, softened (for the outside of the bread)
Extra shredded cheddar for good measure (trust me)

Let’s Do This
Step 1: Roast Those Jalapeños
If you haven’t roasted your peppers yet, just pop them under the broiler (or over an open flame) until the skins are blackened and blistered all over. Toss them in a bowl and cover it with a plate or plastic wrap for 10 minutes to steam. Peel off the skins, remove the seeds (or leave a few if you like it hot), and chop ’em up.
Step 2: Mix the Cheesy Goodness
In a bowl, stir together the cream cheese, shredded cheddar, Monterey Jack, roasted jalapeños, crumbled bacon (if using), garlic powder, and smoked paprika. Give it a taste. Need more salt? More heat? More bacon? Go ahead and make it perfect for you.
Step 3: Butter and Build
Spread butter on one side of each slice of bread (this is your grilled-cheese crust, so be generous). Flip the slices over and spread a thick, glorious layer of the cheesy jalapeño filling on the inside. If you’re feeling a little unhinged (in the best way), sprinkle a little extra cheddar on top before closing the sandwiches.
Step 4: Grill Like a Pro
Heat a skillet or griddle over medium heat. Place the sandwiches butter-side-down and cook for 3–4 minutes per side, pressing down lightly with a spatula, until the bread is golden and crispy and the cheese is oozing. Keep the heat moderate — you want the inside melted before the outside goes full toast.
Step 5: Let It Rest (Just Kidding — Eat Immediately)
Let the sandwiches sit for 1–2 minutes before slicing (if you can resist), just so everything doesn’t come lava-flowing out. Then cut it in half, get a good cheese pull, and enjoy the best dang grilled cheese you’ve had all year.
Serving Suggestions
Serve with tomato soup for a spicy, creamy, perfect pairing.
Try it with a drizzle of honey or hot honey for sweet-heat action.
Cold beer or fizzy lemonade = a beautiful beverage match.
Add a side of pickles or slaw for crunch and contrast.
Switch It Up
Make it Veggie: Skip the bacon, add roasted corn or black beans for some Tex-Mex flair.
Cheese Swap: Pepper jack, gouda, or even blue cheese if you’re feeling adventurous.
Extra Crunch: Add crushed tortilla chips inside the sandwich before grilling. Trust me.
Low Carb: Make it as a grilled cheese “melt” on low-carb bread or in a tortilla quesadilla-style.
Make-Ahead Tips
Roast jalapeños and cook bacon ahead of time — store in the fridge for up to 3 days.
You can mix the filling a day or two in advance, then just spread and grill when hunger strikes.
Leftover sandwiches reheat best in a skillet or air fryer — avoid the microwave unless you like soggy bread (no judgment, just facts).

Questions People Actually Ask
Q: Can I use jarred jalapeños instead of fresh?
A: You can, but roasted fresh ones give you that smoky flavor poppers are known for. If you go the jarred route, pat them dry before using so they don’t water down the filling.
Q: What’s the best bread for this?
A: A thick, crusty sourdough or rustic white bread is ideal. It needs to hold up to the gooey filling and get nice and crisp on the outside.
Q: Can I make this in the air fryer?
A: Totally. Assemble as usual, then air fry at 375°F for about 6–8 minutes, flipping halfway. Keep an eye on it so the cheese doesn’t try to escape.
Q: Is this super spicy?
A: It can be! Control the heat by removing all the seeds from your jalapeños and using a milder cheese. Or dial it up with extra seeds or even a pinch of cayenne in the mix.
Roasted Jalapeño Popper Grilled Cheese: The Spicy Sandwich You Didn’t Know You Needed
- Total Time: 25 minutes
- Yield: 2 big sandwiches 1x
Description
Take everything you love about jalapeño poppers — the creamy, cheesy, spicy, smoky situation — and smash it between two slices of golden, buttery bread. Now imagine that whole spicy-creamy-crunchy dream getting the grilled cheese treatment. Yeah, we’re doing that. This Roasted Jalapeño Popper Grilled Cheese is what happens when your favorite bar snack and your childhood comfort food decide to make delicious magic together. It’s gooey, it’s bold, it’s got heat and crunch and a kiss of smoke, and it’s absolutely not your average grilled cheese. Honestly? It might just ruin regular grilled cheese for you forever (sorry, not sorry).
Ingredients
For the Filling:
4 oz cream cheese, softened
1/2 cup sharp cheddar cheese, shredded
1/2 cup Monterey Jack or mozzarella, shredded (melty and mild FTW)
2–3 roasted jalapeños, skins peeled, seeds removed, chopped (or keep some seeds if you’re spicy like that)
2 slices cooked bacon, crumbled (optional but highly encouraged)
Pinch of garlic powder
Pinch of smoked paprika (optional, but so good)
For Assembly:
4 slices thick sourdough or your favorite sturdy sandwich bread
2–3 tbsp butter, softened (for the outside of the bread)
Extra shredded cheddar for good measure (trust me)
Instructions
Step 1: Roast Those Jalapeños
If you haven’t roasted your peppers yet, just pop them under the broiler (or over an open flame) until the skins are blackened and blistered all over. Toss them in a bowl and cover it with a plate or plastic wrap for 10 minutes to steam. Peel off the skins, remove the seeds (or leave a few if you like it hot), and chop ’em up.
Step 2: Mix the Cheesy Goodness
In a bowl, stir together the cream cheese, shredded cheddar, Monterey Jack, roasted jalapeños, crumbled bacon (if using), garlic powder, and smoked paprika. Give it a taste. Need more salt? More heat? More bacon? Go ahead and make it perfect for you.
Step 3: Butter and Build
Spread butter on one side of each slice of bread (this is your grilled-cheese crust, so be generous). Flip the slices over and spread a thick, glorious layer of the cheesy jalapeño filling on the inside. If you’re feeling a little unhinged (in the best way), sprinkle a little extra cheddar on top before closing the sandwiches.
Step 4: Grill Like a Pro
Heat a skillet or griddle over medium heat. Place the sandwiches butter-side-down and cook for 3–4 minutes per side, pressing down lightly with a spatula, until the bread is golden and crispy and the cheese is oozing. Keep the heat moderate — you want the inside melted before the outside goes full toast.
Step 5: Let It Rest (Just Kidding — Eat Immediately)
Let the sandwiches sit for 1–2 minutes before slicing (if you can resist), just so everything doesn’t come lava-flowing out. Then cut it in half, get a good cheese pull, and enjoy the best dang grilled cheese you’ve had all year.
Notes
Serve with tomato soup for a spicy, creamy, perfect pairing.
Try it with a drizzle of honey or hot honey for sweet-heat action.
Cold beer or fizzy lemonade = a beautiful beverage match.
Add a side of pickles or slaw for crunch and contrast.
- Prep Time: 15 minutes
- Cook Time: 10 minutes
Nutrition
- Calories: ~520 kcal per serving
- Fat: ~35g
- Carbohydrates: ~35g
- Protein: ~18g