Description
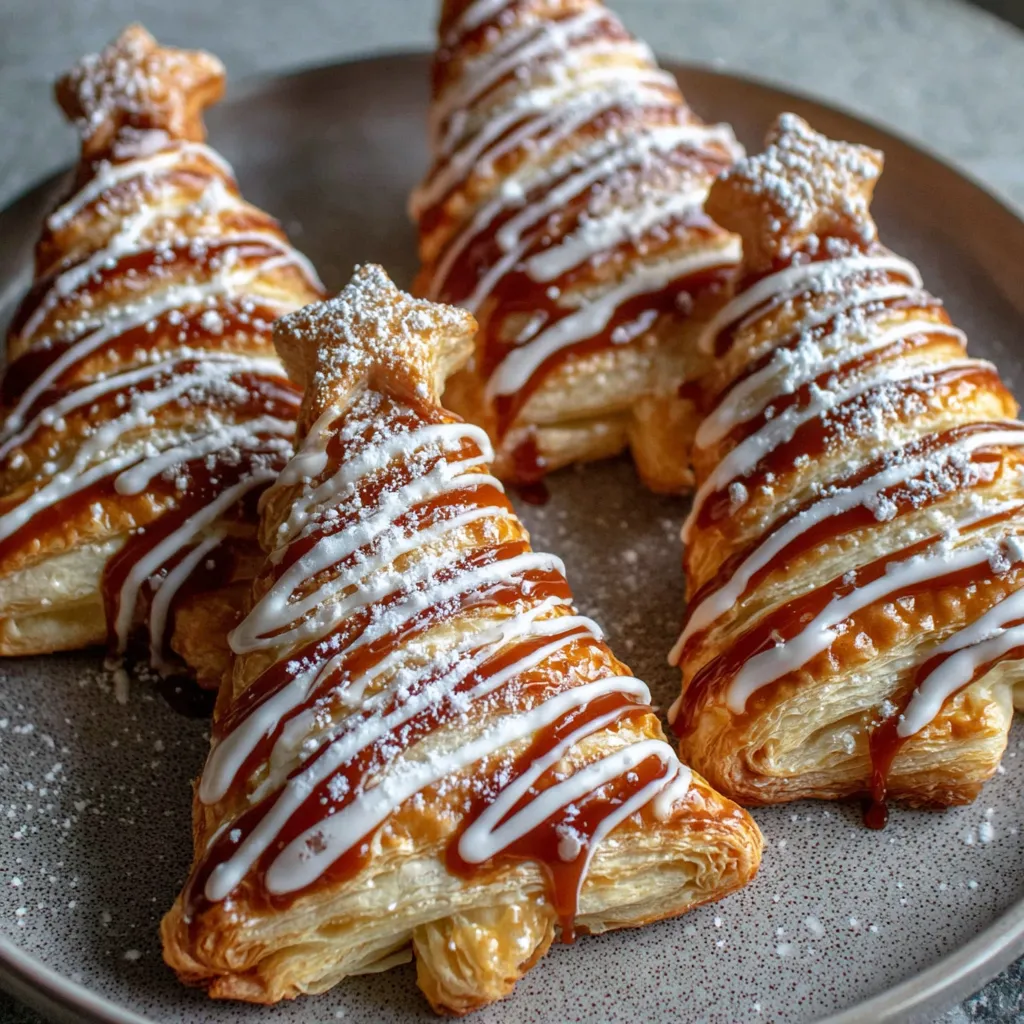
Okay, so imagine if a croissant and a Christmas ornament had a baby that decided to show up at your holiday party looking absolutely adorable and tasting even better. That’s what we’re dealing with here. Puff Pastry Christmas Trees are basically buttery, flaky puff pastry cut into tree shapes, filled with your choice of sweet filling (Nutella, jam, cream cheese, cinnamon sugar—you name it), twisted into gorgeous spirals, and dusted with powdered sugar to look like freshly fallen snow. They look like you spent hours making them, but they’re actually stupid easy. The kind of easy where you feel like you’re cheating but accept the compliments anyway. I made these for a holiday brunch once and people asked if I’d trained in France. Another person tried to commission me to make them for their entire office party. These pastries inspire French bakery assumptions and catering requests.
Ingredients
For the Pastry:
- 2 sheets frozen puff pastry, thawed (17.3 oz package—Pepperidge Farm works great)
- 1 egg, beaten (for egg wash)
- Powdered sugar for dusting
- Optional: Coarse sugar or pearl sugar for sparkle
Filling Options (Choose Your Adventure):
Option 1: Nutella or Chocolate Hazelnut Spread
- 1/2 cup Nutella or chocolate spread
Option 2: Cinnamon Sugar
- 3 tbsp melted butter
- 1/3 cup brown sugar mixed with 1 tbsp cinnamon
Option 3: Cream Cheese
- 4 oz cream cheese, softened
- 2 tbsp sugar
- 1/2 tsp vanilla extract
Option 4: Fruit Preserves
- 1/2 cup raspberry, strawberry, or apricot jam
Option 5: Apple Pie Filling
- 1/2 cup apple pie filling, finely chopped
- Pinch of cinnamon
Optional Add-Ins:
- Mini chocolate chips
- Chopped nuts (pecans, walnuts, almonds)
- Dried cranberries, finely chopped
- White chocolate chips
- Caramel sauce drizzle
For Decoration:
- Powdered sugar for “snow”
- Royal icing drizzle
- Melted chocolate drizzle
- Silver or gold edible glitter
- Red and green sprinkles
- Mini star sprinkles for the “top”
Equipment:
- Rolling pin
- Sharp knife or pizza cutter
- Baking sheet
- Parchment paper or silicone baking mat
- Pastry brush
- Small bowl for egg wash
- Fine-mesh sifter for powdered sugar
Instructions
Step 1: Prep Your Puff Pastry
Remove puff pastry from the freezer and let it thaw according to package directions—usually about 40 minutes at room temperature.
Don’t microwave it or rush this process. Proper thawing is crucial.
The pastry should be cold but pliable, not warm and soft. If it gets too warm, it becomes sticky and impossible to work with.
Keep the second sheet refrigerated while working with the first.
Preheat your oven to 400°F (200°C) while the pastry thaws.
Step 2: Prepare Your Filling
If using Nutella: Just spread it straight from the jar. Easy mode activated.
If using cinnamon sugar: Mix brown sugar and cinnamon in a small bowl. Melt butter and set aside.
If using cream cheese: Beat softened cream cheese with sugar and vanilla until smooth and spreadable.
If using jam: Stir jam until smooth. If it has big fruit chunks, chop them smaller so they spread easier.
Have your filling ready before you roll out the pastry. Puff pastry waits for no one.
Step 3: Roll and Cut the Pastry
Unfold one sheet of puff pastry on a lightly floured surface.
Roll it out gently with a rolling pin to smooth any creases and make it slightly larger—about 10×12 inches.
Use a sharp knife or pizza cutter to cut the sheet lengthwise into strips. For Christmas trees, you want about 6-8 strips per sheet, each about 1.5 inches wide.
Cut the strips at a slight angle to create a longer, more dramatic triangle shape for your trees.
Alternatively, cut the pastry into large triangles (about 4-5 inches at the base) and skip the strip method. Both work.
Step 4: Fill the Strips
For each strip, spread your chosen filling down the center, leaving about 1/4 inch border on each edge.
Don’t overfill or it’ll ooze everywhere during baking. A thin layer is plenty—trust the process.
If using butter and cinnamon sugar: Brush the strip with melted butter first, then sprinkle generously with cinnamon sugar.
If using cream cheese or Nutella: Spread a thin, even layer with a butter knife or offset spatula.
Work quickly—if the pastry gets too warm, pop it in the fridge for 5 minutes before continuing.
Step 5: Create the Tree Shape
Starting at the wide end (the bottom of the tree), make diagonal cuts on both sides of the strip at an angle, about 3/4 inch apart.
You’re creating little branches. Cut from the edge toward the filling, leaving the center section (about 1 inch) intact.
Once all the cuts are made, start twisting. Take one strip and twist it 180 degrees (half a turn). Then take the strip from the opposite side and twist it the same way.
Continue alternating sides, twisting each strip outward to create that crisscross, braided tree effect.
At the top, pinch the end to a point to create the tree tip.
For the tree trunk, you can either use a small rectangle of pastry pressed at the bottom or skip it entirely.
Step 6: Apply Egg Wash
Beat one egg in a small bowl until smooth.
Use a pastry brush to brush the entire surface of each tree with egg wash. This creates that gorgeous golden-brown shine.
Don’t skip the egg wash. It’s the difference between pale, sad pastries and beautiful, golden ones.
Be gentle—don’t deflate the pastry layers by pressing too hard.
Optional: Sprinkle with coarse sugar before baking for extra sparkle and crunch.
Step 7: Bake to Golden Perfection
Line a baking sheet with parchment paper or a silicone baking mat.
Place the trees on the prepared sheet, spacing them about 2 inches apart. They puff up quite a bit.
Bake at 400°F for 15-18 minutes until puffed and deeply golden brown.
Don’t open the oven door during the first 12 minutes—puff pastry is dramatic and will deflate if disturbed.
They should be golden, crispy, and flaky. If they’re pale, give them another 2-3 minutes.
Remove from the oven and let cool on the baking sheet for 5 minutes, then transfer to a wire rack.
Step 8: Decorate Like a Pro
Once the trees are completely cool (or slightly warm if you’re impatient), dust generously with powdered sugar using a fine-mesh sifter.
The powdered sugar creates that “snowy” effect that makes these look magical.
Optional decorations:
- Drizzle with melted chocolate or white chocolate
- Pipe royal icing “garland” down the tree
- Add tiny star sprinkles at the top
- Dust with edible glitter for extra sparkle
- Press a small star candy at the tip before baking
Arrange on a festive platter and prepare for the compliments.
Notes
These are basically perfect as-is, but here are some ideas:
- Serve warm for breakfast with coffee or hot chocolate
- Arrange on a tiered stand as a holiday dessert centerpiece
- Package individually as edible Christmas gifts
- Serve at holiday brunches, cookie exchanges, or parties
- Pair with mulled wine or eggnog for grown-up holiday vibes
- Make a “forest” display on a cake stand dusted with powdered sugar
- Serve with vanilla ice cream or whipped cream for dessert
- Prep Time: 20 minutes
- Cook Time: 18 minutes
Nutrition
- Calories: ~180 kcal
- Sugar: ~6g
- Sodium: ~120mg
- Fat: ~10g
- Carbohydrates: ~20g
- Protein: ~3g