
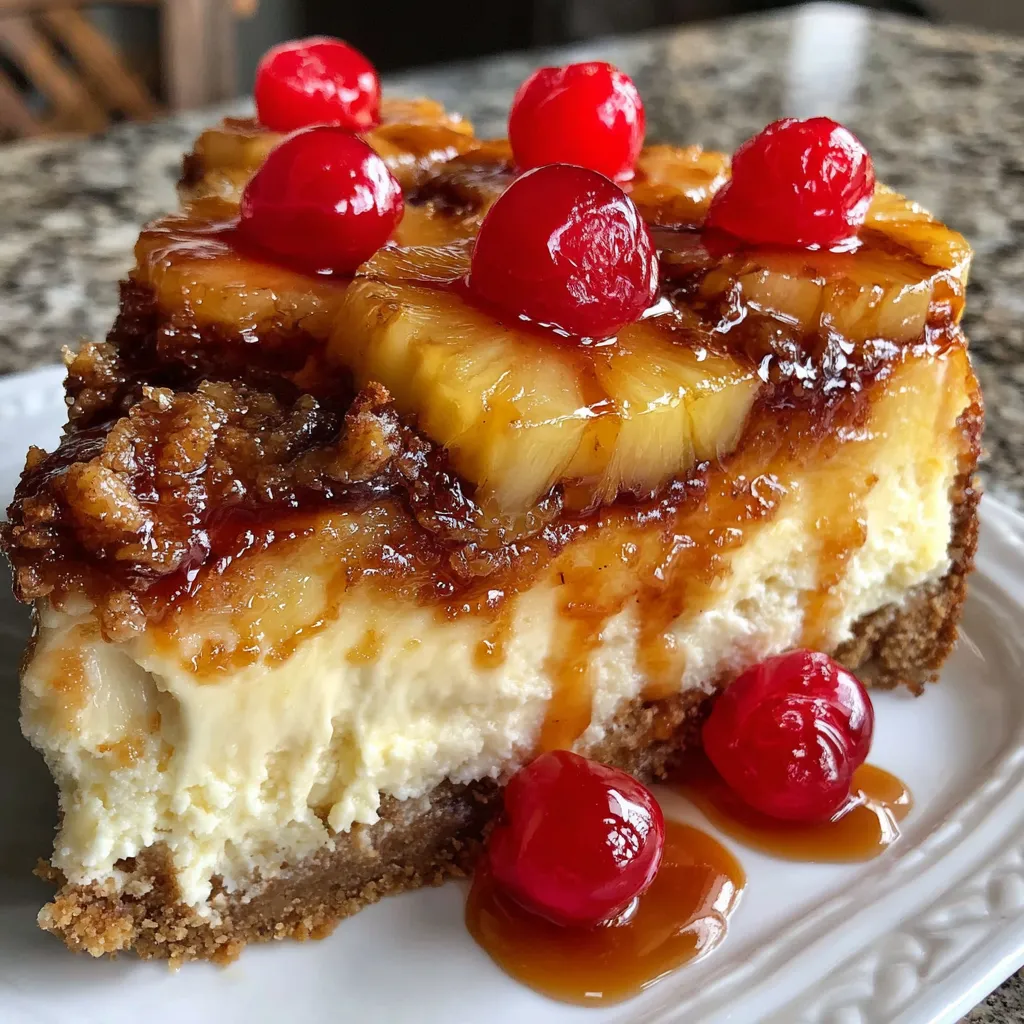
Listen, somebody looked at a classic pineapple upside-down cake and a creamy cheesecake and said “why choose?” and honestly, that person deserves a medal. This is what happens when two iconic desserts have a love child and that child is PERFECT. You’ve got the caramelized pineapple rings with their glossy, buttery glaze situation happening on top, sitting on the creamiest, tangiest cheesecake layer you’ve ever tasted, all held up by a buttery graham cracker crust. It’s retro. It’s tropical. It’s fancy but also grandma’s-house-in-the-best-way. I made this for a summer potluck and three different people asked if I was secretly a professional baker. I’m not, but this dessert makes you LOOK like one. Someone’s aunt took a bite, closed her eyes, and said “this tastes like vacation.” Another guy had two slices and said he was “emotionally compromised.” These are the reactions you want from dessert.
Why You’ll Love This Recipe
Two desserts in one. You get the caramelized fruit situation of pineapple upside-down cake AND the creamy decadence of cheesecake. Best of both worlds.
Looks absolutely stunning. When you flip this thing over, it’s like a dessert magazine cover. Those glossy pineapple rings and cherries? Chef’s kiss.
Not too sweet. The tangy cheesecake balances out the caramelized sugar perfectly. It’s sweet but not tooth-achingly so.
Tropical vibes. One bite and you’re mentally on a beach somewhere. Works for any season but ESPECIALLY summer.
Easier than it looks. People will think you slaved for hours. You’ll know it took maybe 30 minutes of actual work.
Make-ahead superstar. Actually needs to chill overnight, so you HAVE to make it ahead. Perfect for party planning.
The Good Stuff You’ll Need
For the Pineapple Topping:
- 3 tbsp unsalted butter
- 1/2 cup brown sugar, packed (dark or light, your call)
- 1 can (20 oz) pineapple rings, drained and VERY well dried (save about 7-9 rings)
- 7-9 maraschino cherries, drained and dried (the classic red ones for that retro look)
- Optional: 1/4 cup chopped pecans or walnuts if you want some crunch
For the Crust:
- 2 cups graham cracker crumbs (about 16-18 crackers, crushed)
- 1/3 cup granulated sugar
- 6 tbsp unsalted butter, melted
- Pinch of salt
For the Cheesecake:
- 24 oz (three 8-oz blocks) cream cheese, softened to room temp (this is crucial)
- 1 cup granulated sugar
- 3 large eggs, room temperature
- 1 cup sour cream (full-fat, don’t be scared)
- 1/4 cup pineapple juice (from the can you drained)
- 1 tbsp vanilla extract
- 1 tbsp all-purpose flour
- 1/4 tsp salt
Let’s Do This
Step 1: Prep Your Pan
Grab a 9-inch springform pan. This is non-negotiable—you need that removable bottom.
Wrap the OUTSIDE of the pan (bottom and sides) tightly with heavy-duty aluminum foil. Like, really wrap it. Multiple layers. This prevents water from the water bath getting in.
Have a roasting pan ready that’s large enough to hold your springform pan. We’re doing a water bath situation.
Step 2: Make That Caramelized Pineapple Magic
Preheat your oven to 325°F (163°C).
In a small saucepan over medium heat, melt 3 tablespoons of butter. Add the brown sugar and stir until it’s all melty and combined, about 2 minutes. It should look like caramel sauce.
Pour this gorgeous caramel into the bottom of your prepared springform pan. Spread it evenly.
Pat those pineapple rings VERY dry with paper towels. Like, obsessively dry. Arrange them in a single layer over the caramel—you should fit about 7-9 rings depending on how you arrange them. Overlap slightly if needed.
Place a cherry in the center of each pineapple ring (classic move). If you’re using nuts, sprinkle them in the gaps.
Set this aside. Admire how pretty it already looks.
Step 3: Build the Crust
In a medium bowl, mix graham cracker crumbs, 1/3 cup sugar, melted butter, and a pinch of salt until it looks like wet sand.
Press this mixture FIRMLY over the pineapple layer. Use the bottom of a measuring cup to really pack it down. You want it compact.
Get into the edges too. A firm, even crust is key.
Step 4: Make the Cheesecake Filling
In a large bowl (or stand mixer), beat the softened cream cheese on medium speed for 3-4 minutes until it’s completely smooth and fluffy. Scrape down the sides at least twice. Any lumps now = lumps forever.
Add 1 cup sugar and beat for another 2 minutes until light and creamy.
Add eggs ONE AT A TIME, beating on low speed after each addition. Don’t rush this. Each egg should be fully incorporated before adding the next.
Add sour cream, pineapple juice, vanilla, flour, and salt. Mix on low just until combined and smooth. Don’t overmix at this stage.
The batter should be silky, thick, and pourable.
Step 5: Assemble and Water Bath
Pour the cheesecake batter over the crust in the springform pan. Smooth the top with a spatula.
Tap the pan gently on the counter a few times to release any air bubbles.
Place the springform pan in your roasting pan. Put them both in the oven.
Carefully pour hot water into the roasting pan until it comes about halfway up the sides of the springform pan. This water bath keeps the cheesecake from cracking.
Step 6: Bake Low and Slow
Bake at 325°F for 60-75 minutes. The cheesecake is done when the edges are set but the center still has a slight wobble (about 3 inches in diameter). It should jiggle like Jell-O, not liquid.
Turn off the oven, crack the door open slightly, and let the cheesecake sit in there for 1 hour. This gradual cooling helps prevent cracks.
After an hour, remove from the oven and water bath. Let it cool on the counter for another hour.
Step 7: Chill Out
Once cooled to room temperature, cover the pan with plastic wrap (don’t let it touch the surface) and refrigerate for at least 8 hours, preferably overnight.
This chill time is MANDATORY. The cheesecake needs to set completely.
Step 8: The Big Flip
When you’re ready to serve, run a thin knife around the edge of the pan to loosen.
Place a serving plate upside down on top of the springform pan.
Hold them together firmly and flip the whole thing over quickly and confidently. Don’t hesitate—commit to the flip.
Remove the springform pan sides and bottom carefully.
If any pineapple rings stick to the pan, just place them back where they belong. If any caramel is left in the pan, heat it slightly and drizzle it over the top.
Behold your masterpiece.
Serving Suggestions
This is gorgeous enough to serve on its own, but here are some ideas:
- Dollop of fresh whipped cream on each slice
- Drizzle of extra caramel sauce for the truly decadent
- A sprinkle of toasted coconut for extra tropical vibes
- Serve with vanilla ice cream for full dessert overload
- Garnish with fresh mint leaves for a pop of color
- Pair with coffee or tropical drinks like piña coladas
Switch It Up
Mango Upside-Down: Use fresh mango slices instead of pineapple for a different tropical flavor.
Coconut Lover’s Version: Add 1/2 cup shredded coconut to the crust and 1/2 tsp coconut extract to the filling.
Boozy Adult Version: Brush the pineapple rings with rum before arranging them. Add 2 tablespoons of rum to the filling.
Caramel Pecan: Add 1/2 cup chopped pecans to the caramel layer and sprinkle more on top after flipping.
Lime Twist: Add 1 tablespoon lime zest to the filling and use lime juice instead of pineapple juice for a more tangy version.
Chocolate Drizzle: After flipping, drizzle melted dark chocolate over the pineapple rings.
Mini Versions: Make these in muffin tins for individual servings. Reduce baking time to 25-30 minutes.
Make-Ahead Tips
This is basically DESIGNED to be made ahead, which makes it perfect for entertaining.
- The day before: Make the entire cheesecake, let it chill overnight. Flip it an hour before serving.
- Two days ahead: Totally fine. Keep covered in the fridge. The flavors actually deepen.
- The crust: Can be made and pressed into the pan up to 2 days ahead. Cover and refrigerate.
- Freezing: Bake and chill completely, then freeze BEFORE flipping for up to 1 month. Thaw overnight in the fridge, then flip and serve.
Why This Works So Damn Well
The magic of this dessert is all about balance and technique. Cheesecakes are notoriously finicky, but the water bath is your secret weapon—it provides gentle, even heat that prevents cracking and creates that silky texture.
The pineapple caramelizes in the oven, which concentrates its flavor and creates that gorgeous glossy coating. The brown sugar melts into a butterscotch-like sauce that seeps into the cheesecake slightly, creating pockets of caramel flavor.
The graham cracker crust acts as a buffer between the wet caramel and the creamy filling, preventing sogginess while adding that classic cheesecake crunch. Using sour cream in the filling adds tanginess that cuts through the richness and balances the sweet pineapple perfectly.
The make-ahead nature isn’t just convenient—cheesecakes genuinely taste better after chilling overnight. The flavors meld, the texture becomes creamier, and everything just settles into perfection.
When to Make This
Summer BBQs: Tropical flavors scream summer. Plus, it’s already chilled and ready.
Retro Dinner Parties: This is vintage cool. Very mid-century modern vibes.
Easter or Spring Celebrations: Bright, cheerful, and impressive on a dessert table.
Potlucks: Make this and you’ll be invited to every future gathering. It travels well and serves a crowd.
Birthday Alternative: Skip the regular cake. This is way more interesting.
Just Because You Want Something Amazing: Valid reason. No special occasion required.
Questions People Actually Ask
Q: Can I skip the water bath? A: You CAN, but your cheesecake might crack and the texture won’t be as creamy. The water bath is worth it, I promise.
Q: My cheesecake cracked. Is it ruined? A: Nope! Once you flip it, any cracks are on the bottom. No one will ever know. That’s the beauty of the upside-down situation.
Q: Can I use fresh pineapple instead of canned? A: Yes, but canned is actually better here. It’s already the perfect sweetness and texture. Fresh pineapple can be too acidic and wet.
Q: The pineapple stuck to the pan when I flipped it. Now what? A: Don’t panic. Just carefully remove the stuck pieces and place them back on top. Use any leftover caramel to “glue” them back on. Totally fixable.
Q: How do I know when the cheesecake is done? A: The edges should be set, but the center should still wobble slightly. It will firm up as it cools. An instant-read thermometer should read 150°F in the center.
Q: Can I make this without a springform pan? A: Not really. You need the removable bottom to flip it successfully. Springform pans are worth the investment if you make cheesecakes or upside-down cakes.
Q: Why is my crust soggy? A: Your pineapple rings weren’t dry enough. Always pat them very dry before arranging them. Also, make sure your crust is firmly packed.
Q: Can I use low-fat cream cheese? A: Please don’t. Full-fat cream cheese is essential for that creamy texture. Low-fat will make it grainy and sad.
Print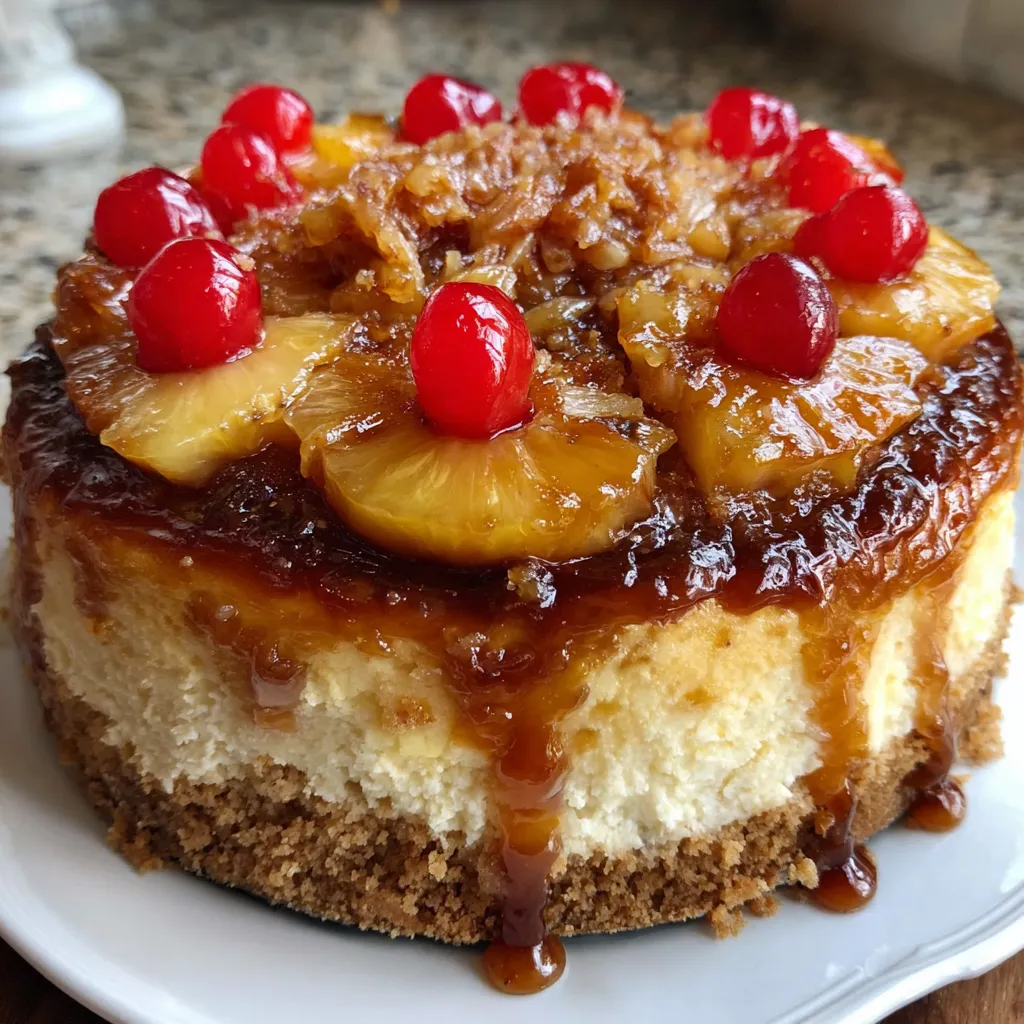
Pineapple Upside-Down Cheesecake
- Total Time: 1 hour 40 minutes
- Yield: 12–14 slices 1x
Description
Listen, somebody looked at a classic pineapple upside-down cake and a creamy cheesecake and said “why choose?” and honestly, that person deserves a medal. This is what happens when two iconic desserts have a love child and that child is PERFECT. You’ve got the caramelized pineapple rings with their glossy, buttery glaze situation happening on top, sitting on the creamiest, tangiest cheesecake layer you’ve ever tasted, all held up by a buttery graham cracker crust. It’s retro. It’s tropical. It’s fancy but also grandma’s-house-in-the-best-way. I made this for a summer potluck and three different people asked if I was secretly a professional baker. I’m not, but this dessert makes you LOOK like one. Someone’s aunt took a bite, closed her eyes, and said “this tastes like vacation.” Another guy had two slices and said he was “emotionally compromised.” These are the reactions you want from dessert.
Ingredients
For the Pineapple Topping:
- 3 tbsp unsalted butter
- 1/2 cup brown sugar, packed (dark or light, your call)
- 1 can (20 oz) pineapple rings, drained and VERY well dried (save about 7–9 rings)
- 7–9 maraschino cherries, drained and dried (the classic red ones for that retro look)
- Optional: 1/4 cup chopped pecans or walnuts if you want some crunch
For the Crust:
- 2 cups graham cracker crumbs (about 16–18 crackers, crushed)
- 1/3 cup granulated sugar
- 6 tbsp unsalted butter, melted
- Pinch of salt
For the Cheesecake:
- 24 oz (three 8-oz blocks) cream cheese, softened to room temp (this is crucial)
- 1 cup granulated sugar
- 3 large eggs, room temperature
- 1 cup sour cream (full-fat, don’t be scared)
- 1/4 cup pineapple juice (from the can you drained)
- 1 tbsp vanilla extract
- 1 tbsp all-purpose flour
- 1/4 tsp salt
Instructions
Grab a 9-inch springform pan. This is non-negotiable—you need that removable bottom.
Wrap the OUTSIDE of the pan (bottom and sides) tightly with heavy-duty aluminum foil. Like, really wrap it. Multiple layers. This prevents water from the water bath getting in.
Have a roasting pan ready that’s large enough to hold your springform pan. We’re doing a water bath situation.
Preheat your oven to 325°F (163°C).
In a small saucepan over medium heat, melt 3 tablespoons of butter. Add the brown sugar and stir until it’s all melty and combined, about 2 minutes. It should look like caramel sauce.
Pour this gorgeous caramel into the bottom of your prepared springform pan. Spread it evenly.
Pat those pineapple rings VERY dry with paper towels. Like, obsessively dry. Arrange them in a single layer over the caramel—you should fit about 7-9 rings depending on how you arrange them. Overlap slightly if needed.
Place a cherry in the center of each pineapple ring (classic move). If you’re using nuts, sprinkle them in the gaps.
Set this aside. Admire how pretty it already looks.
In a medium bowl, mix graham cracker crumbs, 1/3 cup sugar, melted butter, and a pinch of salt until it looks like wet sand.
Press this mixture FIRMLY over the pineapple layer. Use the bottom of a measuring cup to really pack it down. You want it compact.
Get into the edges too. A firm, even crust is key.
In a large bowl (or stand mixer), beat the softened cream cheese on medium speed for 3-4 minutes until it’s completely smooth and fluffy. Scrape down the sides at least twice. Any lumps now = lumps forever.
Add 1 cup sugar and beat for another 2 minutes until light and creamy.
Add eggs ONE AT A TIME, beating on low speed after each addition. Don’t rush this. Each egg should be fully incorporated before adding the next.
Add sour cream, pineapple juice, vanilla, flour, and salt. Mix on low just until combined and smooth. Don’t overmix at this stage.
The batter should be silky, thick, and pourable.
Pour the cheesecake batter over the crust in the springform pan. Smooth the top with a spatula.
Tap the pan gently on the counter a few times to release any air bubbles.
Place the springform pan in your roasting pan. Put them both in the oven.
Carefully pour hot water into the roasting pan until it comes about halfway up the sides of the springform pan. This water bath keeps the cheesecake from cracking.
Bake at 325°F for 60-75 minutes. The cheesecake is done when the edges are set but the center still has a slight wobble (about 3 inches in diameter). It should jiggle like Jell-O, not liquid.
Turn off the oven, crack the door open slightly, and let the cheesecake sit in there for 1 hour. This gradual cooling helps prevent cracks.
After an hour, remove from the oven and water bath. Let it cool on the counter for another hour.
Once cooled to room temperature, cover the pan with plastic wrap (don’t let it touch the surface) and refrigerate for at least 8 hours, preferably overnight.
This chill time is MANDATORY. The cheesecake needs to set completely.
When you’re ready to serve, run a thin knife around the edge of the pan to loosen.
Place a serving plate upside down on top of the springform pan.
Hold them together firmly and flip the whole thing over quickly and confidently. Don’t hesitate—commit to the flip.
Remove the springform pan sides and bottom carefully.
If any pineapple rings stick to the pan, just place them back where they belong. If any caramel is left in the pan, heat it slightly and drizzle it over the top.
Behold your masterpiece.
Notes
This is gorgeous enough to serve on its own, but here are some ideas:
- Dollop of fresh whipped cream on each slice
- Drizzle of extra caramel sauce for the truly decadent
- A sprinkle of toasted coconut for extra tropical vibes
- Serve with vanilla ice cream for full dessert overload
- Garnish with fresh mint leaves for a pop of color
- Pair with coffee or tropical drinks like piña coladas
- Prep Time: 30 minutes
- Cook Time: 70 minutes
Nutrition
- Calories: ~380 kcal
- Fat: ~22g
- Carbohydrates: ~38g
- Protein: ~7g


