Quick Overview
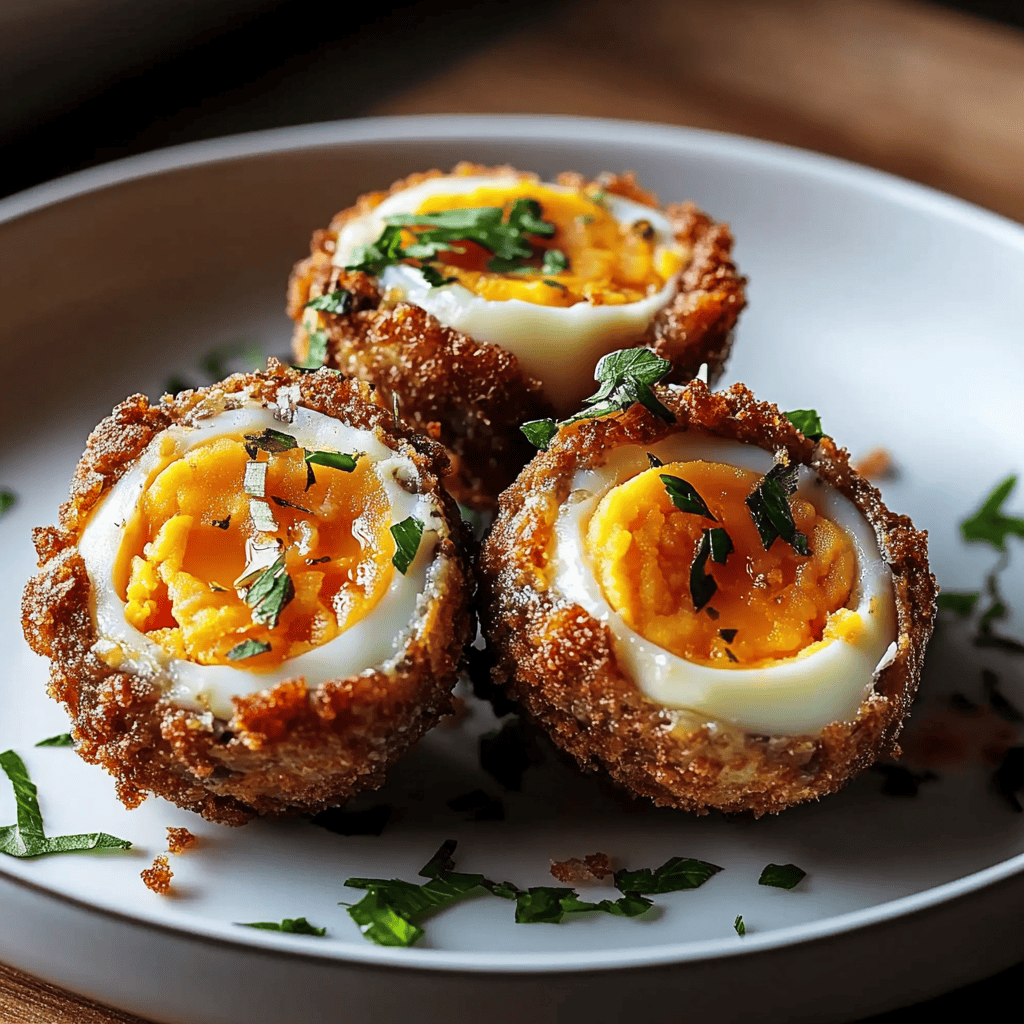
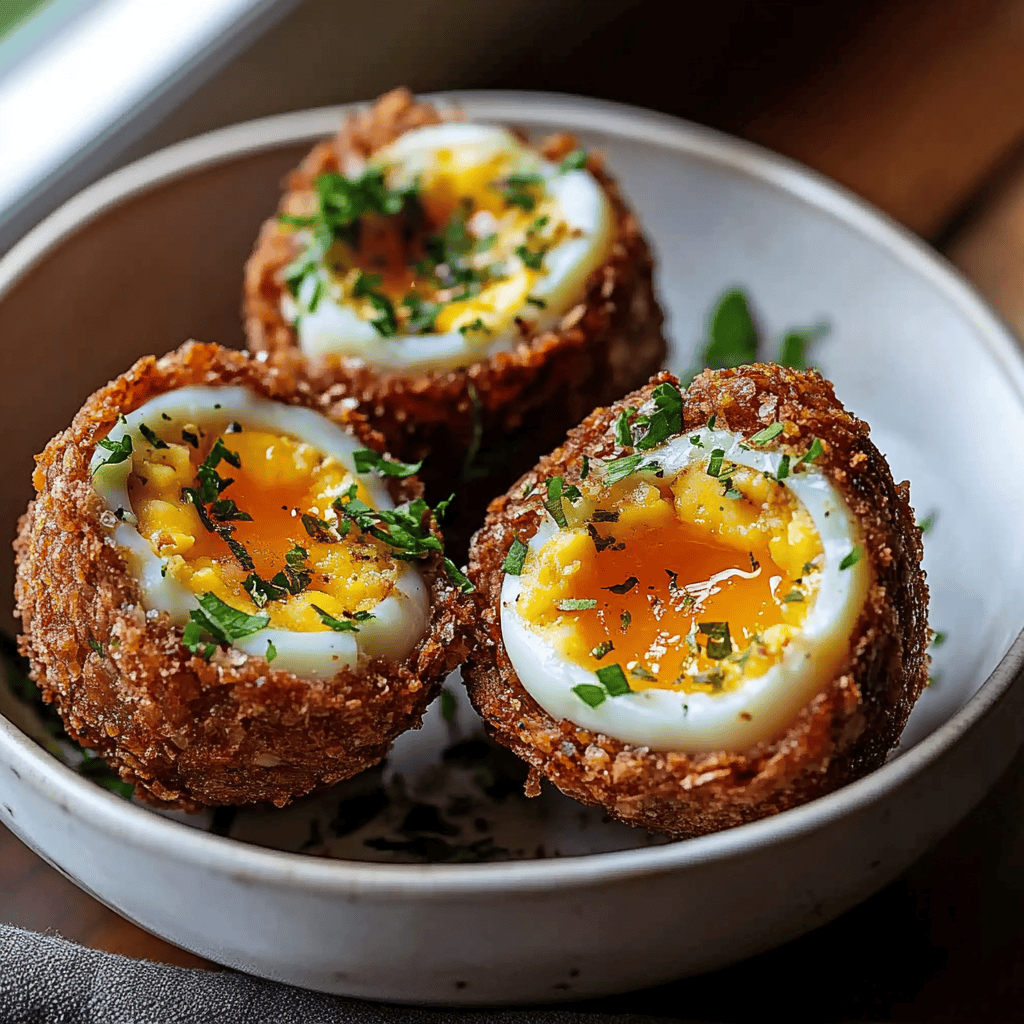
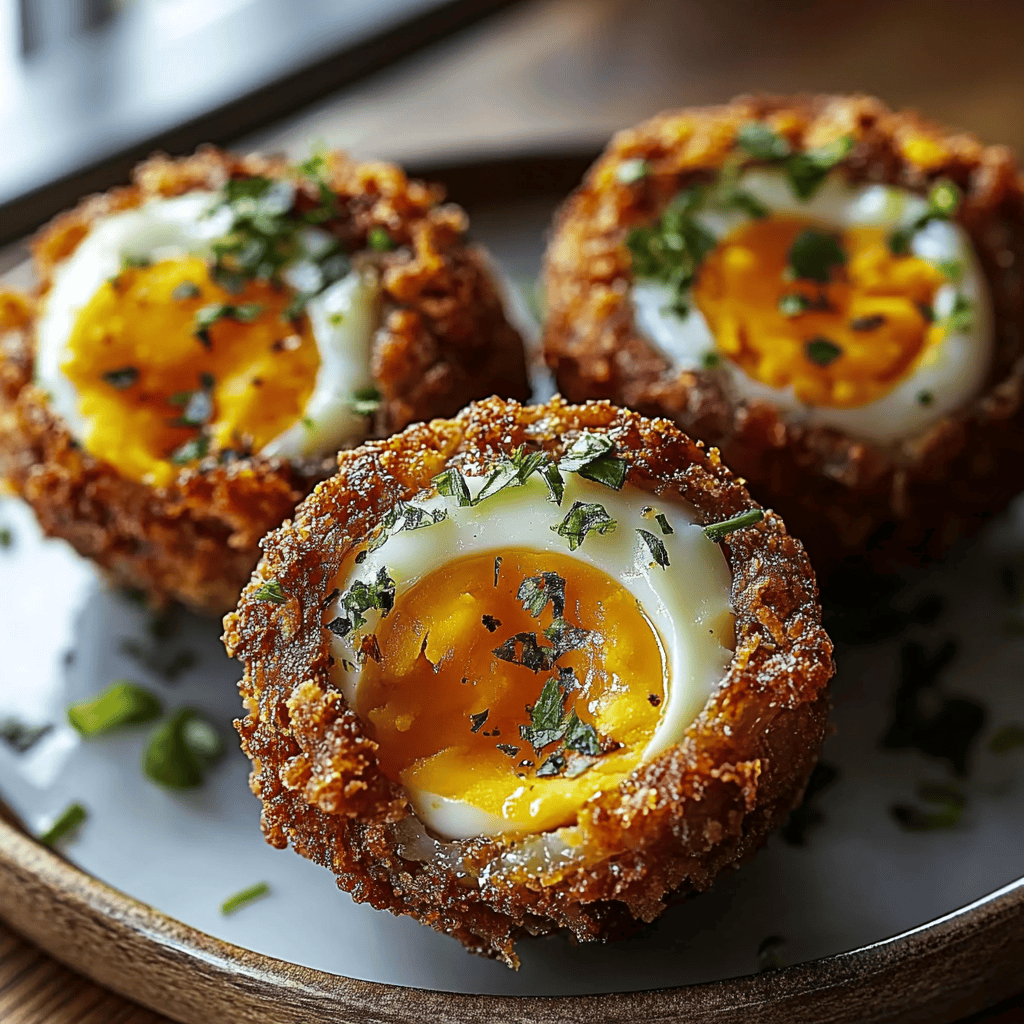
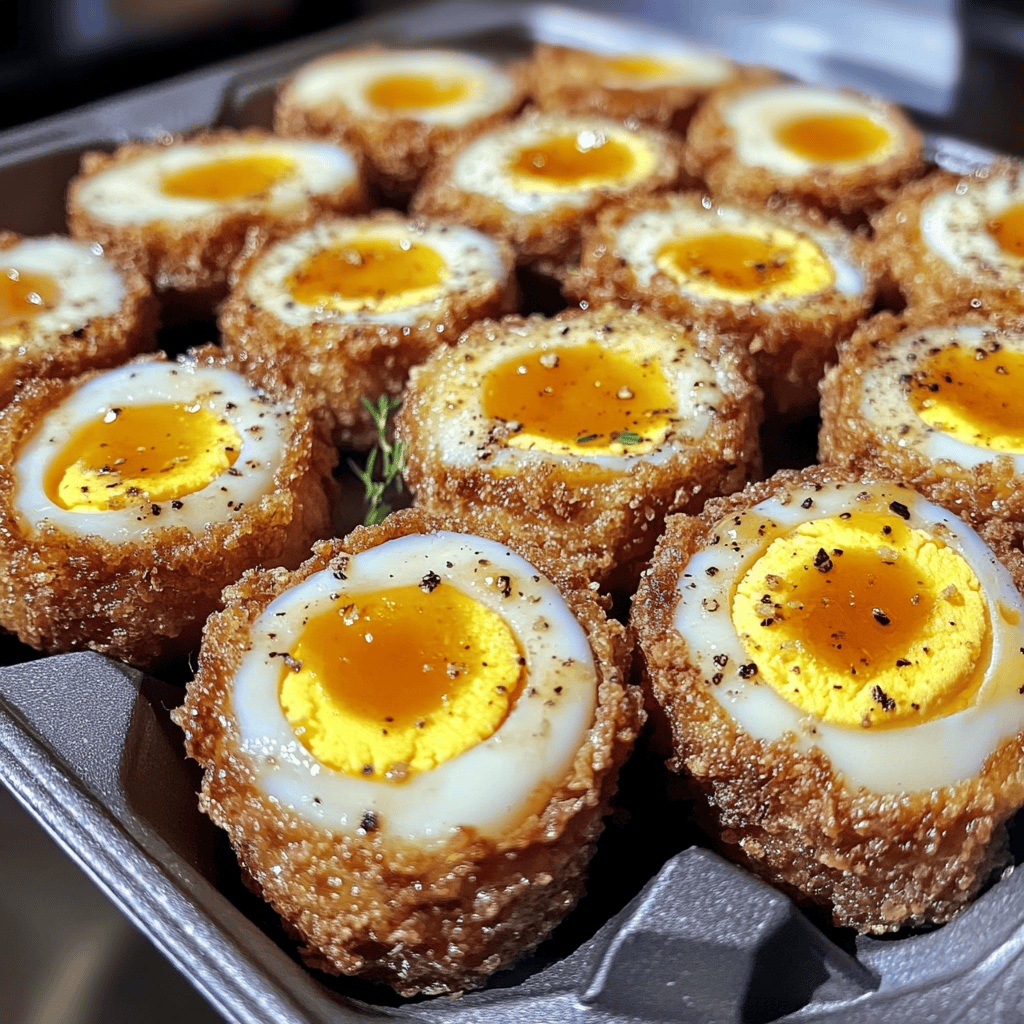
Scotch eggs are a classic British dish that combines hard-boiled eggs wrapped in seasoned sausage meat and coated in breadcrumbs. This delightful snack or meal is perfect for picnics, parties, or a cozy night in. With a crispy exterior and a gooey yolk, these savory treats are sure to impress your family and friends. In this article, we will guide you through making the perfect Scotch eggs from scratch.
Ingredient Breakdown
H4: Eggs
You will need six large eggs for this recipe. The eggs should be at room temperature for better cooking results. Boil four of the eggs until they are hard-boiled (about 8-10 minutes), while keeping the other two raw for wrapping the sausage meat.
H4: Sausage Meat
Use about 500 grams of high-quality sausage meat. You can choose your favorite flavor, like pork or chicken sausage, ensuring it is well-seasoned for the best flavor profile. This will wrap around the boiled eggs.
H4: Breadcrumbs
Prepare 200 grams of fresh breadcrumbs derived from day-old bread. Fresh breadcrumbs provide a wonderful texture and enhance the crispiness of the finished Scotch eggs. You can also use panko breadcrumbs for extra crunch.
H4: Flour
Use about 100 grams of all-purpose flour. This will help in coating the eggs before frying them. It helps the egg adhere to the sausage layer and creates a nice crust when fried.
H4: Seasonings
Gather salt and pepper as needed to season your sausage meat mixture. You may also add herbs like parsley or thyme if desired for added flavor.
H4: Oil
To fry your Scotch eggs properly, you will need approximately 1 liter of vegetable oil or any neutral oil with a high smoke point. This ensures even frying without imparting unwanted flavors to your dish.
Step By step Recipe: Scotch Eggs
H4: Prepare Your Ingredients
Start by gathering all ingredients on your kitchen counter. Ensure that you have your boiled and raw eggs ready along with the sausage meat seasoned with salt and pepper. Preheat your cooking oil in a deep fryer or a large pot over medium heat while preparing other ingredients.
H4: Boil the Eggs
Place four large eggs into a pot filled with cold water. Bring it to a boil over medium heat and cook for about 8-10 minutes until hard-boiled. Once done, transfer them into an ice bath to halt cooking and cool them down quickly.
H4: Peel the Boiled Eggs
After cooling in the ice bath for about five minutes, carefully tap each egg on a hard surface to crack the shell gently. Roll them between your hands to loosen up the shell and peel under running water if necessary to remove any stubborn bits of shell.
H4: Wrap Each Egg
Take a portion of sausage meat (about 100 grams) and flatten it into a disc shape on parchment paper or plastic wrap. Place one boiled egg in the center and mold the sausage around it evenly until fully covered. Repeat this process with all four boiled eggs.
H4: Coat with Flour
Once all wrapped, take each sausage-wrapped egg and roll it gently in flour until evenly coated. Shake off any excess flour before moving on to the next step; this ensures better adherence of breadcrumbs later on.
H4: Dip in Egg Wash
Beat two raw eggs in a bowl until well combined—this will be used as an egg wash for coating your Scotch eggs. Dip each floured egg into this mixture thoroughly so that it’s completely covered before proceeding to coat with breadcrumbs.
H4: Coat with Breadcrumbs
Roll each dipped egg into fresh breadcrumbs until fully covered on all sides; press gently to ensure they stick well during frying. Set aside on a plate while preparing to fry them all at once.
H4: Fry Your Scotch Eggs
Carefully drop each coated Scotch egg into hot oil (around 180°C/350°F) using tongs or a slotted spoon—fry them in batches if necessary without overcrowding! Cook until golden brown (about 5-7 minutes) turning occasionally for even cooking throughout.
H4: Drain Excess Oil
Once perfectly golden brown, remove them from oil using slotted spoon and place onto paper towels laid out on a plate; this allows excess oil to drain off while keeping them crispy!

Serving and Storing Tips
H4: Serving Suggestions
Serve your homemade Scotch eggs warm alongside mustard or chutney for dipping! They pair excellently with a fresh salad or pickles too! Enjoy these delightful snacks as an appetizer during gatherings or as part of lunchboxes!
H4: Storage Guidelines
If you have leftovers, let them cool completely before storing them in an airtight container in the refrigerator; they will last up to three days! For longer storage durations, consider freezing un-fried Scotch eggs; simply thaw overnight before frying whenever you’re ready!
By following this comprehensive guide on making traditional Scottish delicacies at home you’ll surely impress everyone around you with these delectable treats! Enjoy every bite!
Mistakes to avoid
One common mistake when making Scotch eggs is using the wrong type of sausage meat. Traditional recipes call for pork sausage, but some may opt for overly seasoned or spiced varieties. This can overpower the delicate flavor of the egg. Always choose a fresh and simple sausage blend for balance.
Another frequent error is not cooking the eggs properly. It’s essential to achieve that perfect soft-boiled texture, which means cooking the eggs for about six minutes. Overcooking will yield hard yolks, losing that creamy richness that makes Scotch eggs delightful.
Failing to wrap the egg thoroughly with sausage meat can lead to uneven cooking. Ensure you encase the egg completely without any gaps, as this helps maintain moisture and flavor. Thin spots may result in dry bites.
Many home cooks skip the chilling step after boiling the eggs. Chilling them helps firm up the whites, making them easier to handle during assembly. Neglecting this step can result in breakage and messy coating.
Finally, avoid frying at too high a temperature. If the oil is too hot, the outside may brown quickly while the inside remains undercooked. Aim for a medium heat and a gentle sizzle for perfectly cooked Scotch eggs.
Tips and tricks
To make perfect Scotch eggs, start with room temperature ingredients. If you chill your boiled eggs in advance, remember to take them out about 15 minutes before wrapping them in sausage meat. Room temperature ingredients help ensure even cooking and a better final texture.
When selecting your sausage meat, consider adding herbs or spices that complement rather than overpower the egg’s flavor. Fresh herbs like parsley or thyme can add a lovely aroma without being overwhelming. You can also mix in some grated cheese for added richness if desired.
For an extra crispy coating, double-dip your Scotch eggs in breadcrumbs. First, coat them lightly in flour, then dip them into beaten egg before rolling in breadcrumbs twice. This method creates a thicker crust that adds texture and crunch when fried.
It’s also crucial to monitor frying time closely. Depending on your stove and oil temperature, it typically takes about 5-7 minutes per Scotch egg for a golden-brown finish. Use a thermometer to ensure the oil stays around 350°F (175°C) for optimal frying conditions.
Lastly, serve your Scotch eggs warm with an array of dipping sauces like mustard or a tangy relish. This enhances their appeal and gives guests options to personalize their experience.
Suggestions for Scotch Eggs
Consider using different types of sausages to create unique flavors in your Scotch eggs. For instance, spicy Italian sausage lends a kick if you prefer something bold, while chicken or turkey sausage offers a leaner alternative without sacrificing taste.
If you’re looking for vegetarian options, try using seasoned mashed potatoes or chickpea mixtures instead of sausage meat. These alternatives provide great texture and absorb spices well, ensuring everyone can enjoy this dish.
Pairing your Scotch eggs with sides can elevate your meal experience; serve them alongside fresh salads or pickled vegetables for added crunch and acidity. A light green salad dressed with vinaigrette works beautifully to cut through the richness of the dish.
Additionally, consider making small batch versions for parties or gatherings by using quail eggs instead of regular ones. Quail eggs lend elegance and make each bite feel special while still delivering that delicious flavor combination you love.
FAQs
What are Scotch Eggs?
Scotch eggs are traditional British snacks consisting of hard-boiled or soft-boiled eggs wrapped in seasoned sausage meat and coated with breadcrumbs before frying or baking. They offer a delightful contrast between crispy exterior and creamy yolk inside.
Can I bake Scotch Eggs instead of frying?
Yes! Baking Scotch eggs is a healthier alternative to frying. Preheat your oven to 400°F (200°C), place coated Scotch eggs on a lined baking sheet, and bake for about 25-30 minutes until golden brown and cooked through.
How do I store leftover Scotch Eggs?
Store leftover Scotch eggs in an airtight container in the refrigerator for up to three days. Reheat them gently in an oven or air fryer before serving again to maintain their crispy coating while ensuring they are heated evenly throughout.
Can I prepare Scotch Eggs ahead of time?
Absolutely! You can prepare Scotch eggs up until they are coated with breadcrumbs and then refrigerate them until you’re ready to fry or bake them later on the same day or within 24 hours for best results.
Are there gluten-free options available?
Yes! To make gluten-free Scotch eggs, substitute regular breadcrumbs with gluten-free alternatives such as crushed cornflakes or gluten-free panko crumbs. Ensure all other ingredients used are also certified gluten-free as needed.
What dipping sauces pair well with Scotch Eggs?
Dipping sauces such as whole grain mustard, spicy ketchup, or tangy salsa verde work wonderfully with Scotch eggs. These sauces add extra flavor layers that enhance every bite while providing contrasting textures.
Summary
In summary, making delicious Scotch eggs involves avoiding common mistakes such as improper cooking times and inadequate wrapping of ingredients. Utilize helpful tips like double-dipping breadcrumbs and experimenting with various sausages or vegetarian options to enhance flavors further. Lastly, enjoy your creation with suitable side dishes and dips for an unforgettable experience!