
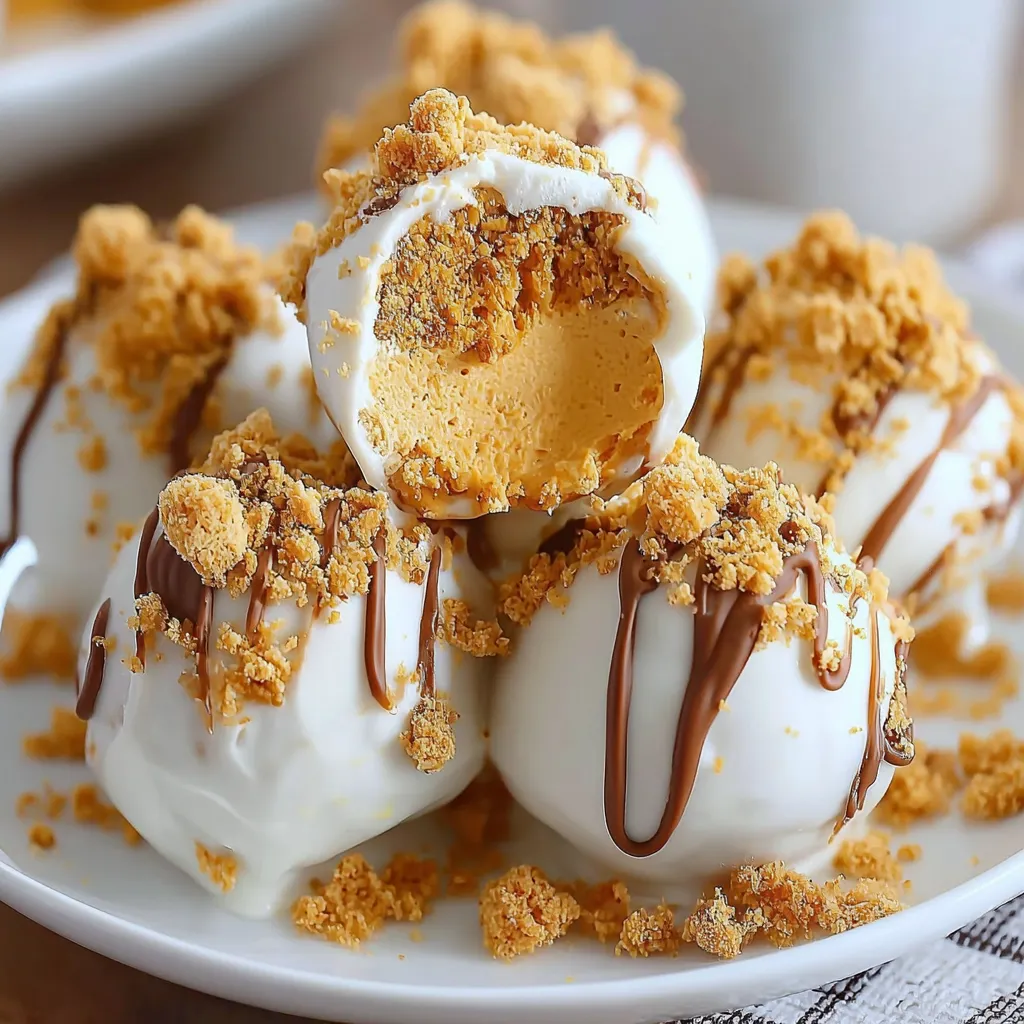
Someone figured out that if you mix cream cheese with pumpkin and spices, roll it into balls, and coat it in crushed graham crackers, you get bite-sized cheesecake that requires zero oven time and tastes like fall distilled into edible form. Then that genius shared it with the internet, and now we all have this trick up our sleeves for every potluck, party, and “I need dessert in 30 minutes” emergency from September through November.
This isn’t some complicated cheesecake that requires a water bath and prayers. This is “mix, roll, coat, chill, devour” level simplicity that somehow results in one of the most addictive desserts you’ll make all season. They’re creamy like cheesecake, spiced like pumpkin pie, crunchy on the outside, and completely impossible to stop eating. It’s everything good about fall dessert with none of the stress.
This is pumpkin spice energy without the coffee. It’s what happens when you stop overthinking dessert and just roll with it. Literally. It’s cheesecake you can eat with your hands, which automatically makes it superior.
Why These Cheesecake Balls Are About to Ruin Your Life (In the Best Way)
- No baking required — Not even a little bit. Your oven can stay off
- 30 minutes active time — The rest is just chilling in the fridge
- Perfectly portable — No plates, no forks, just pop them in your mouth
- Fall flavor bomb — All the pumpkin pie vibes without making a pie
- Make-ahead champion — Better after sitting overnight, actually
- Crowd-pleaser guarantee — Never met anyone who didn’t love these
The Stuff You Need
For the Cheesecake Balls:
- 8 oz cream cheese, softened (don’t skip the softening or you’ll have lumps)
- 1/2 cup pumpkin puree (NOT pumpkin pie filling, just pure pumpkin)
- 1/2 cup powdered sugar
- 1 teaspoon vanilla extract
- 1 1/2 teaspoons pumpkin pie spice (or make your own: 3/4 tsp cinnamon, 1/4 tsp ginger, 1/4 tsp nutmeg, pinch of cloves)
- 1/4 teaspoon salt
For the Coating:
- 1 1/2 cups graham cracker crumbs (about 10-12 graham crackers, crushed)
- 2 tablespoons sugar
- 1/2 teaspoon cinnamon
Optional But Highly Recommended:
- White chocolate chips for drizzling
- Chopped pecans or walnuts mixed into the coating
- Mini chocolate chips mixed into the filling
- Gingersnap cookies instead of graham crackers for coating
- Caramel sauce for drizzling
Special Equipment:
- Hand mixer or stand mixer
- Medium mixing bowl
- Cookie scoop or tablespoon for portioning
- Baking sheet or large plate
- Parchment paper
- Your hands (for rolling)
Let’s Make These Little Balls of Autumn Joy
Step 1: The Cream Cheese Situation
Make sure your cream cheese is actually soft. Not just “took it out of the fridge 5 minutes ago” soft, but genuinely room temperature soft. Leave it out for 30-60 minutes or microwave it for 10-15 seconds. Cold cream cheese equals lumpy filling and nobody has time for that.
Step 2: Mix the Magic
In a medium bowl, beat the softened cream cheese with a hand mixer until it’s smooth and fluffy, about 1-2 minutes. No lumps allowed. Add the pumpkin puree, powdered sugar, vanilla, pumpkin pie spice, and salt. Beat until completely combined and smooth. The mixture should be thick but creamy, like a very thick frosting.
Step 3: Taste Test (Mandatory)
Taste the mixture. Is it sweet enough? Spiced enough? This is your moment to adjust. Add more powdered sugar if you want it sweeter, more pumpkin pie spice if you want it spicier. Get it exactly how you want it because once they’re rolled, there’s no going back.
Step 4: The Chilling (Patience Required)
Cover the bowl and refrigerate for at least 1 hour, or up to overnight. This step is non-negotiable. The mixture needs to firm up enough to roll into balls without making a sticky mess all over your hands. If you try to rush this, you’ll regret it. Trust me. Go watch a show. Do some laundry. Just wait.
Step 5: The Coating Assembly
While the mixture chills, make your coating. Crush those graham crackers into fine crumbs. Put them in a Ziploc bag and smash them with a rolling pin, or pulse them in a food processor. Mix the crumbs with sugar and cinnamon in a shallow bowl. Set it aside and feel proud that you’re being prepared.
Step 6: The Rolling Process
Line a baking sheet with parchment paper. Once the mixture is chilled, use a cookie scoop or tablespoon to scoop out portions. Roll each portion between your palms into a smooth ball, about 1 inch in diameter. This is oddly satisfying. Embrace it. If the mixture gets too soft while you’re working, pop it back in the fridge for 10 minutes.
Step 7: The Coating Operation
Roll each ball in the graham cracker mixture, coating it completely. Press gently so the crumbs actually stick. You want full coverage. Place the coated balls back on the parchment-lined baking sheet. Continue until all the mixture is used. You should get about 20-24 balls, depending on how big you make them.
Step 8: The Final Chill
Refrigerate the coated balls for at least 30 minutes before serving. This helps them set properly and makes them easier to eat without them falling apart. If you’re drizzling with white chocolate (do it, it looks fancy), wait until after this chill.
Step 9: Optional Fancy Drizzle
If you want to get extra, melt some white chocolate chips in the microwave (30-second intervals, stirring between each). Drizzle it over the balls using a fork or transfer it to a Ziploc bag, snip the corner, and squeeze. Let the chocolate set for a few minutes. Congratulations, you just made something that looks professional.
Step 10: The Eating
Pop one in your mouth and experience the creamy, spiced, crunchy perfection. Notice how the graham cracker coating adds texture while the inside is smooth and rich. Feel the pumpkin spice hit your taste buds in that cozy fall way. Immediately reach for another one because one is never enough.
Pro Tips From Someone Who Makes These Every October
Don’t Use Pumpkin Pie Filling: Regular pumpkin puree only. The pie filling has sugar and spices already added and will make these weird.
Soften That Cream Cheese: Cannot stress this enough. Room temperature cream cheese is essential for smooth filling.
Make Them Uniform: Use a cookie scoop for consistent sizing. Nobody likes the tiny ball while someone else got the mega ball.
Keep Your Hands Dry: If the mixture starts sticking to your hands, wipe them off between balls. Wet hands make rolling impossible.
Double Coat If Needed: If you want extra crunch, roll them in the coating twice. More crunch is never wrong.
Chill Between Steps: When in doubt, refrigerate. Cold mixture is easier to work with at every stage.
Size Matters: Don’t make them too big or they’re awkward to eat. Keep them bite-sized or two-bite max.
Switch It Up (Because Creativity Is Fun)
Chocolate Pumpkin Version: Mix 1/4 cup mini chocolate chips into the filling. Roll in crushed Oreos instead of graham crackers.
Maple Pecan: Replace half the powdered sugar with maple syrup. Roll in crushed pecans mixed with graham cracker crumbs.
Gingersnap Coating: Use crushed gingersnap cookies for the coating. The extra ginger spice is incredible.
White Chocolate Center: Press a white chocolate chip into the center of each ball before coating. Hidden treasure.
Caramel Drizzle: Skip the white chocolate, drizzle with caramel sauce instead. Add sea salt flakes on top.
Chai Spice: Replace pumpkin pie spice with chai spice blend. Still autumn, different vibe.
Cookie Butter Swirl: Swirl in 2 tablespoons of cookie butter (Biscoff) before chilling. Next-level flavor.
Make-Ahead Magic
The Filling: Make the filling up to 2 days ahead. Keep it covered in the fridge until you’re ready to roll.
Fully Made: These actually improve after sitting overnight. The flavors meld and the texture gets even better. Make them 1-3 days ahead.
Freeze Them: Freeze uncoated balls for up to 3 months. Thaw slightly, then coat and serve.
Coating in Advance: Mix the graham cracker coating and store it in an airtight container. It’ll stay fresh for a week.
Party Prep: Make these the night before any party. They’re grab-and-go ready and hold up perfectly.
Storage Real Talk
Refrigerated: Keep them in an airtight container in the fridge for up to 5 days. They need to stay cold.
Layered Storage: If stacking them, put parchment paper between layers so they don’t stick together.
Freezer Friendly: Freeze in a single layer on a baking sheet, then transfer to a freezer bag. Thaw in the fridge before eating.
Don’t Leave Out: These are cheesecake balls. They need refrigeration. Don’t let them sit at room temperature for more than an hour.
Perfect Pairings
Hot Coffee: The temperature contrast is perfect. Warm coffee, cold cheesecake ball, pure bliss.
Spiced Cider: Lean into the fall vibes completely.
Whipped Cream: A dollop on the side never hurt anybody.
Ice Cream: Specifically vanilla or cinnamon ice cream. Make it a dessert plate.
Absolutely Nothing: These are perfect as-is. Self-contained autumn happiness.
The Science of No-Bake Cheesecake
Cream cheese has enough structure on its own that when combined with sugar and chilled, it firms up into a texture similar to baked cheesecake. The pumpkin puree adds moisture and flavor without making it too soft. The coating provides textural contrast and helps them hold together. The chilling is crucial – it’s what transforms the mixture from spreadable to rollable to perfect.
The graham cracker coating isn’t just decoration. It absorbs any excess moisture from the pumpkin and creates a barrier that makes these easy to handle. Plus, that cinnamon-sugar crunch against the smooth filling is what makes these addictive.
When to Make These Cheesecake Balls
Thanksgiving Dessert Table: These disappear faster than pie and require way less work.
Fall Potlucks: Easy to transport, no serving utensils needed, universally loved.
Halloween Parties: Make them, put them on a plate, watch them vanish.
Office Treats: Bring these and become the hero of your workplace.
Weekend Baking Project: Simple enough for kids to help, impressive enough for adults to enjoy.
Last-Minute Dessert: When you need something NOW but want it to look like you planned ahead.
Why These Work So Damn Well
No-bake pumpkin cheesecake balls are genius because they combine the best parts of cheesecake (rich, creamy, tangy) with the best parts of pumpkin pie (spiced, cozy, fall-flavored) while eliminating the worst parts of both (baking, crust drama, slicing, serving logistics). They’re portable. They’re portion-controlled. They’re make-ahead friendly. They’re basically perfect.
Rolling them into balls makes them fun. The graham cracker coating adds crunch. The pumpkin spice delivers that seasonal flavor everyone craves from September to December. And the fact that you didn’t turn on your oven means you can make these even when it’s hot outside or when your oven is occupied with actual dinner.
This is what happens when you stop making dessert complicated and just focus on flavor and ease. No water baths. No springform pans. No stress. Just cream cheese, pumpkin, spices, and your hands making something people will beg you to make again.
Questions People Always Ask
Q: Can I use low-fat cream cheese? A: You can, but they won’t be as rich and creamy. Full-fat cream cheese is what makes these taste like actual cheesecake.
Q: My mixture is too soft to roll. What did I do wrong? A: You either didn’t chill it long enough, or you added too much pumpkin. Add a bit more powdered sugar and chill longer.
Q: Can I make these without pumpkin? A: Yes! Replace the pumpkin with more cream cheese and add different flavors like lemon zest, cocoa powder, or berry puree.
Q: Do these really taste like cheesecake? A: Yes. They’re tangy, creamy, and rich just like baked cheesecake, but in convenient ball form.
Q: How far in advance can I make these? A: Up to 3 days before serving. They actually taste better after sitting a day or two.
Q: Can I use homemade pumpkin puree? A: Sure, just make sure it’s thick. If it’s watery, strain it through cheesecloth first or the balls will be too soft.
Q: What if I don’t have pumpkin pie spice? A: Make your own with cinnamon, ginger, nutmeg, and a tiny bit of cloves. Or just use cinnamon and call it a day.
Print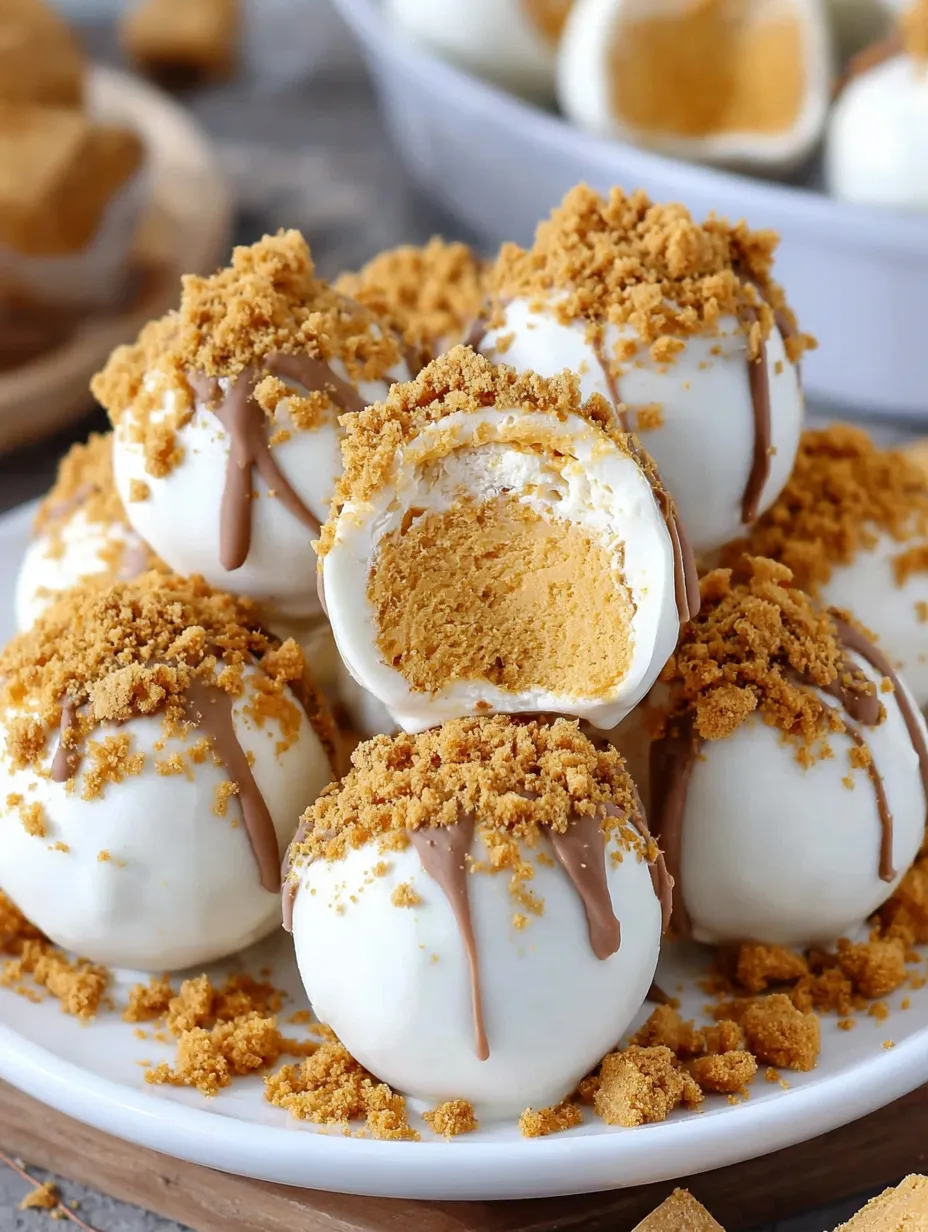
No-Bake Pumpkin Cheesecake Balls
- Total Time: 20 minutes
- Yield: 20–24 balls 1x
Description
Someone figured out that if you mix cream cheese with pumpkin and spices, roll it into balls, and coat it in crushed graham crackers, you get bite-sized cheesecake that requires zero oven time and tastes like fall distilled into edible form. Then that genius shared it with the internet, and now we all have this trick up our sleeves for every potluck, party, and “I need dessert in 30 minutes” emergency from September through November.
This isn’t some complicated cheesecake that requires a water bath and prayers. This is “mix, roll, coat, chill, devour” level simplicity that somehow results in one of the most addictive desserts you’ll make all season. They’re creamy like cheesecake, spiced like pumpkin pie, crunchy on the outside, and completely impossible to stop eating. It’s everything good about fall dessert with none of the stress.
This is pumpkin spice energy without the coffee. It’s what happens when you stop overthinking dessert and just roll with it. Literally. It’s cheesecake you can eat with your hands, which automatically makes it superior.
Ingredients
For the Cheesecake Balls:
- 8 oz cream cheese, softened (don’t skip the softening or you’ll have lumps)
- 1/2 cup pumpkin puree (NOT pumpkin pie filling, just pure pumpkin)
- 1/2 cup powdered sugar
- 1 teaspoon vanilla extract
- 1 1/2 teaspoons pumpkin pie spice (or make your own: 3/4 tsp cinnamon, 1/4 tsp ginger, 1/4 tsp nutmeg, pinch of cloves)
- 1/4 teaspoon salt
For the Coating:
- 1 1/2 cups graham cracker crumbs (about 10–12 graham crackers, crushed)
- 2 tablespoons sugar
- 1/2 teaspoon cinnamon
Optional But Highly Recommended:
- White chocolate chips for drizzling
- Chopped pecans or walnuts mixed into the coating
- Mini chocolate chips mixed into the filling
- Gingersnap cookies instead of graham crackers for coating
- Caramel sauce for drizzling
Special Equipment:
- Hand mixer or stand mixer
- Medium mixing bowl
- Cookie scoop or tablespoon for portioning
- Baking sheet or large plate
- Parchment paper
- Your hands (for rolling)
Instructions
Make sure your cream cheese is actually soft. Not just “took it out of the fridge 5 minutes ago” soft, but genuinely room temperature soft. Leave it out for 30-60 minutes or microwave it for 10-15 seconds. Cold cream cheese equals lumpy filling and nobody has time for that.
In a medium bowl, beat the softened cream cheese with a hand mixer until it’s smooth and fluffy, about 1-2 minutes. No lumps allowed. Add the pumpkin puree, powdered sugar, vanilla, pumpkin pie spice, and salt. Beat until completely combined and smooth. The mixture should be thick but creamy, like a very thick frosting.
Taste the mixture. Is it sweet enough? Spiced enough? This is your moment to adjust. Add more powdered sugar if you want it sweeter, more pumpkin pie spice if you want it spicier. Get it exactly how you want it because once they’re rolled, there’s no going back.
Cover the bowl and refrigerate for at least 1 hour, or up to overnight. This step is non-negotiable. The mixture needs to firm up enough to roll into balls without making a sticky mess all over your hands. If you try to rush this, you’ll regret it. Trust me. Go watch a show. Do some laundry. Just wait.
While the mixture chills, make your coating. Crush those graham crackers into fine crumbs. Put them in a Ziploc bag and smash them with a rolling pin, or pulse them in a food processor. Mix the crumbs with sugar and cinnamon in a shallow bowl. Set it aside and feel proud that you’re being prepared.
Line a baking sheet with parchment paper. Once the mixture is chilled, use a cookie scoop or tablespoon to scoop out portions. Roll each portion between your palms into a smooth ball, about 1 inch in diameter. This is oddly satisfying. Embrace it. If the mixture gets too soft while you’re working, pop it back in the fridge for 10 minutes.
Roll each ball in the graham cracker mixture, coating it completely. Press gently so the crumbs actually stick. You want full coverage. Place the coated balls back on the parchment-lined baking sheet. Continue until all the mixture is used. You should get about 20-24 balls, depending on how big you make them.
Refrigerate the coated balls for at least 30 minutes before serving. This helps them set properly and makes them easier to eat without them falling apart. If you’re drizzling with white chocolate (do it, it looks fancy), wait until after this chill.
If you want to get extra, melt some white chocolate chips in the microwave (30-second intervals, stirring between each). Drizzle it over the balls using a fork or transfer it to a Ziploc bag, snip the corner, and squeeze. Let the chocolate set for a few minutes. Congratulations, you just made something that looks professional.
Pop one in your mouth and experience the creamy, spiced, crunchy perfection. Notice how the graham cracker coating adds texture while the inside is smooth and rich. Feel the pumpkin spice hit your taste buds in that cozy fall way. Immediately reach for another one because one is never enough.
Notes
Don’t Use Pumpkin Pie Filling: Regular pumpkin puree only. The pie filling has sugar and spices already added and will make these weird.
Soften That Cream Cheese: Cannot stress this enough. Room temperature cream cheese is essential for smooth filling.
Make Them Uniform: Use a cookie scoop for consistent sizing. Nobody likes the tiny ball while someone else got the mega ball.
Keep Your Hands Dry: If the mixture starts sticking to your hands, wipe them off between balls. Wet hands make rolling impossible.
Double Coat If Needed: If you want extra crunch, roll them in the coating twice. More crunch is never wrong.
Chill Between Steps: When in doubt, refrigerate. Cold mixture is easier to work with at every stage.
- Prep Time: 20 minutes
Nutrition
- Calories: ~75 kcal
- Fat: ~4g
- Carbohydrates: ~8g
- Protein: ~2g


