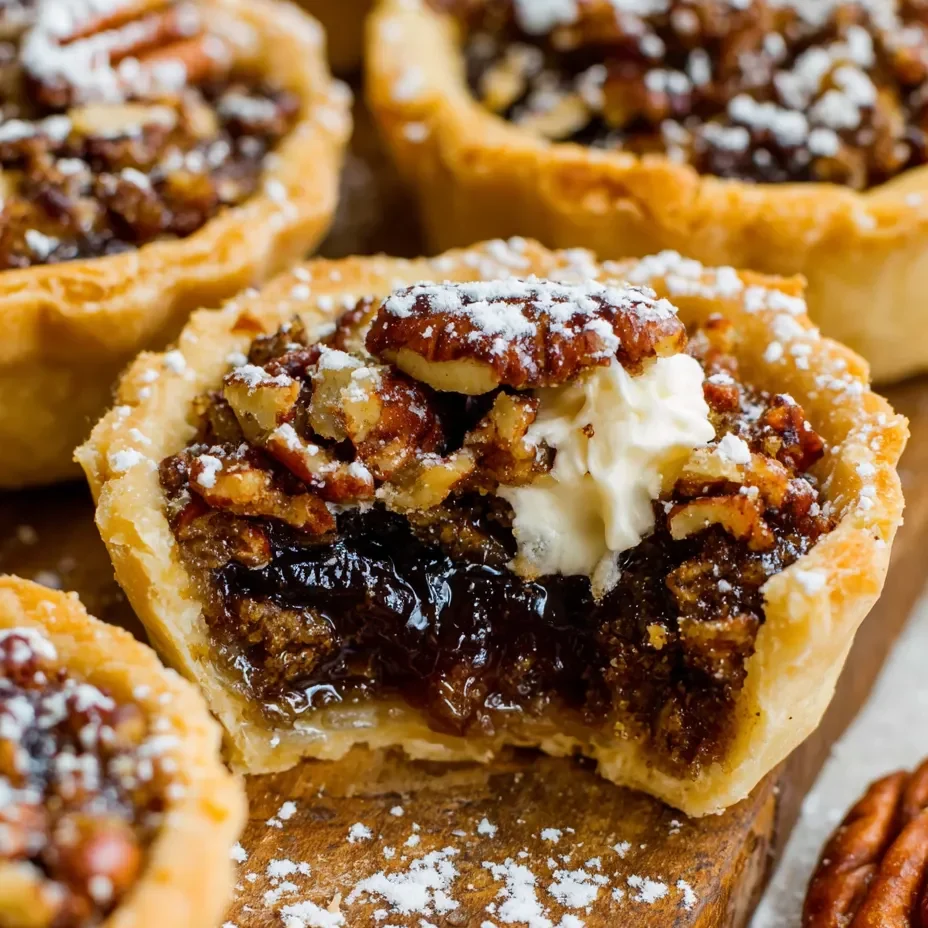
Someone looked at regular pecan pie and thought “this is great, but what if I could eat it with my hands and have a socially acceptable reason to eat multiple servings?” and honestly, that person was thinking ahead. These are buttery, flaky pie crusts filled with gooey, caramel-like pecan filling that’s sweet, nutty, and impossible to stop eating. It’s what happens when you take the best part of Thanksgiving dessert and make it portable, poppable, and perfectly portioned (which means eating three counts as one regular slice, obviously).
This isn’t some complicated pastry project that requires a culinary degree. This is “press dough into muffin tins, make filling, bake, devour” simplicity that results in something that looks bakery-professional but actually took minimal effort. The crust gets crispy and buttery. The filling is that perfect balance of sweet and toasty. The pecans get slightly caramelized on top. It’s everything good about pecan pie but in a form that doesn’t require plates or forks or explaining why you’re cutting yourself a second piece.
This is holiday dessert energy that works year-round. It’s what happens when you stop pretending portion control matters and just make individual pies so everyone can have their own. It’s pie that fits in your hand and your heart.
Why These Mini Pecan Pies Are About to Dominate Every Dessert Table
- Portion-controlled perfection — Individual servings mean no awkward slicing
- Portable and party-friendly — No plates or forks required
- Make-ahead champion — Bake days ahead, they keep beautifully
- Freezer-friendly — Make a double batch, freeze half for emergencies
- Less filling, more crust — Better crust-to-filling ratio than regular pie
- Impossible to mess up — Muffin tins make uniform, professional-looking pies
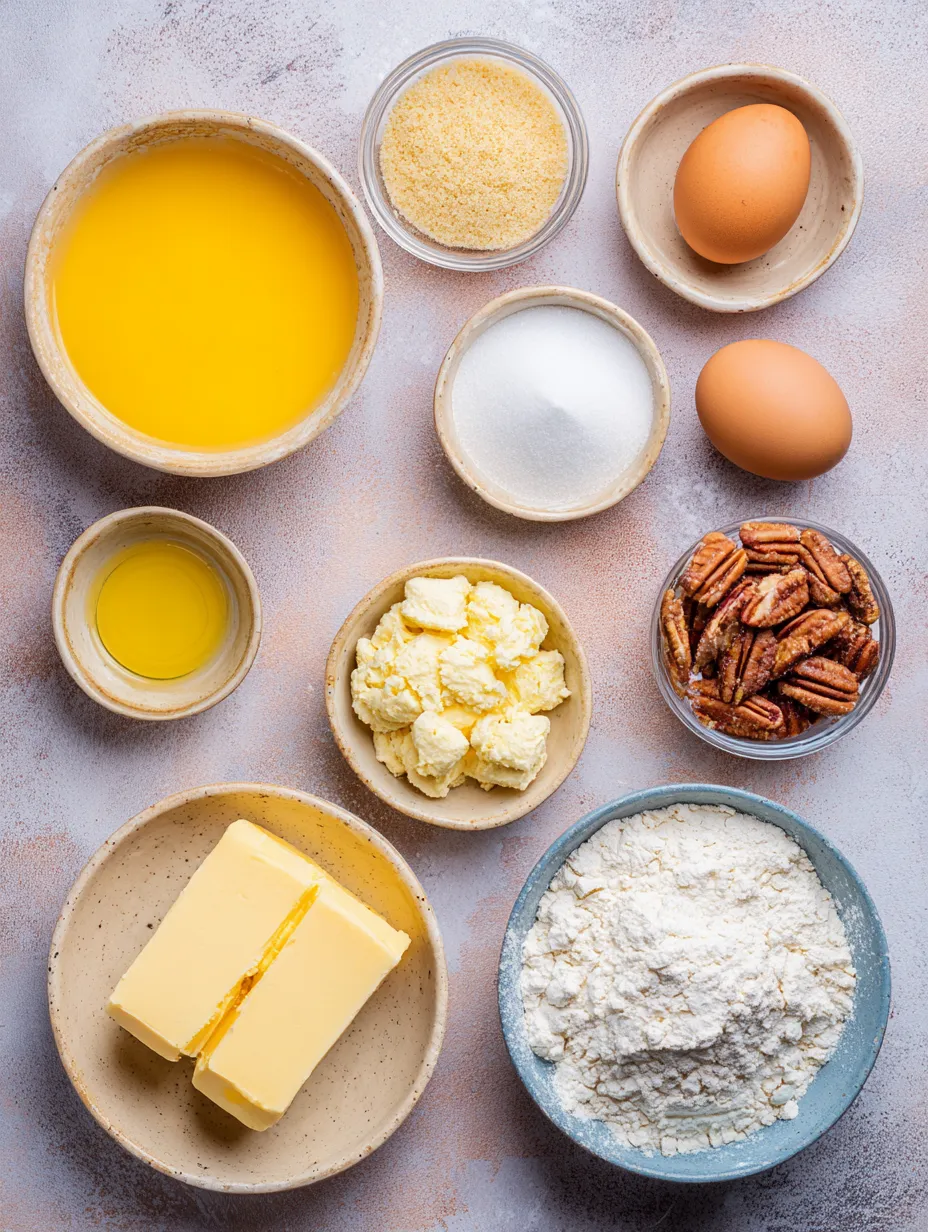
The Stuff You Need
For the Pie Crust:
- 2 1/2 cups all-purpose flour
- 1 tablespoon sugar
- 1 teaspoon salt
- 1 cup (2 sticks) cold unsalted butter, cubed
- 6-8 tablespoons ice water
- OR: 2 store-bought pie crusts (no shame, we’re making this easy)
For the Pecan Filling:
- 3/4 cup light corn syrup (or dark for deeper flavor)
- 1/2 cup packed brown sugar
- 3 tablespoons unsalted butter, melted
- 2 large eggs, lightly beaten
- 1 teaspoon vanilla extract
- 1/4 teaspoon salt
- 1 1/2 cups pecans, roughly chopped (not too fine)
- Optional: 1 tablespoon bourbon (adds depth)
For Topping (Optional but Recommended):
- Whipped cream (fresh or from a can)
- Vanilla ice cream
- Caramel sauce for drizzling
- Pinch of cinnamon
- Flaky sea salt (sweet and salty is life)
Optional Upgrades:
- 1/2 cup chocolate chips mixed into the filling
- 1/4 cup maple syrup replacing some corn syrup
- Toasted pecans (toast before adding for extra flavor)
- Orange zest (adds brightness)
- Cinnamon or pumpkin pie spice in the filling
Special Equipment:
- Standard 12-cup muffin tin
- Rolling pin (if making homemade crust)
- Round cookie cutter or glass (3-4 inches diameter)
- Fork for docking dough
- Mixing bowls
- Whisk
- Cooling rack
Let’s Make These Little Pies That’ll Disappear Faster Than You Can Say “Just One More”
Step 1: The Crust Decision
If you’re making homemade crust (props to you), combine flour, sugar, and salt in a bowl. Cut in the cold butter with a pastry cutter or your fingers until it resembles coarse crumbs. Add ice water 1 tablespoon at a time, mixing until dough just comes together. Divide in half, flatten into disks, wrap in plastic, refrigerate 30 minutes. If you’re using store-bought (smart choice), just let it sit at room temperature for 10 minutes to make it easier to work with.
Step 2: The Muffin Tin Prep
Preheat your oven to 350°F. Generously grease your muffin tin with butter or non-stick spray. Don’t skip this—these pies can stick and you’ll cry when the bottoms tear out. Be thorough. Get in the crevices.
Step 3: The Dough Rolling
On a lightly floured surface, roll out your pie dough to about 1/8 inch thickness. Using a 3-4 inch round cookie cutter or the rim of a glass, cut out 12 circles. You might need to re-roll scraps to get all 12. If your dough gets warm and sticky, pop it in the fridge for 10 minutes.
Step 4: The Crust Pressing
Gently press each dough circle into a muffin cup, making sure it goes up the sides and sits flat on the bottom. Don’t stretch the dough—it’ll shrink back when baking. Press it gently but firmly. If you have excess dough hanging over the edges, that’s fine—it adds a rustic look. Or trim it if you want neat edges.
Step 5: The Docking Process
Use a fork to prick the bottom of each crust 2-3 times. This prevents air bubbles from forming and making your crust puff up. It’s called docking and it’s your insurance against wonky crusts.
Step 6: The Filling Assembly
In a medium bowl, whisk together the corn syrup, brown sugar, melted butter, beaten eggs, vanilla, and salt until smooth and well combined. The mixture should be thick but pourable. If you’re adding bourbon, stir it in now. Taste it (yes, there are raw eggs, but just a tiny taste for quality control).
Step 7: The Pecan Distribution
Place about 2 tablespoons of chopped pecans into each pie crust, distributing them evenly. Don’t overfill—you need room for the liquid filling. If you’re adding chocolate chips, add a few to each cup now.
Step 8: The Filling Pour
Carefully pour the filling mixture over the pecans in each cup, filling them about 3/4 full—not to the very top or they’ll overflow during baking. The pecans will float to the top as they bake, creating that classic pecan pie look. If some sink, that’s fine too.
Step 9: The Baking Process
Bake for 25-30 minutes until the filling is set and slightly puffed. The centers might still look slightly jiggly, but they’ll set as they cool. The crust edges should be golden brown. If the crusts are browning too fast, loosely tent with foil. Don’t overbake or the filling gets tough and the pecans burn.
Step 10: The Cooling (Crucial Step)
Let the pies cool in the muffin tin for 10 minutes. This is important—if you try to remove them immediately, the filling is too liquid and they’ll fall apart. After 10 minutes, carefully run a butter knife around the edges of each pie and gently lift them out onto a cooling rack. Let them cool completely before serving or storing.
Step 11: The Optional Topping
Once cooled (or still slightly warm if you can’t wait), top each mini pie with a dollop of whipped cream, a small scoop of vanilla ice cream, or a drizzle of caramel sauce. Sprinkle with a tiny pinch of cinnamon or flaky sea salt. Make them Instagram-worthy.
Step 12: The Eating Experience
Pick one up (this is handheld pie, embrace it) or use a fork if you’re fancy. Take a bite and notice the buttery, flaky crust giving way to the gooey, sweet filling studded with crunchy pecans. Taste the caramel notes from the brown sugar and corn syrup. Feel the texture contrast between tender crust and toasted nuts. Immediately reach for a second one because these are dangerously good and portion control was never really the plan.
Pro Tips From Someone Who Makes These Every Holiday Season
Cold Butter for Crust: If making homemade, keep that butter COLD. It creates flaky layers.
Don’t Overwork the Dough: Mix just until it comes together. Overworking makes tough crust.
Grease Thoroughly: The filling is sticky. Greasing prevents heartbreak when removing them.
Don’t Overfill: Fill only 3/4 full. They puff up while baking and will overflow if too full.
Watch the Baking Time: Ovens vary. Check at 25 minutes. The filling should be set but with a slight jiggle.
Cool Before Removing: Patience here prevents disasters. Let them set up in the pan first.
Toast the Pecans: Toast them in a dry skillet for 5 minutes before adding. It intensifies the nutty flavor.
Switch It Up (Because Variety Is the Spice of Life)
Chocolate Pecan: Add 1/2 cup chocolate chips to the filling. Chocolate-pecan heaven.
Maple Pecan: Replace half the corn syrup with real maple syrup. Use maple extract instead of vanilla.
Bourbon Pecan: Add 2 tablespoons bourbon to the filling. Very Kentucky, very delicious.
Salted Caramel Pecan: Drizzle caramel sauce in each crust before adding pecans. Top with sea salt.
Pumpkin Pecan: Mix 1/4 cup pumpkin puree and pumpkin pie spice into the filling. Fall in a cup.
Coconut Pecan: Add 1/2 cup sweetened shredded coconut to the filling. German chocolate vibes.
Espresso Pecan: Add 1 tablespoon instant espresso powder to the filling. Coffee and pecans are soulmates.
Make-Ahead Magic
Bake and Store: Make these 2-3 days ahead. Store in airtight containers at room temperature. They keep beautifully.
Freeze Baked Pies: Bake completely, cool, wrap individually in plastic wrap, freeze for up to 3 months. Thaw at room temperature.
Freeze Unbaked: Assemble in the muffin tin, freeze solid, then pop out and store in freezer bags. Bake from frozen, adding 5-10 minutes.
Prep the Components: Make the dough 2 days ahead. Make the filling mixture a day ahead. Assemble and bake when ready.
Storage Real Talk
Room Temperature: Keep in an airtight container for up to 3 days. They don’t need refrigeration due to the sugar content.
Refrigerated: They’ll keep for up to a week in the fridge, but the crust softens slightly.
Freezing: Freeze baked pies for up to 3 months. Thaw and optionally warm in a 300°F oven for 10 minutes.
The Crust Softens: Over time, the filling moisture softens the crust. They’re still delicious, just less crispy.
Perfect Pairings
Vanilla Ice Cream: Cold ice cream, warm pie. Temperature contrast is everything.
Whipped Cream: Light and fluffy against rich and sweet. Classic pairing.
Hot Coffee: The bitterness cuts through the sweetness perfectly.
Bourbon or Whiskey: If you’re making these for adults, a small pour on the side is magic.
Caramel Sauce: Drizzle over the top. More sweet never hurt anybody.
Nothing: These are perfect as-is. Self-contained pie excellence.
The Science of Perfect Pecan Pie Filling
Corn syrup prevents crystallization and creates that smooth, glossy texture. Brown sugar adds molasses depth and caramel notes. Eggs bind everything together and help the filling set as it bakes. The butter adds richness and helps carry flavors.
The pecans float to the top during baking because they’re less dense than the filling mixture. This creates the classic look with nuts on top and gooey filling underneath. Baking at 350°F is the sweet spot—hot enough to set the eggs but not so hot that it curdles or burns.
The filling sets as it cools. That slight jiggle when you remove them from the oven becomes firm and sliceable after cooling. Overbaking makes it tough and grainy instead of smooth and gooey.
When to Make These Mini Pecan Pies
Thanksgiving Dessert: Individual servings mean everyone gets their own pie. No fighting over portions.
Christmas Cookie Trays: Add these to your holiday cookie assortment. They’re the star.
Potluck Perfection: Easy to transport, no cutting required, crowd favorite.
Bake Sales: These sell out immediately. Make extras.
Game Day Dessert: Handheld pies for eating while watching football.
Just Because: You don’t need a reason for pecan pie. Make them anytime.
Why These Work So Damn Well
Mini Pecan Pies work because they improve on the original in several ways. The crust-to-filling ratio is better—more crispy crust in every bite. They’re portion-controlled, which paradoxically makes eating multiple feel justified. They’re portable and don’t require utensils. The individual portions bake more evenly than a full pie.
They’re also just fun. There’s something appealing about miniature versions of classic desserts. They look impressive but are actually easier to make than a full pie—no crimping, no perfect pie crust display, no worrying about soggy bottoms. Just press, fill, bake, eat.
This is what happens when you take a beloved classic and make it more accessible and practical without sacrificing any of the flavor. Sometimes the best innovation is just making things smaller and easier.
Questions People Always Ask
Q: Can I use a different nut? A: Yes! Walnuts work great. So do a mix of pecans and walnuts. Almonds are good too but change the flavor significantly.
Q: My filling overflowed. What did I do wrong? A: You filled them too full. Only fill 3/4 full—they puff up as they bake.
Q: Can I make these in a mini muffin tin? A: Yes! You’ll get about 24-30 mini-mini pies. Reduce baking time to 12-15 minutes.
Q: My crust shrunk during baking. Help? A: You stretched the dough when pressing it in. Press gently without stretching. Also, chilling the shaped crusts for 15 minutes before filling helps.
Q: Can I use a different sweetener? A: Honey or maple syrup can replace some of the corn syrup, but corn syrup creates that signature texture. Don’t replace all of it.
Q: Are these supposed to be gooey or firm? A: Slightly gooey when warm, firmer when cool. The center should be set but not hard.
Q: Can I make these dairy-free? A: Use dairy-free butter and make sure your pie crust is dairy-free. The filling is mostly corn syrup and eggs, so it’s easier to adapt.
Print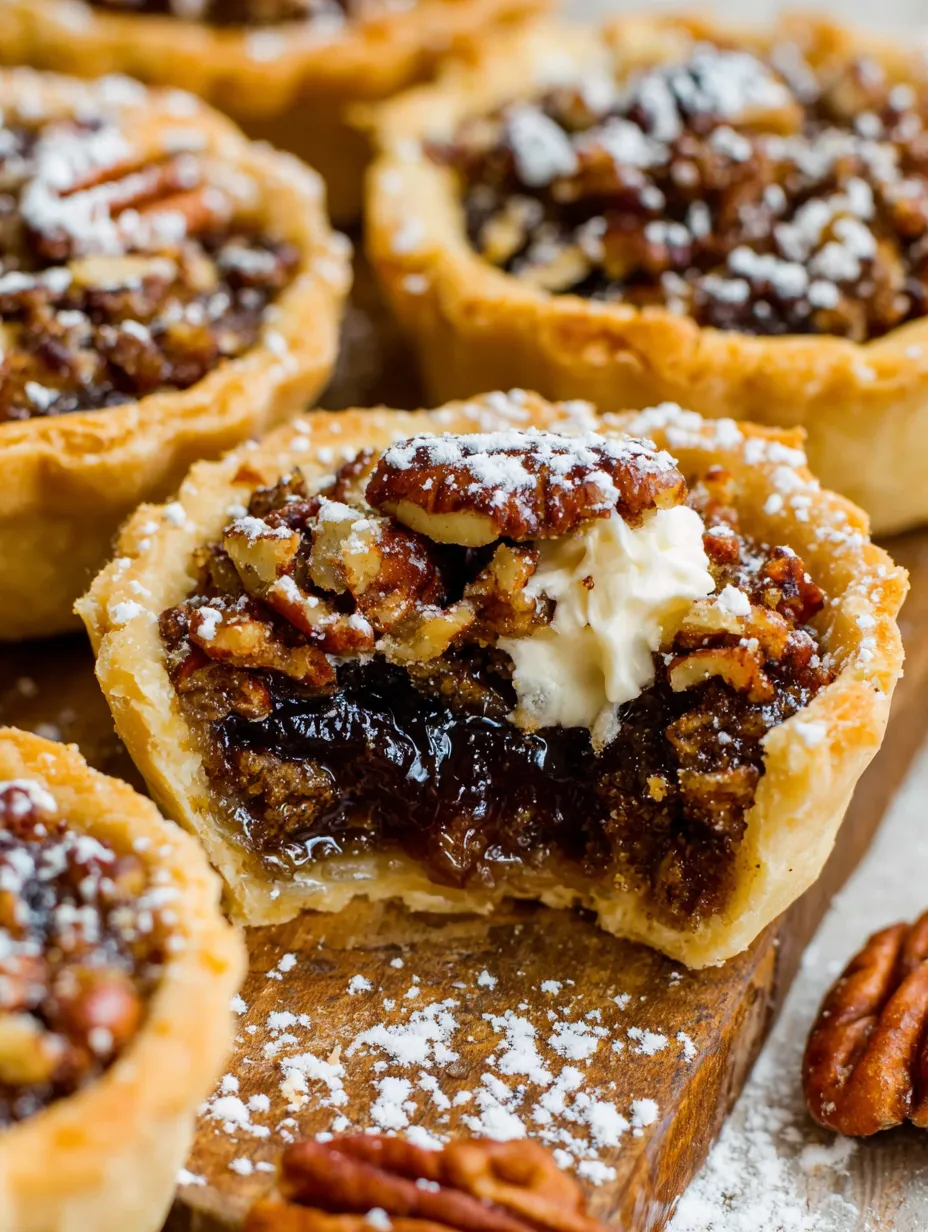
Mini Pecan Pies
- Total Time: 19 minute
- Yield: 12 mini pies 1x
Description
Someone looked at regular pecan pie and thought “this is great, but what if I could eat it with my hands and have a socially acceptable reason to eat multiple servings?” and honestly, that person was thinking ahead. These are buttery, flaky pie crusts filled with gooey, caramel-like pecan filling that’s sweet, nutty, and impossible to stop eating. It’s what happens when you take the best part of Thanksgiving dessert and make it portable, poppable, and perfectly portioned (which means eating three counts as one regular slice, obviously).
This isn’t some complicated pastry project that requires a culinary degree. This is “press dough into muffin tins, make filling, bake, devour” simplicity that results in something that looks bakery-professional but actually took minimal effort. The crust gets crispy and buttery. The filling is that perfect balance of sweet and toasty. The pecans get slightly caramelized on top. It’s everything good about pecan pie but in a form that doesn’t require plates or forks or explaining why you’re cutting yourself a second piece.
This is holiday dessert energy that works year-round. It’s what happens when you stop pretending portion control matters and just make individual pies so everyone can have their own. It’s pie that fits in your hand and your heart.
Ingredients
For the Pie Crust:
- 2 1/2 cups all-purpose flour
- 1 tablespoon sugar
- 1 teaspoon salt
- 1 cup (2 sticks) cold unsalted butter, cubed
- 6–8 tablespoons ice water
- OR: 2 store-bought pie crusts (no shame, we’re making this easy)
For the Pecan Filling:
- 3/4 cup light corn syrup (or dark for deeper flavor)
- 1/2 cup packed brown sugar
- 3 tablespoons unsalted butter, melted
- 2 large eggs, lightly beaten
- 1 teaspoon vanilla extract
- 1/4 teaspoon salt
- 1 1/2 cups pecans, roughly chopped (not too fine)
- Optional: 1 tablespoon bourbon (adds depth)
For Topping (Optional but Recommended):
- Whipped cream (fresh or from a can)
- Vanilla ice cream
- Caramel sauce for drizzling
- Pinch of cinnamon
- Flaky sea salt (sweet and salty is life)
Optional Upgrades:
- 1/2 cup chocolate chips mixed into the filling
- 1/4 cup maple syrup replacing some corn syrup
- Toasted pecans (toast before adding for extra flavor)
- Orange zest (adds brightness)
- Cinnamon or pumpkin pie spice in the filling
Special Equipment:
- Standard 12-cup muffin tin
- Rolling pin (if making homemade crust)
- Round cookie cutter or glass (3-4 inches diameter)
- Fork for docking dough
- Mixing bowls
- Whisk
- Cooling rack
Instructions
If you’re making homemade crust (props to you), combine flour, sugar, and salt in a bowl. Cut in the cold butter with a pastry cutter or your fingers until it resembles coarse crumbs. Add ice water 1 tablespoon at a time, mixing until dough just comes together. Divide in half, flatten into disks, wrap in plastic, refrigerate 30 minutes. If you’re using store-bought (smart choice), just let it sit at room temperature for 10 minutes to make it easier to work with.
Preheat your oven to 350°F. Generously grease your muffin tin with butter or non-stick spray. Don’t skip this—these pies can stick and you’ll cry when the bottoms tear out. Be thorough. Get in the crevices.
On a lightly floured surface, roll out your pie dough to about 1/8 inch thickness. Using a 3-4 inch round cookie cutter or the rim of a glass, cut out 12 circles. You might need to re-roll scraps to get all 12. If your dough gets warm and sticky, pop it in the fridge for 10 minutes.
Gently press each dough circle into a muffin cup, making sure it goes up the sides and sits flat on the bottom. Don’t stretch the dough—it’ll shrink back when baking. Press it gently but firmly. If you have excess dough hanging over the edges, that’s fine—it adds a rustic look. Or trim it if you want neat edges.
Use a fork to prick the bottom of each crust 2-3 times. This prevents air bubbles from forming and making your crust puff up. It’s called docking and it’s your insurance against wonky crusts.
In a medium bowl, whisk together the corn syrup, brown sugar, melted butter, beaten eggs, vanilla, and salt until smooth and well combined. The mixture should be thick but pourable. If you’re adding bourbon, stir it in now. Taste it (yes, there are raw eggs, but just a tiny taste for quality control).
Place about 2 tablespoons of chopped pecans into each pie crust, distributing them evenly. Don’t overfill—you need room for the liquid filling. If you’re adding chocolate chips, add a few to each cup now.
Carefully pour the filling mixture over the pecans in each cup, filling them about 3/4 full—not to the very top or they’ll overflow during baking. The pecans will float to the top as they bake, creating that classic pecan pie look. If some sink, that’s fine too.
Bake for 25-30 minutes until the filling is set and slightly puffed. The centers might still look slightly jiggly, but they’ll set as they cool. The crust edges should be golden brown. If the crusts are browning too fast, loosely tent with foil. Don’t overbake or the filling gets tough and the pecans burn.
Let the pies cool in the muffin tin for 10 minutes. This is important—if you try to remove them immediately, the filling is too liquid and they’ll fall apart. After 10 minutes, carefully run a butter knife around the edges of each pie and gently lift them out onto a cooling rack. Let them cool completely before serving or storing.
Once cooled (or still slightly warm if you can’t wait), top each mini pie with a dollop of whipped cream, a small scoop of vanilla ice cream, or a drizzle of caramel sauce. Sprinkle with a tiny pinch of cinnamon or flaky sea salt. Make them Instagram-worthy.
Pick one up (this is handheld pie, embrace it) or use a fork if you’re fancy. Take a bite and notice the buttery, flaky crust giving way to the gooey, sweet filling studded with crunchy pecans. Taste the caramel notes from the brown sugar and corn syrup. Feel the texture contrast between tender crust and toasted nuts. Immediately reach for a second one because these are dangerously good and portion control was never really the plan.
Notes
Cold Butter for Crust: If making homemade, keep that butter COLD. It creates flaky layers.
Don’t Overwork the Dough: Mix just until it comes together. Overworking makes tough crust.
Grease Thoroughly: The filling is sticky. Greasing prevents heartbreak when removing them.
Don’t Overfill: Fill only 3/4 full. They puff up while baking and will overflow if too full.
Watch the Baking Time: Ovens vary. Check at 25 minutes. The filling should be set but with a slight jiggle.
Cool Before Removing: Patience here prevents disasters. Let them set up in the pan first.
Toast the Pecans: Toast them in a dry skillet for 5 minutes before adding. It intensifies the nutty flavor.
- Prep Time: 20 minutes
- Cook Time: 25-30 minutes
Nutrition
- Calories: ~285 kcal
- Fat: ~16g
- Carbohydrates: ~34g
- Protein: ~3g