What the heck is this?
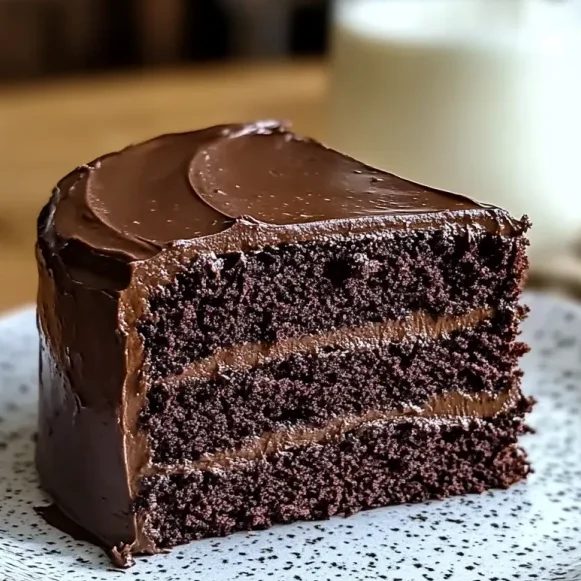
Matilda’s Chocolate Cake is that dreamy, melt-in-your-mouth chocolate cake you didn’t know you needed until now. Think super moist layers, intense cocoa flavor, and a frosting so silky it could make you weak in the knees. Inspired by classic homemade recipes but with a little modern twist, this cake brings all the cozy nostalgia with none of the fuss. Whether it’s a birthday, a casual weeknight craving, or just because you deserve it, this cake is the perfect way to satisfy your chocolate obsession. Spoiler: it’s better than anything from a box mix.
Why You’ll Love This Recipe
- Ridiculously rich chocolate flavor that hits all the right notes.
- Moist and tender crumb that stays fresh for days.
- Easy to make with simple pantry ingredients you probably already have.
- Perfectly balanced — not too sweet, not too bitter.
- Frosting is creamy, smooth, and pairs beautifully with the cake layers.
- Great for celebrations or anytime you want to impress with zero stress.
The Good Stuff You’ll Need
For the Cake:
- 1 and 3/4 cups all-purpose flour
- 3/4 cup unsweetened cocoa powder (use a good quality one for best flavor)
- 1 and 1/2 teaspoons baking powder
- 1 and 1/2 teaspoons baking soda
- 1 teaspoon salt
- 2 cups granulated sugar
- 2 large eggs
- 1 cup whole milk
- 1/2 cup vegetable oil
- 2 teaspoons vanilla extract
- 1 cup boiling water
For the Frosting:
- 1/2 cup unsalted butter, softened
- 2/3 cup unsweetened cocoa powder
- 3 cups powdered sugar
- 1/3 cup whole milk
- 1 teaspoon vanilla extract
Let’s Do This
Step 1: Prep and Mix Dry Stuff
Preheat your oven to 350°F (175°C). Grease and flour two 9-inch round cake pans or line them with parchment paper. In a large bowl, sift together flour, cocoa powder, baking powder, baking soda, and salt. This makes sure your cake will be super light and evenly mixed.
Step 2: Mix Wet Ingredients
In another bowl, beat sugar and eggs together until creamy. Add milk, oil, and vanilla, and mix until smooth.
Step 3: Combine and Add the Magic Water
Gradually add the dry ingredients into the wet, mixing slowly so you don’t end up with a flour cloud. Here’s the trick: carefully stir in the boiling water last. The batter will be thin, but that’s exactly what keeps the cake moist and tender.
Step 4: Bake to Perfection
Divide batter evenly between your prepared pans. Bake for about 30–35 minutes or until a toothpick inserted in the center comes out clean. Let the cakes cool in the pans for 10 minutes, then transfer to wire racks to cool completely before frosting.
Step 5: Make the Frosting
Beat the softened butter and cocoa powder together until smooth. Gradually add powdered sugar alternating with milk, beating until fluffy and spreadable. Stir in vanilla extract for that final flavor boost.
Step 6: Frost and Assemble
Place one cake layer on your serving plate and spread a generous layer of frosting. Top with the second cake layer and frost the top and sides. Use a spatula or knife to create swirls or smooth it out — your call! Chill for 15 minutes if you want a firmer frosting finish.
Serving Suggestions
Serve with a scoop of vanilla ice cream or fresh berries to cut through the richness. A hot cup of coffee or a glass of cold milk pairs perfectly too. This cake shines as the centerpiece for any celebration or as a special weekend treat.
Switch It Up
- Add a teaspoon of espresso powder to the batter to intensify the chocolate flavor.
- Swap regular cocoa powder for Dutch-processed cocoa for a smoother taste.
- Mix mini chocolate chips into the batter for extra melty bites.
- Use cream cheese frosting instead of chocolate for a tangy twist.
Make-Ahead Tips
Bake the cake layers a day ahead and keep them wrapped tightly in plastic wrap. You can also make the frosting a day ahead and keep it covered in the fridge — just bring it to room temp and re-whip before frosting.

Questions People Actually Ask
Q: Can I use oil instead of butter in the frosting?
A: Butter gives the best texture and flavor, but you can try margarine or vegan butter for dairy-free versions. Oil won’t work well for frosting since it’s liquidy.
Q: How do I store leftover cake?
A: Keep it covered at room temp for up to 2 days or in the fridge up to 4 days. Bring to room temp before eating for the best taste.
Q: Can I freeze this cake?
A: Yes! Freeze unfrosted layers wrapped in plastic and foil for up to 3 months. Thaw overnight in the fridge before frosting.

Matilda’s Chocolate Cake: The Ultimate Rich, Moist, Totally Irresistible Dessert
- Total Time: 55 minutes
- Yield: 4 servings 1x
Description
Matilda’s Chocolate Cake is that dreamy, melt-in-your-mouth chocolate cake you didn’t know you needed until now. Think super moist layers, intense cocoa flavor, and a frosting so silky it could make you weak in the knees. Inspired by classic homemade recipes but with a little modern twist, this cake brings all the cozy nostalgia with none of the fuss. Whether it’s a birthday, a casual weeknight craving, or just because you deserve it, this cake is the perfect way to satisfy your chocolate obsession. Spoiler: it’s better than anything from a box mix.
Ingredients
For the Cake:
1 and 3/4 cups all-purpose flour
3/4 cup unsweetened cocoa powder (use a good quality one for best flavor)
1 and 1/2 teaspoons baking powder
1 and 1/2 teaspoons baking soda
1 teaspoon salt
2 cups granulated sugar
2 large eggs
1 cup whole milk
1/2 cup vegetable oil
2 teaspoons vanilla extract
1 cup boiling water
For the Frosting:
1/2 cup unsalted butter, softened
2/3 cup unsweetened cocoa powder
3 cups powdered sugar
1/3 cup whole milk
1 teaspoon vanilla extract
Instructions
Step 1: Prep and Mix Dry Stuff
Preheat your oven to 350°F (175°C). Grease and flour two 9-inch round cake pans or line them with parchment paper. In a large bowl, sift together flour, cocoa powder, baking powder, baking soda, and salt. This makes sure your cake will be super light and evenly mixed.
Step 2: Mix Wet Ingredients
In another bowl, beat sugar and eggs together until creamy. Add milk, oil, and vanilla, and mix until smooth.
Step 3: Combine and Add the Magic Water
Gradually add the dry ingredients into the wet, mixing slowly so you don’t end up with a flour cloud. Here’s the trick: carefully stir in the boiling water last. The batter will be thin, but that’s exactly what keeps the cake moist and tender.
Step 4: Bake to Perfection
Divide batter evenly between your prepared pans. Bake for about 30–35 minutes or until a toothpick inserted in the center comes out clean. Let the cakes cool in the pans for 10 minutes, then transfer to wire racks to cool completely before frosting.
Step 5: Make the Frosting
Beat the softened butter and cocoa powder together until smooth. Gradually add powdered sugar alternating with milk, beating until fluffy and spreadable. Stir in vanilla extract for that final flavor boost.
Step 6: Frost and Assemble
Place one cake layer on your serving plate and spread a generous layer of frosting. Top with the second cake layer and frost the top and sides. Use a spatula or knife to create swirls or smooth it out — your call! Chill for 15 minutes if you want a firmer frosting finish.
Notes
Serve with a scoop of vanilla ice cream or fresh berries to cut through the richness. A hot cup of coffee or a glass of cold milk pairs perfectly too. This cake shines as the centerpiece for any celebration or as a special weekend treat.
- Prep Time: 20 minutes
- Cook Time: 35 minutes
Nutrition
- Calories: ~400 kcal per serving
- Fat: ~55g
- Carbohydrates: ~5g
- Protein: ~18g