What the heck is this?
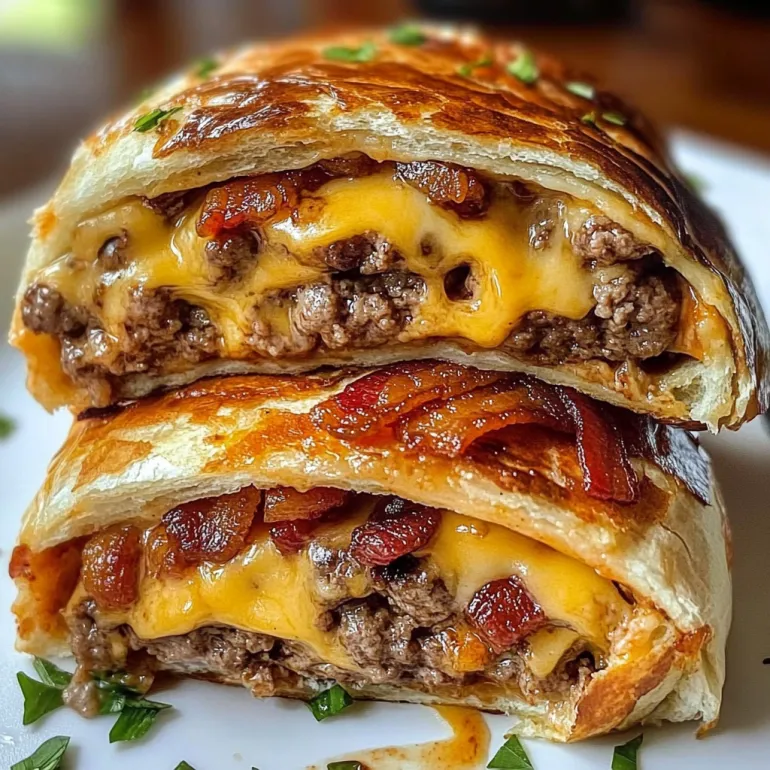
Ever wish your cheeseburger came in a cute little portable package that exploded with flavor in every bite? Meet the Maple Bacon Cheeseburger Bombs — golden, flaky biscuit dough stuffed with juicy ground beef, melty cheese, crispy bacon, and just a kiss of maple syrup to make your taste buds do a happy dance. They’re sweet, savory, salty, cheesy, and dangerously addictive. Think burger meets breakfast meets game-day snack. Yeah, it’s a vibe.
Why You’ll Love This Recipe
- They’re literally bombs of flavor (yes, pun intended).
- Perfect for parties, picky eaters, or Netflix binging nights.
- That maple-bacon combo? Sweet-salty heaven.
- No need for a grill — everything happens in your kitchen.
- Store-bought dough keeps it weeknight-friendly.
- Reheats like a dream in the oven or air fryer.
The Good Stuff You’ll Need
For the Filling:
- 1 lb ground beef
- 1/2 tsp salt
- 1/4 tsp black pepper
- 1/2 tsp garlic powder
- 1/2 small onion, finely diced (optional but fab)
- 6 slices cooked bacon, chopped
- 1 tbsp maple syrup (plus extra for brushing)
- 1 1/2 cups shredded cheddar cheese
For the Bombs:
- 1 can (16 oz) refrigerated biscuit dough (like Pillsbury Grands)
- 1 egg + 1 tbsp water (for egg wash)
- Sesame seeds (optional, for topping)

Let’s Do This
Step 1: Cook the Beef
In a skillet over medium heat, cook ground beef with salt, pepper, garlic powder, and onion until browned and fully cooked (about 6–8 minutes). Drain any excess fat. Stir in maple syrup and cooked bacon. Remove from heat and let it cool slightly before adding cheese. Stir to combine.
Step 2: Prep the Dough
Preheat oven to 375°F (190°C). Lightly grease a baking sheet or line it with parchment paper. Flatten each biscuit round slightly with your hands or a rolling pin. Scoop a generous spoonful of the beef-cheese mixture into the center of each round. Fold the edges up and pinch to seal like a little dough pouch. Place seam-side down on the baking sheet.
Step 3: Brush & Bake
Brush each bomb with egg wash and sprinkle with sesame seeds if using. Bake for 15–18 minutes until golden and puffed.
Step 4: The Final Touch
As soon as they come out of the oven, brush with a little extra maple syrup for that shiny, sticky-sweet finish.
Serving Suggestions
Serve with pickles and dipping sauces like spicy mayo, BBQ, or good old-fashioned ketchup.
Add a side salad or coleslaw if you’re trying to feel balanced.
Serve them as sliders with mini buns if you’re feeding a crowd.
Switch It Up
- Go Spicy: Add jalapeños or pepper jack cheese.
- Breakfast Bombs: Toss in scrambled eggs and a sausage patty instead.
- Veggie Version: Use plant-based ground and veggie bacon.
- Make It Big: Skip the biscuits and stuff all that goodness into a pie crust or puff pastry sheet and bake it as one giant cheeseburger roll.
Make-Ahead Tips
The filling can be made up to 2 days ahead and stored in the fridge.
Assemble the bombs up to 4 hours ahead and refrigerate until ready to bake.
Leftovers reheat well in the oven or air fryer at 350°F for about 8–10 minutes.

Questions People Actually Ask
Q: Can I freeze them?
A: Totally. Bake first, cool completely, and freeze. Reheat from frozen at 375°F for 15–20 minutes.
Q: What kind of cheese works best?
A: Sharp cheddar is classic, but try pepper jack, gouda, or a smoky cheddar blend.
Q: Can I use crescent rolls instead?
A: Absolutely. They’ll be slightly flakier and just as delicious.
Q: What’s the best maple syrup for this?
A: Go for real-deal pure maple syrup (Grade A Dark for extra flavor).

Maple Bacon Cheeseburger Bombs: Bite-Sized Bliss with a Sweet and Savory Twist
- Total Time: 40 minutes
- Yield: 8 bombs 1x
Description
Ever wish your cheeseburger came in a cute little portable package that exploded with flavor in every bite? Meet the Maple Bacon Cheeseburger Bombs — golden, flaky biscuit dough stuffed with juicy ground beef, melty cheese, crispy bacon, and just a kiss of maple syrup to make your taste buds do a happy dance. They’re sweet, savory, salty, cheesy, and dangerously addictive. Think burger meets breakfast meets game-day snack. Yeah, it’s a vibe.
Ingredients
For the Filling:
1 lb ground beef
1/2 tsp salt
1/4 tsp black pepper
1/2 tsp garlic powder
1/2 small onion, finely diced (optional but fab)
6 slices cooked bacon, chopped
1 tbsp maple syrup (plus extra for brushing)
1 1/2 cups shredded cheddar cheese
For the Bombs:
1 can (16 oz) refrigerated biscuit dough (like Pillsbury Grands)
1 egg + 1 tbsp water (for egg wash)
Sesame seeds (optional, for topping)
Instructions
Step 1: Cook the Beef
In a skillet over medium heat, cook ground beef with salt, pepper, garlic powder, and onion until browned and fully cooked (about 6–8 minutes). Drain any excess fat. Stir in maple syrup and cooked bacon. Remove from heat and let it cool slightly before adding cheese. Stir to combine.
Step 2: Prep the Dough
Preheat oven to 375°F (190°C). Lightly grease a baking sheet or line it with parchment paper. Flatten each biscuit round slightly with your hands or a rolling pin. Scoop a generous spoonful of the beef-cheese mixture into the center of each round. Fold the edges up and pinch to seal like a little dough pouch. Place seam-side down on the baking sheet.
Step 3: Brush & Bake
Brush each bomb with egg wash and sprinkle with sesame seeds if using. Bake for 15–18 minutes until golden and puffed.
Step 4: The Final Touch
As soon as they come out of the oven, brush with a little extra maple syrup for that shiny, sticky-sweet finish.
Notes
Serve with pickles and dipping sauces like spicy mayo, BBQ, or good old-fashioned ketchup.
Add a side salad or coleslaw if you’re trying to feel balanced.
Serve them as sliders with mini buns if you’re feeding a crowd.
- Prep Time: 20 minutes
- Cook Time: 20 minutes
Nutrition
- Calories: ~320 kcal per serving
- Fat: ~20g
- Carbohydrates: ~20g
- Protein: ~15g
