Description
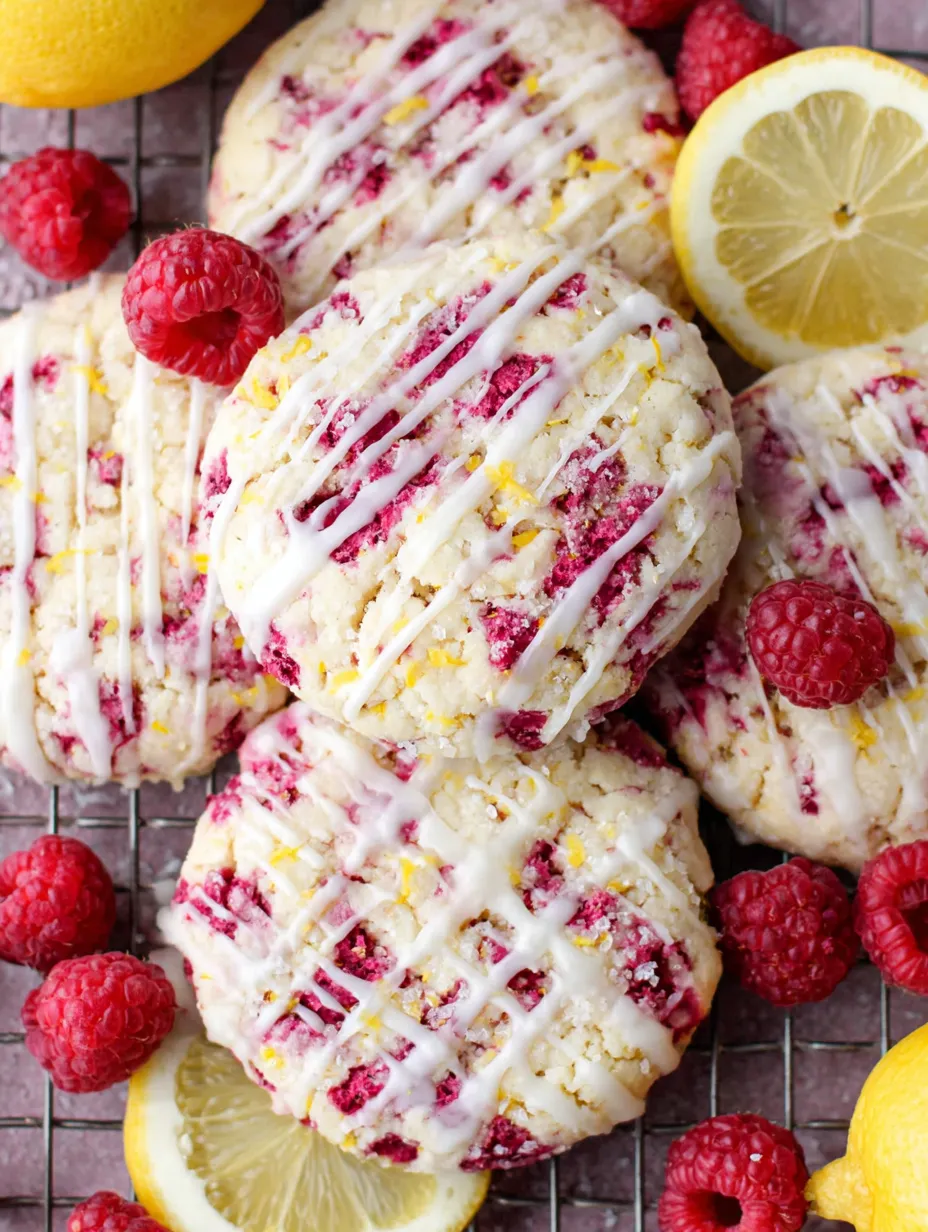
Imagine if sunshine and raspberries had a baby and that baby was a soft, chewy cookie that makes your taste buds do a happy dance. That’s what we’re working with here. These Lemon Raspberry Cookies are basically the perfect marriage of tart lemon and sweet-tart raspberries in a buttery sugar cookie that’s got more personality than your most dramatic friend. They’re soft, they’re citrusy, they’ve got little bursts of raspberry throughout, and they’re topped with a lemon glaze that’s so good you’ll want to drink it straight. I brought these to a summer picnic last year and someone literally asked if I’d consider catering their wedding. My sister ate four in a row and said “this is what I imagine clouds taste like if clouds were made of happiness.” My coworker’s five-year-old, who allegedly “doesn’t like fruit,” ate three and asked if I could make them every week. These cookies make people poetic and slightly unhinged in the best way.
Ingredients
For the Cookies:
- 2 1/2 cups all-purpose flour
- 1/2 tsp baking soda
- 1/2 tsp baking powder
- 1/2 tsp salt
- 3/4 cup (1.5 sticks) unsalted butter, softened
- 1 cup granulated sugar
- 1 large egg
- 1 egg yolk
- 1/4 cup sour cream (this is the secret to softness)
- 2 tbsp fresh lemon juice
- 1 tbsp lemon zest (about 1 large lemon)
- 1 tsp vanilla extract
- 1/2 tsp almond extract (optional but really elevates it)
- 1/2 cup freeze-dried raspberries, roughly crushed
- 1/2 cup fresh raspberries, chopped into small pieces
For the Lemon Glaze:
- 2 cups powdered sugar
- 3–4 tbsp fresh lemon juice
- 1 tsp lemon zest
- 1 tbsp melted butter (makes it glossy and rich)
- Pinch of salt
For Topping (optional but pretty):
- Extra freeze-dried raspberries, crushed
- Lemon zest
- Coarse sugar for sparkle
Equipment:
- Stand mixer or hand mixer
- Zester or microplane
- Cookie scoop (2-tablespoon size)
- Baking sheets
- Parchment paper or silicone mats
- Wire cooling racks
- Small bowl for glaze
- Paper towels
Instructions
Step 1: Prep Your Raspberries Like a Pro
Take your freeze-dried raspberries and crush them into small pieces in a ziplock bag or with your hands. You want some powder and some chunks—not completely pulverized. The chunks add pops of flavor.
Take your fresh raspberries and chop them into small pieces, about 1/4 inch. Pat them VERY dry with paper towels. This is crucial—excess moisture will make your dough wet and your cookies will spread like crazy.
If your fresh raspberries are too wet or mushy, stick them in the freezer for 10 minutes to firm them up before chopping. Frozen raspberries are easier to chop cleanly.
Set both types of prepared raspberries aside. Try not to eat them all. I believe in you.
Step 2: Zest and Juice That Lemon
Zest your lemon BEFORE you juice it. Use a microplane or fine zester. You want just the yellow part, not the white pith underneath—that’s bitter as hell.
Roll the lemon on the counter with your palm, pressing firmly. This breaks up the juice sacs inside and makes it easier to juice.
Cut and juice the lemon. You need 2 tablespoons for the cookies and 3-4 tablespoons for the glaze, so juice at least 1.5-2 lemons total. Fresh lemon juice is NON-NEGOTIABLE. Bottled lemon juice tastes like sadness.
Set aside the zest and juice. Don’t mix them together yet—you’ll add them at different times.
Step 3: Mix the Dry Ingredients
Preheat your oven to 350°F (175°C). Line your baking sheets with parchment paper.
In a medium bowl, whisk together flour, baking soda, baking powder, and salt. Set this aside.
Don’t add the raspberries to the dry mixture yet—they’ll go in at the end.
Step 4: Cream Butter and Sugar Like You Mean It
In your stand mixer bowl (or large bowl with hand mixer), beat the softened butter and sugar together on medium-high speed for 3-4 minutes. You want it light, fluffy, and pale yellow. This aerates the dough and creates soft cookies. Don’t rush this step or your cookies will be dense.
The butter needs to be room temperature—soft enough to press your finger into easily but not greasy or melted. Cold butter won’t cream properly. Melted butter will make flat cookies.
Add the whole egg and egg yolk. Beat for 1 minute until fully incorporated and fluffy. Scrape down the sides of the bowl.
Add the sour cream, lemon juice, lemon zest, vanilla extract, and almond extract (if using). Beat until combined, about 30 seconds. The mixture might look slightly curdled—that’s normal. The acid from the lemon and sour cream does that. Don’t panic.
Step 5: Bring It All Together
With the mixer on low speed, gradually add the flour mixture. Mix until JUST combined—you should barely see flour streaks. Overmixing develops gluten and makes tough cookies. We want tender, soft cookies.
Remove the bowl from the mixer. Using a spatula, gently fold in the freeze-dried raspberry pieces and the chopped fresh raspberries. Fold carefully so you don’t crush the fresh berries too much. You want them distributed throughout but still visible.
The dough will be soft, slightly sticky, and smell INCREDIBLE—like lemon, berries, and summer. If it’s too sticky to scoop, chill it for 15-20 minutes.
Step 6: Scoop and Bake
Using a cookie scoop (about 2 tablespoons), scoop out portions of dough. You don’t need to roll these into balls—just scoop and drop. Rustic is charming here.
Place them on your prepared baking sheets, spacing them about 2 inches apart. They’ll spread a little but not much.
Optional: Gently press each dough ball down slightly with your palm or the bottom of a glass. This gives them a more even shape.
Bake for 11-13 minutes. They should look barely set in the center and very lightly golden on the bottom edges. The tops might still look a tiny bit shiny and underdone—THAT’S PERFECT. They’ll continue cooking on the hot pan.
Do NOT overbake these. Lemon cookies can dry out fast. Pull them when they look slightly underdone.
Let them cool on the baking sheet for 5 minutes. They’ll be very soft and delicate when warm, so don’t try to move them immediately or they’ll fall apart.
Transfer to wire racks to cool completely before glazing. And I mean COMPLETELY. If they’re even slightly warm, the glaze will melt and slide off. Be patient. I know it’s hard.
Step 7: Make That Gorgeous Glaze
While the cookies are cooling, make your glaze.
In a medium bowl, whisk together powdered sugar, 3 tablespoons lemon juice, lemon zest, melted butter, and a pinch of salt.
Whisk until smooth and glossy. The consistency should be thick but pourable—like honey or thick cream. When you lift the whisk, it should drizzle off in a ribbon that slowly disappears into the surface.
If it’s too thick, add more lemon juice 1 teaspoon at a time. If it’s too thin, add more powdered sugar 1 tablespoon at a time.
Taste it. It should be tangy and sweet with a strong lemon flavor. If it’s not lemony enough, add more zest or a tiny squeeze more juice.
Step 8: Glaze Like a Boss
Once your cookies are COMPLETELY cool, it’s glaze time.
You can either dip the top of each cookie into the glaze or drizzle the glaze over the cookies with a spoon.
Dipping method: Hold the cookie and dip the top into the glaze, letting excess drip off. Place back on the wire rack with the glazed side up. This gives you full, even coverage.
Drizzling method: Use a spoon to drizzle glaze over the top of each cookie in a zigzag pattern. This looks more artisanal and uses less glaze.
Spreading method: Spread a thin layer of glaze on each cookie with the back of a spoon or offset spatula. This is the most controlled method.
While the glaze is still wet, sprinkle with crushed freeze-dried raspberries, a tiny bit of lemon zest, or coarse sugar for extra pretty factor. Work quickly—the glaze sets fast.
Let the glaze set for at least 20-30 minutes before serving or stacking. It’ll harden into a beautiful, slightly shiny coating.
Step 9: Try Not to Eat Them All
Arrange your cookies on a pretty plate. Take 47 photos because they’re GORGEOUS.
Bite into one and experience that perfect lemon-raspberry-buttery-sweet-tart explosion.
Share them with people you like. Or don’t. I won’t judge.
Accept compliments graciously while pretending they were super easy to make.
Notes
These are already perfection, but here are ways to make moments even more special:
- Afternoon tea: Serve with iced tea or lemonade for peak summer vibes
- Brunch spread: These are perfect alongside quiche, fruit salad, and mimosas
- Mother’s Day: Elegant, fruity, and way better than flowers
- Picnic treats: Pack them in a tin and take them to the park with fresh berries
- Bridal shower: Light, pretty, and feminine—perfect for celebrations
- Ice cream topping: Crumble them over lemon or vanilla ice cream
- With coffee: The citrus pairs beautifully with a strong morning coffee
- Gift boxes: Pack in cellophane bags tied with ribbon for gorgeous gifts
- Prep Time: 25 minutes
- Cook Time: 12 minutes
Nutrition
- Calories: ~125 kcal
- Sugar: ~11g
- Sodium: ~85mg
- Fat: ~5g
- Carbohydrates: ~18g
- Protein: ~2g