What the heck is this?
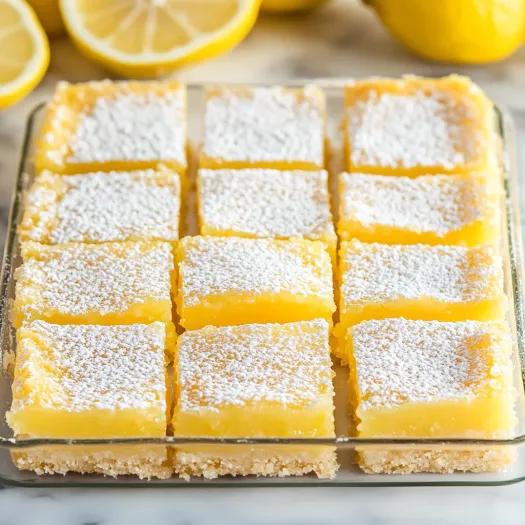
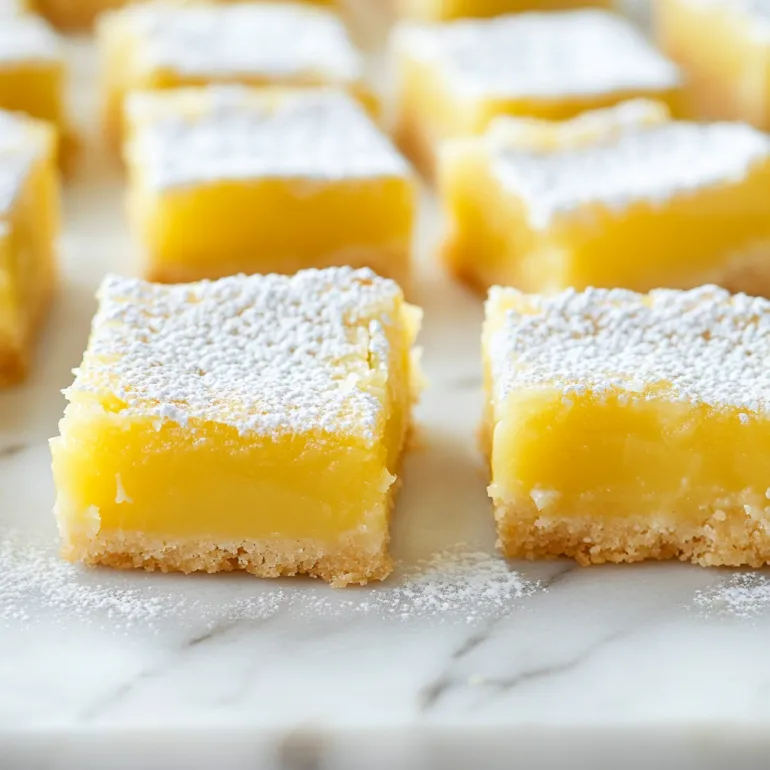
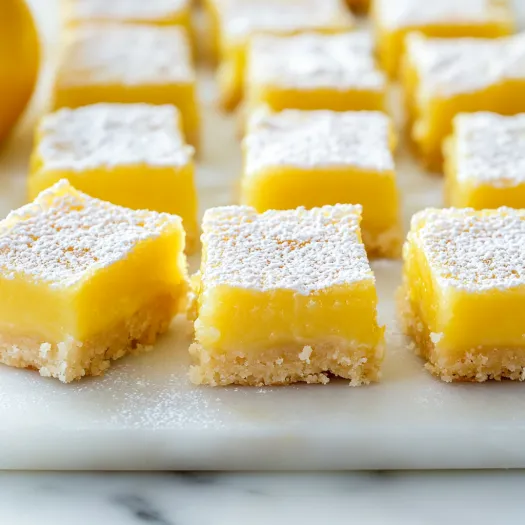
Lemon bars are those bright, tangy-sweet dessert squares with a soft, silky lemon curd layer baked right on top of a buttery shortbread crust. They’re sunshine in bar form—zippy, smooth, and balanced with just enough sweetness to make your mouth pucker and smile at the same time. These are not the shy, overly sweet kind. These bars bring bold lemon flavor, melt-in-your-mouth texture, and that iconic powdered sugar snowfall on top. Perfect for bake sales, picnics, family dinners, or, let’s be honest, eating straight out of the pan.
Why You’ll Love This Recipe
These bars are simple but feel luxurious. The crust is buttery and tender without being fussy, and the lemon filling is bold, bright, and luscious without a long list of ingredients. You don’t need fancy tools or stand mixers—just some elbow grease, fresh lemons, and a square baking dish. Plus, they store well and even freeze beautifully (if they last that long). If you like your desserts with a little sass, these lemon bars are your new go-to.
The Good Stuff You’ll Need
For the shortbread crust:
- 1 cup (2 sticks) unsalted butter, melted
- ½ cup granulated sugar
- 2 cups all-purpose flour
- ¼ teaspoon salt
For the lemon filling:
- 1½ cups granulated sugar
- ¼ cup all-purpose flour
- 4 large eggs
- ⅔ cup freshly squeezed lemon juice (about 3–4 lemons)
- Zest of 2 lemons
- Powdered sugar, for dusting
Let’s Do This
- Preheat and prep: Preheat your oven to 350°F (175°C). Line a 9×13-inch baking pan with parchment paper, leaving a little overhang so you can lift the bars out later.
- Make the crust: In a medium bowl, stir together melted butter, sugar, flour, and salt until it forms a soft dough. Press it evenly into the bottom of your prepared pan—use your hands or the bottom of a flat cup to get it smooth and even.
- Bake the crust: Pop it in the oven and bake for 18–20 minutes, or until it’s just starting to turn golden around the edges. Remove and set aside while you prep the filling.
- Whisk the filling: In a large bowl, whisk together the sugar and flour. Add the eggs, lemon juice, and zest, and whisk until smooth. It should be pale yellow and glossy—no lumps allowed.
- Bake again: Pour the filling over the warm crust. Return the pan to the oven and bake for another 20–22 minutes, or until the center is set and no longer jiggles.
- Cool and chill: Let the bars cool completely at room temperature, then chill in the fridge for at least 2 hours (overnight is even better). This helps the filling set and makes them easier to slice.
- Dust and slice: Just before serving, dust generously with powdered sugar. Slice into neat squares or rectangles, and prepare to wow your tastebuds.
Serving Suggestions
Serve chilled with a dollop of whipped cream, a sprig of mint, or a few fresh berries on the side. These make a stellar addition to any dessert table, picnic basket, or 3 p.m. kitchen raid. Pro tip: run your knife under hot water and wipe it clean between cuts for those perfectly crisp edges.
Switch It Up
- Use Meyer lemons for a slightly sweeter, more floral citrus flavor.
- Add a touch of vanilla extract to the filling for warmth.
- Feeling adventurous? Try swirling in a bit of raspberry or blueberry puree before baking.
- Sub in gluten-free flour for both crust and filling for a GF-friendly version.
Make-Ahead Tips
Lemon bars can be made up to 3 days ahead and stored covered in the fridge. They also freeze beautifully—just wrap individual bars in plastic wrap, stash in a freezer bag, and thaw in the fridge or on the counter before serving.
Questions People Actually Ask
Can I use bottled lemon juice? Technically yes, but fresh is 100% better. You need the zest, and the flavor is much brighter.
Why are my lemon bars runny? They probably needed more time in the oven or weren’t chilled long enough. Make sure the center is set before removing from the oven, and always cool completely.
Can I double this recipe? Yes! Use a larger pan (like a half-sheet pan) and keep an eye on the baking time—it might need a few extra minutes.
Lemon Bars: The Zingy, Buttery Classic That Never Goes Out of Style
- Total Time: 55 minutes
- Yield: 12 bars 1x
Description
Lemon bars are those bright, tangy-sweet dessert squares with a soft, silky lemon curd layer baked right on top of a buttery shortbread crust. They’re sunshine in bar form—zippy, smooth, and balanced with just enough sweetness to make your mouth pucker and smile at the same time. These are not the shy, overly sweet kind. These bars bring bold lemon flavor, melt-in-your-mouth texture, and that iconic powdered sugar snowfall on top. Perfect for bake sales, picnics, family dinners, or, let’s be honest, eating straight out of the pan.
Ingredients
For the shortbread crust:
1 cup (2 sticks) unsalted butter, melted
½ cup granulated sugar
2 cups all-purpose flour
¼ teaspoon salt
For the lemon filling:
1½ cups granulated sugar
¼ cup all-purpose flour
4 large eggs
⅔ cup freshly squeezed lemon juice (about 3–4 lemons)
Zest of 2 lemons
Powdered sugar, for dusting
Instructions
Preheat and prep: Preheat your oven to 350°F (175°C). Line a 9×13-inch baking pan with parchment paper, leaving a little overhang so you can lift the bars out later.
Make the crust: In a medium bowl, stir together melted butter, sugar, flour, and salt until it forms a soft dough. Press it evenly into the bottom of your prepared pan—use your hands or the bottom of a flat cup to get it smooth and even.
Bake the crust: Pop it in the oven and bake for 18–20 minutes, or until it’s just starting to turn golden around the edges. Remove and set aside while you prep the filling.
Whisk the filling: In a large bowl, whisk together the sugar and flour. Add the eggs, lemon juice, and zest, and whisk until smooth. It should be pale yellow and glossy—no lumps allowed.
Bake again: Pour the filling over the warm crust. Return the pan to the oven and bake for another 20–22 minutes, or until the center is set and no longer jiggles.
Cool and chill: Let the bars cool completely at room temperature, then chill in the fridge for at least 2 hours (overnight is even better). This helps the filling set and makes them easier to slice.
Dust and slice: Just before serving, dust generously with powdered sugar. Slice into neat squares or rectangles, and prepare to wow your tastebuds.
Notes
Serve chilled with a dollop of whipped cream, a sprig of mint, or a few fresh berries on the side. These make a stellar addition to any dessert table, picnic basket, or 3 p.m. kitchen raid. Pro tip: run your knife under hot water and wipe it clean between cuts for those perfectly crisp edges.
- Prep Time: 15 minutes
- Cook Time: 40 minutes
Nutrition
- Calories: ~210 kcal per bar
- Fat: ~9g
- Carbohydrates: ~30g
- Protein: ~2g