
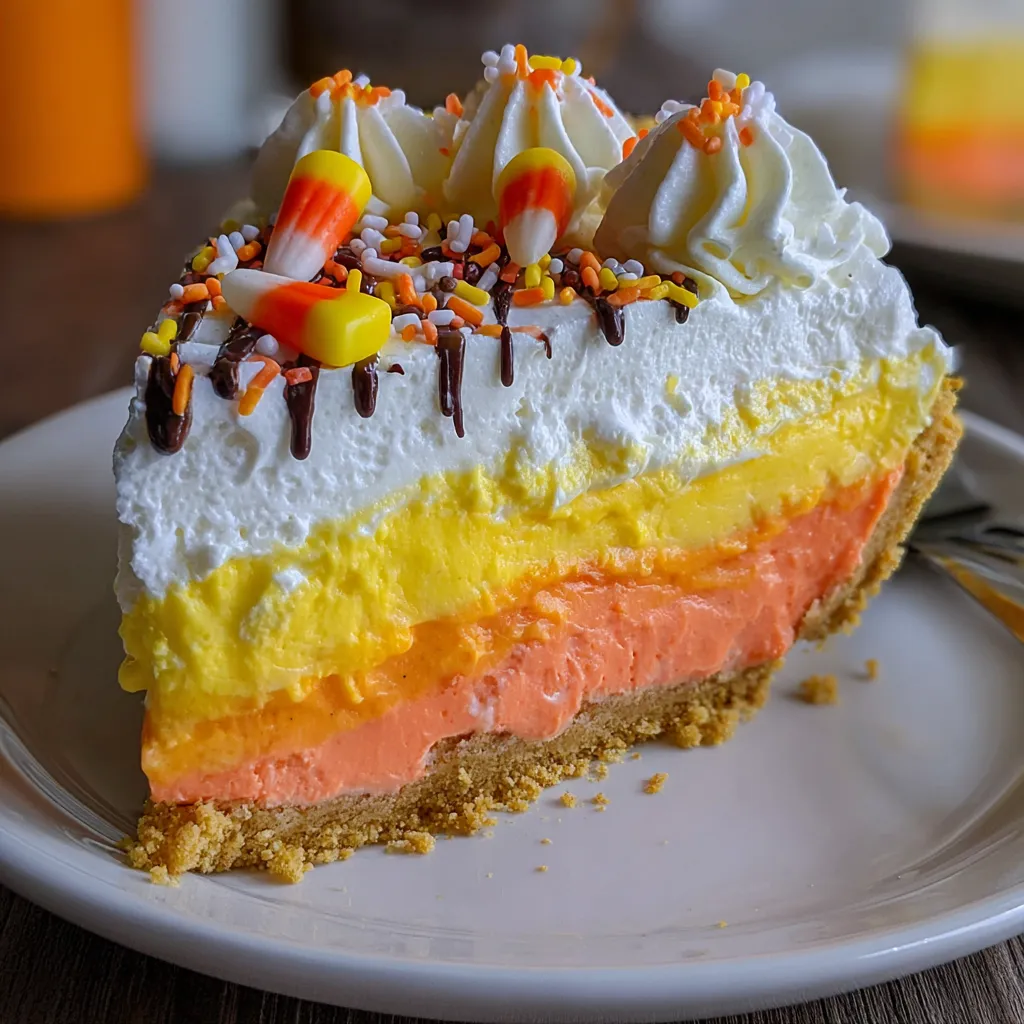
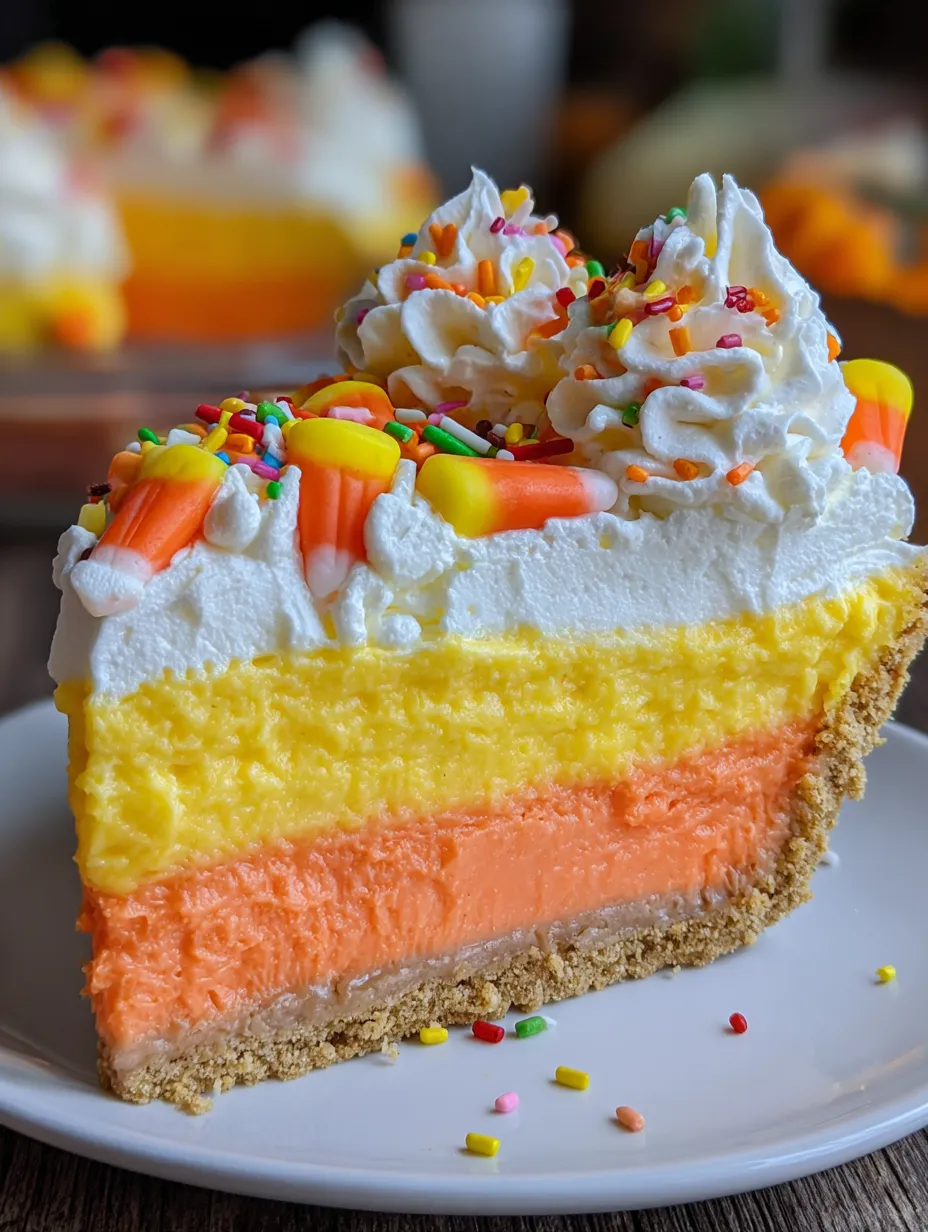
This is what happens when you decide to turn everyone’s favorite (or most controversial) Halloween candy into an actual dessert masterpiece. We’re talking three gorgeous layers — yellow, orange, and white — that look just like a giant candy corn, except this version is creamy, dreamy, and tastes like autumn decided to throw a party in your mouth. It’s a no-bake wonder with an Oreo crust, layers of silky cheesecake filling, and enough festive vibes to make your Halloween spread look like Pinterest came to life. My sister-in-law (who claims to hate candy corn) had two slices and asked for the recipe. That’s the kind of conversion power we’re dealing with here.
Why You’ll Love This Recipe
It looks absolutely STUNNING — like, showstopper level gorgeous.
No-bake perfection means no oven stress during holiday prep.
Three distinct layers that actually taste amazing together.
Perfect for Halloween parties or fall gatherings.
Way better than actual candy corn (controversial but true).
Feeds a crowd and everyone will want the recipe.
The Good Stuff You’ll Need
For the Oreo Crust:
- 24 Oreo cookies, crushed (filling and all)
- 5 tbsp unsalted butter, melted
- Pinch of salt
For the Yellow Layer:
- 8 oz cream cheese, softened
- 1/2 cup powdered sugar
- 1 tsp vanilla extract
- 1/4 tsp butter extract
- Yellow gel food coloring
- 1 cup heavy cream, whipped to stiff peaks
For the Orange Layer:
- 8 oz cream cheese, softened
- 1/2 cup powdered sugar
- 1 tsp vanilla extract
- 1/4 tsp orange extract (optional but amazing)
- Orange gel food coloring
- 1 cup heavy cream, whipped to stiff peaks
For the White Layer:
- 8 oz cream cheese, softened
- 1/2 cup powdered sugar
- 1 tsp vanilla extract
- 1 cup heavy cream, whipped to stiff peaks
For Topping:
- Whipped cream
- Candy corn (obviously)
- Orange and yellow sprinkles
- White chocolate shavings
Let’s Do This
Step 1: Crust Game Strong
Crush Oreos in a food processor until they’re fine crumbs (or put them in a ziplock bag and go to town with a rolling pin — great stress relief).
Mix crushed Oreos with melted butter and salt. Press firmly into the bottom and up the sides of a 9-inch pie pan.
Freeze for 15-20 minutes while you make the filling layers.
Step 2: Yellow Layer Magic
Beat cream cheese until smooth and fluffy (about 2-3 minutes). Add powdered sugar, vanilla, and butter extract. Beat until combined.
Add yellow gel food coloring until you get that perfect candy corn yellow. Start small — you can always add more.
In a separate bowl, whip heavy cream to stiff peaks. Gently fold about 1/3 of it into the cream cheese mixture to lighten it, then fold in the rest until no white streaks remain.
Spread evenly over the chilled crust. Freeze for 30 minutes.
Step 3: Orange You Glad
Repeat the same process with the orange layer: beat cream cheese, add sugar and extracts, add orange food coloring (go bold with this color!), and fold in whipped cream.
Carefully spread over the yellow layer. Try not to disturb the layer below — a gentle touch is key.
Freeze for another 30 minutes.
Step 4: White Layer Wonder
Make the white layer the same way as the others, but skip the food coloring (unless you want a super bright white, then add a tiny bit of white gel coloring).
Spread carefully over the orange layer, creating smooth swirls on top if you’re feeling artistic.
Step 5: The Big Chill
Cover with plastic wrap (gently press it onto the surface to prevent a skin) and refrigerate for at least 4 hours, or overnight for best results. This lets everything set up perfectly.
Step 6: The Grand Finale
Before serving, pipe whipped cream around the edges (or just dollop it on — we’re not judging).
Arrange candy corn on top in a decorative pattern. Sprinkle with festive sprinkles and white chocolate shavings if you’re feeling extra.
Slice with a hot knife (run it under hot water and wipe between cuts) for clean, perfect slices.
Serving Suggestions
Serve chilled for the best texture and flavor.
Pair with hot apple cider or pumpkin spice lattes.
Perfect as the centerpiece dessert at Halloween parties.
Store covered in the fridge for up to 3 days (if it lasts that long).
Switch It Up
Different Flavors: Try almond extract in the white layer or maple in the orange.
Chocolate Crust: Use a chocolate cookie crust or graham crackers.
Adult Version: Add a splash of amaretto or rum to each layer.
Pumpkin Twist: Mix pumpkin pie spice into the orange layer.
Mini Versions: Make individual servings in mason jars or small cups.
Different Colors: Make it festive for other holidays (red/white/blue for 4th of July!).
Pro Tips
Softened Cream Cheese: This is crucial — rock-hard cream cheese equals lumpy filling.
Gel Food Coloring: Liquid will make your layers runny. Gel is the way to go.
Gentle Folding: Don’t overmix when adding whipped cream or you’ll deflate it.
Freeze Between Layers: This prevents the colors from bleeding together.
Sharp Knife: Hot water + wipe between cuts = Instagram-worthy slices.
Color Intensity: Make colors slightly bolder than you think — they lighten when you add whipped cream.
Make-Ahead Tips
This actually NEEDS to be made ahead, so that’s perfect!
Make it up to 2 days before your event — the flavors develop beautifully.
The crust can be made and frozen up to a week ahead.
Don’t add toppings until just before serving to keep them fresh.

Questions People Actually Ask
Q: Can I use Cool Whip instead of whipping cream? A: Yes! Use 3 cups total (1 cup per layer) of thawed Cool Whip. It’s actually easier.
Q: Do I have to use extracts? A: Nope! Vanilla works great in all three layers. Extracts just add extra flavor dimension.
Q: My layers are bleeding together — help! A: Make sure each layer is fully frozen before adding the next one.
Q: Can I make this in a different pan? A: Sure! Use a springform pan for easier removal, or a tart pan with removable bottom.
Q: How do I get my colors vibrant? A: Use gel food coloring and don’t be shy. The whipped cream lightens everything.
Q: Can I freeze this pie? A: Yes! Freeze for up to 1 month. Thaw in the fridge overnight before serving.
Q: What if I don’t like candy corn? A: Make it anyway! The pie doesn’t actually taste like candy corn — it’s just inspired by the colors.
PrintLayered Candy Corn Pie
- Total Time: 34 minute
- Yield: 10–12 1x
Description
This is what happens when you decide to turn everyone’s favorite (or most controversial) Halloween candy into an actual dessert masterpiece. We’re talking three gorgeous layers — yellow, orange, and white — that look just like a giant candy corn, except this version is creamy, dreamy, and tastes like autumn decided to throw a party in your mouth. It’s a no-bake wonder with an Oreo crust, layers of silky cheesecake filling, and enough festive vibes to make your Halloween spread look like Pinterest came to life. My sister-in-law (who claims to hate candy corn) had two slices and asked for the recipe. That’s the kind of conversion power we’re dealing with here.
Ingredients
For the Oreo Crust:
- 24 Oreo cookies, crushed (filling and all)
- 5 tbsp unsalted butter, melted
- Pinch of salt
For the Yellow Layer:
- 8 oz cream cheese, softened
- 1/2 cup powdered sugar
- 1 tsp vanilla extract
- 1/4 tsp butter extract
- Yellow gel food coloring
- 1 cup heavy cream, whipped to stiff peaks
For the Orange Layer:
- 8 oz cream cheese, softened
- 1/2 cup powdered sugar
- 1 tsp vanilla extract
- 1/4 tsp orange extract (optional but amazing)
- Orange gel food coloring
- 1 cup heavy cream, whipped to stiff peaks
For the White Layer:
- 8 oz cream cheese, softened
- 1/2 cup powdered sugar
- 1 tsp vanilla extract
- 1 cup heavy cream, whipped to stiff peaks
For Topping:
- Whipped cream
- Candy corn (obviously)
- Orange and yellow sprinkles
- White chocolate shavings
Instructions
Crush Oreos in a food processor until they’re fine crumbs (or put them in a ziplock bag and go to town with a rolling pin — great stress relief).
Mix crushed Oreos with melted butter and salt. Press firmly into the bottom and up the sides of a 9-inch pie pan.
Freeze for 15-20 minutes while you make the filling layers.
Beat cream cheese until smooth and fluffy (about 2-3 minutes). Add powdered sugar, vanilla, and butter extract. Beat until combined.
Add yellow gel food coloring until you get that perfect candy corn yellow. Start small — you can always add more.
In a separate bowl, whip heavy cream to stiff peaks. Gently fold about 1/3 of it into the cream cheese mixture to lighten it, then fold in the rest until no white streaks remain.
Spread evenly over the chilled crust. Freeze for 30 minutes.
Repeat the same process with the orange layer: beat cream cheese, add sugar and extracts, add orange food coloring (go bold with this color!), and fold in whipped cream.
Carefully spread over the yellow layer. Try not to disturb the layer below — a gentle touch is key.
Freeze for another 30 minutes.
Make the white layer the same way as the others, but skip the food coloring (unless you want a super bright white, then add a tiny bit of white gel coloring).
Spread carefully over the orange layer, creating smooth swirls on top if you’re feeling artistic.
Cover with plastic wrap (gently press it onto the surface to prevent a skin) and refrigerate for at least 4 hours, or overnight for best results. This lets everything set up perfectly.
Before serving, pipe whipped cream around the edges (or just dollop it on — we’re not judging).
Arrange candy corn on top in a decorative pattern. Sprinkle with festive sprinkles and white chocolate shavings if you’re feeling extra.
Slice with a hot knife (run it under hot water and wipe between cuts) for clean, perfect slices.
Notes
Serve chilled for the best texture and flavor.
Pair with hot apple cider or pumpkin spice lattes.
Perfect as the centerpiece dessert at Halloween parties.
Store covered in the fridge for up to 3 days (if it lasts that long).
- Prep Time: 45 minutes
- Cook Time: no-cook recipe
Nutrition
- Calories: ~480 kcal
- Fat: ~35g
- Carbohydrates: ~40g
- Protein: ~5g


