What the heck is this?
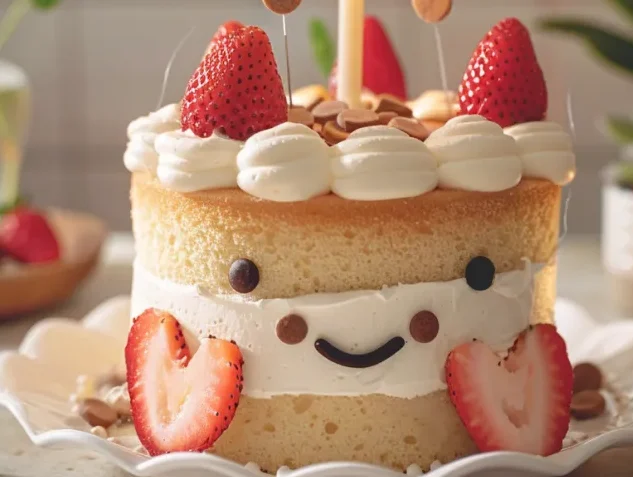
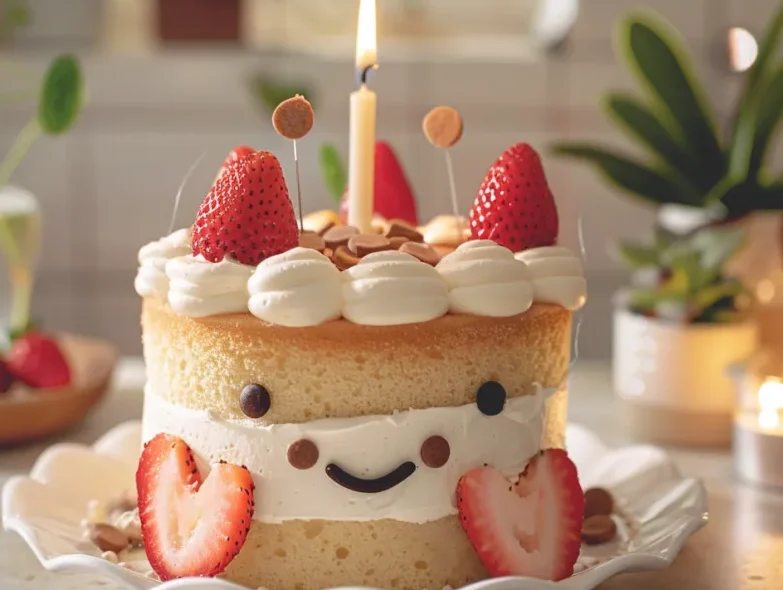
Okay, so you know those adorable Jellycat stuffed animals that make you go “awww” every time you see them? Well, someone went and turned that energy into a CAKE. This Jellycat Birthday Cake is basically a fluffy vanilla sponge cake that looks like it belongs in a toy store window. We’re talking two layers of pure happiness, covered in the fluffiest buttercream, with little piped dots that look like the softest plush fur, and a face so cute you’ll almost feel bad eating it. Almost. This is the cake that makes grown adults squeal and kids lose their absolute minds. Perfect for birthdays, baby showers, or just because you need something ridiculously adorable in your life.
Why You’ll Love This Recipe
- It’s so cute, you’ll want to hug it before you eat it
- Vanilla cake that’s moist AF and actually tastes amazing
- Buttercream that pipes like a dream and tastes even better
- Everyone will think you’re a baking genius (we won’t tell them how easy it was)
- Makes the BEST Instagram content (seriously, prepare for likes)
- Kid-approved, adult-obsessed
- Way cheaper than buying an actual Jellycat toy
The Good Stuff You’ll Need
For the Cake:
- 2 1/2 cups all-purpose flour
- 2 1/2 tsp baking powder
- 1/2 tsp salt
- 1/2 cup unsalted butter, room temp
- 1 3/4 cups granulated sugar
- 4 large eggs
- 2 tsp vanilla extract
- 1 1/4 cups whole milk
For the Buttercream:
- 1 cup unsalted butter, room temp
- 4 cups powdered sugar
- 1/4 cup heavy cream
- 2 tsp vanilla extract
- Pinch of salt
For the Face & Details:
- Mini chocolate chips (for eyes)
- 1 piece of chocolate or candy (for mouth)
- Food coloring (optional, for colored arms/details)
- Fresh strawberries (for decoration)
- 1 birthday candle
Let’s Do This
Step 1: Bake the Cake
Preheat your oven to 350°F. Grease and flour two 6-inch round cake pans (or use 8-inch if you want a bigger baby).
In a bowl, whisk together flour, baking powder, and salt. Set aside.
Cream butter and sugar until light and fluffy (about 4 minutes). Add eggs one at a time, then vanilla.
Alternate adding the flour mixture and milk, starting and ending with flour. Mix until just combined.
Divide batter between pans and bake 25-30 minutes until a toothpick comes out clean.
Cool completely before even THINKING about decorating.
Step 2: Make That Buttercream
Beat butter until super fluffy (like, 5 minutes of beating).
Gradually add powdered sugar, then cream, vanilla, and salt.
Beat until it’s cloud-like and perfect for piping.
Step 3: Assembly Time
Level your cake layers if needed (we want this baby sitting pretty).
Place bottom layer on your serving plate. Spread a layer of buttercream on top.
Add the second layer and cover the entire cake with a thin crumb coat. Chill for 30 minutes.
Apply a final layer of buttercream, making it as smooth as you can.
Step 4: The Magic Happens
Fill a piping bag with buttercream and use a round tip to pipe little dots all around the cake edges (top and bottom). These are your “plush” details.
Gently press mini chocolate chips for eyes and use a small piece of chocolate for the mouth.
If you’re feeling fancy, pipe little arms using colored buttercream.
Top with fresh strawberries and stick in that birthday candle.
Step 5: Prepare for Cuteness Overload
Take approximately 47 photos before cutting.
Watch everyone’s faces light up when they see it.
Try not to cry when you have to cut into something so adorable.
Serving Suggestions
Serve with vanilla ice cream and watch people melt from the cuteness.
Pair with some actual Jellycat toys for the ultimate photo op.
Save a slice for yourself because you EARNED it.
Switch It Up
Chocolate Lover: Make it a chocolate cake base instead of vanilla.
Strawberry Vibes: Add strawberry extract to the buttercream and make it pink.
Mini Versions: Make cupcakes instead for individual Jellycat babies.
Different Animals: Change up the face to make different creatures (bears, bunnies, cats).
Make-Ahead Tips
Cake layers can be made 2 days ahead and wrapped tightly.
Buttercream can be made 3 days ahead and stored in the fridge (just re-whip before using).
Fully assembled cake keeps for 2-3 days covered at room temp.
Questions People Actually Ask
Q: Can I use box mix? A: Listen, I won’t judge. Use a good vanilla box mix and doctor it up with an extra egg and some vanilla extract.
Q: What if I mess up the face? A: That’s what makes it even cuter! Wonky faces = more personality.
Q: Can I make it dairy-free? A: Absolutely! Sub the butter for vegan butter and use plant milk. Just make sure everything’s room temp.
Q: How do I transport this cutie? A: Very carefully. Use a cake carrier and drive like you’re transporting actual babies.
Q: Can adults eat this or is it just for kids? A: Are you kidding? Adults need cute cake too. No age limit on happiness.
Print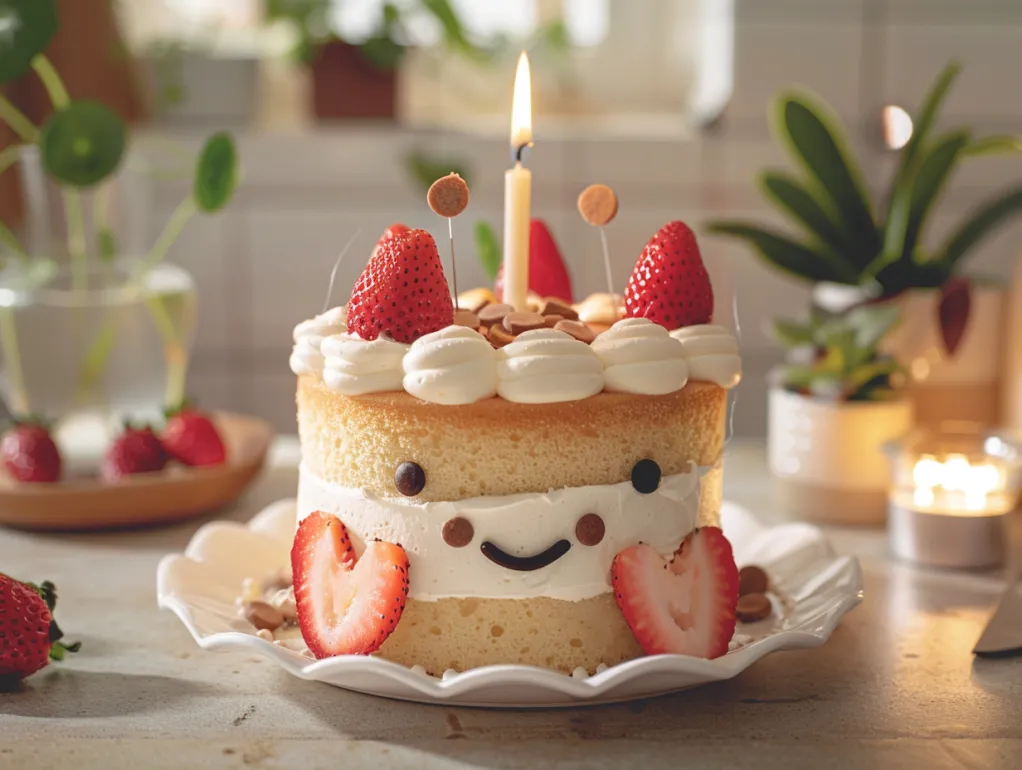
Jellycat Birthday Cake: The Cutest Thing You’ll Ever Bake
- Total Time: 30 minutes
- Yield: 8–10 slices of pure joy 1x
Description
Okay, so you know those adorable Jellycat stuffed animals that make you go “awww” every time you see them? Well, someone went and turned that energy into a CAKE. This Jellycat Birthday Cake is basically a fluffy vanilla sponge cake that looks like it belongs in a toy store window. We’re talking two layers of pure happiness, covered in the fluffiest buttercream, with little piped dots that look like the softest plush fur, and a face so cute you’ll almost feel bad eating it. Almost. This is the cake that makes grown adults squeal and kids lose their absolute minds. Perfect for birthdays, baby showers, or just because you need something ridiculously adorable in your life.
Ingredients
For the Cake:
- 2 1/2 cups all-purpose flour
- 2 1/2 tsp baking powder
- 1/2 tsp salt
- 1/2 cup unsalted butter, room temp
- 1 3/4 cups granulated sugar
- 4 large eggs
- 2 tsp vanilla extract
- 1 1/4 cups whole milk
For the Buttercream:
- 1 cup unsalted butter, room temp
- 4 cups powdered sugar
- 1/4 cup heavy cream
- 2 tsp vanilla extract
- Pinch of salt
For the Face & Details:
- Mini chocolate chips (for eyes)
- 1 piece of chocolate or candy (for mouth)
- Food coloring (optional, for colored arms/details)
- Fresh strawberries (for decoration)
- 1 birthday candle
Instructions
Preheat your oven to 350°F. Grease and flour two 6-inch round cake pans (or use 8-inch if you want a bigger baby).
In a bowl, whisk together flour, baking powder, and salt. Set aside.
Cream butter and sugar until light and fluffy (about 4 minutes). Add eggs one at a time, then vanilla.
Alternate adding the flour mixture and milk, starting and ending with flour. Mix until just combined.
Divide batter between pans and bake 25-30 minutes until a toothpick comes out clean.
Cool completely before even THINKING about decorating.
Beat butter until super fluffy (like, 5 minutes of beating).
Gradually add powdered sugar, then cream, vanilla, and salt.
Beat until it’s cloud-like and perfect for piping.
Level your cake layers if needed (we want this baby sitting pretty).
Place bottom layer on your serving plate. Spread a layer of buttercream on top.
Add the second layer and cover the entire cake with a thin crumb coat. Chill for 30 minutes.
Apply a final layer of buttercream, making it as smooth as you can.
Fill a piping bag with buttercream and use a round tip to pipe little dots all around the cake edges (top and bottom). These are your “plush” details.
Gently press mini chocolate chips for eyes and use a small piece of chocolate for the mouth.
If you’re feeling fancy, pipe little arms using colored buttercream.
Top with fresh strawberries and stick in that birthday candle.
Take approximately 47 photos before cutting.
Watch everyone’s faces light up when they see it.
Try not to cry when you have to cut into something so adorable.
Notes
Serve with vanilla ice cream and watch people melt from the cuteness.
Pair with some actual Jellycat toys for the ultimate photo op.
Save a slice for yourself because you EARNED it.
- Prep Time: 30 minutes
Nutrition
- Calories: ~520 kcal of adorable deliciousness