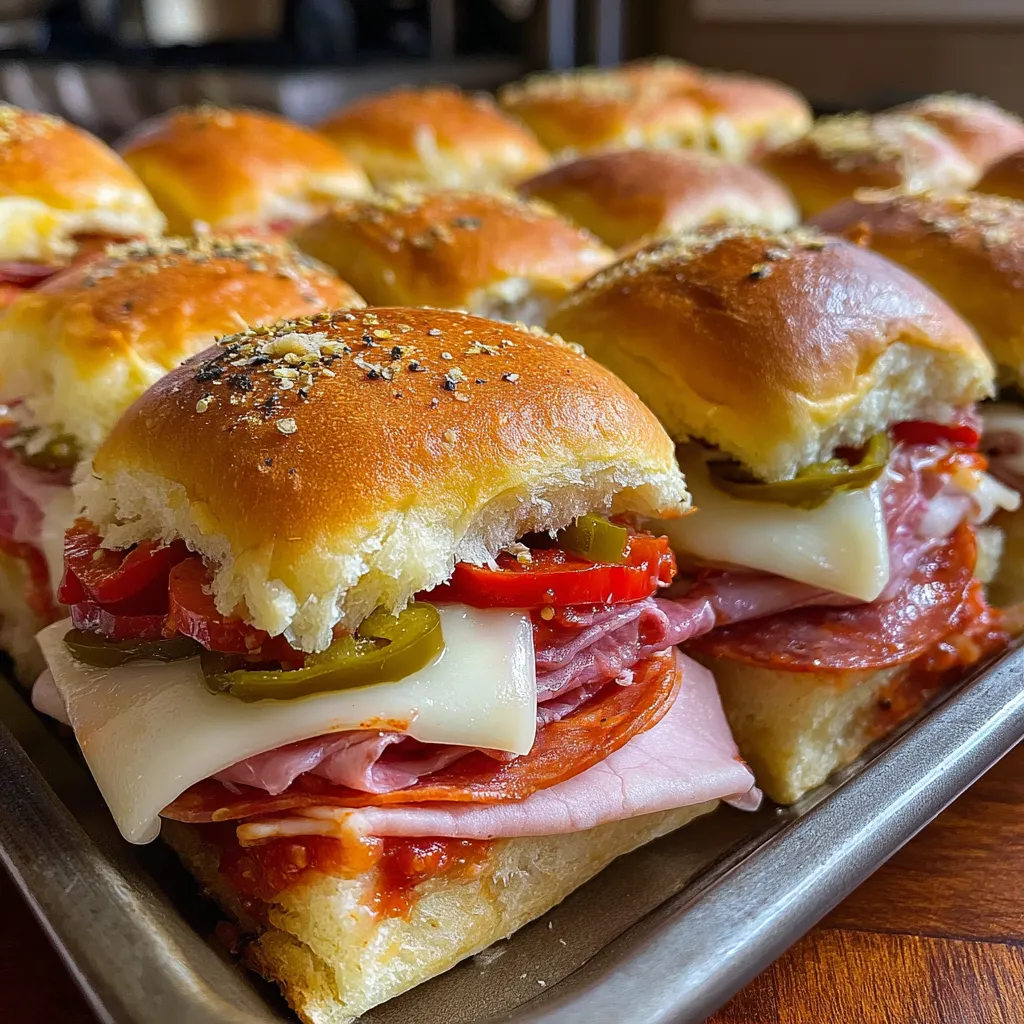
Okay, so imagine all the best parts of an Italian sub — the salty meats, melty cheese, tangy peppers, and that unbeatable combo of oil and vinegar — but baked into slider form with buttery, garlicky tops that get all golden and crispy. These bad boys are basically party food royalty. You make a whole pan at once, which means less work and more time to actually enjoy yourself. They’re perfect for game day, potlucks, family gatherings, or honestly just a Tuesday when you want something that feels special but requires minimal effort. Warning: people will hover around the pan like seagulls, so maybe make two batches.
Why You’ll Love This Recipe
- Feeds a crowd without the fuss. No individual sandwich assembly required.
- Everything gets baked together. The flavors meld into something magical.
- That butter topping though. Seriously, it’s the secret weapon.
- Customizable as hell. Swap meats, add more peppers, go wild.
- Make-ahead friendly. Assemble and bake later when you’re ready.
- Leftovers reheat beautifully. If there are any leftovers, which is doubtful.
The Good Stuff You’ll Need
For the Sliders:
- 12 Hawaiian sweet rolls (the connected kind in a pack)
- 1/4 lb sliced salami
- 1/4 lb sliced pepperoni
- 1/4 lb sliced capicola or ham
- 1/4 lb sliced provolone cheese
- 1/4 lb sliced mozzarella cheese
- 1/2 cup sliced pepperoncini or banana peppers
- 1/2 cup roasted red peppers, drained and sliced
- 1/4 cup thinly sliced red onion (optional)
- Shredded iceberg lettuce (for serving)
- Sliced tomatoes (for serving)
For the Magical Butter Topping:
- 1/2 cup (1 stick) unsalted butter, melted
- 2 cloves garlic, minced
- 1 tbsp Italian seasoning
- 1/2 tsp red pepper flakes
- 2 tbsp grated parmesan cheese
- 1 tbsp red wine vinegar
For Extra Flavor:
- 2 tbsp olive oil
- 1 tbsp red wine vinegar
- 1/2 tsp dried oregano
Let’s Do This
Step 1: Prep Your Pan
Preheat oven to 350°F.
Spray a 9×13 baking dish with cooking spray or line it with parchment paper for easy cleanup.
Step 2: Slice and Layer
Without separating the rolls, slice the entire block of Hawaiian rolls in half horizontally using a serrated knife. Keep the top and bottom connected to their respective halves.
Place the bottom half in your prepared baking dish.
Step 3: Build That Flavor Tower
Drizzle the bottom half with olive oil, red wine vinegar, and sprinkle with oregano.
Layer on the meats, alternating and overlapping: salami, pepperoni, capicola. Get generous — this isn’t the time to be shy.
Add both cheeses, layering them over the meat.
Scatter the pepperoncini, roasted red peppers, and red onion (if using) over the cheese.
Place the top half of the rolls over everything. Press down gently so it all compacts a bit.
Step 4: The Magic Happens
In a small bowl, mix together melted butter, minced garlic, Italian seasoning, red pepper flakes, parmesan, and red wine vinegar.
Brush this glorious mixture all over the top of the rolls. Use it all — don’t hold back. Get into every crevice.
Step 5: Bake to Golden Perfection
Cover the pan tightly with aluminum foil.
Bake for 15 minutes covered.
Remove foil and bake another 10–15 minutes until the tops are golden brown and the cheese is melted and gooey.
Step 6: Slice and Devour
Let cool for 5 minutes (if you can wait that long).
Use the natural perforations in the rolls to cut into individual sliders.
Serve with shredded lettuce and tomato slices on the side for people to add if they want.
Serving Suggestions
- Serve with chips, pasta salad, or a simple green salad.
- Set out extra pepperoncini, hot sauce, or Italian dressing for people to customize.
- These pair perfectly with cold beer, iced tea, or Italian sodas.
Switch It Up
Go Veggie: Skip the meat and load up with grilled eggplant, artichoke hearts, olives, and extra cheese.
Turkey Club Style: Use turkey, bacon, Swiss cheese, and add mayo instead of the oil/vinegar.
Spicy Lover: Add sliced jalapeños and use pepper jack cheese instead of mozzarella.
French Dip Vibe: Use roast beef and provolone, and serve with au jus for dipping.
Extra Herbs: Add fresh basil leaves between the meat and cheese layers.
Make-Ahead Tips
- Assemble the sliders completely (including the butter topping) up to 24 hours ahead. Cover tightly and refrigerate until ready to bake.
- If baking from cold, add 5–10 minutes to the covered baking time.
- Leftover sliders keep 2–3 days in the fridge. Reheat in the oven at 300°F for about 10 minutes.
- You can also freeze assembled (unbaked) sliders for up to a month. Thaw overnight in the fridge before baking.
Questions People Actually Ask
Q: Can I use regular sandwich rolls?
A: Sure, but Hawaiian rolls add that slightly sweet contrast that makes these extra special. If you use regular rolls, you might want to brush them with a little honey mixed into the butter.
Q: Do I have to use all those meats?
A: Nope! Use whatever Italian meats you like. Even just two types work great.
Q: Can I add the lettuce and tomato before baking?
A: Don’t do it. They’ll get soggy and sad. Always serve those fresh on the side.
Q: How do I keep the tops from getting too brown?
A: If they’re browning too fast, tent loosely with foil for the last few minutes.
Q: Can I make these gluten-free?
A: Absolutely — just swap in your favorite GF slider rolls or buns.
Q: What if I don’t have Italian seasoning?
A: Mix equal parts dried basil, oregano, and a pinch of thyme. Boom, homemade Italian seasoning.
Hot Italian Sub Sliders: A Deliciously Easy Recipe!
- Total Time: 19 minute
- Yield: 12 sliders 1x
Description
Okay, so imagine all the best parts of an Italian sub — the salty meats, melty cheese, tangy peppers, and that unbeatable combo of oil and vinegar — but baked into slider form with buttery, garlicky tops that get all golden and crispy. These bad boys are basically party food royalty. You make a whole pan at once, which means less work and more time to actually enjoy yourself. They’re perfect for game day, potlucks, family gatherings, or honestly just a Tuesday when you want something that feels special but requires minimal effort. Warning: people will hover around the pan like seagulls, so maybe make two batches.
Ingredients
For the Sliders:
- 12 Hawaiian sweet rolls (the connected kind in a pack)
- 1/4 lb sliced salami
- 1/4 lb sliced pepperoni
- 1/4 lb sliced capicola or ham
- 1/4 lb sliced provolone cheese
- 1/4 lb sliced mozzarella cheese
- 1/2 cup sliced pepperoncini or banana peppers
- 1/2 cup roasted red peppers, drained and sliced
- 1/4 cup thinly sliced red onion (optional)
- Shredded iceberg lettuce (for serving)
- Sliced tomatoes (for serving)
For the Magical Butter Topping:
- 1/2 cup (1 stick) unsalted butter, melted
- 2 cloves garlic, minced
- 1 tbsp Italian seasoning
- 1/2 tsp red pepper flakes
- 2 tbsp grated parmesan cheese
- 1 tbsp red wine vinegar
For Extra Flavor:
- 2 tbsp olive oil
- 1 tbsp red wine vinegar
- 1/2 tsp dried oregano
Instructions
Preheat oven to 350°F.
Spray a 9×13 baking dish with cooking spray or line it with parchment paper for easy cleanup.
Without separating the rolls, slice the entire block of Hawaiian rolls in half horizontally using a serrated knife. Keep the top and bottom connected to their respective halves.
Place the bottom half in your prepared baking dish.
Drizzle the bottom half with olive oil, red wine vinegar, and sprinkle with oregano.
Layer on the meats, alternating and overlapping: salami, pepperoni, capicola. Get generous — this isn’t the time to be shy.
Add both cheeses, layering them over the meat.
Scatter the pepperoncini, roasted red peppers, and red onion (if using) over the cheese.
Place the top half of the rolls over everything. Press down gently so it all compacts a bit.
In a small bowl, mix together melted butter, minced garlic, Italian seasoning, red pepper flakes, parmesan, and red wine vinegar.
Brush this glorious mixture all over the top of the rolls. Use it all — don’t hold back. Get into every crevice.
Cover the pan tightly with aluminum foil.
Bake for 15 minutes covered.
Remove foil and bake another 10–15 minutes until the tops are golden brown and the cheese is melted and gooey.
Let cool for 5 minutes (if you can wait that long).
Use the natural perforations in the rolls to cut into individual sliders.
Serve with shredded lettuce and tomato slices on the side for people to add if they want.
Notes
- Serve with chips, pasta salad, or a simple green salad.
- Set out extra pepperoncini, hot sauce, or Italian dressing for people to customize.
- These pair perfectly with cold beer, iced tea, or Italian sodas.
- Prep Time: 15 minutes
- Cook Time: 25–30 minutes
Nutrition
- Calories: ~320 kcal
- Fat: ~18g
- Carbohydrates: ~24g
- Protein: ~15g