Description
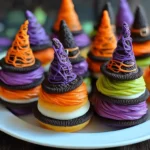
Get ready to cast the most delicious spell of the season with these absolutely enchanting Halloween Witch Hat Cookies. These little beauties are basically what happens when chocolate cookies decide to put on their Halloween costume and become the most adorable treats you’ve ever seen. We’re talking rich, fudgy chocolate cookies that serve as the perfect “brim” topped with upside-down chocolate ice cream cones that look exactly like pointy witch hats, all held together with melted chocolate and decorated with colorful icing to make them as spooky or as cute as you want. They’re the kind of cookies that make kids (and adults) squeal with delight and have everyone asking if you went to pastry school. Fair warning: these are almost too cute to eat, but trust me, you’ll want to devour every magical bite.
Ingredients
For the Chocolate Cookie Base:
- 2 1/4 cups all-purpose flour
- 3/4 cup unsweetened cocoa powder
- 1 tsp baking soda
- 1/2 tsp salt
- 1 cup butter, softened
- 1 1/4 cups brown sugar, packed
- 1/2 cup granulated sugar
- 2 large eggs
- 2 tsp vanilla extract
- 2 cups chocolate chips (mini work best)
For the Witch Hat Assembly:
- 24–30 sugar ice cream cones (the pointed kind)
- 2 cups chocolate chips or candy melts for “glue”
- 2 tbsp coconut oil or shortening (helps chocolate melt smoothly)
For the Decorating Magic:
- 1 batch royal icing or store-bought decorating icing
- Food coloring (orange, purple, green, black)
- Halloween sprinkles
- Candy eyes or mini chocolate chips
- Orange and black gel decorating icing
- Mini candy pieces (like mini M&Ms or candy corn)
For Royal Icing (if making from scratch):
- 3 cups powdered sugar
- 2 large egg whites or 3 tbsp meringue powder
- 1 tsp vanilla extract
- Food coloring as desired
Instructions
Preheat oven to 350°F and line baking sheets with parchment paper.
In a medium bowl, whisk together flour, cocoa powder, baking soda, and salt.
In a large bowl, cream together softened butter, brown sugar, and granulated sugar until light and fluffy (about 3-4 minutes).
Beat in eggs one at a time, then vanilla extract.
Gradually mix in the flour mixture until just combined.
Fold in chocolate chips.
Scoop dough into balls about 2 tablespoons each (you want them big enough to support the cones).
Place on prepared baking sheets, leaving space between cookies.
Bake for 10-12 minutes until edges are set but centers still look slightly soft.
Let cool on baking sheet for 5 minutes, then transfer to wire racks.
Cool completely before decorating.
Melt chocolate chips with coconut oil in microwave in 30-second intervals, stirring between each, until smooth.
You can also use a double boiler if you prefer.
The chocolate should be smooth and easy to work with but not too hot.
Dip the open end of each ice cream cone into the melted chocolate.
Immediately place chocolate-side down onto the center of a cooled cookie.
Press gently to secure, then let sit for 10-15 minutes until chocolate sets.
Work quickly but carefully — the chocolate “glue” sets fast.
If making royal icing: Beat egg whites (or reconstituted meringue powder) until frothy, then gradually add powdered sugar and vanilla. Beat until thick and glossy.
Divide into small bowls and tint with food coloring as desired.
Transfer to piping bags or squeeze bottles for easy decorating.
Pipe bands around the base of each hat in different colors.
Add dots, stripes, stars, or spooky designs with contrasting colors.
While icing is wet, add sprinkles or small candy pieces.
Create spooky faces on the cookie base with candy eyes or piped icing.
Let your creativity run wild — each hat can be unique!
Allow decorated cookies to sit for at least 30 minutes until icing is completely set.
Store in airtight containers with layers separated by parchment paper.
These actually taste better after sitting overnight as flavors meld together.
Notes
Perfect for Halloween parties, school events, or trick-or-treater rewards.
Display them on a tiered stand for maximum spooky impact.
Pair with hot apple cider or Halloween-themed punch.
Great alongside other Halloween treats like candy apples or pumpkin bars.
- Prep Time: 45 minutes
- Cook Time: 12 minutes per batch
Nutrition
- Calories: ~285 kcal
- Carbohydrates: ~45g
- Protein: ~4g