Description
Okay, so picture this: you’re craving a grilled cheese sandwich AND a burrito at the same time (don’t pretend like this hasn’t happened to you). Instead of choosing, some genius decided to combine them into one glorious, melty, crispy-on-the-outside, gooey-on-the-inside masterpiece. We’re talking a flour tortilla loaded with all your favorite burrito fillings, wrapped up tight, then grilled like a sandwich until it’s golden brown and the cheese is oozing out the sides. It’s the kind of food mashup that makes you question why nobody thought of this sooner. My teenagers literally lose their minds over these things, and honestly? I get it. It’s comfort food that doesn’t follow the rules, and sometimes that’s exactly what you need.
Ingredients
For the Basic Filling:
- 4 large flour tortillas (burrito-size, not taco-size)
- 2 cups cooked rice (day-old rice works great)
- 1 can (15 oz) black beans, drained and rinsed
- 2 cups shredded cheese (Mexican blend or cheddar)
- 1 cup cooked protein (ground beef, chicken, carnitas, whatever)
The Flavor Boosters:
- 1/2 cup salsa or pico de gallo
- 1/4 cup sour cream
- 2 tbsp taco seasoning
- 1 diced jalapeño (optional)
- 1/4 cup diced onion
- 2 cloves garlic, minced
- Fresh cilantro, chopped
For the Grilling Magic:
- Butter or olive oil for the pan
- Extra cheese for the outside (trust me on this)
Optional Add-Ins:
- Corn kernels
- Diced tomatoes
- Avocado or guacamole
- Hot sauce
- Pickled jalapeños
- Lettuce or spinach
Instructions
If your rice is cold, warm it up in the microwave with a splash of water. Season it with half the taco seasoning. In a large bowl, mix the seasoned rice, black beans, cooked protein, salsa, and remaining taco seasoning. Taste and adjust — this is your flavor base, so make it good.
Lay out your tortillas on a flat surface. Spread about 1/4 of the filling down the center of each tortilla, leaving about 2 inches on each side. Add sour cream, cheese, jalapeños, and any other add-ins you’re using. Don’t overfill — you need to be able to wrap these babies.
Fold the sides of the tortilla over the filling, then roll from the bottom up, tucking as you go to keep everything tight. The key is tension — you want it snug but not so tight that it tears.
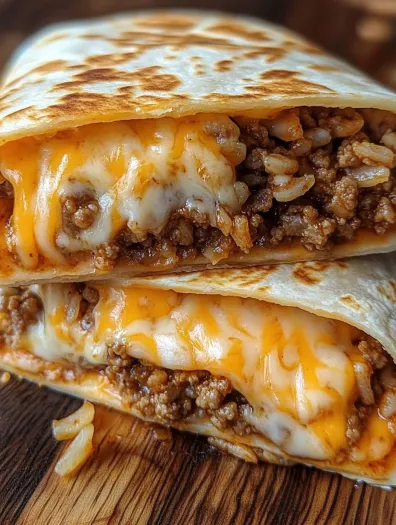
Heat a large skillet or griddle over medium heat. Brush or spray with oil or butter. Here’s the secret: sprinkle some shredded cheese directly on the pan where you’ll place the burrito. This creates that crispy cheese crust.
Place the burrito seam-side down on the cheese in the pan. Cook for 3-4 minutes until golden brown and crispy. Carefully flip (use a spatula to support it) and repeat on the other side. The cheese should be melted and starting to ooze out.
Let the burrito rest for 2-3 minutes before cutting — this helps everything set up. Slice diagonally to show off that beautiful cross-section.
Notes
Don’t Overfill: Less is more when it comes to filling. You want to be able to wrap it without everything exploding out.
Cool Fillings: Let hot fillings cool slightly before assembling to prevent the tortilla from getting soggy.
The Cheese Crust: That extra cheese on the pan creates an amazing crispy exterior that’s pure genius.
Medium Heat: Too high and the outside burns before the inside heats through.
- Prep Time: 20 minutes
- Cook Time: 8 minutes
Nutrition
- Calories: ~520 kcal
- Fat: ~22g
- Carbohydrates: ~58g
- Protein: ~25g