What the heck is this?
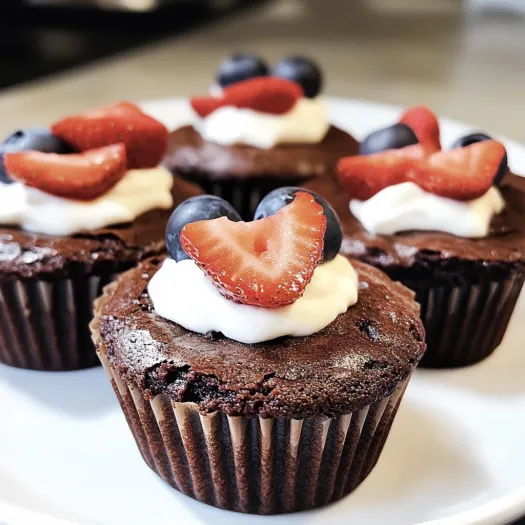
Imagine all the rich, fudgy goodness of a brownie—but in a perfectly portioned, cupcake-style cup that you don’t have to slice, fight over, or secretly reshape to hide the uneven edge. Brownie cups are like the VIP version of regular brownies: gooey centers, chewy edges, and you get the whole thing to yourself. They’re faster to bake, cuter to serve, and dangerously easy to make. Bonus: no forks required.
Why You’ll Love This Recipe
- Fudgy, chocolatey, and perfectly portioned
- No slicing. No mess. No drama
- Faster baking time than a whole pan
- Easy to freeze and stash for emergencies (yes, dessert emergencies are real)
- Customize with toppings like a brownie artist
The Good Stuff You’ll Need
- 1/2 cup (1 stick) unsalted butter
- 3/4 cup granulated sugar
- 1/2 cup brown sugar
- 2 large eggs
- 1 tsp vanilla extract
- 1/2 cup all-purpose flour
- 1/3 cup unsweetened cocoa powder
- 1/4 tsp salt
- 1/4 tsp baking powder
- 1/2 cup chocolate chips (plus more for topping if you’re feelin’ fancy)
Optional Toppings
- Crushed Oreos
- Mini marshmallows
- Chopped nuts
- A dollop of peanut butter or Nutella
- Sea salt flakes
Let’s Do This
Step 1: Get Preheated
Preheat your oven to 350°F (175°C). Line a muffin tin with paper liners or grease it well.
Step 2: Melt and Mix
Melt the butter in a microwave-safe bowl or on the stovetop. Stir in both sugars while it’s still warm.
Step 3: Add the Eggs and Vanilla
Whisk in the eggs one at a time, then stir in the vanilla. The batter will look glossy and smell amazing.
Step 4: Bring in the Dry Ingredients
In a separate bowl, mix flour, cocoa powder, salt, and baking powder. Fold this into the wet mixture until just combined.
Step 5: Stir in the Chips
Fold in the chocolate chips. Optional: taste test a few.
Step 6: Scoop and Bake
Scoop the batter into the muffin tin, filling each about 3/4 full. Bake for 16 to 20 minutes until the tops look set but the centers are still slightly soft.
Step 7: Cool
Let them cool in the pan for 5 to 10 minutes before transferring to a wire rack.
Serving Suggestions
- Top warm brownie cups with a scoop of vanilla ice cream
- Drizzle with melted chocolate or caramel sauce
- Serve with fresh berries
Switch It Up
- Add a mini peanut butter cup in the center before baking
- Mix in 1 tsp instant espresso powder for mocha flavor
- Use almond flour for a gluten-free version
- Swirl in cream cheese for cheesecake brownie vibes
Make-Ahead Tips
- Store at room temp in an airtight container for 3 to 4 days
- Freeze individually wrapped cups for up to 3 months
- Reheat in the microwave for 15 to 20 seconds

Questions People Actually Ask
Q: Can I double this recipe?
A: Yes, just use two muffin tins or bake in batches.
Q: How do I know they’re done?
A: Tops should look shiny and crackly, and a toothpick should come out with just a few moist crumbs.
Q: Can I use a boxed mix?
A: Definitely. Just follow the box instructions and bake in muffin tins instead of a pan.
Easy Homemade Brownie Cups: Because Why Share a Whole Pan When You Can Have Your Own?
- Total Time: 28 minutes
- Yield: 12 brownie cups 1x
Description
Imagine all the rich, fudgy goodness of a brownie—but in a perfectly portioned, cupcake-style cup that you don’t have to slice, fight over, or secretly reshape to hide the uneven edge. Brownie cups are like the VIP version of regular brownies: gooey centers, chewy edges, and you get the whole thing to yourself. They’re faster to bake, cuter to serve, and dangerously easy to make. Bonus: no forks required.
Ingredients
1/2 cup (1 stick) unsalted butter
3/4 cup granulated sugar
1/2 cup brown sugar
2 large eggs
1 tsp vanilla extract
1/2 cup all-purpose flour
1/3 cup unsweetened cocoa powder
1/4 tsp salt
1/4 tsp baking powder
1/2 cup chocolate chips (plus more for topping if you’re feelin’ fancy)
Optional Toppings
Crushed Oreos
Mini marshmallows
Chopped nuts
A dollop of peanut butter or Nutella
Sea salt flakes
Instructions
Step 1: Get Preheated
Preheat your oven to 350°F (175°C). Line a muffin tin with paper liners or grease it well.
Step 2: Melt and Mix
Melt the butter in a microwave-safe bowl or on the stovetop. Stir in both sugars while it’s still warm.
Step 3: Add the Eggs and Vanilla
Whisk in the eggs one at a time, then stir in the vanilla. The batter will look glossy and smell amazing.
Step 4: Bring in the Dry Ingredients
In a separate bowl, mix flour, cocoa powder, salt, and baking powder. Fold this into the wet mixture until just combined.
Step 5: Stir in the Chips
Fold in the chocolate chips. Optional: taste test a few.
Step 6: Scoop and Bake
Scoop the batter into the muffin tin, filling each about 3/4 full. Bake for 16 to 20 minutes until the tops look set but the centers are still slightly soft.
Step 7: Cool
Let them cool in the pan for 5 to 10 minutes before transferring to a wire rack.
Notes
Add a mini peanut butter cup in the center before baking
Mix in 1 tsp instant espresso powder for mocha flavor
Use almond flour for a gluten-free version
Swirl in cream cheese for cheesecake brownie vibes
- Prep Time: 10 minutes
- Cook Time: 18 minutes
Nutrition
- Calories: 220 kcal
- Protein: 3g