What the heck is this?
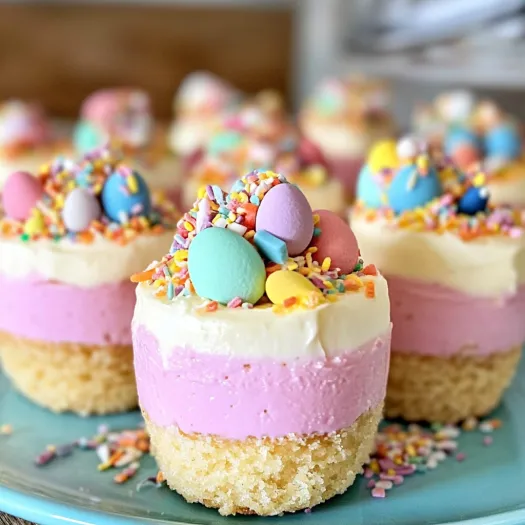
These Easter No-Bake Mini Cheesecakes are like the little happy bite-sized version of the classic dessert we all know and love, but better. Why? Because they’re no-bake! That’s right — just whip them up, pop them in the fridge, and let the magic happen. The crust is buttery and perfectly crisp, while the cheesecake filling is rich, creamy, and just the right amount of sweet. Plus, they’re topped with colorful Easter candies and berries, making them the ultimate festive treat. Easy to make, and even easier to devour, these mini cheesecakes will have everyone asking for the recipe.
Why You’ll Love This Recipe
- No baking required — perfect for when you want cheesecake without turning on the oven.
- Perfectly portioned mini cheesecakes, so no mess or fuss.
- Super creamy, indulgent cheesecake filling with just the right amount of sweetness.
- Topped with festive Easter candy and fresh berries for a pop of color and flavor.
- Ideal for Easter brunch or any spring celebration.
- Kids will love helping decorate them — it’s a fun family activity.
The Good Stuff You’ll Need
For the Crust:
- 1 ½ cups graham cracker crumbs
- ¼ cup melted butter
- 2 tbsp sugar
For the Cheesecake Filling:
- 16 oz cream cheese, softened
- ½ cup powdered sugar
- 1 tsp vanilla extract
- 1 cup heavy whipping cream
For the Topping:
- Easter-themed candies (chocolate eggs, jelly beans, etc.)
- Fresh berries (strawberries, raspberries, blueberries)
- Optional: whipped cream for extra fluff

Let’s Do This
Step 1: Make the Crust
In a medium bowl, combine graham cracker crumbs, melted butter, and sugar.
Stir until everything is well mixed and the crumbs are coated in butter.
Spoon about 1–2 tablespoons of the mixture into the bottom of each mini tart or muffin pan.
Press down gently with the back of a spoon to form a firm crust.
Chill the crust in the fridge for 10 minutes to set while you prepare the filling.
Step 2: Make the Cheesecake Filling
In a large mixing bowl, beat the softened cream cheese with a hand mixer until smooth and creamy.
Add the powdered sugar and vanilla extract, and continue to beat until fully combined.
In a separate bowl, whip the heavy cream until stiff peaks form.
Gently fold the whipped cream into the cream cheese mixture until smooth and fluffy.
Taste and adjust sweetness if needed.
Step 3: Assemble the Mini Cheesecakes
Spoon the cheesecake filling over the chilled crusts, filling each one to the top.
Smooth the tops with a spatula, and refrigerate for at least 3 hours (or overnight) to let them firm up.
Step 4: Decorate and Serve
Once the mini cheesecakes have set, it’s time to decorate!
Top each one with your favorite Easter candies and a few fresh berries for a burst of color.
If you want extra fluff, add a dollop of whipped cream on top.
Serve chilled and watch them disappear!
Serving Suggestions
- These mini cheesecakes make an excellent addition to your Easter brunch spread.
- Pair with a cold glass of lemonade or iced tea for a refreshing dessert experience.
- For an extra indulgence, drizzle some melted chocolate over the top before adding the candies.
Switch It Up
- Want to change the crust? Try using crushed Oreos or Biscoff cookies instead of graham crackers for a different flavor.
- Add a fruit compote on top for a tangy contrast to the sweetness of the cheesecake filling.
- For a more decadent treat, fold some chocolate chips into the cheesecake filling before refrigerating.
Make-Ahead Tips
- These mini cheesecakes can be made a day or two ahead of time. Just keep them covered in the fridge until ready to serve.
- If you’re short on time, you can prepare the crusts and filling ahead of time, then assemble them on the day you plan to serve.
- Leftovers (if there are any!) can be kept in the fridge for up to 4 days.

Questions People Actually Ask
Q: Can I use a different type of candy for the topping?
A: Absolutely! Feel free to use whatever Easter candy you prefer — jelly beans, chocolate bunnies, or even mini marshmallows would be delicious.
Q: Can I make these gluten-free?
A: Yes! Simply swap out the graham cracker crumbs for a gluten-free variety or use gluten-free cookies for the crust.
Q: Can I use regular sugar instead of powdered sugar?
A: Powdered sugar gives the cheesecake a smoother texture, but if you don’t have any, you can substitute regular sugar, just be sure to beat the mixture well.
Q: Can I make a full-sized cheesecake instead of mini ones?
A: Yep! Just press the crust mixture into the bottom of a pie pan or springform pan, and then pour the cheesecake filling over it. You may need to increase the chilling time to 4–6 hours, depending on the size of the pan.
Easter No-Bake Mini Cheesecakes: Your Springtime Sweet Treat
- Total Time: 15 minutes
- Yield: 12 mini cheesecakes 1x
Description
These Easter No-Bake Mini Cheesecakes are like the little happy bite-sized version of the classic dessert we all know and love, but better. Why? Because they’re no-bake! That’s right — just whip them up, pop them in the fridge, and let the magic happen. The crust is buttery and perfectly crisp, while the cheesecake filling is rich, creamy, and just the right amount of sweet. Plus, they’re topped with colorful Easter candies and berries, making them the ultimate festive treat. Easy to make, and even easier to devour, these mini cheesecakes will have everyone asking for the recipe.
Ingredients
For the Crust:
1 ½ cups graham cracker crumbs
¼ cup melted butter
2 tbsp sugar
For the Cheesecake Filling:
16 oz cream cheese, softened
½ cup powdered sugar
1 tsp vanilla extract
1 cup heavy whipping cream
For the Topping:
Easter-themed candies (chocolate eggs, jelly beans, etc.)
Fresh berries (strawberries, raspberries, blueberries)
Optional: whipped cream for extra fluff
Instructions
Step 1: Make the Crust
In a medium bowl, combine graham cracker crumbs, melted butter, and sugar.
Stir until everything is well mixed and the crumbs are coated in butter.
Spoon about 1–2 tablespoons of the mixture into the bottom of each mini tart or muffin pan.
Press down gently with the back of a spoon to form a firm crust.
Chill the crust in the fridge for 10 minutes to set while you prepare the filling.
Step 2: Make the Cheesecake Filling
In a large mixing bowl, beat the softened cream cheese with a hand mixer until smooth and creamy.
Add the powdered sugar and vanilla extract, and continue to beat until fully combined.
In a separate bowl, whip the heavy cream until stiff peaks form.
Gently fold the whipped cream into the cream cheese mixture until smooth and fluffy.
Taste and adjust sweetness if needed.
Step 3: Assemble the Mini Cheesecakes
Spoon the cheesecake filling over the chilled crusts, filling each one to the top.
Smooth the tops with a spatula, and refrigerate for at least 3 hours (or overnight) to let them firm up.
Step 4: Decorate and Serve
Once the mini cheesecakes have set, it’s time to decorate!
Top each one with your favorite Easter candies and a few fresh berries for a burst of color.
If you want extra fluff, add a dollop of whipped cream on top.
Serve chilled and watch them disappear!
Notes
These mini cheesecakes make an excellent addition to your Easter brunch spread.
Pair with a cold glass of lemonade or iced tea for a refreshing dessert experience.
For an extra indulgence, drizzle some melted chocolate over the top before adding the candies
- Prep Time: 15 minutes
Nutrition
- Calories: ~350 calories
- Protein: ~5g