Okay, so imagine if someone took the most elegant, sophisticated dessert in the French pastry canon—crème brûlée with its creamy custard and crackling caramelized sugar top—and said “what if we made this into a COOKIE?” And somehow, impossibly, it actually works. Crème Brûlée Cookies are basically soft, buttery sugar cookies with a creamy vanilla custard center, topped with a layer of sugar that you literally TORCH until it forms that signature glass-like caramelized shell. They’re crispy on top, creamy in the middle, soft and buttery around the edges, and require you to use a kitchen torch which automatically makes you feel like a professional pastry chef. I made these for a dinner party once and someone asked if I went to culinary school in Paris. I did not. I went to YouTube University. Another time I brought them to a cookie exchange and people were taking photos like they were food bloggers. These cookies have MAIN CHARACTER ENERGY.
Why You’ll Love This Recipe
Fancy AF without being impossible. These look and taste like they’re from a French bakery. Actually just require basic baking skills and a torch.
That torch moment. Using a kitchen torch on cookies is deeply satisfying on a spiritual level. You’re basically playing with fire.
The CRACK. Breaking through that caramelized sugar shell with your teeth is pure dessert theater.
Creamy custard center. Real vanilla custard filling makes these special and keeps them from being just regular cookies.
Impressive presentation. Serve these and people will assume you have skills you may or may not actually possess.
Customizable sweetness. Control how much caramelized sugar you add for your preferred level of sweetness and crunch.
The Good Stuff You’ll Need
For the Cookie Dough:
- 2 1/2 cups all-purpose flour
- 1/2 tsp baking powder
- 1/4 tsp salt
- 1 cup (2 sticks) unsalted butter, softened
- 3/4 cup granulated sugar
- 1 large egg
- 1 large egg yolk (extra richness)
- 2 tsp vanilla extract
- 1/2 tsp almond extract (optional but adds sophistication)
For the Vanilla Custard Filling:
- 3 large egg yolks
- 1/4 cup granulated sugar
- 2 tbsp cornstarch
- 1 cup whole milk
- 1/2 cup heavy cream
- 1 vanilla bean (or 2 tsp vanilla extract—bean is better for aesthetics)
- 2 tbsp unsalted butter
- Pinch of salt
For the Brûlée Topping:
- 1/2 to 3/4 cup granulated sugar (for torching)
- You’ll need about 1-2 tsp per cookie
Equipment:
- Kitchen torch (NON-NEGOTIABLE—this is essential)
- Cookie scoop or spoon
- Baking sheets
- Parchment paper
- Saucepan for custard
- Whisk
- Piping bag or zip-top bag (for filling)
- Round cookie cutter or glass (about 3 inches)
Let’s Do This
Step 1: Make the Custard Filling (Do This First)
In a medium saucepan, combine milk and cream. If using a vanilla bean, split it lengthwise, scrape out the seeds, and add both seeds and pod to the milk mixture.
Heat over medium until it just starts to simmer. Remove from heat and let steep for 10 minutes. Remove the vanilla pod.
In a bowl, whisk together egg yolks, sugar, and cornstarch until smooth and pale.
Slowly pour about 1/3 of the hot milk mixture into the egg mixture while whisking constantly (this is called tempering—it prevents scrambled eggs).
Pour the tempered egg mixture back into the saucepan with the remaining milk.
Cook over medium heat, whisking constantly, until the custard thickens significantly—about 3-5 minutes. It should coat the back of a spoon and hold a line when you drag your finger through it.
Remove from heat. Whisk in butter and salt until smooth.
Transfer to a bowl, press plastic wrap directly onto the surface (prevents a skin from forming), and refrigerate for at least 2 hours until completely cold and thick.
Step 2: Make the Cookie Dough
In a medium bowl, whisk together flour, baking powder, and salt. Set aside.
In a large bowl (or stand mixer), beat softened butter and sugar on medium-high speed for 3-4 minutes until light, fluffy, and pale. Don’t rush this—air incorporation is key.
Add the whole egg and egg yolk, one at a time, beating well after each addition.
Mix in vanilla extract and almond extract (if using).
Add the flour mixture and mix on low speed until just combined. Don’t overmix or cookies will be tough.
Divide dough in half, flatten each half into a disc, wrap in plastic wrap.
Refrigerate for at least 1 hour or up to 3 days. Chilled dough is easier to work with.
Step 3: Shape the Cookies
Preheat oven to 350°F (175°C). Line two baking sheets with parchment paper.
Remove one disc of dough from the fridge. Let sit for 5-10 minutes so it’s workable but still cold.
On a lightly floured surface, roll dough to about 1/4-inch thickness.
Use a 3-inch round cutter to cut out circles. You should get about 12-15 circles per disc.
Place cookies on prepared baking sheets about 2 inches apart.
Use your thumb or the back of a rounded tablespoon to press a deep indent in the center of each cookie. Make it DEEP—about halfway through. This is where the custard goes.
Re-roll scraps and repeat.
Step 4: Bake
Bake for 12-15 minutes until the edges are just barely starting to turn golden. The centers should still look pale.
Don’t overbake—these should be soft and tender, not crispy.
Remove from oven and IMMEDIATELY re-press the centers if they puffed up during baking. Use the back of a spoon while they’re still hot.
Let cool on the baking sheet for 5 minutes, then transfer to a wire rack to cool completely.
Step 5: Fill with Custard
Once cookies are completely cool, it’s filling time.
Transfer the chilled custard to a piping bag or zip-top bag with a corner snipped off.
Pipe custard into the indent of each cookie, filling it generously so the custard is level with or slightly mounded above the cookie surface.
Use about 1-2 tablespoons of custard per cookie.
Smooth the top with a small offset spatula or the back of a spoon.
Place filled cookies in the refrigerator for at least 30 minutes to let the custard firm up before torching.
Step 6: The Brûlée Moment (The Fun Part)
Right before serving (within 30 minutes), sprinkle about 1-2 teaspoons of granulated sugar evenly over the custard filling on each cookie.
Spread it around so you have an even layer covering the entire custard surface.
Get your kitchen torch. Feel powerful. You’re about to use FIRE.
Hold the torch 3-4 inches away from the sugar. Move it in a circular motion over the surface.
Watch the sugar melt, bubble, and turn golden brown. Keep going until it’s deep amber and caramelized.
Don’t rush—you want proper caramelization, not just melted sugar. It should look like glass.
Let the sugar cool and harden for about 2-3 minutes. It will form that signature crispy shell.
Serve immediately for maximum crackle effect.
Step 7: Serve and Amaze
Arrange on a serving platter.
Optional: Dust the edges with powdered sugar for extra elegance.
Watch as people’s eyes light up when they crack through that sugar shell.
Accept compliments graciously even though you know it was actually pretty straightforward.
Serving Suggestions
These are already a complete dessert experience, but here’s how to make them even MORE special:
- Serve with espresso or coffee for an elegant afternoon treat
- Pair with champagne or dessert wine for fancy entertaining
- Arrange on individual dessert plates with fresh berries
- Dust the plate with cocoa powder for restaurant-style plating
- Serve alongside vanilla ice cream
- Add a mint leaf garnish for color
- Serve at the end of a dinner party for maximum impact
Switch It Up
Chocolate Crème Brûlée Cookies: Add 1/4 cup cocoa powder to the cookie dough and reduce flour by 1/4 cup.
Lemon Crème Brûlée: Add lemon zest to the custard and use lemon extract in the cookies.
Coffee Custard: Add 1 tbsp instant espresso powder to the custard for mocha flavor.
Lavender Crème Brûlée: Steep 1 tbsp culinary lavender with the milk/cream mixture.
Matcha Version: Add 1 tbsp matcha powder to the custard for green tea flavor.
Caramel Custard: Make a caramel base in the cookie indent before adding custard.
Raspberry Swirl: Add a tiny dollop of raspberry jam to the custard before torching.
Brown Butter Cookies: Brown the butter before making the dough for nutty depth.
Storage and Make-Ahead Tips
These require some planning but are worth the effort.
Cookie dough: Make and refrigerate for up to 3 days, or freeze for up to 3 months.
Baked unfilled cookies: Store in an airtight container for up to 5 days before filling.
Custard: Make up to 3 days ahead and keep refrigerated.
Assembled cookies (before torching): Fill cookies and refrigerate for up to 24 hours. Torch right before serving.
After torching: Serve within 30 minutes to 1 hour for best texture. The caramelized sugar softens over time.
Don’t torch ahead: The sugar shell will dissolve into the custard if left too long. Always torch just before serving.
Freezing: Not recommended after assembly. The custard texture changes and the cookie softens.
Why This Works So Damn Well
These cookies are basically edible chemistry experiments that happen to be delicious.
The deep indent creates the perfect vessel for custard without it spilling over the sides.
Re-pressing after baking ensures you maintain that custard well even after the cookies puff up.
Chilling the custard makes it thick enough to stay in place and not run all over the cookie.
Sugar caramelizes at high heat from the torch, creating that signature crackling shell through the Maillard reaction.
The contrast of textures—crispy sugar, creamy custard, soft cookie—is what makes these special and memorable.
Vanilla bean adds those beautiful black flecks that scream “fancy French dessert” even though you made them at home.
Torching just before serving ensures maximum crackle. The sugar stays hard and glass-like only briefly after caramelizing.
The extra egg yolk in both the cookie dough and custard creates richness and that signature crème brûlée flavor.
When to Make These
Dinner Parties: End a meal with these and your guests will never forget it.
Anniversary Celebration: Romantic, elegant, and impressive. Perfect for special occasions.
Valentine’s Day: These scream “I put effort into this” without actually being that difficult.
Bridal Shower: Fancy, feminine, and photogenic. Ideal for elegant gatherings.
Holiday Dessert Table: Stand out from the standard cookies with something unexpected.
Date Night at Home: Make these together and torch them together. It’s basically foreplay.
Birthday Treat: For the person who deserves something more special than regular cookies.
Questions People Actually Ask
Q: Can I make these without a torch? A: You can use the broiler on HIGH, watching carefully, but it won’t give the same precise caramelization. The torch is really the way to go.
Q: My custard is lumpy. What happened? A: You heated it too fast or didn’t whisk constantly. Strain it through a fine-mesh sieve to remove lumps.
Q: The sugar isn’t caramelizing, just melting. A: Keep the torch on it longer and closer. It needs sustained heat to actually caramelize, not just melt.
Q: My cookie indents filled in during baking. A: You didn’t press deep enough initially, or you didn’t re-press immediately after baking while still hot.
Q: The custard is too runny. A: You didn’t cook it long enough. It should be THICK—like pudding consistency. Cook longer next time.
Q: The caramelized sugar melted into the custard. A: You torched too far in advance. Torch only 30 minutes to 1 hour before serving maximum.
Q: Can I use store-bought custard or pudding? A: You CAN use vanilla pudding mix if desperate, but homemade custard is what makes these special. Don’t skip it.
Q: My cookies are too hard. A: You overbaked them. They should be soft and tender, not crispy. Bake less time next time.
Q: The custard is weeping/separating. A: Either it wasn’t thick enough initially, or it’s been sitting too long. Make sure it’s properly thickened and serve within 24 hours of filling.
Print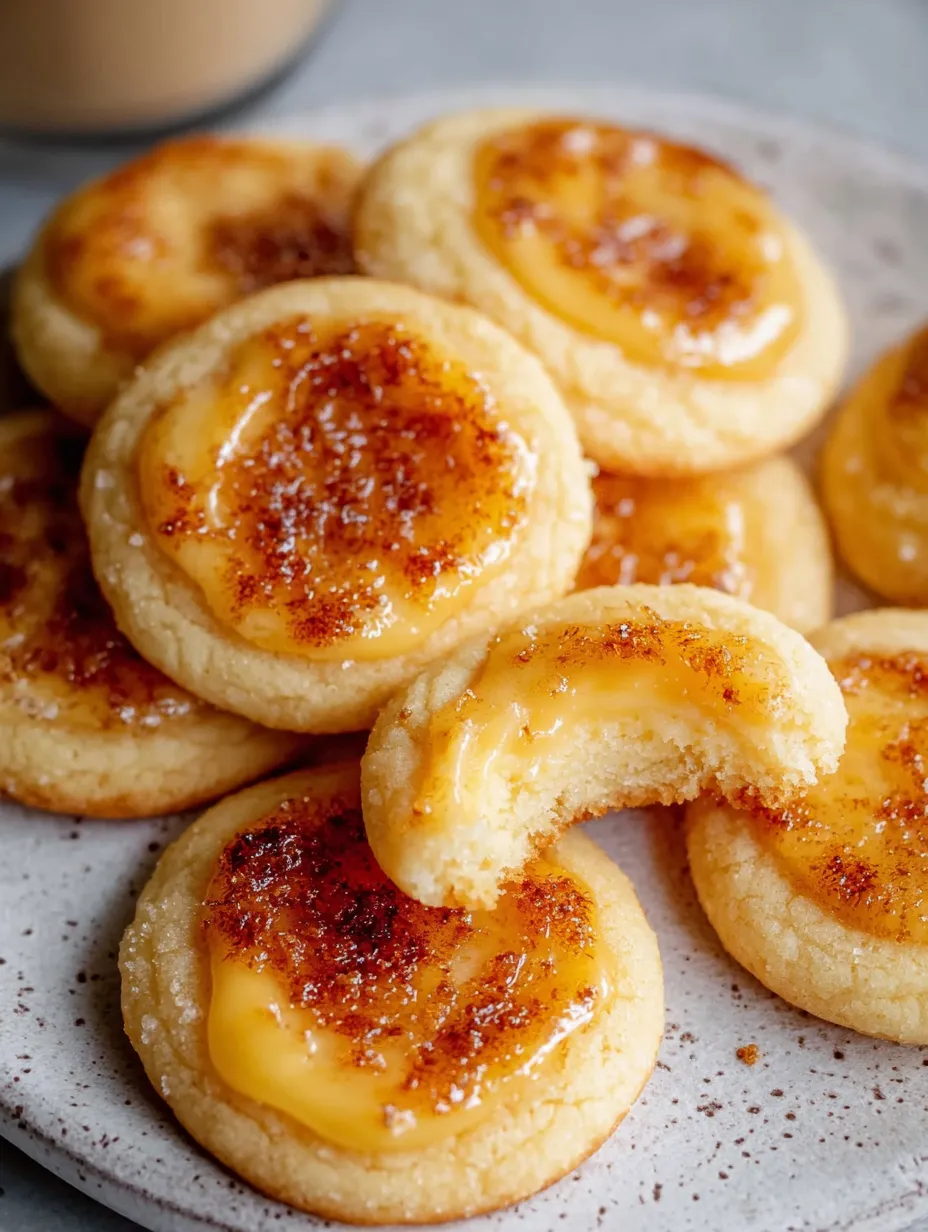
Crème Brûlée Cookies
- Total Time: 1 hour
- Yield: 24–30 cookies 1x
Description
Okay, so imagine if someone took the most elegant, sophisticated dessert in the French pastry canon—crème brûlée with its creamy custard and crackling caramelized sugar top—and said “what if we made this into a COOKIE?” And somehow, impossibly, it actually works. Crème Brûlée Cookies are basically soft, buttery sugar cookies with a creamy vanilla custard center, topped with a layer of sugar that you literally TORCH until it forms that signature glass-like caramelized shell. They’re crispy on top, creamy in the middle, soft and buttery around the edges, and require you to use a kitchen torch which automatically makes you feel like a professional pastry chef. I made these for a dinner party once and someone asked if I went to culinary school in Paris. I did not. I went to YouTube University. Another time I brought them to a cookie exchange and people were taking photos like they were food bloggers. These cookies have MAIN CHARACTER ENERGY.
Ingredients
For the Cookie Dough:
- 2 1/2 cups all-purpose flour
- 1/2 tsp baking powder
- 1/4 tsp salt
- 1 cup (2 sticks) unsalted butter, softened
- 3/4 cup granulated sugar
- 1 large egg
- 1 large egg yolk (extra richness)
- 2 tsp vanilla extract
- 1/2 tsp almond extract (optional but adds sophistication)
For the Vanilla Custard Filling:
- 3 large egg yolks
- 1/4 cup granulated sugar
- 2 tbsp cornstarch
- 1 cup whole milk
- 1/2 cup heavy cream
- 1 vanilla bean (or 2 tsp vanilla extract—bean is better for aesthetics)
- 2 tbsp unsalted butter
- Pinch of salt
For the Brûlée Topping:
- 1/2 to 3/4 cup granulated sugar (for torching)
- You’ll need about 1-2 tsp per cookie
Equipment:
- Kitchen torch (NON-NEGOTIABLE—this is essential)
- Cookie scoop or spoon
- Baking sheets
- Parchment paper
- Saucepan for custard
- Whisk
- Piping bag or zip-top bag (for filling)
- Round cookie cutter or glass (about 3 inches)
Instructions
In a medium saucepan, combine milk and cream. If using a vanilla bean, split it lengthwise, scrape out the seeds, and add both seeds and pod to the milk mixture.
Heat over medium until it just starts to simmer. Remove from heat and let steep for 10 minutes. Remove the vanilla pod.
In a bowl, whisk together egg yolks, sugar, and cornstarch until smooth and pale.
Slowly pour about 1/3 of the hot milk mixture into the egg mixture while whisking constantly (this is called tempering—it prevents scrambled eggs).
Pour the tempered egg mixture back into the saucepan with the remaining milk.
Cook over medium heat, whisking constantly, until the custard thickens significantly—about 3-5 minutes. It should coat the back of a spoon and hold a line when you drag your finger through it.
Remove from heat. Whisk in butter and salt until smooth.
Transfer to a bowl, press plastic wrap directly onto the surface (prevents a skin from forming), and refrigerate for at least 2 hours until completely cold and thick.
In a medium bowl, whisk together flour, baking powder, and salt. Set aside.
In a large bowl (or stand mixer), beat softened butter and sugar on medium-high speed for 3-4 minutes until light, fluffy, and pale. Don’t rush this—air incorporation is key.
Add the whole egg and egg yolk, one at a time, beating well after each addition.
Mix in vanilla extract and almond extract (if using).
Add the flour mixture and mix on low speed until just combined. Don’t overmix or cookies will be tough.
Divide dough in half, flatten each half into a disc, wrap in plastic wrap.
Refrigerate for at least 1 hour or up to 3 days. Chilled dough is easier to work with.
Preheat oven to 350°F (175°C). Line two baking sheets with parchment paper.
Remove one disc of dough from the fridge. Let sit for 5-10 minutes so it’s workable but still cold.
On a lightly floured surface, roll dough to about 1/4-inch thickness.
Use a 3-inch round cutter to cut out circles. You should get about 12-15 circles per disc.
Place cookies on prepared baking sheets about 2 inches apart.
Use your thumb or the back of a rounded tablespoon to press a deep indent in the center of each cookie. Make it DEEP—about halfway through. This is where the custard goes.
Re-roll scraps and repeat.
Bake for 12-15 minutes until the edges are just barely starting to turn golden. The centers should still look pale.
Don’t overbake—these should be soft and tender, not crispy.
Remove from oven and IMMEDIATELY re-press the centers if they puffed up during baking. Use the back of a spoon while they’re still hot.
Let cool on the baking sheet for 5 minutes, then transfer to a wire rack to cool completely.
Once cookies are completely cool, it’s filling time.
Transfer the chilled custard to a piping bag or zip-top bag with a corner snipped off.
Pipe custard into the indent of each cookie, filling it generously so the custard is level with or slightly mounded above the cookie surface.
Use about 1-2 tablespoons of custard per cookie.
Smooth the top with a small offset spatula or the back of a spoon.
Place filled cookies in the refrigerator for at least 30 minutes to let the custard firm up before torching.
Right before serving (within 30 minutes), sprinkle about 1-2 teaspoons of granulated sugar evenly over the custard filling on each cookie.
Spread it around so you have an even layer covering the entire custard surface.
Get your kitchen torch. Feel powerful. You’re about to use FIRE.
Hold the torch 3-4 inches away from the sugar. Move it in a circular motion over the surface.
Watch the sugar melt, bubble, and turn golden brown. Keep going until it’s deep amber and caramelized.
Don’t rush—you want proper caramelization, not just melted sugar. It should look like glass.
Let the sugar cool and harden for about 2-3 minutes. It will form that signature crispy shell.
Serve immediately for maximum crackle effect.
Arrange on a serving platter.
Optional: Dust the edges with powdered sugar for extra elegance.
Watch as people’s eyes light up when they crack through that sugar shell.
Accept compliments graciously even though you know it was actually pretty straightforward.
Notes
These are already a complete dessert experience, but here’s how to make them even MORE special:
- Serve with espresso or coffee for an elegant afternoon treat
- Pair with champagne or dessert wine for fancy entertaining
- Arrange on individual dessert plates with fresh berries
- Dust the plate with cocoa powder for restaurant-style plating
- Serve alongside vanilla ice cream
- Add a mint leaf garnish for color
- Serve at the end of a dinner party for maximum impact
- Prep Time: 45 minutes
- Cook Time: 15 minutes
Nutrition
- Calories: ~180 kcal
- Sugar: ~12g
- Sodium: ~65mg
- Fat: ~9g
- Carbohydrates: ~22g
- Protein: ~3g