
Okay, so imagine if crème brûlée—you know, that fancy French dessert with the crunchy sugar top that makes you feel like royalty—decided to become a cake and invited pecans and salted caramel to the party. That’s what we’re dealing with here. This Crème Brûlée Caramel Pecan Cake is basically layers of buttery pecan cake soaked in vanilla custard that tastes EXACTLY like the filling of crème brûlée, drizzled with homemade salted caramel, and topped with a torched sugar crust that cracks when you tap it. It’s got that crispy-creamy-crunchy thing going on that makes your brain short-circuit with happiness. I made this for Thanksgiving last year instead of pie and my aunt literally asked if I’d hired a pastry chef. My cousin posted a video of me torching it on Instagram and it got more likes than her wedding photos. This cake makes people lose their minds and their manners.
Why You’ll Love This Recipe
Restaurant-level impressive. That torched sugar top? Pure culinary theatre. You’ll feel like you should be on Masterchef.
Triple texture dream. Soft cake + silky custard + crunchy caramelized sugar = the holy trinity of dessert textures.
Pecans make everything better. Toasted pecans add that nutty richness that takes this from “nice cake” to “marry me cake.”
Make-ahead champion. Prep everything the day before and just torch before serving. Maximum wow, minimum stress.
Feeds a crowd. One cake serves 12-14 people, so you’re covered for any gathering.
Easier than it looks. Yeah, it’s fancy. But the steps are straightforward and totally doable for home bakers.
The Good Stuff You’ll Need
For the Pecan Cake:
- 2 1/2 cups all-purpose flour
- 2 tsp baking powder
- 1/2 tsp baking soda
- 1/2 tsp salt
- 1 cup (2 sticks) unsalted butter, softened
- 1 3/4 cups granulated sugar
- 4 large eggs, room temperature
- 1 tbsp vanilla extract
- 1 cup buttermilk, room temperature
- 1 1/2 cups pecans, toasted and finely chopped
For the Crème Brûlée Custard:
- 6 large egg yolks
- 1/2 cup granulated sugar
- 2 cups heavy cream
- 1 cup whole milk
- 2 tsp vanilla extract (or 1 vanilla bean, scraped)
- Pinch of salt
For the Salted Caramel:
- 1 cup granulated sugar
- 6 tbsp unsalted butter, room temperature
- 1/2 cup heavy cream, room temperature
- 1 tsp sea salt (adjust to taste)
For the Torched Sugar Topping:
- 1/2 cup granulated sugar (or more, depending on cake size)
Equipment:
- Two 9-inch round cake pans
- Kitchen torch (non-negotiable for that brûlée effect)
- Whisk and saucepan for custard
- Stand mixer or hand mixer
Let’s Do This
Step 1: Toast Those Pecans
Preheat your oven to 350°F (175°C).
Spread pecans on a baking sheet in a single layer. Toast for 8-10 minutes, shaking the pan halfway through, until they smell amazing and are slightly darker. Watch them like a hawk—they go from perfect to burned in about 30 seconds.
Let them cool completely, then chop finely. You want small pieces that mix throughout the cake, not big chunks that sink.
Step 2: Make the Pecan Cake
Grease and flour your two 9-inch round cake pans. Line the bottoms with parchment paper because we’re civilized people.
In a medium bowl, whisk together flour, baking powder, baking soda, and salt. Set this aside.
In your stand mixer (or large bowl with hand mixer), beat the softened butter and sugar on medium-high speed for 4-5 minutes. You want it pale, fluffy, and doubled in volume. This aerates the batter for a light cake. Don’t rush this step.
Add eggs one at a time, beating well after each addition. Scrape down the bowl between eggs.
Mix in vanilla extract.
With the mixer on low, add the flour mixture in three additions, alternating with buttermilk in two additions. Start and end with flour: flour, buttermilk, flour, buttermilk, flour. Mix until JUST combined after each addition. Overmixing = tough cake.
Fold in the toasted pecans with a spatula. Make sure they’re evenly distributed.
Divide batter evenly between the two prepared pans. Smooth the tops.
Bake for 28-32 minutes until a toothpick inserted in the center comes out with just a few moist crumbs. The tops should spring back when lightly pressed.
Cool in pans for 15 minutes, then turn out onto wire racks to cool completely. And I mean COMPLETELY. Warm cake + custard = soggy disaster.
Step 3: Make the Crème Brûlée Custard
This is the star of the show. You’re making actual crème brûlée filling.
In a medium saucepan, combine cream and milk. Heat over medium heat until it just starts to steam and tiny bubbles form around the edges. Do NOT let it boil.
While that’s heating, whisk egg yolks and sugar in a heatproof bowl for about 2 minutes until pale yellow and thick.
Here’s the critical part: Slowly pour about 1/2 cup of the hot cream mixture into the egg mixture while whisking constantly. This tempers the eggs so they don’t turn into sweet scrambled eggs.
Pour the tempered egg mixture back into the saucepan with the remaining cream, whisking constantly.
Cook over medium-low heat, stirring constantly with a wooden spoon or silicone spatula. Scrape the bottom and sides. You’re looking for it to thicken enough to coat the back of the spoon—run your finger through it and the line should hold. This takes 8-10 minutes. Temperature should be around 170°F. DO NOT BOIL.
Remove from heat immediately and stir in vanilla and salt.
Strain through a fine-mesh sieve into a clean bowl. This catches any bits of cooked egg.
Press plastic wrap directly onto the surface of the custard to prevent a skin from forming.
Refrigerate for at least 4 hours, but overnight is better. The custard needs to be completely cold and set.
Step 4: Make the Salted Caramel
Pour sugar into a medium saucepan. Spread it evenly across the bottom.
Heat over medium heat. Don’t stir at first—just let it melt. Once it starts melting, you can swirl the pan gently to help it melt evenly.
Once all the sugar is melted and turned amber-colored (like the color of an old penny), remove from heat immediately. This takes 8-10 minutes. Don’t walk away—it goes from perfect to burned FAST.
Carefully whisk in the butter. IT WILL BUBBLE VIOLENTLY. This is normal and terrifying. Keep whisking until the butter is fully incorporated.
Slowly drizzle in the heavy cream while whisking constantly. Again, more violent bubbling. Keep whisking until it’s smooth and gorgeous.
Stir in the sea salt. Taste it—some people like it saltier, some less salty. Adjust to your preference.
Let cool to room temperature. It’ll thicken as it cools. If it gets too thick later, just warm it gently.
Step 5: Assemble This Masterpiece
Level your cake layers if they domed during baking. Use a long serrated knife and saw gently. Flat layers = professional look.
Place the first cake layer on your serving plate or cake stand.
Spread half of the chilled crème brûlée custard over the first layer. Go all the way to the edges—it’s okay if some squishes out.
Drizzle about 1/3 of the salted caramel over the custard layer. Let it pool and drip a little.
Place the second cake layer on top. Press down gently so it adheres.
Spread the remaining custard over the top of the cake. You can also spread custard on the sides if you want full coverage, or leave the sides naked-cake style.
Drizzle more caramel over the top, letting it cascade down the sides artistically.
Refrigerate for at least 2 hours to let everything set. The custard needs to firm up. Overnight is even better if you’re making this ahead.
Step 6: The Grand Finale (Torching Time)
This is where you become a culinary badass.
RIGHT before serving—and I mean like 10-15 minutes before—sprinkle an even layer of granulated sugar over the entire top of the cake. You want full coverage, about 1/8 inch thick.
Get your kitchen torch ready. Light it up.
Hold the torch about 3-4 inches from the sugar surface and move it in steady, sweeping motions. Don’t keep it in one spot or you’ll burn it. You want the sugar to melt, bubble, and caramelize to a golden-brown color.
Work your way across the entire surface until all the sugar is caramelized and bubbly.
Let it sit for 2-3 minutes. The sugar will harden into that signature crackly brûlée crust.
Bring it to the table and prepare for gasps. Maybe even applause. Definitely phone cameras.
Serving Suggestions
This cake is basically perfect as-is, but here are some ways to make it even more extra:
- Serve with extra salted caramel sauce on the side for the caramel addicts
- Add a dollop of fresh whipped cream to cut the richness
- Garnish with extra toasted pecans around the base of the cake
- Fresh berries on the side add color and brightness
- Pair with strong coffee or dessert wine for dinner parties
- Torch it AT THE TABLE for maximum drama
Switch It Up
Bourbon Pecan: Add 2 tbsp bourbon to the cake batter for that Southern vibe.
Chocolate Drizzle: Melt dark chocolate and drizzle it over the caramel for chocolate pecan lovers.
Maple Pecan: Replace half the sugar in the cake with pure maple syrup and use maple caramel.
Walnut Version: Swap pecans for toasted walnuts if that’s your jam.
Espresso Custard: Add 2 tbsp instant espresso powder to the custard for coffee flavor.
Praline Topping: Crush some pecan pralines and sprinkle over the caramelized sugar.
Berry Layers: Add fresh raspberries or sliced strawberries between the layers for fruitiness.
Storage and Make-Ahead Tips
This is actually a fantastic make-ahead dessert, which is clutch for entertaining.
The cake layers can be baked up to 2 days ahead. Wrap tightly in plastic wrap and store at room temperature.
The custard must be made at least 4 hours ahead (overnight is better). It keeps in the fridge for up to 3 days.
The caramel keeps in an airtight container in the fridge for up to 2 weeks. Just warm it gently before using.
The assembled cake (without the torched topping) can sit in the fridge for up to 2 days. Cover it loosely with plastic wrap.
DO NOT torch the sugar until RIGHT before serving. The sugar crust will absorb moisture and get soggy within an hour.
Leftover slices keep covered in the fridge for up to 3 days. The sugar top will soften but it’s still delicious.
Why This Works So Damn Well
The science here is actually beautiful. The custard is a classic crème brûlée base—egg yolks, cream, and sugar cooked to the exact temperature where the egg proteins thicken the mixture without scrambling. Tempering (slowly adding hot liquid to eggs) prevents curdling. As it chills, the proteins set further, creating that silky, spoonable texture.
The pecan cake uses the creaming method—beating butter and sugar together incorporates air bubbles that expand during baking, creating a light, fluffy crumb. The buttermilk adds acidity that tenderizes the gluten and gives a slight tang. Toasting the pecans first develops deeper flavors through the Maillard reaction.
The salted caramel works because you’re cooking sugar to the caramelization stage (around 340°F), where it breaks down and develops those complex, slightly bitter notes. Adding butter and cream creates an emulsion that’s smooth and pourable. The salt enhances the caramel flavor and prevents it from being one-dimensionally sweet.
The torched sugar topping is pure chemistry magic. When you apply direct high heat to granulated sugar, it melts almost instantly and caramelizes. As it cools, the sugar molecules reorganize into a hard, glassy structure—that iconic brûlée crack. This MUST be done right before serving because sugar is hygroscopic (it absorbs moisture from the air and the custard), which will soften that perfect crust.
The combination works because of contrasting textures (soft cake, silky custard, crunchy sugar) and complementary flavors (buttery pecan, rich vanilla custard, bittersweet caramel, salty finish). Every component has a job to do.
When to Make This
Special Birthdays: This is THE cake for people who claim they don’t like cake. They’re wrong, they just haven’t had this.
Thanksgiving: Tired of pie? This is your new tradition. Bring this and become the favorite relative.
Dinner Parties: Make it the night before, torch before dessert. You look like a genius with minimal day-of effort.
Anniversary Dinners: Romantic, impressive, shareable. Perfect for celebrating love.
Holiday Gatherings: Christmas, New Year’s, Easter—any celebration that needs a showstopper.
“I Need a Favor” Bribes: Nothing says “please help me move” like a homemade torched cake.
Questions People Actually Ask
Q: I don’t have a kitchen torch. Can I use the broiler?
A: Technically yes, but it’s not the same. Broilers heat unevenly and you risk melting the custard underneath. Kitchen torches are like $15-20 online and worth every penny. Just get one.
Q: My custard curdled and looks like scrambled eggs. What happened?
A: You cooked it too hot or too fast. Temperature matters—keep it below 180°F and use medium-low heat. If it does curdle, immediately strain it through a fine-mesh sieve. You might be able to save it.
Q: The caramel seized up when I added the butter. Help!
A: Your butter was too cold, or you added it too fast. Room temperature butter is crucial. If it seizes, put it back on low heat and whisk vigorously until smooth. It usually comes back.
Q: Can I skip the caramel? It seems hard.
A: You CAN, but you’re missing out on a major flavor component. The caramel adds depth and balances the sweetness. It’s easier than it looks—just watch it closely.
Q: My cake layers domed in the middle. Does it matter?
A: For assembly and aesthetics, yes. Level them with a long serrated knife. A flat, even cake looks professional and stacks better.
Q: The sugar won’t caramelize when I torch it. What’s wrong?
A: Either your sugar is damp (moisture in the air), your custard surface is wet, or your torch flame is too weak. Pat the custard with a paper towel before adding sugar, and get the torch closer.
Q: This seems really rich. Is it?
A: Oh absolutely. This is DECADENT. It’s not a “light summer dessert.” It’s rich, indulgent, and meant for special occasions. Serve small slices and own it.
Q: Can I freeze this cake?
A: The cake layers freeze beautifully. The assembled cake with custard? Not recommended. The custard texture suffers when frozen. Make this fresh or make-ahead in the fridge only.
Print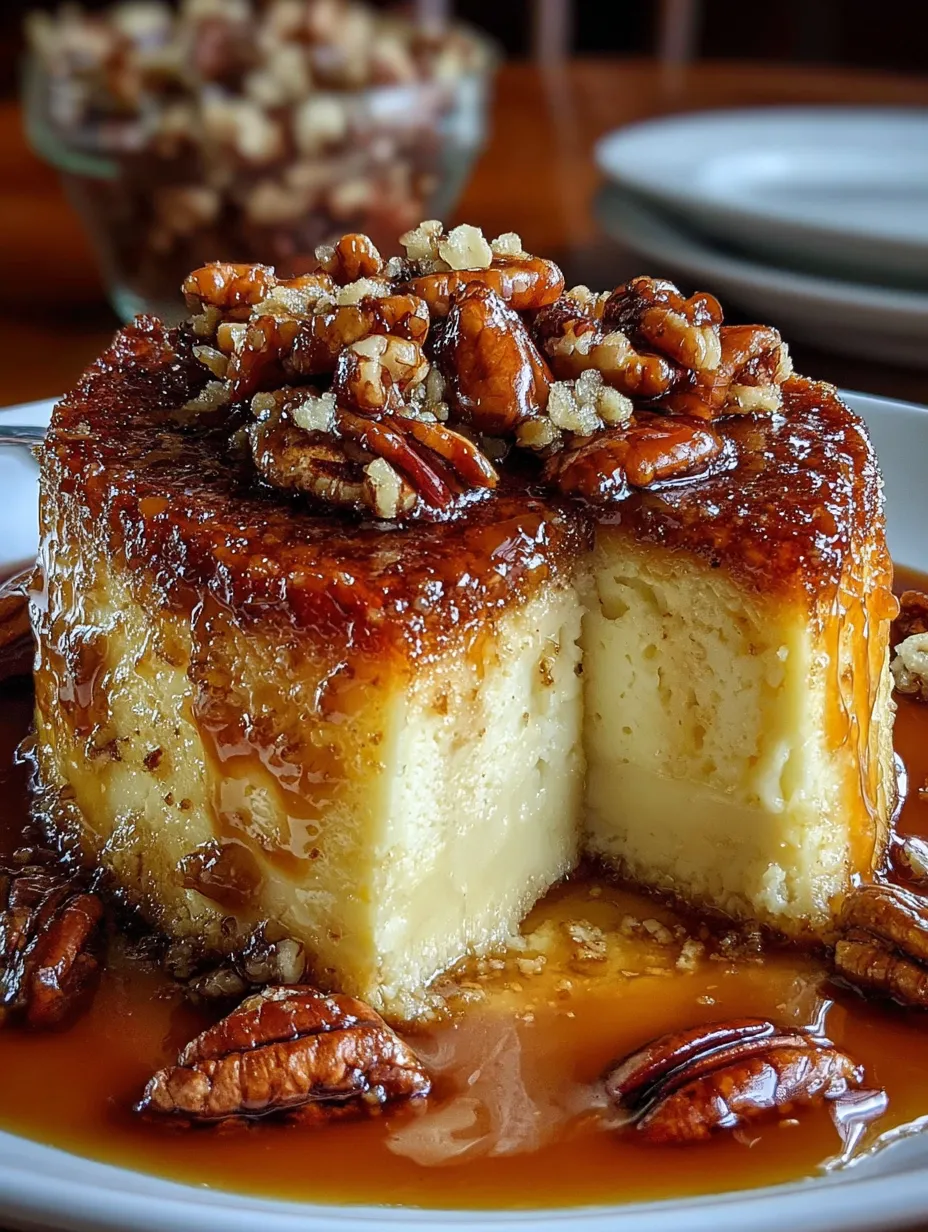
Crème Brûlée Caramel Pecan Cake
- Total Time: 1 hour 15 minutes
- Yield: 12–14 servings 1x
Description
Okay, so imagine if crème brûlée—you know, that fancy French dessert with the crunchy sugar top that makes you feel like royalty—decided to become a cake and invited pecans and salted caramel to the party. That’s what we’re dealing with here. This Crème Brûlée Caramel Pecan Cake is basically layers of buttery pecan cake soaked in vanilla custard that tastes EXACTLY like the filling of crème brûlée, drizzled with homemade salted caramel, and topped with a torched sugar crust that cracks when you tap it. It’s got that crispy-creamy-crunchy thing going on that makes your brain short-circuit with happiness. I made this for Thanksgiving last year instead of pie and my aunt literally asked if I’d hired a pastry chef. My cousin posted a video of me torching it on Instagram and it got more likes than her wedding photos. This cake makes people lose their minds and their manners.
Ingredients
For the Pecan Cake:
- 2 1/2 cups all-purpose flour
- 2 tsp baking powder
- 1/2 tsp baking soda
- 1/2 tsp salt
- 1 cup (2 sticks) unsalted butter, softened
- 1 3/4 cups granulated sugar
- 4 large eggs, room temperature
- 1 tbsp vanilla extract
- 1 cup buttermilk, room temperature
- 1 1/2 cups pecans, toasted and finely chopped
For the Crème Brûlée Custard:
- 6 large egg yolks
- 1/2 cup granulated sugar
- 2 cups heavy cream
- 1 cup whole milk
- 2 tsp vanilla extract (or 1 vanilla bean, scraped)
- Pinch of salt
For the Salted Caramel:
- 1 cup granulated sugar
- 6 tbsp unsalted butter, room temperature
- 1/2 cup heavy cream, room temperature
- 1 tsp sea salt (adjust to taste)
For the Torched Sugar Topping:
- 1/2 cup granulated sugar (or more, depending on cake size)
Equipment:
- Two 9-inch round cake pans
- Kitchen torch (non-negotiable for that brûlée effect)
- Whisk and saucepan for custard
- Stand mixer or hand mixer
Instructions
Step 1: Toast Those Pecans
Preheat your oven to 350°F (175°C).
Spread pecans on a baking sheet in a single layer. Toast for 8-10 minutes, shaking the pan halfway through, until they smell amazing and are slightly darker. Watch them like a hawk—they go from perfect to burned in about 30 seconds.
Let them cool completely, then chop finely. You want small pieces that mix throughout the cake, not big chunks that sink.
Step 2: Make the Pecan Cake
Grease and flour your two 9-inch round cake pans. Line the bottoms with parchment paper because we’re civilized people.
In a medium bowl, whisk together flour, baking powder, baking soda, and salt. Set this aside.
In your stand mixer (or large bowl with hand mixer), beat the softened butter and sugar on medium-high speed for 4-5 minutes. You want it pale, fluffy, and doubled in volume. This aerates the batter for a light cake. Don’t rush this step.
Add eggs one at a time, beating well after each addition. Scrape down the bowl between eggs.
Mix in vanilla extract.
With the mixer on low, add the flour mixture in three additions, alternating with buttermilk in two additions. Start and end with flour: flour, buttermilk, flour, buttermilk, flour. Mix until JUST combined after each addition. Overmixing = tough cake.
Fold in the toasted pecans with a spatula. Make sure they’re evenly distributed.
Divide batter evenly between the two prepared pans. Smooth the tops.
Bake for 28-32 minutes until a toothpick inserted in the center comes out with just a few moist crumbs. The tops should spring back when lightly pressed.
Cool in pans for 15 minutes, then turn out onto wire racks to cool completely. And I mean COMPLETELY. Warm cake + custard = soggy disaster.
Step 3: Make the Crème Brûlée Custard
This is the star of the show. You’re making actual crème brûlée filling.
In a medium saucepan, combine cream and milk. Heat over medium heat until it just starts to steam and tiny bubbles form around the edges. Do NOT let it boil.
While that’s heating, whisk egg yolks and sugar in a heatproof bowl for about 2 minutes until pale yellow and thick.
Here’s the critical part: Slowly pour about 1/2 cup of the hot cream mixture into the egg mixture while whisking constantly. This tempers the eggs so they don’t turn into sweet scrambled eggs.
Pour the tempered egg mixture back into the saucepan with the remaining cream, whisking constantly.
Cook over medium-low heat, stirring constantly with a wooden spoon or silicone spatula. Scrape the bottom and sides. You’re looking for it to thicken enough to coat the back of the spoon—run your finger through it and the line should hold. This takes 8-10 minutes. Temperature should be around 170°F. DO NOT BOIL.
Remove from heat immediately and stir in vanilla and salt.
Strain through a fine-mesh sieve into a clean bowl. This catches any bits of cooked egg.
Press plastic wrap directly onto the surface of the custard to prevent a skin from forming.
Refrigerate for at least 4 hours, but overnight is better. The custard needs to be completely cold and set.
Step 4: Make the Salted Caramel
Pour sugar into a medium saucepan. Spread it evenly across the bottom.
Heat over medium heat. Don’t stir at first—just let it melt. Once it starts melting, you can swirl the pan gently to help it melt evenly.
Once all the sugar is melted and turned amber-colored (like the color of an old penny), remove from heat immediately. This takes 8-10 minutes. Don’t walk away—it goes from perfect to burned FAST.
Carefully whisk in the butter. IT WILL BUBBLE VIOLENTLY. This is normal and terrifying. Keep whisking until the butter is fully incorporated.
Slowly drizzle in the heavy cream while whisking constantly. Again, more violent bubbling. Keep whisking until it’s smooth and gorgeous.
Stir in the sea salt. Taste it—some people like it saltier, some less salty. Adjust to your preference.
Let cool to room temperature. It’ll thicken as it cools. If it gets too thick later, just warm it gently.
Step 5: Assemble This Masterpiece
Level your cake layers if they domed during baking. Use a long serrated knife and saw gently. Flat layers = professional look.
Place the first cake layer on your serving plate or cake stand.
Spread half of the chilled crème brûlée custard over the first layer. Go all the way to the edges—it’s okay if some squishes out.
Drizzle about 1/3 of the salted caramel over the custard layer. Let it pool and drip a little.
Place the second cake layer on top. Press down gently so it adheres.
Spread the remaining custard over the top of the cake. You can also spread custard on the sides if you want full coverage, or leave the sides naked-cake style.
Drizzle more caramel over the top, letting it cascade down the sides artistically.
Refrigerate for at least 2 hours to let everything set. The custard needs to firm up. Overnight is even better if you’re making this ahead.
Step 6: The Grand Finale (Torching Time)
This is where you become a culinary badass.
RIGHT before serving—and I mean like 10-15 minutes before—sprinkle an even layer of granulated sugar over the entire top of the cake. You want full coverage, about 1/8 inch thick.
Get your kitchen torch ready. Light it up.
Hold the torch about 3-4 inches from the sugar surface and move it in steady, sweeping motions. Don’t keep it in one spot or you’ll burn it. You want the sugar to melt, bubble, and caramelize to a golden-brown color.
Work your way across the entire surface until all the sugar is caramelized and bubbly.
Let it sit for 2-3 minutes. The sugar will harden into that signature crackly brûlée crust.
Bring it to the table and prepare for gasps. Maybe even applause. Definitely phone cameras.
Notes
This cake is basically perfect as-is, but here are some ways to make it even more extra:
- Serve with extra salted caramel sauce on the side for the caramel addicts
- Add a dollop of fresh whipped cream to cut the richness
- Garnish with extra toasted pecans around the base of the cake
- Fresh berries on the side add color and brightness
- Pair with strong coffee or dessert wine for dinner parties
- Torch it AT THE TABLE for maximum drama
- Prep Time: 45 minutes
- Cook Time: 30 minutes
Nutrition
- Calories: ~520 kcal
- Sugar: ~32g
- Sodium: ~280mg
- Carbohydrates: ~48g
- Protein: ~6g


