
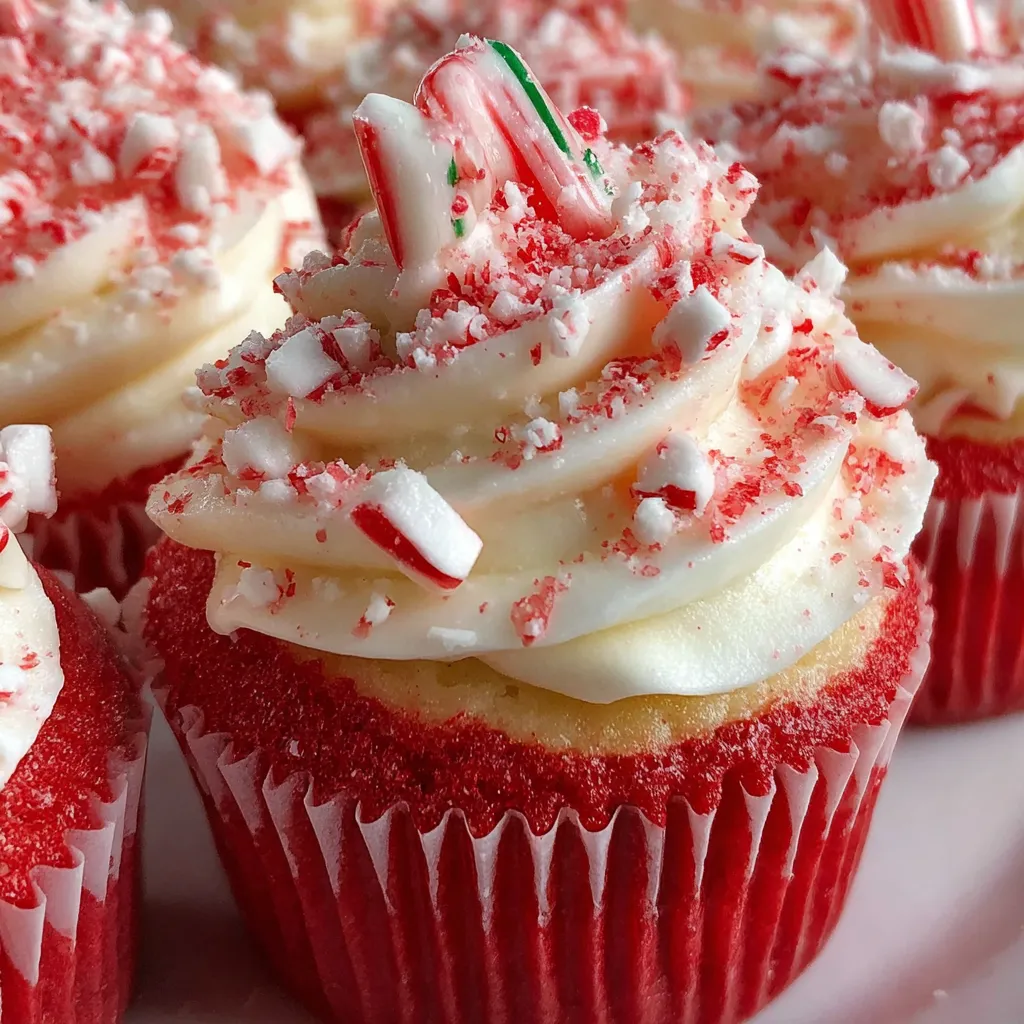
Okay, so imagine if a candy cane and a cupcake had a beautiful holiday baby that tastes like Christmas morning and looks like it belongs on a magazine cover. That’s exactly what’s happening here. Candy Cane Peppermint Cupcakes are basically fluffy vanilla (or red velvet) cupcakes infused with peppermint extract, topped with swirls of creamy peppermint buttercream, then decorated with crushed candy canes and an actual mini candy cane sticking out of the top like a festive little flag. They’re minty, sweet, festive AF, and so pretty you’ll want to display them before eating them. I made these for a Christmas party once and someone asked if they could hire me to cater their wedding. I’m not a caterer. I just made cupcakes. Another time I brought them to a cookie exchange (yes, cupcakes to a COOKIE exchange—I’m a rebel) and they were gone before the cookies.
Why You’ll Love This Recipe
Christmas in cupcake form. These taste like the holidays, look like the holidays, and make you FEEL like the holidays.
Peppermint perfection. That cool, refreshing mint flavor is festive without being overwhelming.
Instagram-worthy. The swirled frosting + crushed candy canes + mini candy cane topper = pure aesthetic gold.
Easy but impressive. Basic cupcake recipe elevated with festive flavors and decorations. Anyone can do this.
Crowd pleaser. Even people who claim they don’t like peppermint end up loving these. They’re magic.
Customizable intensity. Control how minty they are based on how much extract you add. Go subtle or go FULL North Pole.
The Good Stuff You’ll Need
For the Cupcakes (Makes 12-15):
- 1 1/2 cups all-purpose flour
- 1 1/2 tsp baking powder
- 1/4 tsp salt
- 1/2 cup (1 stick) unsalted butter, softened
- 1 cup granulated sugar
- 2 large eggs
- 2 tsp vanilla extract
- 1 tsp peppermint extract (start with 1/2 tsp if you’re nervous about mint)
- 1/2 cup whole milk
- 1/4 cup sour cream (secret ingredient for moisture)
- Red food coloring (optional, for pink or red cupcakes)
For the Peppermint Buttercream:
- 1 cup (2 sticks) unsalted butter, softened to room temp
- 4 cups powdered sugar
- 2-3 tbsp heavy cream or milk
- 1 tsp vanilla extract
- 1 tsp peppermint extract (adjust to taste)
- Pinch of salt
- Optional: white food coloring gel to make it bright white
For Decorations:
- 8-10 candy canes, crushed (put them in a zip-top bag and smash with rage and a rolling pin)
- 12-15 mini candy canes (one per cupcake)
- Red and green sprinkles (optional)
- White sanding sugar (optional, for sparkle)
- Edible glitter or pearl dust (if you’re feeling EXTRA fancy)
Equipment:
- Muffin tin
- Cupcake liners (festive red, white, or patterned)
- Piping bag with large star tip (like Wilton 1M or 2D)
- Hand or stand mixer
- Wire cooling rack
Let’s Do This
Step 1: Make the Cupcake Batter
Preheat oven to 350°F (175°C). Line a muffin tin with cupcake liners.
In a medium bowl, whisk together flour, baking powder, and salt. Set aside.
In a large bowl (or stand mixer), beat softened butter and sugar on medium-high speed for 3-4 minutes until light, fluffy, and pale. This step is crucial—don’t skip the beating time.
Add eggs one at a time, beating well after each addition. Scrape down the bowl between additions.
Mix in vanilla extract and peppermint extract. If you want pink or red cupcakes, add red food coloring now (start with 3-4 drops and add more for deeper color).
In a small bowl or measuring cup, whisk together milk and sour cream.
Add the flour mixture and milk mixture alternately to the butter mixture, starting and ending with flour. Mix on low speed: flour, milk, flour, milk, flour. Don’t overmix—stop as soon as everything is combined.
The batter should be smooth, thick, and smell AMAZING.
Step 2: Bake the Cupcakes
Fill cupcake liners about 2/3 full. Don’t overfill or you’ll get weird mushroom tops.
Bake for 18-22 minutes until a toothpick inserted in the center comes out clean or with just a few moist crumbs.
The tops should spring back when lightly touched and look set but not dry.
Don’t overbake—dry cupcakes are sad cupcakes. Better to slightly underbake than overbake.
Let cool in the pan for 5 minutes, then transfer to a wire rack to cool COMPLETELY before frosting. Frosting warm cupcakes = melted frosting disaster.
Step 3: Make the Peppermint Buttercream
While cupcakes cool, make your frosting. This is where the magic happens.
In a large bowl (or stand mixer), beat softened butter on medium-high speed for 2-3 minutes until creamy and pale.
Add powdered sugar one cup at a time, mixing on low speed after each addition to avoid a sugar explosion in your kitchen.
Add 2 tablespoons heavy cream, vanilla extract, peppermint extract, and a pinch of salt.
Beat on high speed for 3-5 minutes until light, fluffy, and smooth as silk. If it’s too thick, add more cream a tablespoon at a time. Too thin? Add more powdered sugar.
Taste it. Does it taste like peppermint heaven? Good. If you want it mintier, add more peppermint extract 1/4 tsp at a time.
Optional: Add white food coloring gel if you want BRIGHT white frosting instead of slightly off-white.
Transfer frosting to a piping bag fitted with a large star tip (like Wilton 1M or 2D for those gorgeous swirls).
Step 4: Frost the Cupcakes
Make sure cupcakes are completely cool. Like, actually cool. Touch them. Are they cool? Good.
Hold the piping bag perpendicular to the cupcake with the tip about 1/2 inch above the surface.
Starting from the outside edge, pipe in a spiral motion moving toward the center, gradually building upward.
When you reach the center/top, release pressure and pull away quickly to create a nice point.
Practice on parchment paper first if you’re nervous. The first one is always weird—that’s fine.
If you mess up, scrape it off and try again. Frosting is forgiving.
Step 5: Decorate
IMMEDIATELY after frosting (while the buttercream is still soft), sprinkle crushed candy canes generously over the top. Press gently so they stick.
Add a sprinkle of red and green sprinkles or white sanding sugar for extra sparkle.
Gently press a mini candy cane into the top of each cupcake at an angle, like a festive little handle.
Optional: Dust with edible glitter or pearl dust for that “freshly snowed on” effect.
Stand back and admire your work. You basically just made art.
Step 6: Try Not to Eat Them All
Display them on a festive platter or tiered stand.
Take approximately 73 photos from different angles for social media.
Serve with hot chocolate, coffee, or eggnog.
Watch as people’s faces light up when they bite into minty, fluffy, candy-cane-topped perfection.
Serving Suggestions
These are already perfect, but here are some ways to make them even MORE festive:
- Serve on a red or white platter for color contrast
- Arrange on a tiered stand for a Christmas dessert table
- Pair with peppermint hot chocolate or candy cane mochas
- Serve alongside other Christmas cookies and treats
- Package individually in clear boxes for holiday gifts
- Display with fresh greenery and twinkling lights
- Serve at Christmas parties, cookie exchanges, or holiday brunches
Switch It Up
Chocolate Peppermint: Use chocolate cupcakes instead of vanilla for a mint-chocolate combo.
Red Velvet Candy Cane: Make red velvet cupcakes with peppermint cream cheese frosting.
Hot Chocolate Cupcakes: Add cocoa powder to the batter and top with mini marshmallows alongside the candy canes.
White Chocolate Peppermint: Fold melted white chocolate into the buttercream for extra richness.
Cookies and Cream: Crush Oreos into the frosting along with the candy canes.
Peppermint Mocha: Add espresso powder to chocolate cupcakes and use peppermint frosting.
Stuffed Cupcakes: Fill the centers with peppermint ganache before frosting.
Vegan Version: Use vegan butter and dairy-free milk for plant-based peppermint cupcakes.
Storage and Make-Ahead Tips
These keep beautifully and can be made ahead for easier holiday prep.
Room temperature: Store in an airtight container for up to 3 days. The buttercream stays soft and the cupcakes stay moist.
Refrigerate: Keep for up to 5 days if your kitchen is warm. Let come to room temp before serving (cold buttercream is hard).
Freeze unfrosted cupcakes: Wrap individually and freeze for up to 3 months. Thaw and frost fresh.
Freeze frosted cupcakes: Freeze until solid, then wrap individually. Thaw at room temp for 2-3 hours before serving.
Make ahead timeline: Bake cupcakes 1-2 days ahead and store unfrosted. Make buttercream 1 day ahead and refrigerate (re-whip before using). Decorate day-of for freshest appearance.
Don’t add candy cane decorations too early if storing—they can dissolve or bleed color into the frosting over time. Add fresh before serving.
Why This Works So Damn Well
These cupcakes are basically engineered for holiday perfection.
Sour cream in the batter adds moisture and creates that tender, fluffy crumb that stays soft for days.
Creaming butter and sugar properly incorporates air, making cupcakes light instead of dense.
Peppermint extract in BOTH the cake and frosting creates layers of flavor without being overwhelming.
High ratio of buttercream to cake means every bite has that perfect frosting-to-cake balance. This is crucial.
Crushing candy canes releases their peppermint oils and creates varied texture with both fine powder and chunky pieces.
Star tip piping creates those professional-looking swirls that look way harder than they actually are.
Adding decorations immediately after frosting ensures they stick properly and don’t slide off.
The mini candy cane garnish is both decorative and functional—it’s a built-in spoon/stirrer for hot chocolate.
When to Make These
Christmas Parties: These scream “CHRISTMAS” louder than Mariah Carey in November.
Cookie Exchange: Bring cupcakes to a cookie exchange. Be a rebel. Watch them disappear first.
Holiday Bake Sale: Price these high—they’ll sell out immediately and look expensive.
Office Holiday Party: Be the hero who brings the fancy cupcakes instead of store-bought cookies.
Christmas Morning: Make these ahead and serve for festive Christmas breakfast.
New Year’s Eve: Use silver decorations instead of red/green for a winter wonderland vibe.
Winter Birthday: Anyone with a December-February birthday deserves peppermint cupcakes.
Questions People Actually Ask
Q: My cupcakes are dense and heavy. What happened? A: You either overmixed the batter, didn’t cream the butter and sugar long enough, or overbaked them. Mix gently and follow timing carefully.
Q: The peppermint flavor is too strong. How do I fix it? A: You can’t un-mint a cupcake, but next time use less extract. Start with 1/2 tsp and add more to taste.
Q: My frosting is grainy. Why? A: The powdered sugar wasn’t fully incorporated, or your butter was too cold. Beat longer on high speed until silky smooth.
Q: The candy canes are melting into the frosting. A: Your kitchen is too warm, or you added them too early. Store in a cool place and add crushed candy canes right before serving.
Q: Can I use mint extract instead of peppermint? A: Peppermint extract is sweeter and more candy-like. Mint extract (like spearmint) tastes different—more herbal. Use peppermint for best results.
Q: My frosting is too soft and won’t hold shape. A: Your butter was too warm, or you added too much liquid. Refrigerate for 15-20 minutes, then re-whip. Add more powdered sugar if needed.
Q: The cupcakes sunk in the middle. Help! A: Your oven temp was too high (they rose too fast then collapsed), or you opened the oven door too early. Use an oven thermometer and don’t peek until at least 15 minutes in.
Q: Can I make these without a piping tip? A: Yes! Use a zip-top bag with the corner snipped off, or just spread frosting with a knife. They won’t look as professional but will taste the same.
Q: The red food coloring turned my cupcakes brown. Why? A: You added too much, or you used a color that reacts with baking soda. Use gel food coloring and add gradually until you get the shade you want.
Print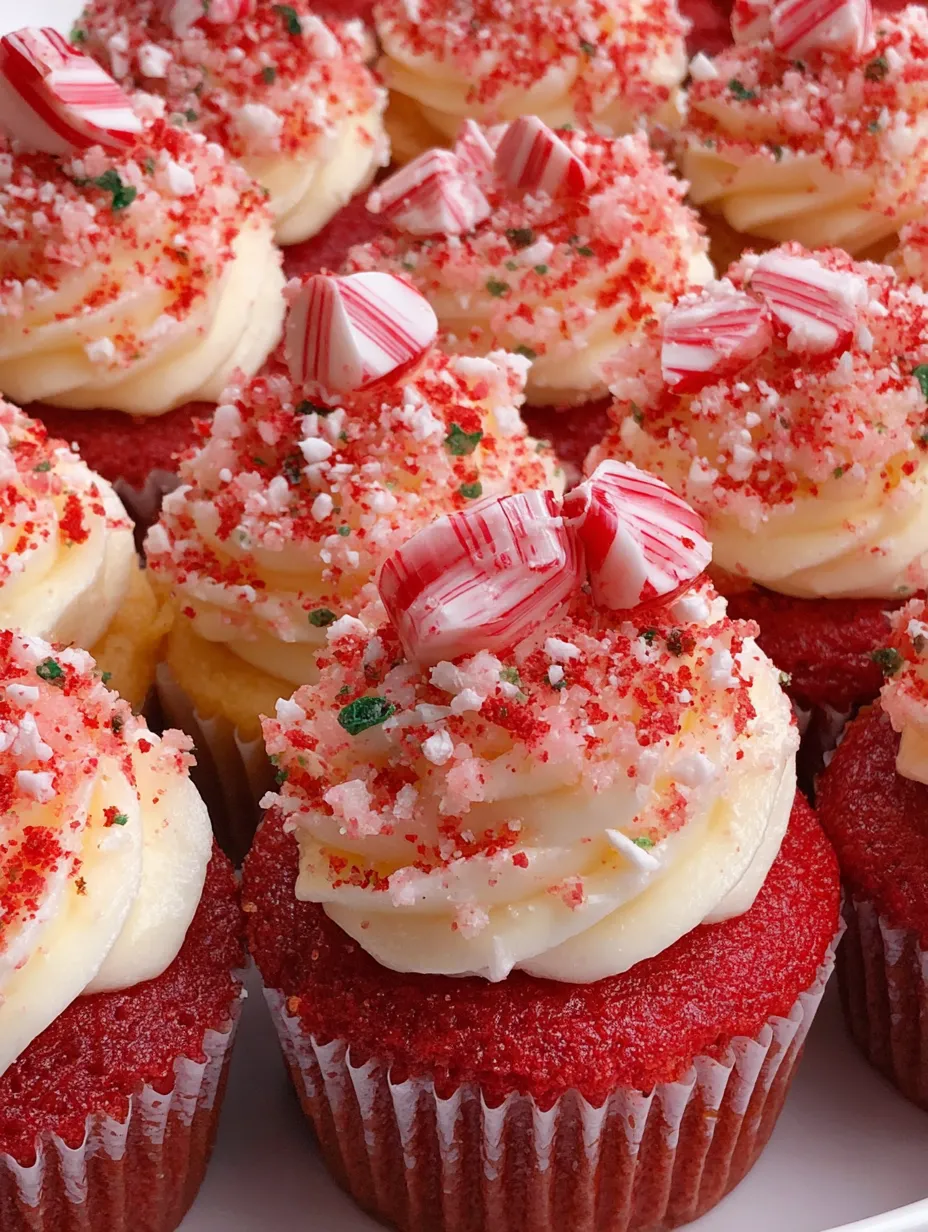
Candy Cane Peppermint Cupcakes
- Total Time: 40 minutes
Description
Okay, so imagine if a candy cane and a cupcake had a beautiful holiday baby that tastes like Christmas morning and looks like it belongs on a magazine cover. That’s exactly what’s happening here. Candy Cane Peppermint Cupcakes are basically fluffy vanilla (or red velvet) cupcakes infused with peppermint extract, topped with swirls of creamy peppermint buttercream, then decorated with crushed candy canes and an actual mini candy cane sticking out of the top like a festive little flag. They’re minty, sweet, festive AF, and so pretty you’ll want to display them before eating them. I made these for a Christmas party once and someone asked if they could hire me to cater their wedding. I’m not a caterer. I just made cupcakes. Another time I brought them to a cookie exchange (yes, cupcakes to a COOKIE exchange—I’m a rebel) and they were gone before the cookies.
Ingredients
For the Cupcakes (Makes 12-15):
- 1 1/2 cups all-purpose flour
- 1 1/2 tsp baking powder
- 1/4 tsp salt
- 1/2 cup (1 stick) unsalted butter, softened
- 1 cup granulated sugar
- 2 large eggs
- 2 tsp vanilla extract
- 1 tsp peppermint extract (start with 1/2 tsp if you’re nervous about mint)
- 1/2 cup whole milk
- 1/4 cup sour cream (secret ingredient for moisture)
- Red food coloring (optional, for pink or red cupcakes)
For the Peppermint Buttercream:
- 1 cup (2 sticks) unsalted butter, softened to room temp
- 4 cups powdered sugar
- 2–3 tbsp heavy cream or milk
- 1 tsp vanilla extract
- 1 tsp peppermint extract (adjust to taste)
- Pinch of salt
- Optional: white food coloring gel to make it bright white
For Decorations:
- 8–10 candy canes, crushed (put them in a zip-top bag and smash with rage and a rolling pin)
- 12–15 mini candy canes (one per cupcake)
- Red and green sprinkles (optional)
- White sanding sugar (optional, for sparkle)
- Edible glitter or pearl dust (if you’re feeling EXTRA fancy)
Equipment:
- Muffin tin
- Cupcake liners (festive red, white, or patterned)
- Piping bag with large star tip (like Wilton 1M or 2D)
- Hand or stand mixer
- Wire cooling rack
Instructions
Preheat oven to 350°F (175°C). Line a muffin tin with cupcake liners.
In a medium bowl, whisk together flour, baking powder, and salt. Set aside.
In a large bowl (or stand mixer), beat softened butter and sugar on medium-high speed for 3-4 minutes until light, fluffy, and pale. This step is crucial—don’t skip the beating time.
Add eggs one at a time, beating well after each addition. Scrape down the bowl between additions.
Mix in vanilla extract and peppermint extract. If you want pink or red cupcakes, add red food coloring now (start with 3-4 drops and add more for deeper color).
In a small bowl or measuring cup, whisk together milk and sour cream.
Add the flour mixture and milk mixture alternately to the butter mixture, starting and ending with flour. Mix on low speed: flour, milk, flour, milk, flour. Don’t overmix—stop as soon as everything is combined.
The batter should be smooth, thick, and smell AMAZING.
Fill cupcake liners about 2/3 full. Don’t overfill or you’ll get weird mushroom tops.
Bake for 18-22 minutes until a toothpick inserted in the center comes out clean or with just a few moist crumbs.
The tops should spring back when lightly touched and look set but not dry.
Don’t overbake—dry cupcakes are sad cupcakes. Better to slightly underbake than overbake.
Let cool in the pan for 5 minutes, then transfer to a wire rack to cool COMPLETELY before frosting. Frosting warm cupcakes = melted frosting disaster.
While cupcakes cool, make your frosting. This is where the magic happens.
In a large bowl (or stand mixer), beat softened butter on medium-high speed for 2-3 minutes until creamy and pale.
Add powdered sugar one cup at a time, mixing on low speed after each addition to avoid a sugar explosion in your kitchen.
Add 2 tablespoons heavy cream, vanilla extract, peppermint extract, and a pinch of salt.
Beat on high speed for 3-5 minutes until light, fluffy, and smooth as silk. If it’s too thick, add more cream a tablespoon at a time. Too thin? Add more powdered sugar.
Taste it. Does it taste like peppermint heaven? Good. If you want it mintier, add more peppermint extract 1/4 tsp at a time.
Optional: Add white food coloring gel if you want BRIGHT white frosting instead of slightly off-white.
Transfer frosting to a piping bag fitted with a large star tip (like Wilton 1M or 2D for those gorgeous swirls).
Make sure cupcakes are completely cool. Like, actually cool. Touch them. Are they cool? Good.
Hold the piping bag perpendicular to the cupcake with the tip about 1/2 inch above the surface.
Starting from the outside edge, pipe in a spiral motion moving toward the center, gradually building upward.
When you reach the center/top, release pressure and pull away quickly to create a nice point.
Practice on parchment paper first if you’re nervous. The first one is always weird—that’s fine.
If you mess up, scrape it off and try again. Frosting is forgiving.
IMMEDIATELY after frosting (while the buttercream is still soft), sprinkle crushed candy canes generously over the top. Press gently so they stick.
Add a sprinkle of red and green sprinkles or white sanding sugar for extra sparkle.
Gently press a mini candy cane into the top of each cupcake at an angle, like a festive little handle.
Optional: Dust with edible glitter or pearl dust for that “freshly snowed on” effect.
Stand back and admire your work. You basically just made art.
Display them on a festive platter or tiered stand.
Take approximately 73 photos from different angles for social media.
Serve with hot chocolate, coffee, or eggnog.
Watch as people’s faces light up when they bite into minty, fluffy, candy-cane-topped perfection.
Notes
These are already perfect, but here are some ways to make them even MORE festive:
- Serve on a red or white platter for color contrast
- Arrange on a tiered stand for a Christmas dessert table
- Pair with peppermint hot chocolate or candy cane mochas
- Serve alongside other Christmas cookies and treats
- Package individually in clear boxes for holiday gifts
- Display with fresh greenery and twinkling lights
- Serve at Christmas parties, cookie exchanges, or holiday brunches
- Prep Time: 20 minutes
- Cook Time: 20 minutes
Nutrition
- Calories: ~380 kcal
- Sugar: ~40g
- Sodium: ~150mg
- Fat: ~18g
- Carbohydrates: ~52g
- Protein: ~3g


