
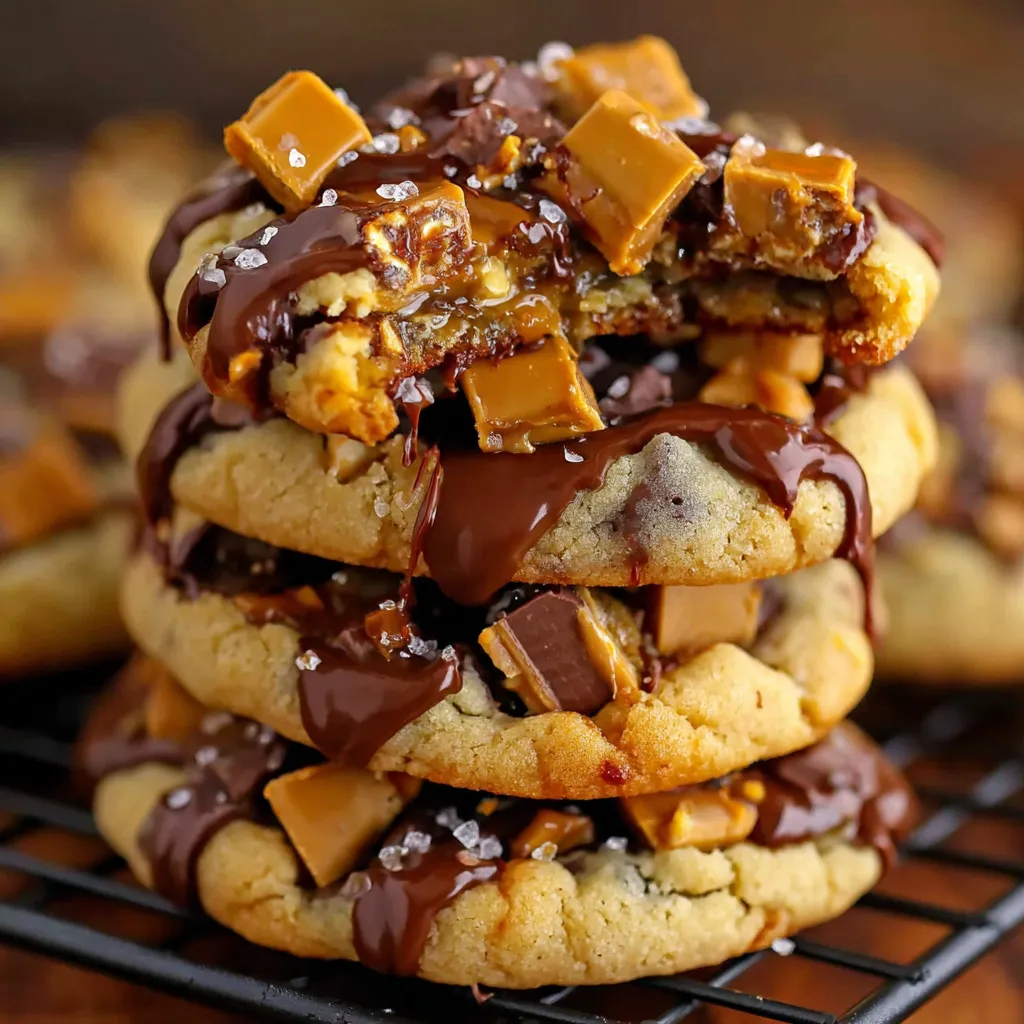
Okay, so picture this: you take a chewy brown sugar cookie, stuff it with gooey caramel and chunks of Butterfinger candy bars, then roll the whole thing in crushed Butterfinger pieces so every bite has that satisfying crunch. These cookies are what happens when you take everything good about candy bars and cookie dough and smash them together into one absolutely unhinged dessert. They’re crispy on the edges, chewy in the middle, with pockets of melted caramel and that distinctive peanut buttery crunch that Butterfingers are famous for. I brought these to a potluck once and watched a grown man take three cookies, wrap them in a napkin, and put them in his jacket pocket “for later.” That’s the level of obsession we’re dealing with here.
Why You’ll Love This Recipe
Candy bar chaos. It’s like eating a cookie and a Butterfinger at the same time. Why choose when you can have both?
Caramel surprise. Bite into a pocket of gooey caramel and suddenly life makes sense again.
Texture heaven. Crispy, chewy, crunchy, gooey—all in one cookie. Your mouth won’t know what hit it.
No chill time. The dough doesn’t need to chill before baking. Instant gratification, baby.
Crowd obliterator. These disappear faster than you can say “I should’ve made a double batch.”
Uses up Halloween candy. Got leftover Butterfingers? This is your destiny. You’re welcome.
The Good Stuff You’ll Need
For the Cookies:
- 2 1/4 cups all-purpose flour
- 1 tsp baking soda
- 1 tsp salt
- 1 cup (2 sticks) unsalted butter, softened
- 3/4 cup granulated sugar
- 3/4 cup packed brown sugar (light or dark, your call)
- 2 large eggs, room temperature
- 2 tsp vanilla extract
- 1 1/2 cups chopped Butterfinger candy bars (about 8-10 fun-size bars), divided
- 24-30 soft caramel squares, unwrapped (Kraft caramels work great)
For Rolling:
- 1 cup crushed Butterfinger pieces (about 4-5 fun-size bars, crushed fine)
- 2 tbsp granulated sugar (optional, for extra sparkle)
Let’s Do This
Step 1: Prep Your Candy
Chop up your Butterfingers. You want some bigger chunks (like pea-sized) for texture, and some finer pieces for rolling. Put the crushed rolling pieces in a shallow bowl and set aside.
Unwrap all those caramels. This is tedious but necessary. Do it while watching TV or something.
Step 2: Make the Cookie Dough
Preheat oven to 350°F (175°C). Line two baking sheets with parchment paper or silicone mats.
In a medium bowl, whisk together flour, baking soda, and salt. Set this aside.
In a large bowl (or stand mixer), beat softened butter with both sugars for 3-4 minutes until light and fluffy. Don’t rush this—the fluffiness matters.
Add eggs one at a time, beating well after each addition. Mix in vanilla.
Gradually add the flour mixture, mixing on low until just combined. Don’t overmix or your cookies will be tough.
Fold in 1 cup of the chopped Butterfinger pieces. Save the rest for later.
Step 3: Stuff These Bad Boys
Scoop about 2 tablespoons of dough (a medium cookie scoop works perfectly).
Flatten it slightly in your palm, place a caramel square in the center, and wrap the dough around it completely. Make sure the caramel is fully enclosed or it’ll leak out during baking.
Roll the dough ball in your hands to smooth it out.
Roll it in the crushed Butterfinger mixture until it’s completely coated. Press gently so the pieces stick.
Place on prepared baking sheet, leaving about 3 inches between cookies. They spread like crazy.
Step 4: Bake to Perfection
Bake for 11-13 minutes. The edges should be golden brown and set, but the centers will look slightly underdone. That’s what you want—they’ll continue cooking on the baking sheet.
DO NOT OVERBAKE. Seriously. Set a timer. These go from perfect to hockey pucks in about 90 seconds.
Let cookies cool on the baking sheet for 5 minutes (this is when they finish cooking and the caramel sets slightly), then transfer to a wire rack.
Sprinkle the remaining chopped Butterfinger pieces over the warm cookies so they stick.
Step 5: Exercise Restraint (Good Luck)
Try to wait at least 10 minutes before eating. The caramel is molten lava and will burn the roof of your mouth.
Serve warm or at room temperature. Both are phenomenal.
Hide a few for yourself before serving them to others. This is self-care.
Serving Suggestions
These are basically a dessert unto themselves, but if you want to go full dessert mode:
- Serve with vanilla ice cream for a cookie sundae situation
- Drizzle with extra caramel sauce because why not
- Pair with cold milk (obviously)
- Crumble over ice cream for the world’s best cookies and cream
- Warm them up for 10 seconds in the microwave to re-melt the caramel
Switch It Up
Different Candy Bars: Use Snickers, Twix, Milky Way, or Reese’s cups instead of Butterfingers. The caramel-stuffing method works with anything.
Double Caramel: Drizzle caramel sauce over the baked cookies for extra caramel madness.
Peanut Butter Dough: Add 1/2 cup peanut butter to the dough for even more peanut butter flavor.
Sea Salt Finish: Sprinkle with flaky sea salt right after baking for that sweet-salty combo.
Chocolate Drizzle: Melt some chocolate and drizzle over cooled cookies because more is more.
Mini Version: Make smaller cookies with one caramel per cookie for bite-sized treats.
Storage Tips
These keep surprisingly well, considering they have caramel and candy inside.
Store in an airtight container at room temperature for up to 5 days. Put parchment paper between layers so they don’t stick together.
The caramel will firm up as they cool, but you can microwave individual cookies for 10-15 seconds to soften it again.
You can freeze the unbaked, stuffed, and rolled dough balls for up to 3 months. Bake from frozen, adding 1-2 extra minutes to the baking time.
Baked cookies freeze well for up to 2 months. Thaw at room temperature or warm in the microwave.
Why This Works So Damn Well
These cookies work because they’re basically an engineering masterpiece disguised as a simple treat. The brown sugar gives you that chewy texture and caramel-adjacent flavor that plays perfectly with actual caramel. The butter creates those crispy edges while keeping the center soft. The caramel in the middle stays gooey because it’s insulated by the dough—genius.
The Butterfinger pieces do double duty: the chunks inside the dough create little pockets of crunch and peanut butter flavor, while the coating on the outside gives you that satisfying crackly texture right away. It’s textural complexity without being complicated.
The key is not overbaking. These cookies finish cooking on the pan after you pull them from the oven, so taking them out when they look slightly underdone is crucial. That’s what keeps them soft and chewy instead of crispy and hard. And that caramel? It stays molten in the center like a lava cake, which is basically the best surprise ever.
This is comfort food meets candy bar meets homemade cookies. It’s nostalgia, indulgence, and pure joy in one bite.
When to Make These
Cookie Exchange Domination: Show up with these and everyone else’s cookies will look boring.
After School Snack: Kids will lose their minds. Adults will too, honestly.
Office Bribe: Need a favor? These will get you anything you want.
Game Day Snacking: Way better than store-bought cookies at your watch party.
Stress Baking: Bad day? Make cookies with caramel inside. Instant therapy.
Gift Giving: Pack these in a cute box and you’ll be everyone’s favorite person.
Questions People Actually Ask
Q: The caramel leaked out during baking. What did I do wrong? A: You didn’t seal the dough completely around the caramel. Make sure there are no gaps or thin spots in the dough covering.
Q: Can I use caramel sauce instead of caramel squares? A: Not really—liquid caramel will leak everywhere. You need solid caramels that melt but stay contained.
Q: My cookies spread too much. Help! A: Your butter might have been too soft, or your oven temp might be low. Chill the dough balls for 30 minutes before baking and check your oven temp with a thermometer.
Q: Can I make these without the caramel? A: Sure, but then they’re just Butterfinger cookies (which is still delicious, just less exciting).
Q: The Butterfinger coating fell off while baking. A: Press the pieces into the dough more firmly before baking, and make sure the dough is slightly sticky when you roll it.
Q: Can I use homemade caramels? A: If you’re fancy like that, yes. Just make sure they’re firm enough to hold their shape when you wrap them in dough.
Print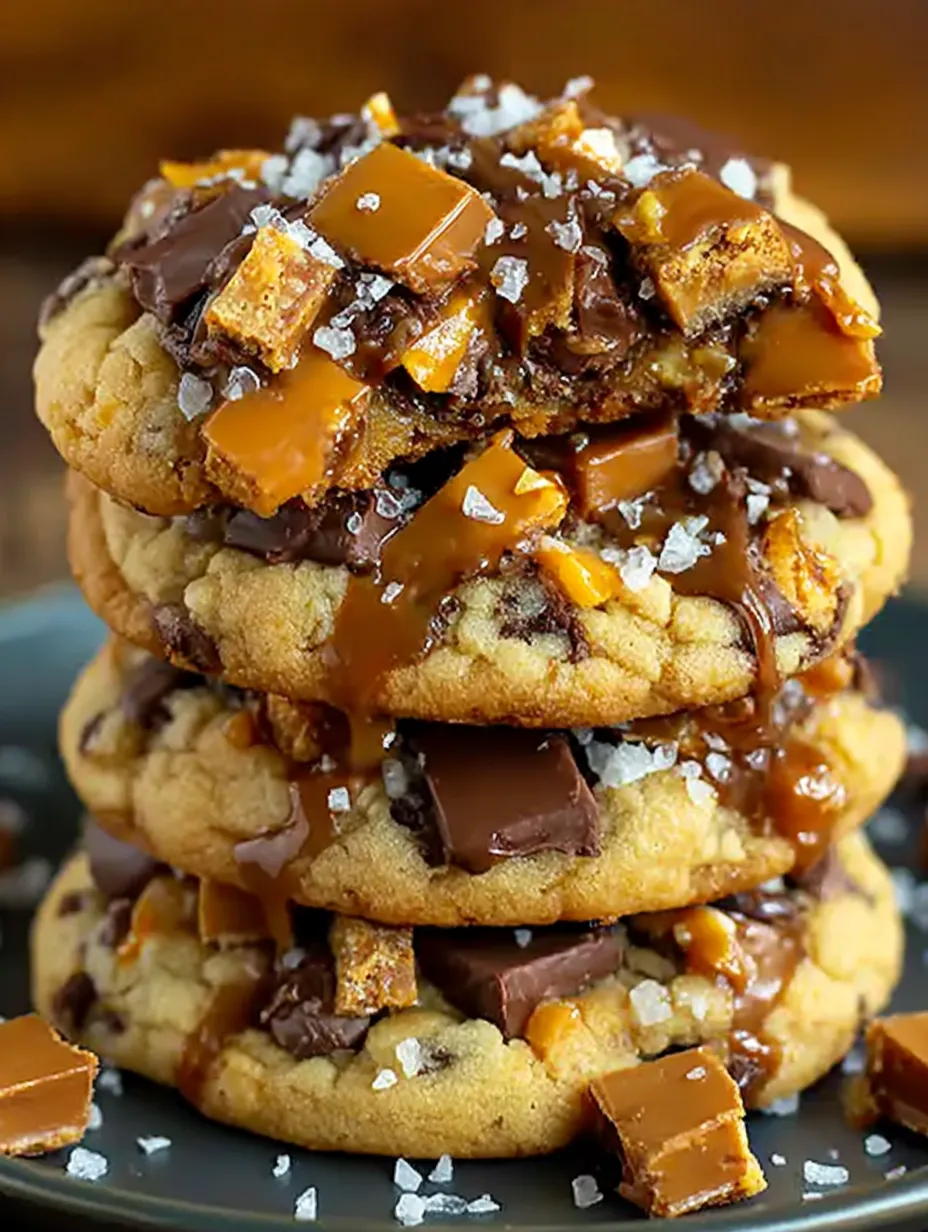
Butterfinger Caramel Crunch Cookies
- Total Time: 38 minutes
- Yield: 24–30 cookies 1x
Description
Okay, so picture this: you take a chewy brown sugar cookie, stuff it with gooey caramel and chunks of Butterfinger candy bars, then roll the whole thing in crushed Butterfinger pieces so every bite has that satisfying crunch. These cookies are what happens when you take everything good about candy bars and cookie dough and smash them together into one absolutely unhinged dessert. They’re crispy on the edges, chewy in the middle, with pockets of melted caramel and that distinctive peanut buttery crunch that Butterfingers are famous for. I brought these to a potluck once and watched a grown man take three cookies, wrap them in a napkin, and put them in his jacket pocket “for later.” That’s the level of obsession we’re dealing with here.
Ingredients
For the Cookies:
- 2 1/4 cups all-purpose flour
- 1 tsp baking soda
- 1 tsp salt
- 1 cup (2 sticks) unsalted butter, softened
- 3/4 cup granulated sugar
- 3/4 cup packed brown sugar (light or dark, your call)
- 2 large eggs, room temperature
- 2 tsp vanilla extract
- 1 1/2 cups chopped Butterfinger candy bars (about 8–10 fun-size bars), divided
- 24–30 soft caramel squares, unwrapped (Kraft caramels work great)
For Rolling:
- 1 cup crushed Butterfinger pieces (about 4–5 fun-size bars, crushed fine)
- 2 tbsp granulated sugar (optional, for extra sparkle)
Instructions
Step 1: Prep Your Candy
Chop up your Butterfingers. You want some bigger chunks (like pea-sized) for texture, and some finer pieces for rolling. Put the crushed rolling pieces in a shallow bowl and set aside.
Unwrap all those caramels. This is tedious but necessary. Do it while watching TV or something.
Step 2: Make the Cookie Dough
Preheat oven to 350°F (175°C). Line two baking sheets with parchment paper or silicone mats.
In a medium bowl, whisk together flour, baking soda, and salt. Set this aside.
In a large bowl (or stand mixer), beat softened butter with both sugars for 3-4 minutes until light and fluffy. Don’t rush this—the fluffiness matters.
Add eggs one at a time, beating well after each addition. Mix in vanilla.
Gradually add the flour mixture, mixing on low until just combined. Don’t overmix or your cookies will be tough.
Fold in 1 cup of the chopped Butterfinger pieces. Save the rest for later.
Step 3: Stuff These Bad Boys
Scoop about 2 tablespoons of dough (a medium cookie scoop works perfectly).
Flatten it slightly in your palm, place a caramel square in the center, and wrap the dough around it completely. Make sure the caramel is fully enclosed or it’ll leak out during baking.
Roll the dough ball in your hands to smooth it out.
Roll it in the crushed Butterfinger mixture until it’s completely coated. Press gently so the pieces stick.
Place on prepared baking sheet, leaving about 3 inches between cookies. They spread like crazy.
Step 4: Bake to Perfection
Bake for 11-13 minutes. The edges should be golden brown and set, but the centers will look slightly underdone. That’s what you want—they’ll continue cooking on the baking sheet.
DO NOT OVERBAKE. Seriously. Set a timer. These go from perfect to hockey pucks in about 90 seconds.
Let cookies cool on the baking sheet for 5 minutes (this is when they finish cooking and the caramel sets slightly), then transfer to a wire rack.
Sprinkle the remaining chopped Butterfinger pieces over the warm cookies so they stick.
Step 5: Exercise Restraint (Good Luck)
Try to wait at least 10 minutes before eating. The caramel is molten lava and will burn the roof of your mouth.
Serve warm or at room temperature. Both are phenomenal.
Hide a few for yourself before serving them to others. This is self-care.
Notes
These are basically a dessert unto themselves, but if you want to go full dessert mode:
- Serve with vanilla ice cream for a cookie sundae situation
- Drizzle with extra caramel sauce because why not
- Pair with cold milk (obviously)
- Crumble over ice cream for the world’s best cookies and cream
- Warm them up for 10 seconds in the microwave to re-melt the caramel
- Prep Time: 25 minutes
- Cook Time: 13 minutes
Nutrition
- Calories: ~195 kcal
- Fat: ~9g
- Carbohydrates: ~27g
- Protein: ~3g


