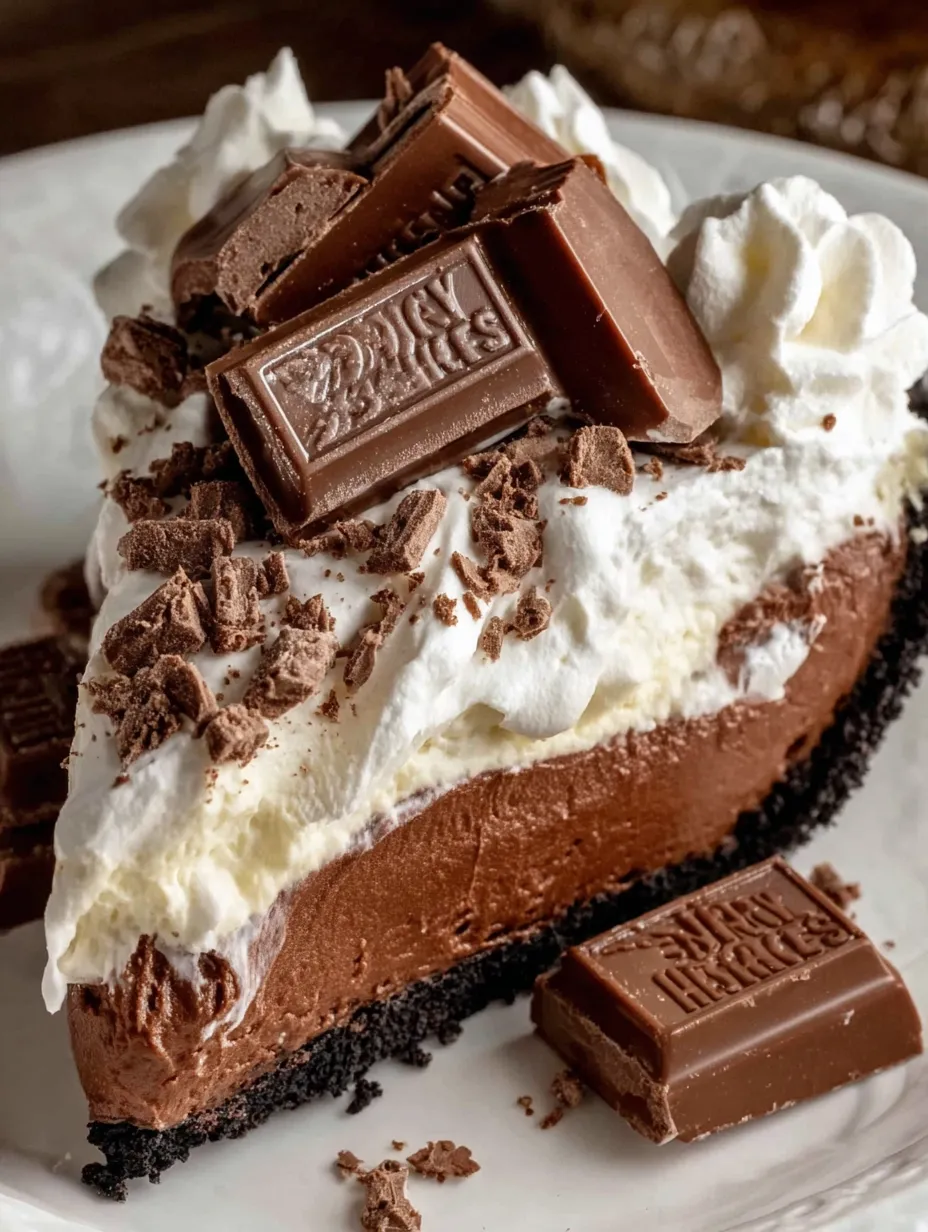
Listen, if you know, you KNOW. Burger King’s Hershey Sundae Pie was that legendary fast food dessert that some brilliant person decided to discontinue, causing widespread mourning and desperate internet searches for copycat recipes. Well, we’re bringing it back from the dead, and honestly? This homemade version is better than the original. We’re talking a chocolate cookie crust, a layer of rich chocolate pudding, a layer of vanilla cream, all topped with whipped cream and a mountain of Hershey’s chocolate shavings. It’s basically every chocolate lover’s fever dream in pie form. The crust is crunchy, the chocolate layer is silky, the vanilla cream is fluffy, and the whipped cream situation on top is completely excessive in the best way. I made this for a dinner party once and someone literally started crying tears of joy over discontinued fast food nostalgia. Another person asked if I could make one for their wedding. This pie inspires emotional breakdowns and marriage proposals.
Why You’ll Love This Recipe
Nostalgia bomb. If you loved the original, this will transport you back to 1998.
No-bake magic. Zero oven time after the crust. Just chill and assemble.
Chocolate heaven. Three types of chocolate situations happening here. It’s intense.
Better than the original. Homemade always wins. Real ingredients, better texture, more chocolate.
Impressive but easy. Looks like you went to pastry school. You just followed directions.
Make-ahead perfect. Assemble a day ahead. Slice and serve when ready.
Feeds a crowd. One pie serves 8-10 people. Scale up for parties.
The Good Stuff You’ll Need
For the Chocolate Cookie Crust:
- 24 Oreo cookies (or chocolate sandwich cookies), filling removed
- 5 tbsp unsalted butter, melted
- 2 tbsp granulated sugar
For the Chocolate Layer:
- 1 box (3.9 oz) instant chocolate pudding mix
- 2 cups cold whole milk
- 1 cup heavy whipping cream
- 2 tbsp powdered sugar
- 1/2 tsp vanilla extract
For the Vanilla Cream Layer:
- 8 oz cream cheese, softened
- 1/2 cup powdered sugar
- 1 tsp vanilla extract
- 1 1/2 cups heavy whipping cream, whipped to stiff peaks
For the Topping:
- 2 cups heavy whipping cream
- 1/4 cup powdered sugar
- 1 tsp vanilla extract
- 2-3 full-size Hershey’s chocolate bars, for shaving
- Chocolate syrup for drizzling (optional but recommended)
Equipment:
- 9-inch pie pan
- Food processor or ziplock bag + rolling pin
- Electric mixer
- Mixing bowls
- Vegetable peeler or knife for chocolate shavings
- Piping bag (optional for fancy whipped cream)
Let’s Do This
Step 1: Make the Chocolate Crust
Preheat your oven to 350°F (175°C).
Separate the Oreos and scrape off the filling (eat it, toss it, whatever—we just need the cookies).
In a food processor, pulse the chocolate cookies until they’re fine crumbs. No food processor? Put them in a ziplock bag and smash them with a rolling pin. Channel your rage. Make them dust.
Mix the cookie crumbs with melted butter and sugar until the mixture looks like wet sand. Every crumb should be coated.
Press the mixture firmly into the bottom and up the sides of a 9-inch pie pan. Use the bottom of a measuring cup to really compact it. A loose crust will fall apart when you slice the pie.
Bake for 8-10 minutes just to set it. Let cool completely before adding filling. Like, actually completely cool. Don’t rush this.
Step 2: Make the Chocolate Pudding Layer
In a large bowl, whisk together the instant chocolate pudding mix and cold milk for 2 minutes. It’ll start to thicken immediately. Keep whisking until it’s thick and smooth.
In a separate bowl, whip 1 cup of heavy cream with 2 tbsp powdered sugar and 1/2 tsp vanilla until stiff peaks form. This takes 2-3 minutes with an electric mixer.
Gently fold the whipped cream into the chocolate pudding. This lightens it and makes it fluffy instead of dense. Use a spatula and fold gently—don’t deflate all that air you just whipped in.
Pour the chocolate mixture into the cooled crust and spread it evenly with a spatula. It should fill about half the pie.
Refrigerate for 30 minutes to let it set while you make the next layer.
Step 3: Make the Vanilla Cream Layer
In a large bowl, beat the softened cream cheese with an electric mixer for 2-3 minutes until smooth and fluffy. Make sure there are no lumps.
Add powdered sugar and vanilla extract. Beat until combined.
In a separate bowl, whip 1 1/2 cups of heavy cream until stiff peaks form. This takes 3-4 minutes.
Fold the whipped cream into the cream cheese mixture in three additions. Fold gently to keep it light and airy.
Carefully spread the vanilla cream layer over the set chocolate layer. Use a spatula to smooth it out. Be gentle so you don’t disturb the chocolate layer underneath.
Refrigerate the entire pie for at least 4 hours, or overnight. It needs time to set completely. Do not skip this or you’ll have soup.
Step 4: Make the Whipped Cream Topping
When you’re ready to serve (or up to 4 hours before), make the final whipped cream topping.
In a large bowl, whip 2 cups of heavy cream with 1/4 cup powdered sugar and 1 tsp vanilla extract until stiff peaks form. This should be thick enough to hold its shape.
Spread or pipe the whipped cream over the top of the pie. You can spread it smooth with a spatula, or use a piping bag with a star tip to make fancy rosettes. Go wild. Make it dramatic.
Step 5: Add the Chocolate Shavings
This is where the magic happens. Take your Hershey’s chocolate bars and use a vegetable peeler to create chocolate shavings. Hold the chocolate bar over the pie and peel off shavings, letting them fall naturally on top.
Cover the entire top with chocolate shavings. Be generous. This is not the time for minimalism.
If you want extra drama (and you should), drizzle chocolate syrup over the whole thing in a crisscross pattern.
Refrigerate for at least 30 minutes to let everything set before slicing. This also helps the chocolate shavings stick.
Step 6: Slice and Serve
Use a sharp knife dipped in hot water (wipe it dry between cuts) for clean slices. This pie has layers that want to stick to the knife, so the hot knife trick really helps.
Serve immediately. This pie is best cold, straight from the fridge.
Watch people’s eyes roll back in their heads. Accept compliments graciously. Pretend it was hard to make.
Serving Suggestions
This pie is already over-the-top, but here are some ideas:
- Serve with extra chocolate syrup for drizzling
- Add a scoop of vanilla ice cream on the side
- Dust with cocoa powder for extra chocolate intensity
- Serve with hot coffee or cold milk
- Garnish with fresh strawberries for color contrast
- Make it mini in individual jars or ramekins
- Top each slice with a cherry for that sundae effect
Switch It Up
Peanut Butter Twist: Add 1/2 cup peanut butter to the chocolate layer for Reese’s vibes.
Mint Chocolate: Add 1/2 tsp peppermint extract to the chocolate layer. Use Andes mints for topping.
Cookies and Cream: Mix crushed Oreos into the vanilla layer.
Mocha Version: Add 2 tbsp instant espresso powder to the chocolate pudding.
Dark Chocolate: Use dark chocolate pudding mix and dark chocolate for shavings.
S’mores Pie: Use graham cracker crust, add mini marshmallows on top.
Banana Split: Add sliced bananas between the chocolate and vanilla layers.
Strawberry Chocolate: Add fresh strawberries between layers.
Storage and Make-Ahead Tips
This pie is perfect for making ahead, which is clutch for parties.
Make-ahead schedule: Make the entire pie through the vanilla layer up to 2 days ahead. Cover and refrigerate. Add whipped cream topping and chocolate shavings right before serving.
Refrigerate: Store covered in the fridge for up to 3 days. The crust gets slightly soft after day 2 but still tastes great.
Freeze: You can freeze the pie (without whipped cream topping) for up to 1 month. Thaw in fridge overnight, then add fresh whipped cream and chocolate before serving.
Whipped cream: Stabilize your whipped cream with 1 tsp unflavored gelatin if making more than 4 hours ahead. It’ll stay fluffy longer.
Chocolate shavings: Make these ahead and refrigerate in an airtight container. Add to pie right before serving.
Leftover slices: Cover individual slices with plastic wrap. The whipped cream might deflate slightly but still tastes good.
Why This Works So Damn Well
This Hershey Pie works because it’s all about contrasting textures and balanced chocolate intensity. The cookie crust provides crunch against creamy layers. It’s sweet but sturdy, and pre-baking it keeps it from getting soggy from all the moisture in the fillings.
The chocolate pudding layer uses instant pudding for speed and reliability, then gets lightened with whipped cream. This creates a mousse-like texture instead of heavy pudding. The whipped cream adds air and prevents the layer from being too dense.
The vanilla cream layer balances the chocolate intensity. All chocolate would be overwhelming—the vanilla provides contrast and lets you taste the chocolate layers better. Cream cheese adds stability and tang, while whipped cream keeps it light.
Folding whipped cream into both layers instead of just mixing creates that signature light, fluffy texture. Deflating the whipped cream by mixing too aggressively would create dense, heavy layers instead of airy ones.
Cold milk is essential for instant pudding. Warm milk won’t let it set properly. The pudding needs cold liquid to activate the starches that make it thicken.
Chilling thoroughly between layers prevents them from mixing together. If you add the vanilla layer to warm chocolate, they’ll swirl together instead of staying distinct. Patience creates clean layers.
Using real Hershey’s chocolate for the shavings isn’t just nostalgia—it’s the right chocolate for this pie. Hershey’s has that distinctive flavor that tastes like childhood and makes this recognizable as the Burger King version.
When to Make This
Birthday parties: This is a birthday pie that competes with cake and wins.
Potlucks: Show up with this and become a legend.
Summer BBQs: No-bake dessert that doesn’t heat up the kitchen.
Nostalgia nights: Make this for friends who remember the original. Watch them cry.
Holiday gatherings: Different from the usual pumpkin and apple pies.
Game day: Serve this at halftime and be the MVP.
Because you want chocolate: It’s Wednesday. Make the pie. Live your life.
Questions People Actually Ask
Q: Can I use homemade pudding instead of instant? A: You can, but instant is easier and sets faster. If using homemade, let it cool completely before folding in whipped cream.
Q: My whipped cream isn’t getting stiff. What’s wrong? A: Your cream or bowl wasn’t cold enough, or you’re using cream with too low fat content. Use heavy whipping cream (not light cream) and chill the bowl.
Q: The layers are mixing together. Help! A: You didn’t let the chocolate layer set long enough before adding vanilla. Each layer needs to be firm before adding the next.
Q: Can I use Cool Whip instead of making whipped cream? A: You can, but real whipped cream tastes way better. Cool Whip works in a pinch though.
Q: My crust is falling apart when I slice. Why? A: Didn’t press it firmly enough, or didn’t bake it long enough to set. The crust should be compact and hold together.
Q: The pie is too sweet for me. How do I fix it? A: Reduce sugar in the cream cheese layer, use dark chocolate pudding, and add a pinch of salt to each layer to balance sweetness.
Q: Can I make this in a different pan? A: Yes! Use a 9×13 pan for bars, or individual jars for personal servings. Just adjust layer thickness.
Q: How do I make chocolate shavings without them melting? A: Work with cold chocolate bars. If your hands are too warm, hold the chocolate with a paper towel while you peel.
Q: Do I need to use Hershey’s chocolate specifically? A: For authentic flavor, yes. But any chocolate bar works for shavings.
PrintBurger King Copycat Hershey Pie
- Total Time: 40 minutes
- Yield: 8–10 slices 1x
Description
Listen, if you know, you KNOW. Burger King’s Hershey Sundae Pie was that legendary fast food dessert that some brilliant person decided to discontinue, causing widespread mourning and desperate internet searches for copycat recipes. Well, we’re bringing it back from the dead, and honestly? This homemade version is better than the original. We’re talking a chocolate cookie crust, a layer of rich chocolate pudding, a layer of vanilla cream, all topped with whipped cream and a mountain of Hershey’s chocolate shavings. It’s basically every chocolate lover’s fever dream in pie form. The crust is crunchy, the chocolate layer is silky, the vanilla cream is fluffy, and the whipped cream situation on top is completely excessive in the best way. I made this for a dinner party once and someone literally started crying tears of joy over discontinued fast food nostalgia. Another person asked if I could make one for their wedding. This pie inspires emotional breakdowns and marriage proposals.
Ingredients
For the Chocolate Cookie Crust:
- 24 Oreo cookies (or chocolate sandwich cookies), filling removed
- 5 tbsp unsalted butter, melted
- 2 tbsp granulated sugar
For the Chocolate Layer:
- 1 box (3.9 oz) instant chocolate pudding mix
- 2 cups cold whole milk
- 1 cup heavy whipping cream
- 2 tbsp powdered sugar
- 1/2 tsp vanilla extract
For the Vanilla Cream Layer:
- 8 oz cream cheese, softened
- 1/2 cup powdered sugar
- 1 tsp vanilla extract
- 1 1/2 cups heavy whipping cream, whipped to stiff peaks
For the Topping:
- 2 cups heavy whipping cream
- 1/4 cup powdered sugar
- 1 tsp vanilla extract
- 2–3 full-size Hershey’s chocolate bars, for shaving
- Chocolate syrup for drizzling (optional but recommended)
Equipment:
- 9-inch pie pan
- Food processor or ziplock bag + rolling pin
- Electric mixer
- Mixing bowls
- Vegetable peeler or knife for chocolate shavings
- Piping bag (optional for fancy whipped cream)
Instructions
Preheat your oven to 350°F (175°C).
Separate the Oreos and scrape off the filling (eat it, toss it, whatever—we just need the cookies).
In a food processor, pulse the chocolate cookies until they’re fine crumbs. No food processor? Put them in a ziplock bag and smash them with a rolling pin. Channel your rage. Make them dust.
Mix the cookie crumbs with melted butter and sugar until the mixture looks like wet sand. Every crumb should be coated.
Press the mixture firmly into the bottom and up the sides of a 9-inch pie pan. Use the bottom of a measuring cup to really compact it. A loose crust will fall apart when you slice the pie.
Bake for 8-10 minutes just to set it. Let cool completely before adding filling. Like, actually completely cool. Don’t rush this.
In a large bowl, whisk together the instant chocolate pudding mix and cold milk for 2 minutes. It’ll start to thicken immediately. Keep whisking until it’s thick and smooth.
In a separate bowl, whip 1 cup of heavy cream with 2 tbsp powdered sugar and 1/2 tsp vanilla until stiff peaks form. This takes 2-3 minutes with an electric mixer.
Gently fold the whipped cream into the chocolate pudding. This lightens it and makes it fluffy instead of dense. Use a spatula and fold gently—don’t deflate all that air you just whipped in.
Pour the chocolate mixture into the cooled crust and spread it evenly with a spatula. It should fill about half the pie.
Refrigerate for 30 minutes to let it set while you make the next layer.
In a large bowl, beat the softened cream cheese with an electric mixer for 2-3 minutes until smooth and fluffy. Make sure there are no lumps.
Add powdered sugar and vanilla extract. Beat until combined.
In a separate bowl, whip 1 1/2 cups of heavy cream until stiff peaks form. This takes 3-4 minutes.
Fold the whipped cream into the cream cheese mixture in three additions. Fold gently to keep it light and airy.
Carefully spread the vanilla cream layer over the set chocolate layer. Use a spatula to smooth it out. Be gentle so you don’t disturb the chocolate layer underneath.
Refrigerate the entire pie for at least 4 hours, or overnight. It needs time to set completely. Do not skip this or you’ll have soup.
When you’re ready to serve (or up to 4 hours before), make the final whipped cream topping.
In a large bowl, whip 2 cups of heavy cream with 1/4 cup powdered sugar and 1 tsp vanilla extract until stiff peaks form. This should be thick enough to hold its shape.
Spread or pipe the whipped cream over the top of the pie. You can spread it smooth with a spatula, or use a piping bag with a star tip to make fancy rosettes. Go wild. Make it dramatic.
This is where the magic happens. Take your Hershey’s chocolate bars and use a vegetable peeler to create chocolate shavings. Hold the chocolate bar over the pie and peel off shavings, letting them fall naturally on top.
Cover the entire top with chocolate shavings. Be generous. This is not the time for minimalism.
If you want extra drama (and you should), drizzle chocolate syrup over the whole thing in a crisscross pattern.
Refrigerate for at least 30 minutes to let everything set before slicing. This also helps the chocolate shavings stick.
Use a sharp knife dipped in hot water (wipe it dry between cuts) for clean slices. This pie has layers that want to stick to the knife, so the hot knife trick really helps.
Serve immediately. This pie is best cold, straight from the fridge.
Watch people’s eyes roll back in their heads. Accept compliments graciously. Pretend it was hard to make.
Notes
This pie is already over-the-top, but here are some ideas:
- Serve with extra chocolate syrup for drizzling
- Add a scoop of vanilla ice cream on the side
- Dust with cocoa powder for extra chocolate intensity
- Serve with hot coffee or cold milk
- Garnish with fresh strawberries for color contrast
- Make it mini in individual jars or ramekins
- Top each slice with a cherry for that sundae effect
- Prep Time: 30 minutes
- Cook Time: 10 minutes
Nutrition
- Calories: ~485 kcal
- Sugar: ~32g
- Sodium: ~260mg
- Fat: ~34g
- Carbohydrates: ~42g
- Protein: ~5g