
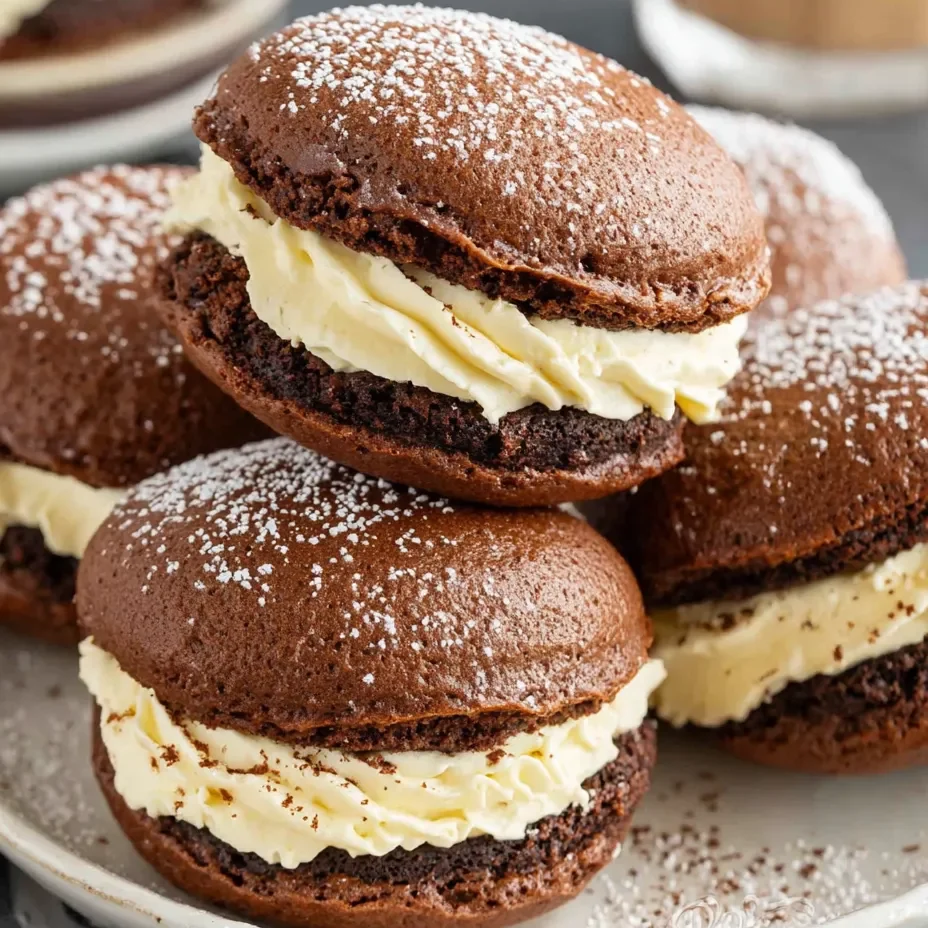
So someone looked at tiramisu—that sophisticated Italian coffee-soaked dessert that makes you feel fancy—and thought “what if this was a COOKIE SANDWICH?” and honestly, that person deserves an award. These are soft, cakey chocolate cookies with a hint of espresso, sandwiched with a mascarpone cream filling that tastes exactly like the fluffy layer in classic tiramisu, all dusted with cocoa powder like they just came from an Italian bakery. They’re elegant but fun, fancy but approachable, and have that addictive coffee-chocolate-cream situation that makes tiramisu so irresistible. I brought these to a holiday cookie swap and someone literally gasped “THESE ARE TIRAMISU?!” before eating three of them. Another person took a bite, closed their eyes, and said “I’m in Rome right now.” My neighbor asked for the recipe and then made them twice in one week. These cookies create OBSESSION.
Why You’ll Love This Recipe
Two desserts become one. You get the best parts of tiramisu in portable, hand-held cookie form. No fork required.
That mascarpone filling. It’s like eating a cloud that tastes like coffee and cream. Ridiculously good.
Coffee lover’s dream. Espresso in the cookies, coffee flavor in the filling. This is caffeinated happiness.
Sophisticated but fun. They look bakery-fancy but have that playful whoopie pie energy.
Soft and cakey. These aren’t crunchy cookies—they’re pillowy-soft and practically melt in your mouth.
Make-ahead champions. Actually get better after sitting for a day. The flavors meld and the cookies soften even more.
The Good Stuff You’ll Need
For the Chocolate Espresso Cookies:
- 2 cups all-purpose flour
- 1/2 cup unsweetened cocoa powder (Dutch-process is best but regular works)
- 1 1/4 tsp baking soda
- 1/2 tsp salt
- 2 tbsp instant espresso powder (or instant coffee)
- 1/2 cup (1 stick) unsalted butter, softened
- 1 cup packed brown sugar
- 1 large egg, room temperature
- 1 tsp vanilla extract
- 1 cup buttermilk (or 1 cup milk + 1 tbsp vinegar, let sit 5 min)
For the Mascarpone Cream Filling:
- 8 oz mascarpone cheese, room temperature (this is crucial—don’t use cold)
- 4 oz (1/2 package) cream cheese, softened
- 1/2 cup (1 stick) unsalted butter, softened
- 3 cups powdered sugar
- 2 tbsp heavy cream or milk
- 1 tbsp instant espresso powder dissolved in 1 tbsp hot water, cooled
- 1 tsp vanilla extract
- Pinch of salt
For Assembly:
- Cocoa powder for dusting (unsweetened)
- Optional: chocolate shavings or mini chocolate chips
Let’s Do This
Step 1: Make the Cookie Dough
Preheat your oven to 350°F (175°C). Line two baking sheets with parchment paper or silicone mats.
In a medium bowl, whisk together flour, cocoa powder, baking soda, salt, and espresso powder. Make sure there are no lumps—sift if needed.
In a large bowl (or stand mixer), beat softened butter and brown sugar on medium-high speed for 2-3 minutes until fluffy and lighter in color.
Add the egg and vanilla. Beat until fully incorporated and smooth, scraping down the sides.
Add half the flour mixture and mix on low until just combined.
Add all the buttermilk and mix until incorporated.
Add the remaining flour mixture and mix just until no streaks remain. Don’t overmix—the dough should be thick but scoopable, like brownie batter.
Step 2: Bake Those Cookies
Using a cookie scoop or spoon, drop rounded tablespoons of dough onto your prepared baking sheets, spacing them about 2 inches apart. You should get about 24-28 cookies.
They should look like little chocolate domes—don’t flatten them.
Bake for 10-12 minutes. The cookies are done when they’re set and spring back lightly when touched. They should still look slightly soft—don’t overbake or they’ll be dry.
Let cool on the baking sheet for 5 minutes, then transfer to a wire rack to cool completely. They need to be 100% cool before filling.
While they cool, admire how cake-like and perfect they look.
Step 3: Make the Mascarpone Filling
In a large bowl, beat softened mascarpone and cream cheese together on medium speed until smooth and creamy, about 2 minutes. No lumps allowed.
Add softened butter and beat for another 2 minutes until fluffy and well combined.
Mix the instant espresso powder with 1 tablespoon hot water until dissolved. Let it cool for a minute.
Add powdered sugar, heavy cream, cooled espresso mixture, vanilla, and salt to the mascarpone mixture.
Beat on low speed first to avoid a sugar cloud, then increase to medium-high and beat for 2-3 minutes until light, fluffy, and completely smooth.
Taste it. Try not to eat it all with a spoon. This is the moment you realize you’re making something special.
Step 4: Assemble the Whoopie Pies
Match up your cookies by size—you want pairs that are similar.
Turn half the cookies flat-side up. These will be your bottoms.
Pipe or spread about 2 tablespoons of filling onto each bottom cookie. You can use a piping bag for precision or just a spoon for rustic charm.
Top with another cookie, flat-side down, and press gently until the filling spreads almost to the edges. Don’t squish too hard.
Repeat with all cookies. Try to resist eating the filling from the bowl.
Step 5: The Finishing Touch
Place all assembled whoopie pies on a platter or baking sheet.
Using a fine-mesh sieve or sifter, dust the tops generously with cocoa powder. This is the tiramisu signature move.
If you want to be extra, add a few chocolate shavings or sprinkle with mini chocolate chips.
Refrigerate for at least 30 minutes before serving. This helps the filling set and makes them easier to eat without squishing everywhere.
Right before serving, dust with more cocoa powder for that fresh-from-the-bakery look.
Serving Suggestions
These are perfect on their own, but here are some ideas:
- Serve with espresso or strong coffee for the full tiramisu experience
- Pair with a glass of dessert wine like Vin Santo
- Arrange on a platter with other Italian cookies for a cookie table
- Wrap individually in cellophane for gifts
- Serve slightly chilled for the best texture
- Add a dollop of whipped cream on the side for extra indulgence
Switch It Up
White Chocolate Version: Add 1/2 cup white chocolate chips to the filling for extra richness.
Kahlúa Spike: Add 2 tablespoons Kahlúa or coffee liqueur to the filling for an boozy adult version.
Chocolate Chip Addition: Fold mini chocolate chips into the cookie dough for extra chocolate.
Mocha Whoopies: Use half espresso powder and half cocoa in the filling for intense mocha flavor.
Amaretto Touch: Add 1/2 tsp almond extract to the filling for that classic Italian flavor.
Cream Filling Only: Can’t find mascarpone? Use all cream cheese (12 oz total) for a more accessible version.
Mini Whoopies: Make smaller cookies (1 tablespoon each) for bite-sized versions. Bake for 8-10 minutes.
Make-Ahead Tips
These are actually BETTER the next day—the flavors meld and the cookies soften perfectly.
- Bake cookies ahead: Make and cool cookies up to 2 days ahead. Store airtight at room temp.
- Make filling ahead: Prepare filling up to 1 day ahead. Cover and refrigerate, then bring to room temp and rewhip before using.
- Fully assembled: Store assembled whoopie pies in an airtight container in the fridge for up to 4 days. They get softer and better as they sit.
- Freeze them: Wrap individually and freeze for up to 1 month. Thaw in the fridge, dust with fresh cocoa before serving.
- Freeze unfilled cookies: Freeze baked cookies for up to 3 months. Thaw, make fresh filling, assemble.
Why This Works So Damn Well
Whoopie pies are basically cake-cookies—they have the texture of cake but the portability of cookies. Using buttermilk creates a tender crumb and adds tanginess that balances the sweetness. The baking soda reacts with the buttermilk’s acid to create lift and that characteristic fluffy texture.
The espresso powder in the cookies intensifies the chocolate flavor without making them taste like coffee—it just makes the chocolate more chocolatey. The coffee flavor in the filling is more obvious and ties into the tiramisu vibe.
Mascarpone is key here—it’s creamier and less tangy than cream cheese alone, giving you that authentic tiramisu flavor. Mixing it with cream cheese adds stability so the filling doesn’t get too soft or runny.
The cookies need to be completely cool before filling, or the heat will melt the butter in the filling and create a mess. The overnight rest period isn’t just convenient—it allows the cookies to absorb a tiny bit of moisture from the filling, making them even softer and more cake-like.
Dusting with cocoa powder isn’t just aesthetic—it adds another layer of chocolate flavor and cuts the sweetness slightly, just like in real tiramisu.
When to Make These
Holiday Cookie Exchanges: These stand out from the usual suspects. You’ll be the star.
Coffee Shop Vibes: Bake these for a brunch or coffee date. Very sophisticated energy.
Italian Themed Dinners: End your Italian feast with these instead of traditional tiramisu.
Afternoon Tea: Fancy but not fussy. Perfect with coffee or tea.
Gift Giving: Package in a pretty box and you’ve got bakery-quality gifts.
Just Because: Sometimes you need sophisticated cookies with coffee flavor. Always valid.
Questions People Actually Ask
Q: Can I skip the espresso powder? A: You can, but you’ll lose that signature coffee flavor. If you’re not a coffee person, reduce it to 1 tablespoon in the cookies and 1/2 tablespoon in the filling.
Q: What if I can’t find mascarpone? A: Use all cream cheese (12 oz total) instead. Add an extra tablespoon of heavy cream to keep it smooth. It’ll be slightly tangier but still delicious.
Q: My cookies spread too much or came out flat. A: Your butter was too soft, or you overmixed the batter. The dough should be thick. Also, make sure your baking soda is fresh.
Q: The filling is too soft and won’t stay in the cookies. A: Your mascarpone/butter wasn’t at true room temp (should be soft but not melty). Refrigerate the filling for 20-30 minutes to firm up, then assemble.
Q: Can I use regular coffee instead of espresso powder? A: Espresso powder is more concentrated and doesn’t add extra liquid. If using brewed coffee, reduce buttermilk to 3/4 cup and add 1/4 cup strong coffee to the batter.
Q: How do I get that perfect cocoa powder dusting? A: Use a fine-mesh sieve and tap it gently over the cookies from about 6 inches up. Multiple light dustings look better than one heavy one.
Q: My cookies are too dry/too wet. A: Too dry means you overbaked them—they’ll firm up as they cool, so pull them slightly early. Too wet means underbaked—give them another minute or two.
Q: Can I make these without buttermilk? A: Yes! Use the milk + vinegar trick mentioned in the ingredients, or use plain yogurt thinned with a bit of milk.
Q: They fell apart when I assembled them. Help! A: Make sure cookies are completely cool. Don’t press too hard when sandwiching. If they’re too crumbly, they may have been overbaked.
Print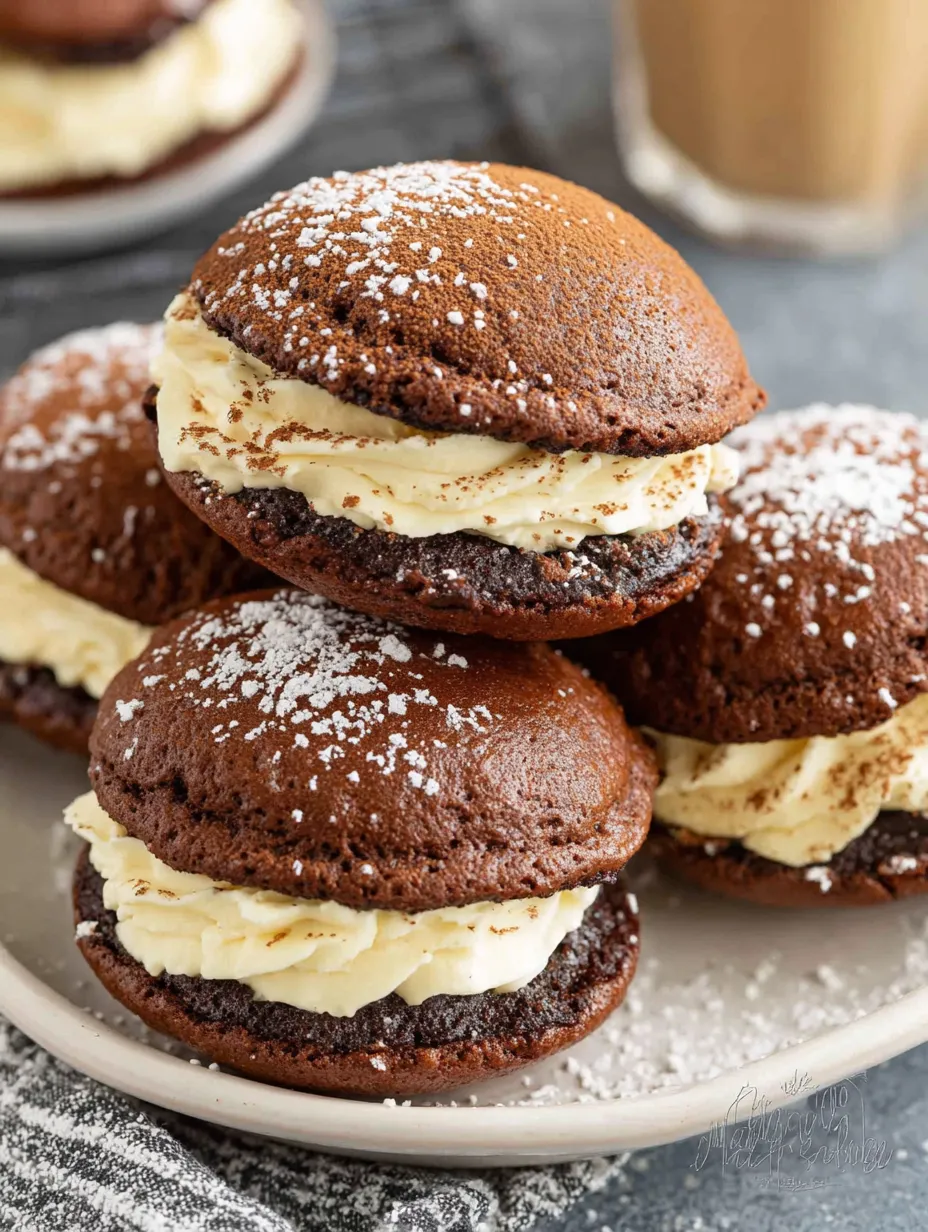
Tiramisu Cookie Sandwiches
- Total Time: 42 minutes
- Yield: 12–14 whoopie pies 1x
Description
So someone looked at tiramisu—that sophisticated Italian coffee-soaked dessert that makes you feel fancy—and thought “what if this was a COOKIE SANDWICH?” and honestly, that person deserves an award. These are soft, cakey chocolate cookies with a hint of espresso, sandwiched with a mascarpone cream filling that tastes exactly like the fluffy layer in classic tiramisu, all dusted with cocoa powder like they just came from an Italian bakery. They’re elegant but fun, fancy but approachable, and have that addictive coffee-chocolate-cream situation that makes tiramisu so irresistible. I brought these to a holiday cookie swap and someone literally gasped “THESE ARE TIRAMISU?!” before eating three of them. Another person took a bite, closed their eyes, and said “I’m in Rome right now.” My neighbor asked for the recipe and then made them twice in one week. These cookies create OBSESSION.
Ingredients
For the Chocolate Espresso Cookies:
- 2 cups all-purpose flour
- 1/2 cup unsweetened cocoa powder (Dutch-process is best but regular works)
- 1 1/4 tsp baking soda
- 1/2 tsp salt
- 2 tbsp instant espresso powder (or instant coffee)
- 1/2 cup (1 stick) unsalted butter, softened
- 1 cup packed brown sugar
- 1 large egg, room temperature
- 1 tsp vanilla extract
- 1 cup buttermilk (or 1 cup milk + 1 tbsp vinegar, let sit 5 min)
For the Mascarpone Cream Filling:
- 8 oz mascarpone cheese, room temperature (this is crucial—don’t use cold)
- 4 oz (1/2 package) cream cheese, softened
- 1/2 cup (1 stick) unsalted butter, softened
- 3 cups powdered sugar
- 2 tbsp heavy cream or milk
- 1 tbsp instant espresso powder dissolved in 1 tbsp hot water, cooled
- 1 tsp vanilla extract
- Pinch of salt
For Assembly:
- Cocoa powder for dusting (unsweetened)
- Optional: chocolate shavings or mini chocolate chips
Instructions
Preheat your oven to 350°F (175°C). Line two baking sheets with parchment paper or silicone mats.
In a medium bowl, whisk together flour, cocoa powder, baking soda, salt, and espresso powder. Make sure there are no lumps—sift if needed.
In a large bowl (or stand mixer), beat softened butter and brown sugar on medium-high speed for 2-3 minutes until fluffy and lighter in color.
Add the egg and vanilla. Beat until fully incorporated and smooth, scraping down the sides.
Add half the flour mixture and mix on low until just combined.
Add all the buttermilk and mix until incorporated.
Add the remaining flour mixture and mix just until no streaks remain. Don’t overmix—the dough should be thick but scoopable, like brownie batter.
Using a cookie scoop or spoon, drop rounded tablespoons of dough onto your prepared baking sheets, spacing them about 2 inches apart. You should get about 24-28 cookies.
They should look like little chocolate domes—don’t flatten them.
Bake for 10-12 minutes. The cookies are done when they’re set and spring back lightly when touched. They should still look slightly soft—don’t overbake or they’ll be dry.
Let cool on the baking sheet for 5 minutes, then transfer to a wire rack to cool completely. They need to be 100% cool before filling.
While they cool, admire how cake-like and perfect they look.
In a large bowl, beat softened mascarpone and cream cheese together on medium speed until smooth and creamy, about 2 minutes. No lumps allowed.
Add softened butter and beat for another 2 minutes until fluffy and well combined.
Mix the instant espresso powder with 1 tablespoon hot water until dissolved. Let it cool for a minute.
Add powdered sugar, heavy cream, cooled espresso mixture, vanilla, and salt to the mascarpone mixture.
Beat on low speed first to avoid a sugar cloud, then increase to medium-high and beat for 2-3 minutes until light, fluffy, and completely smooth.
Taste it. Try not to eat it all with a spoon. This is the moment you realize you’re making something special.
Match up your cookies by size—you want pairs that are similar.
Turn half the cookies flat-side up. These will be your bottoms.
Pipe or spread about 2 tablespoons of filling onto each bottom cookie. You can use a piping bag for precision or just a spoon for rustic charm.
Top with another cookie, flat-side down, and press gently until the filling spreads almost to the edges. Don’t squish too hard.
Repeat with all cookies. Try to resist eating the filling from the bowl.
Place all assembled whoopie pies on a platter or baking sheet.
Using a fine-mesh sieve or sifter, dust the tops generously with cocoa powder. This is the tiramisu signature move.
If you want to be extra, add a few chocolate shavings or sprinkle with mini chocolate chips.
Refrigerate for at least 30 minutes before serving. This helps the filling set and makes them easier to eat without squishing everywhere.
Right before serving, dust with more cocoa powder for that fresh-from-the-bakery look.
Notes
These are perfect on their own, but here are some ideas:
- Serve with espresso or strong coffee for the full tiramisu experience
- Pair with a glass of dessert wine like Vin Santo
- Arrange on a platter with other Italian cookies for a cookie table
- Wrap individually in cellophane for gifts
- Serve slightly chilled for the best texture
- Add a dollop of whipped cream on the side for extra indulgence
- Prep Time: 30 minutes
- Cook Time: 12 minutes
Nutrition
- Calories: ~320 kcal
- Fat: ~18g
- Carbohydrates: ~38g
- Protein: ~4g


