
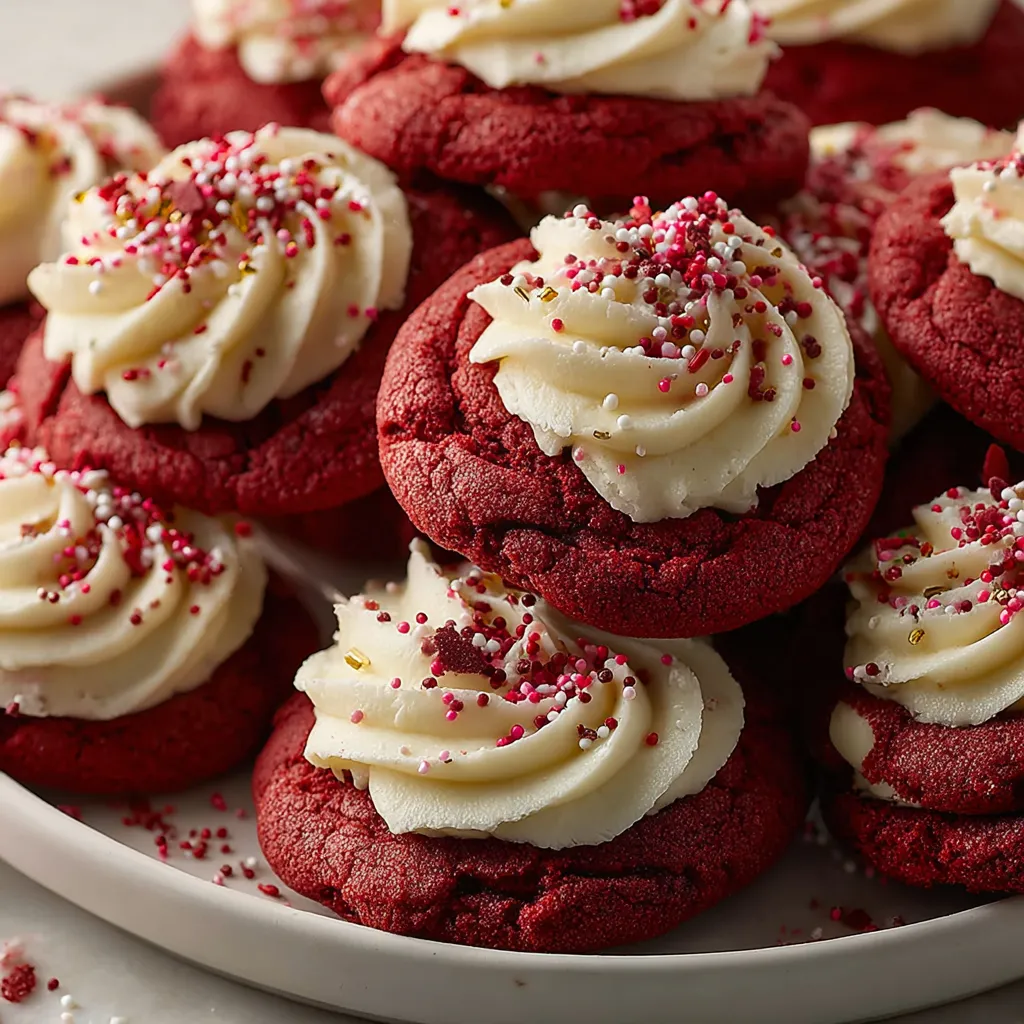
Okay, so imagine if red velvet cake decided to become a cookie, brought its signature cream cheese frosting along for the ride, and showed up looking like it belongs in a magazine spread. That’s what we’re dealing with here. Red Velvet Cookies with Cream Cheese Frosting are basically soft, pillowy cookies with that classic red velvet flavor—subtle cocoa, slight tanginess, gorgeous deep red color—topped with thick, tangy, sweet cream cheese frosting and finished with festive sprinkles. They’re the kind of cookies that make people stop and stare before eating them. The texture is cake-like but still has that satisfying cookie chew, the cream cheese frosting is sweet but balanced with tang, and they look so pretty you almost don’t want to eat them (almost). I made these for Valentine’s Day once and received three marriage proposals. Another time someone asked if I went to pastry school. These cookies inspire life commitments and professional assumptions.
Why You’ll Love This Recipe
Bakery-level gorgeous. That deep red color and swirled frosting make these look like you spent $5 per cookie at a fancy bakery.
Red velvet perfection. All the flavor of red velvet cake in convenient cookie form. No cake pans required.
Cream cheese frosting. Tangy, sweet, creamy perfection. This is what separates red velvet from being just chocolate.
Soft and pillowy. These stay soft for days. No hard, crunchy cookies here—just tender perfection.
Perfect for gifting. Package these in a pretty box and you’ve got the ultimate homemade gift.
Occasion-ready. Valentine’s Day, Christmas, birthdays, or just because you deserve something beautiful
The Good Stuff You’ll Need
For the Red Velvet Cookies:
- 1/2 cup (1 stick) unsalted butter, softened to room temp
- 1 cup granulated sugar
- 1 large egg, room temperature
- 2 tbsp vegetable oil or canola oil
- 1 tbsp liquid red food coloring (NOT gel—liquid works better here)
- 1 tsp vanilla extract
- 1 tsp white vinegar (essential for red velvet chemistry)
- 1.75 cups all-purpose flour
- 2 tbsp unsweetened cocoa powder (not hot cocoa mix)
- 1 tsp baking soda
- 1/4 tsp salt
- 1/2 cup buttermilk, room temperature
For the Cream Cheese Frosting:
- 8 oz cream cheese, softened to room temp (full-fat, not whipped)
- 1/4 cup (1/2 stick) unsalted butter, softened
- 3 cups powdered sugar, sifted
- 1 tsp vanilla extract
- Pinch of salt
- 1-2 tbsp heavy cream or milk (if needed for consistency)
For Decoration:
- Valentine’s sprinkles (red, white, pink mix)
- Heart-shaped sprinkles
- Red and white nonpareils
- Edible glitter (optional but sparkly)
Optional Add-Ins:
- White chocolate chips in the cookie dough
- Mini chocolate chips
- 1/2 tsp almond extract for extra depth
- Lemon zest in the frosting
Equipment:
- Stand mixer or hand mixer
- Two large mixing bowls
- Cookie scoop (2 tablespoon size)
- Baking sheets
- Parchment paper or silicone baking mats
- Piping bag with large star tip (or zip-top bag)
- Wire cooling rack
- Sifter for powdered sugar
Let’s Do This
Step 1: Prep Your Ingredients
Make sure your butter, egg, and buttermilk are all at room temperature. Cold ingredients don’t mix well and create lumpy dough.
If you forgot to take them out, microwave buttermilk for 10-15 seconds until just warm. Let eggs sit in warm water for 5 minutes.
Sift your cocoa powder to remove lumps. Lumpy cocoa means streaky cookies.
Measure your red food coloring carefully. Too much makes them taste bitter, too little makes them pink instead of red.
Step 2: Make the Cookie Dough
In a large bowl (or stand mixer), beat the softened butter and sugar on medium-high speed for 2-3 minutes until light and fluffy.
Add the egg, oil, red food coloring, vanilla extract, and vinegar. Beat for another minute until well combined. The mixture should be bright red and smooth.
The vinegar reacts with the baking soda to create that classic red velvet tang and helps the red color develop.
In a separate bowl, whisk together flour, cocoa powder, baking soda, and salt.
Add half the dry ingredients to the wet ingredients and mix on low speed until just combined.
Add the buttermilk and mix until incorporated.
Add the remaining dry ingredients and mix just until no dry streaks remain. Don’t overmix or cookies will be tough.
The dough will be soft, slightly sticky, and brilliantly red. This is perfect.
Step 3: Chill the Dough
Cover the bowl tightly with plastic wrap and refrigerate for at least 30 minutes, up to 2 hours.
Chilling makes the dough easier to scoop and prevents excessive spreading during baking.
If you’re in a rush, 30 minutes works. If you have time, an hour is ideal.
Cold dough = thicker, prettier cookies. Warm dough = flat pancake cookies.
Step 4: Bake the Cookies
Preheat your oven to 350°F (175°C).
Line two baking sheets with parchment paper or silicone baking mats.
Use a cookie scoop (2 tablespoon size) to portion out the chilled dough onto the prepared sheets.
Space them about 2-3 inches apart. They spread moderately during baking.
Don’t flatten them—just leave them as rounded balls. They’ll spread on their own.
Bake for 10-12 minutes. The edges should look set, but the centers should still look soft and slightly underdone.
They should NOT be browned. Red velvet cookies should stay bright red, not brown at the edges.
Let them cool on the baking sheet for 5 minutes, then transfer to a wire rack to cool completely.
Do not frost warm cookies. The frosting will melt into a puddle and you’ll be sad.
Step 5: Make the Cream Cheese Frosting
While the cookies cool, make your frosting.
In a large bowl (or stand mixer), beat the softened cream cheese and butter together on medium-high speed for 2-3 minutes until smooth and fluffy.
Scrape down the sides of the bowl.
Add the sifted powdered sugar one cup at a time, mixing on low speed after each addition to prevent a sugar explosion.
Add vanilla extract and a pinch of salt.
Beat on high speed for 2-3 minutes until light, fluffy, and smooth.
If the frosting is too thick, add heavy cream one tablespoon at a time until you reach piping consistency. If it’s too thin, add more powdered sugar.
The frosting should hold soft peaks and be smooth enough to pipe but thick enough to hold its shape.
Step 6: Frost Those Cookies
Once the cookies are completely cool (this is crucial), transfer the frosting to a piping bag fitted with a large star tip.
If you don’t have a piping bag, use a zip-top bag with the corner cut off. Won’t look as fancy but still works.
Hold the piping bag perpendicular to the cookie (straight up and down) about 1/2 inch above the surface.
Squeeze with steady pressure while moving in a circular motion from the outside toward the center, creating a swirl.
Release pressure and pull straight up to create a point.
Alternatively, just spread the frosting with an offset spatula or knife for a rustic look.
Immediately top with sprinkles before the frosting sets. Sprinkles stick to wet frosting but slide off dry frosting.
Step 7: Let Them Set and Serve
Let the frosted cookies sit at room temperature for about 15-20 minutes so the frosting firms up slightly.
Arrange on a pretty platter because these deserve to be presented beautifully.
Serve with milk, coffee, or champagne if you’re feeling fancy.
Take approximately 47 photos because they’re gorgeous.
Try to share with others instead of eating them all yourself. This is the hardest step.
Serving Suggestions
These are basically perfect as-is, but here are some ideas:
- Arrange on a tiered stand for an elegant dessert display
- Package in clear boxes or bags tied with ribbon for gifts
- Serve at Valentine’s Day parties, bridal showers, or baby showers
- Make a cookies-and-milk bar with different milk flavors
- Sandwich two cookies with extra frosting for whoopie pie vibes
- Serve with champagne or sparkling wine for grown-up celebrations
- Crumble one over vanilla ice cream for a red velvet sundae
Switch It Up
Blue Velvet: Use blue food coloring instead of red. Perfect for baby showers or gender reveals.
Pink Velvet: Use less red food coloring for a softer pink color. Sweet and feminine.
Chocolate Cream Cheese: Add 2 tbsp cocoa powder to the frosting for chocolate cream cheese version.
Stuffed Cookies: Press a Hershey’s Kiss or chocolate truffle into the center before baking.
White Chocolate Red Velvet: Add 1/2 cup white chocolate chips to the dough.
Mini Cookies: Make smaller cookies for bite-sized treats. Reduce baking time by 2-3 minutes.
Naked Version: Skip the frosting, roll in powdered sugar, and dust with more sugar before serving.
Sandwich Cookies: Make smaller cookies and sandwich two together with cream cheese frosting in the middle.
Gluten-Free: Use a 1:1 gluten-free flour blend. The texture will be slightly different but still good.
Storage and Make-Ahead Tips
These store well and the flavor actually improves after a day.
Room temperature: Store unfrosted cookies in an airtight container for up to 5 days.
Refrigerate frosted cookies: The cream cheese frosting must be refrigerated. Store in an airtight container for up to 4 days. Bring to room temp for 20 minutes before serving.
Freeze unfrosted cookies: Cool completely, layer with parchment in an airtight container, freeze up to 3 months. Thaw and frost when ready to serve.
Freeze frosted cookies: Freeze in a single layer on a baking sheet until solid, then transfer carefully to a container. Thaw in the fridge overnight.
Freeze the dough: Scoop dough balls, freeze on a baking sheet, transfer to freezer bags for up to 3 months. Bake from frozen, adding 1-2 extra minutes.
Make frosting ahead: Refrigerate frosting for up to 3 days. Bring to room temp and re-whip before using.
Keep frosting fresh: Press plastic wrap directly onto the surface of the frosting before refrigerating to prevent a skin from forming.
Why This Works So Damn Well
Red velvet is all about balance—it’s not just chocolate, and it’s not just vanilla. The small amount of cocoa powder adds depth without making it taste like chocolate cake.
The vinegar is essential. It reacts with the baking soda to create carbon dioxide, which makes the cookies tender and gives them rise. It also provides that signature tang.
Buttermilk adds acidity which tenderizes the dough and reacts with the baking soda. The acid also helps the red color stay vibrant instead of turning brown.
Oil plus butter creates the perfect texture. Butter provides flavor, oil keeps them soft and moist. Using both gives you the best of both worlds.
Room temperature ingredients mix smoothly and create even texture. Cold ingredients create lumps and uneven distribution.
Not overbaking is critical. These cookies should look slightly underdone when you pull them out. They firm up as they cool and stay soft inside.
Cream cheese frosting is mandatory, not optional. The tangy cream cheese cuts the sweetness and creates that classic red velvet flavor profile.
Softened cream cheese (not cold, not melted) creates smooth, fluffy frosting. Cold cream cheese is lumpy. Warm cream cheese is runny.
Sifting the powdered sugar prevents lumps in the frosting. Lumpy frosting is the enemy of smooth piping.
When to Make These
Valentine’s Day: These are THE Valentine’s cookie. Red, romantic, covered in hearts.
Christmas: Use red and white sprinkles for festive holiday cookies.
Weddings and Bridal Showers: Elegant enough for fancy celebrations.
Baby Showers: Pink or blue velvet cookies for gender reveals or baby celebrations.
Birthday Parties: Because regular sugar cookies are boring and these are special.
Just Because: You don’t need a reason to make beautiful, delicious cookies.
Questions People Actually Ask
Q: Can I use gel food coloring instead of liquid? A: You can, but use less—gel is much more concentrated. Start with 1/2 tsp and add more if needed. The dough might be slightly drier.
Q: My cookies spread too much. What happened? A: Your dough wasn’t chilled long enough, or your butter was too warm. Always chill for at least 30 minutes.
Q: The frosting is too soft/runny. Help! A: Add more powdered sugar, 1/4 cup at a time, until it thickens. Or refrigerate for 15 minutes to firm up.
Q: Can I skip the vinegar? A: Don’t skip it—it’s part of what makes red velvet unique. It reacts with the baking soda and adds tang.
Q: My cookies turned brown at the edges. Why? A: You overbaked them or your oven runs hot. Red velvet should stay red. Pull them out when they still look slightly underdone.
Q: Can I use whipped cream cheese? A: No, it has too much air and won’t give you the right frosting consistency. Use brick-style full-fat cream cheese.
Q: The red color isn’t bright enough. What do I do? A: Use more food coloring, up to 2 tablespoons. Also make sure you’re using liquid, not gel—liquid colors better.
Q: Do I have to refrigerate these? A: Yes, once frosted. Cream cheese frosting must be refrigerated for food safety. Bring to room temp before serving for best taste.
Q: Can I make these without buttermilk? A: Make your own: Add 1.5 tsp white vinegar or lemon juice to 1/2 cup regular milk. Let sit 5 minutes before using.
Print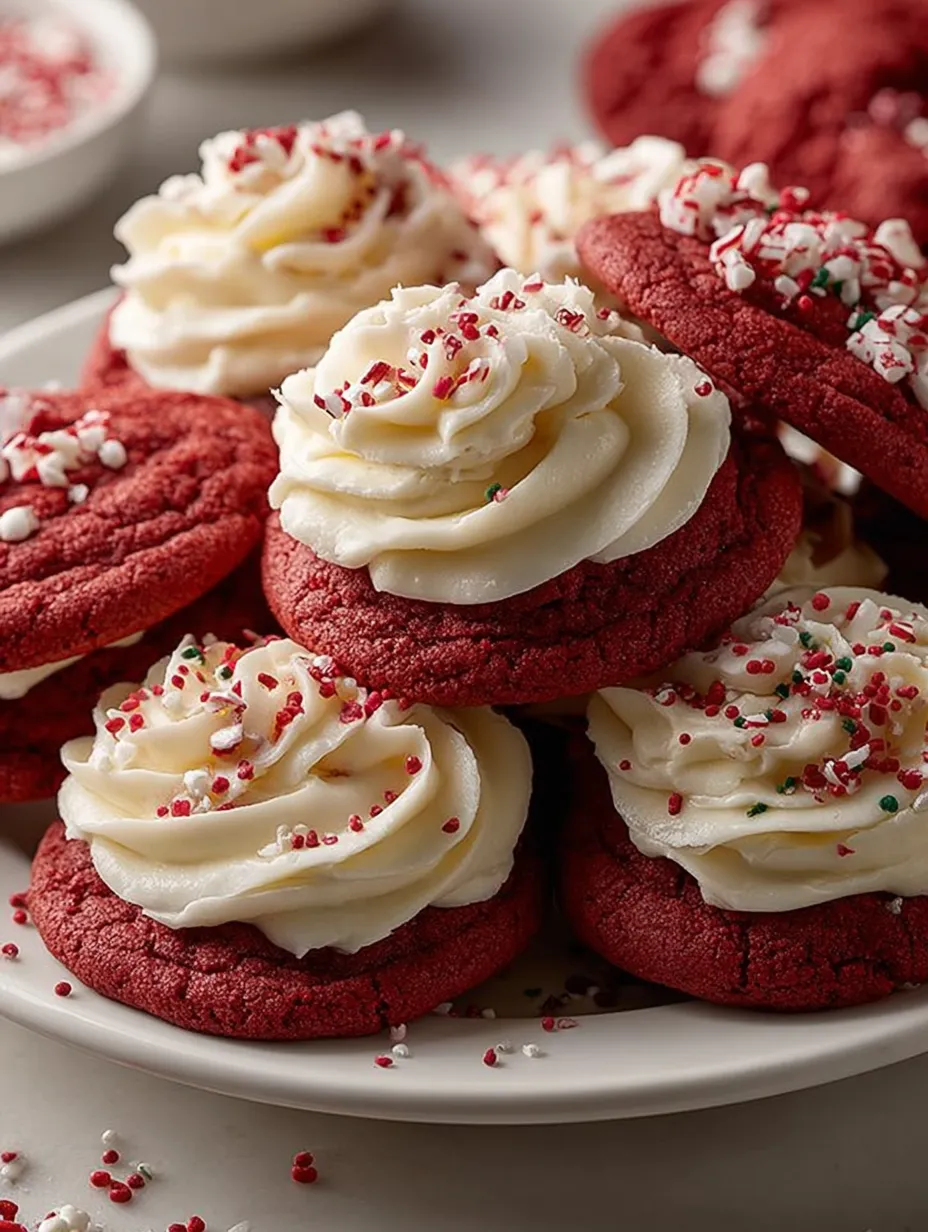
Red Velvet Cookies with Cream Cheese Frosting
- Total Time: 1 hour 20 minutes
- Yield: 20–24 cookies 1x
Description
Okay, so imagine if red velvet cake decided to become a cookie, brought its signature cream cheese frosting along for the ride, and showed up looking like it belongs in a magazine spread. That’s what we’re dealing with here. Red Velvet Cookies with Cream Cheese Frosting are basically soft, pillowy cookies with that classic red velvet flavor—subtle cocoa, slight tanginess, gorgeous deep red color—topped with thick, tangy, sweet cream cheese frosting and finished with festive sprinkles. They’re the kind of cookies that make people stop and stare before eating them. The texture is cake-like but still has that satisfying cookie chew, the cream cheese frosting is sweet but balanced with tang, and they look so pretty you almost don’t want to eat them (almost). I made these for Valentine’s Day once and received three marriage proposals. Another time someone asked if I went to pastry school. These cookies inspire life commitments and professional assumptions.
Ingredients
For the Red Velvet Cookies:
- 1/2 cup (1 stick) unsalted butter, softened to room temp
- 1 cup granulated sugar
- 1 large egg, room temperature
- 2 tbsp vegetable oil or canola oil
- 1 tbsp liquid red food coloring (NOT gel—liquid works better here)
- 1 tsp vanilla extract
- 1 tsp white vinegar (essential for red velvet chemistry)
- 1.75 cups all-purpose flour
- 2 tbsp unsweetened cocoa powder (not hot cocoa mix)
- 1 tsp baking soda
- 1/4 tsp salt
- 1/2 cup buttermilk, room temperature
For the Cream Cheese Frosting:
- 8 oz cream cheese, softened to room temp (full-fat, not whipped)
- 1/4 cup (1/2 stick) unsalted butter, softened
- 3 cups powdered sugar, sifted
- 1 tsp vanilla extract
- Pinch of salt
- 1–2 tbsp heavy cream or milk (if needed for consistency)
For Decoration:
- Valentine’s sprinkles (red, white, pink mix)
- Heart-shaped sprinkles
- Red and white nonpareils
- Edible glitter (optional but sparkly)
Optional Add-Ins:
- White chocolate chips in the cookie dough
- Mini chocolate chips
- 1/2 tsp almond extract for extra depth
- Lemon zest in the frosting
Equipment:
- Stand mixer or hand mixer
- Two large mixing bowls
- Cookie scoop (2 tablespoon size)
- Baking sheets
- Parchment paper or silicone baking mats
- Piping bag with large star tip (or zip-top bag)
- Wire cooling rack
- Sifter for powdered sugar
Instructions
Make sure your butter, egg, and buttermilk are all at room temperature. Cold ingredients don’t mix well and create lumpy dough.
If you forgot to take them out, microwave buttermilk for 10-15 seconds until just warm. Let eggs sit in warm water for 5 minutes.
Sift your cocoa powder to remove lumps. Lumpy cocoa means streaky cookies.
Measure your red food coloring carefully. Too much makes them taste bitter, too little makes them pink instead of red.
In a large bowl (or stand mixer), beat the softened butter and sugar on medium-high speed for 2-3 minutes until light and fluffy.
Add the egg, oil, red food coloring, vanilla extract, and vinegar. Beat for another minute until well combined. The mixture should be bright red and smooth.
The vinegar reacts with the baking soda to create that classic red velvet tang and helps the red color develop.
In a separate bowl, whisk together flour, cocoa powder, baking soda, and salt.
Add half the dry ingredients to the wet ingredients and mix on low speed until just combined.
Add the buttermilk and mix until incorporated.
Add the remaining dry ingredients and mix just until no dry streaks remain. Don’t overmix or cookies will be tough.
The dough will be soft, slightly sticky, and brilliantly red. This is perfect.
Cover the bowl tightly with plastic wrap and refrigerate for at least 30 minutes, up to 2 hours.
Chilling makes the dough easier to scoop and prevents excessive spreading during baking.
If you’re in a rush, 30 minutes works. If you have time, an hour is ideal.
Cold dough = thicker, prettier cookies. Warm dough = flat pancake cookies.
Preheat your oven to 350°F (175°C).
Line two baking sheets with parchment paper or silicone baking mats.
Use a cookie scoop (2 tablespoon size) to portion out the chilled dough onto the prepared sheets.
Space them about 2-3 inches apart. They spread moderately during baking.
Don’t flatten them—just leave them as rounded balls. They’ll spread on their own.
Bake for 10-12 minutes. The edges should look set, but the centers should still look soft and slightly underdone.
They should NOT be browned. Red velvet cookies should stay bright red, not brown at the edges.
Let them cool on the baking sheet for 5 minutes, then transfer to a wire rack to cool completely.
Do not frost warm cookies. The frosting will melt into a puddle and you’ll be sad.
While the cookies cool, make your frosting.
In a large bowl (or stand mixer), beat the softened cream cheese and butter together on medium-high speed for 2-3 minutes until smooth and fluffy.
Scrape down the sides of the bowl.
Add the sifted powdered sugar one cup at a time, mixing on low speed after each addition to prevent a sugar explosion.
Add vanilla extract and a pinch of salt.
Beat on high speed for 2-3 minutes until light, fluffy, and smooth.
If the frosting is too thick, add heavy cream one tablespoon at a time until you reach piping consistency. If it’s too thin, add more powdered sugar.
The frosting should hold soft peaks and be smooth enough to pipe but thick enough to hold its shape.
Once the cookies are completely cool (this is crucial), transfer the frosting to a piping bag fitted with a large star tip.
If you don’t have a piping bag, use a zip-top bag with the corner cut off. Won’t look as fancy but still works.
Hold the piping bag perpendicular to the cookie (straight up and down) about 1/2 inch above the surface.
Squeeze with steady pressure while moving in a circular motion from the outside toward the center, creating a swirl.
Release pressure and pull straight up to create a point.
Alternatively, just spread the frosting with an offset spatula or knife for a rustic look.
Immediately top with sprinkles before the frosting sets. Sprinkles stick to wet frosting but slide off dry frosting.
Let the frosted cookies sit at room temperature for about 15-20 minutes so the frosting firms up slightly.
Arrange on a pretty platter because these deserve to be presented beautifully.
Serve with milk, coffee, or champagne if you’re feeling fancy.
Take approximately 47 photos because they’re gorgeous.
Try to share with others instead of eating them all yourself. This is the hardest step.
Notes
These are basically perfect as-is, but here are some ideas:
- Arrange on a tiered stand for an elegant dessert display
- Package in clear boxes or bags tied with ribbon for gifts
- Serve at Valentine’s Day parties, bridal showers, or baby showers
- Make a cookies-and-milk bar with different milk flavors
- Sandwich two cookies with extra frosting for whoopie pie vibes
- Serve with champagne or sparkling wine for grown-up celebrations
- Crumble one over vanilla ice cream for a red velvet sundae
- Prep Time: 25 minutes
- Cook Time: 12 minutes per batch
Nutrition
- Calories: ~195 kcal
- Sugar: ~20g
- Sodium: ~135mg
- Fat: ~9g
- Carbohydrates: ~28g
- Protein: ~2g


