
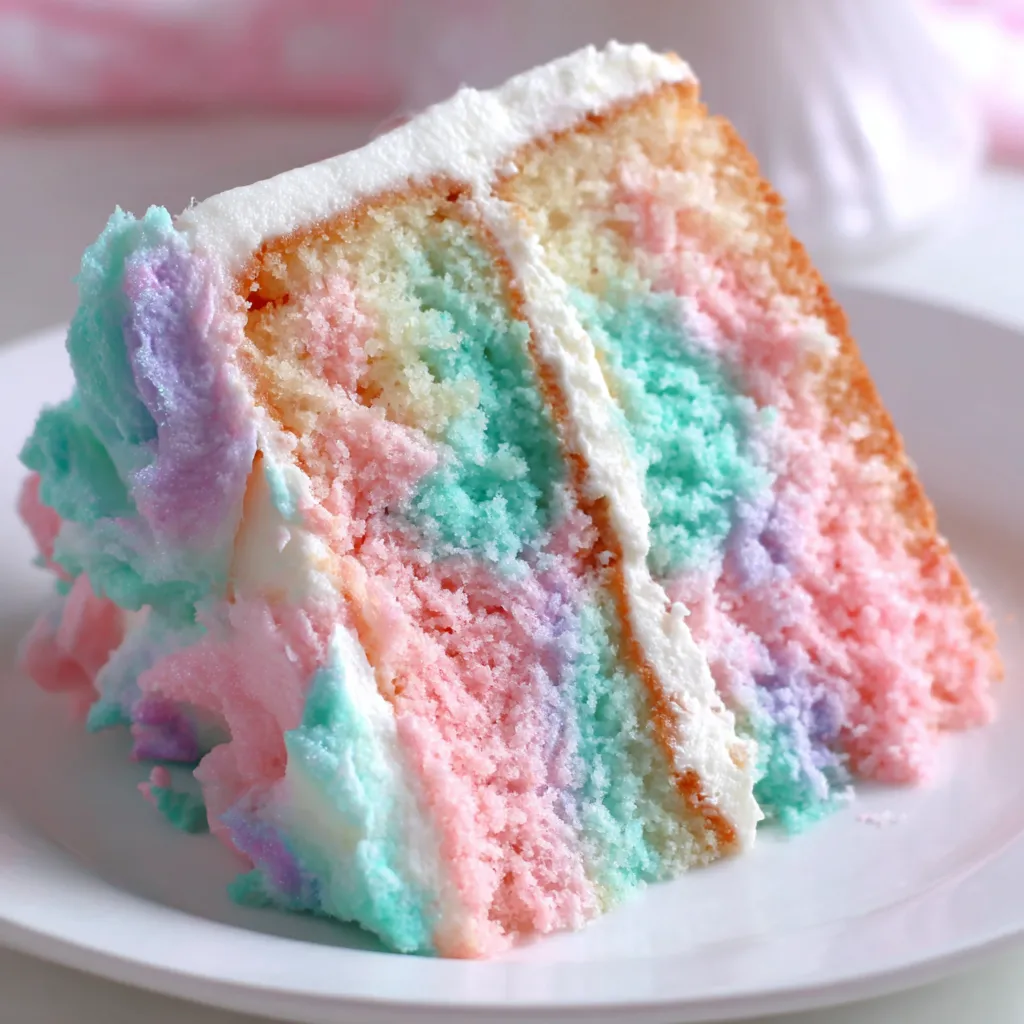
Okay, so picture this: someone took all the magic of a county fair, specifically that fluffy pink and blue sugar cloud situation you eat on a stick, and turned it into an actual cake that tastes like nostalgia and childhood joy. Cotton Candy Cake is a pastel rainbow layer cake—pink, blue, and purple layers that look like a unicorn exploded in the best way possible—with vanilla buttercream between each layer and a swirled frosting situation on the outside that makes it look like you hired a professional. The cake itself is moist, tender, and flavored with actual cotton candy (yes, really), giving it that distinctive sweet carnival taste. Top it with pastel swirled buttercream, sprinkles, and maybe some actual cotton candy for maximum Instagram impact. I made this for my niece’s birthday and the kids literally squealed. Like, actual squealing. One mom asked for the recipe three times. Another mom gave me a look that said “I can never top this.” This cake makes you the hero of every party.
Why You’ll Love This Recipe
Pure Instagram bait. The colors, the swirls, the drama. Your feed needs this.
Tastes like childhood. Cotton candy flavor in cake form. It’s literally magic.
Easier than it looks. It’s basically just colored cake layers. The fancy part is all illusion.
Crowd goes wild. Kids lose their minds. Adults pretend to be sophisticated then ask for seconds.
Customizable colors. Pink, blue, purple—or any pastel combo you want. Make it yours.
Impressive without being hard. Looks like bakery-level skill, requires home baker effort.
Perfect for celebrations. Birthdays, baby showers, unicorn parties, or because it’s Tuesday.
The Good Stuff You’ll Need
For the Cake Layers:
- 3 cups all-purpose flour
- 1 tbsp baking powder
- 1/2 tsp salt
- 1 cup (2 sticks) unsalted butter, softened
- 2 cups granulated sugar
- 4 large eggs, room temperature
- 1 cup whole milk, room temperature
- 2 tsp vanilla extract
- 1 tsp cotton candy extract (or flavoring)
- Gel food coloring (pink, blue, purple)
- Optional: 1/2 cup cotton candy, pulled into small pieces
For the Vanilla Buttercream:
- 2 cups (4 sticks) unsalted butter, softened
- 6-7 cups powdered sugar
- 1/4 cup heavy cream or milk
- 2 tsp vanilla extract
- 1/2 tsp cotton candy extract (optional)
- Pinch of salt
- Gel food coloring (pink, blue, purple)
For Decoration:
- Pastel sprinkles
- Cotton candy (for topping, optional)
- Extra swirls and drama
Equipment:
- Three 8-inch or 9-inch round cake pans
- Parchment paper
- Stand mixer or hand mixer
- Piping bags
- Large round tip or star tip
- Offset spatula
- Cake turntable (helpful but not required)
Let’s Do This
Step 1: Prep Your Pans and Oven
Preheat your oven to 350°F (175°C). This is important. Don’t be a hero and skip this.
Grease three 8-inch or 9-inch round cake pans with butter or cooking spray. Line the bottoms with parchment paper circles. Grease the parchment too. Triple insurance against cake-stuck-in-pan tragedy.
Step 2: Make the Cake Batter
In a medium bowl, whisk together flour, baking powder, and salt. Set aside and resist the urge to taste raw flour.
In a large bowl (or stand mixer with paddle attachment), beat the softened butter and sugar together on medium-high speed for 3-4 minutes until light, fluffy, and pale. This step matters—don’t rush it.
Add eggs one at a time, beating well after each addition. The mixture should look smooth and emulsified, not curdled.
In a measuring cup, combine milk, vanilla extract, and cotton candy extract (if using).
With the mixer on low speed, add the flour mixture and milk mixture alternately, starting and ending with flour. Mix until just combined after each addition. Don’t overmix or your cake will be tough and you’ll be sad.
If you’re adding actual cotton candy pieces, fold them in now. They’ll mostly dissolve but leave flavor and tiny sugar crystals throughout.
Step 3: Color the Batter
Divide the batter evenly among three bowls. Weigh them if you’re precise, eyeball it if you’re confident.
Add gel food coloring to each bowl:
- Bowl 1: Pink (start with 1/2 tsp, add more for desired shade)
- Bowl 2: Blue (same deal)
- Bowl 3: Purple (or leave white, or do another color—you’re the artist)
Fold the color in gently with a spatula until evenly distributed. Don’t overmix—just get it uniform.
Pour each colored batter into its own prepared pan. Smooth the tops with a spatula.
Step 4: Bake
Bake for 25-30 minutes, until a toothpick inserted in the center comes out clean or with just a few moist crumbs. The tops should spring back when lightly pressed.
Don’t overbake or the cake will be dry. Start checking at 25 minutes.
Let the cakes cool in the pans for 10 minutes, then turn them out onto wire racks to cool completely. Peel off the parchment paper.
These MUST be completely cool before frosting or you’ll have a melted buttercream disaster. Be patient. Go watch TikTok or something.
Step 5: Make the Buttercream
In a large bowl (or stand mixer), beat the softened butter on medium speed for 2-3 minutes until creamy and pale.
Add 3 cups of powdered sugar, one cup at a time, beating on low after each addition.
Add heavy cream, vanilla extract, cotton candy extract (if using), and a pinch of salt. Beat on medium until combined.
Add remaining powdered sugar, one cup at a time, until you reach your desired consistency. The frosting should be thick enough to hold its shape but spreadable. If it’s too thick, add more cream (1 tbsp at a time). Too thin? Add more powdered sugar.
Beat on medium-high for 2-3 minutes until light and fluffy.
Step 6: Color the Buttercream
Divide the buttercream into three bowls (or however many colors you want for the outside).
Color each bowl with gel food coloring—pink, blue, and purple (or your chosen colors). Mix until evenly colored.
If you want the swirled effect on the outside, keep the colors separate. If you want a solid color, use one color for the whole thing.
Step 7: Assemble the Cake
Place the first cake layer on your serving plate or cake board. Put a dollop of frosting on the plate first so the cake doesn’t slide around.
Spread a thick layer of buttercream on top (about 1/2 cup). You can use white buttercream between layers and save the colored stuff for outside, or use colored—your call.
Place the second layer on top and repeat the frosting situation.
Add the third layer on top. Make sure everything is level and even. If it’s wonky, trim the tops flat with a serrated knife.
Step 8: Crumb Coat
Apply a thin layer of buttercream all over the entire cake—top and sides. This is the crumb coat. It doesn’t need to look pretty; it’s just trapping crumbs so your final layer is clean.
Refrigerate for 30 minutes to let the crumb coat set. This step is optional but makes the final frosting so much easier.
Step 9: Final Frosting and Swirls
For the swirled pastel look, you have options:
Method 1 (Piping Bag Swirl): Put each colored buttercream into a separate piping bag. Cut the tips off the bags. Place all three bags into one larger piping bag fitted with a large round or star tip. Pipe swirls all over the cake, creating a watercolor effect.
Method 2 (Spatula Swirl): Dollop different colored buttercream randomly all over the cake. Use an offset spatula to spread and swirl, blending colors slightly but keeping them distinct.
Method 3 (Rustic Patches): Spread one color at a time in patches, slightly blending where they meet for a soft ombre effect.
Work your way around the cake, covering the entire surface. The beauty is in the imperfection—embrace the messy, dreamy look.
Step 10: Decorate and Destroy
Top with pastel sprinkles, going heavy or light depending on your vibe.
If you’re using cotton candy for decoration, add it right before serving—it dissolves quickly from moisture.
Pipe extra buttercream swirls or rosettes on top for dimension and drama.
Stand back and admire your work. Take 47 photos. Try not to dive face-first into it.
Serving Suggestions
This cake is already over-the-top, but here’s how to make it even more extra:
- Serve with vanilla ice cream or whipped cream
- Add fresh berries on the side for adults who pretend to like healthy things
- Pair with pink lemonade or strawberry milk for kids
- Cut into small slices—this is SWEET
- Serve at room temperature for best flavor and texture
- Present on a cake stand for maximum impact
Switch It Up
Funfetti Cotton Candy: Add rainbow sprinkles to the batter for extra color and texture.
Chocolate Drip: Add a chocolate ganache drip over the pastel frosting for contrast.
Different Flavors: Try strawberry extract in pink layer, blueberry in blue, grape in purple.
Ombre Layers: Instead of distinct colors, make each layer a slightly different shade of the same color.
Naked Cake: Skip the outside frosting except between layers for a rustic look that shows off the colors.
Cotton Candy Filling: Make a cotton candy buttercream for between layers (extra extract + actual cotton candy mixed in).
Gold Accents: Add edible gold leaf or gold sprinkles for a fancy touch.
Different Size: Make as cupcakes or a sheet cake if you don’t want to deal with layers.
Storage and Make-Ahead Tips
This cake keeps beautifully, which is good because it takes some time.
Room temperature: Store covered at room temperature for up to 2 days. The buttercream acts as a preservative.
Refrigerate: Store in the fridge for up to 1 week. Bring to room temp 30 minutes before serving for best texture and flavor.
Freeze: Wrap individual slices or the whole cake tightly in plastic wrap, then foil. Freeze for up to 3 months. Thaw in fridge overnight.
Make-ahead cakes: Bake cake layers up to 2 days ahead, wrap tightly, and refrigerate. Or freeze for up to 1 month.
Make-ahead buttercream: Make frosting up to 1 week ahead and refrigerate. Bring to room temp and rewhip before using.
Assembly day: You can assemble the cake 1 day ahead and refrigerate. Add cotton candy decoration right before serving.
Why This Works So Damn Well
Cotton Candy Cake works because it’s basically a well-executed vanilla cake with fun additions. The vanilla cake base is deliberately simple so the cotton candy flavor can shine through. Using cotton candy extract gives you that distinctive carnival taste without the grainy texture of actual cotton candy (though adding small pieces of real cotton candy throughout the batter adds extra flavor and little pockets of sweetness).
The key to moist cake layers is not overbaking and using full-fat ingredients—whole milk and real butter. The fat keeps the cake tender. Room temperature ingredients emulsify better, creating a smoother batter and more uniform texture.
Gel food coloring is essential for vibrant colors. Liquid food coloring adds too much liquid to the batter and frosting, affecting texture. Gel gives you bright, saturated colors with just a tiny amount. Start with less than you think you need—you can always add more, but you can’t take it away.
The crumb coat is the secret to professional-looking cakes. It traps all the loose crumbs so your final frosting layer is clean and smooth. Even if you skip it, the cake will taste the same, but it won’t look as polished.
American buttercream (butter + powdered sugar) is perfect for this because it’s stable at room temperature, easy to color, and holds its shape for decorating. It’s also sweet enough to match the cotton candy vibe without being overwhelming.
The swirled frosting technique creates visual interest and that Instagram-worthy watercolor effect. Keeping the colors slightly distinct rather than fully blending them creates dimension and makes it obvious that this is a special cake, not just a regular frosted situation.
When to Make This
Birthday parties: Kids or adults who are kids at heart. Everyone freaks out over this.
Baby showers: Pink and blue layers? Perfect for the theme.
Gender reveals: Make the inside layers pink or blue, frost the outside neutrally.
Unicorn parties: This IS the unicorn cake. Add a horn and you’re done.
Cotton candy themed events: County fair party, carnival birthday, summer celebration.
“Just because”: Life is short. Make the colorful cake on a random Wednesday.
Questions People Actually Ask
Q: Where do I find cotton candy extract? A: Specialty baking stores, Amazon, or some grocery stores in the baking aisle. LorAnn brand is popular. You can also use cotton candy flavoring oil.
Q: Can I skip the cotton candy flavor? A: Sure, just use extra vanilla. It’ll be a pastel vanilla cake, which is still great.
Q: My cake layers are domed. How do I fix it? A: Trim the tops flat with a serrated knife before assembling. Save the scraps for “quality control tasting.”
Q: The frosting is too soft to pipe. Help! A: Refrigerate it for 15-20 minutes to firm up. If it’s still too soft, add more powdered sugar.
Q: Can I make this as cupcakes? A: Yes! Divide batter into cupcake liners, bake at 350°F for 18-20 minutes. Swirl the colored batters together for a marbled effect.
Q: My colors are muddy, not vibrant. What happened? A: You didn’t use gel food coloring, or you didn’t add enough. Gel is way more concentrated than liquid. Be generous.
Q: The cake is dry. What did I do wrong? A: You overbaked it, or your oven temp is too high. Check your oven with a thermometer and reduce baking time next time.
Q: Can I use a different frosting? A: Sure. Cream cheese frosting, Swiss meringue buttercream, or whipped cream frosting all work. But American buttercream is easiest for the swirls.
Q: How do I transport this without ruining it? A: Refrigerate until firm (at least 2 hours). Use a tall cake carrier or box. Drive like you’re transporting explosives. Avoid sudden stops.
Print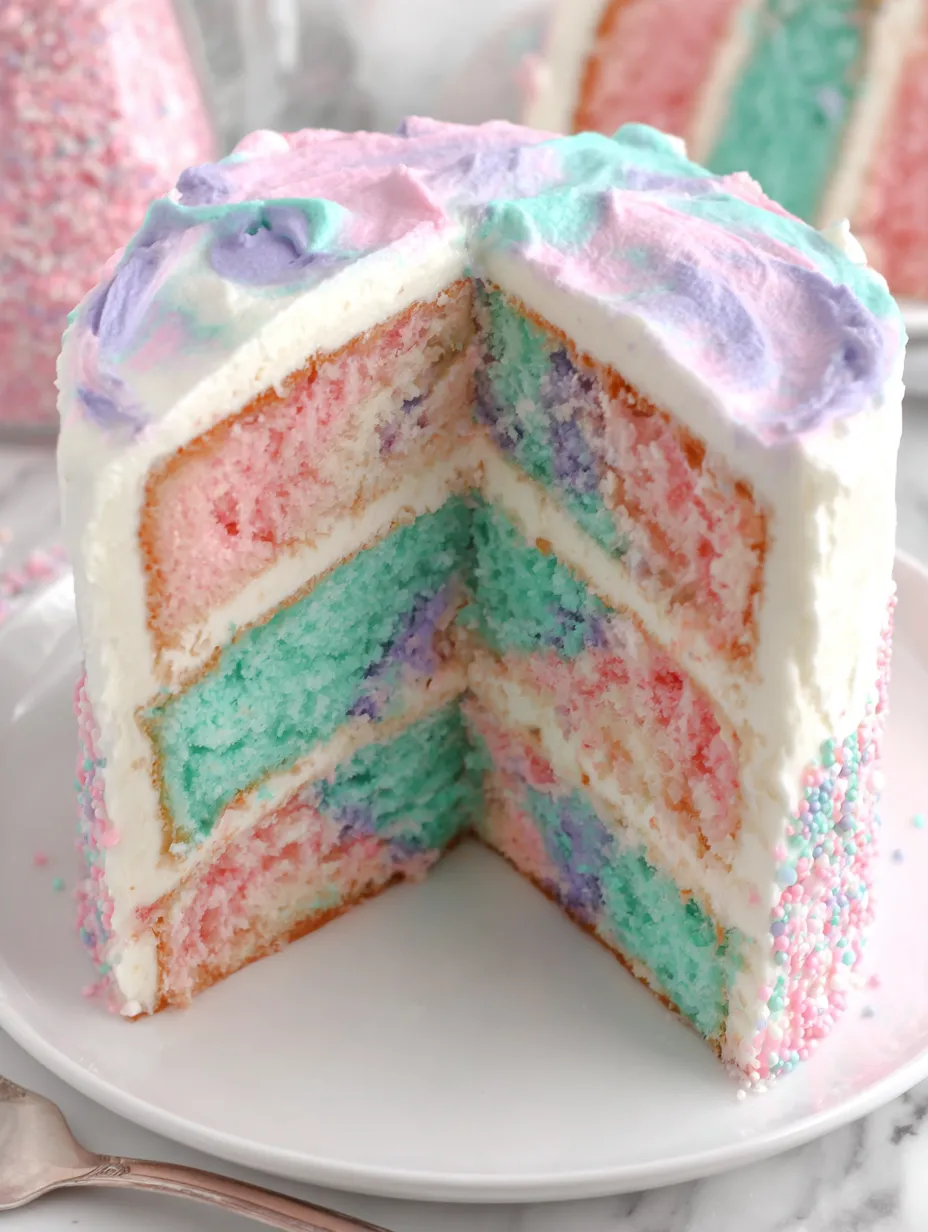
Cotton Candy Cake
- Total Time: 80 Minutes
- Yield: 12–16 slices 1x
- Diet: Vegetarian
Description
Okay, so picture this: someone took all the magic of a county fair, specifically that fluffy pink and blue sugar cloud situation you eat on a stick, and turned it into an actual cake that tastes like nostalgia and childhood joy. Cotton Candy Cake is a pastel rainbow layer cake—pink, blue, and purple layers that look like a unicorn exploded in the best way possible—with vanilla buttercream between each layer and a swirled frosting situation on the outside that makes it look like you hired a professional. The cake itself is moist, tender, and flavored with actual cotton candy (yes, really), giving it that distinctive sweet carnival taste. Top it with pastel swirled buttercream, sprinkles, and maybe some actual cotton candy for maximum Instagram impact. I made this for my niece’s birthday and the kids literally squealed. Like, actual squealing. One mom asked for the recipe three times. Another mom gave me a look that said “I can never top this.” This cake makes you the hero of every party.
Ingredients
For the Cake Layers:
- 3 cups all-purpose flour
- 1 tbsp baking powder
- 1/2 tsp salt
- 1 cup (2 sticks) unsalted butter, softened
- 2 cups granulated sugar
- 4 large eggs, room temperature
- 1 cup whole milk, room temperature
- 2 tsp vanilla extract
- 1 tsp cotton candy extract (or flavoring)
- Gel food coloring (pink, blue, purple)
- Optional: 1/2 cup cotton candy, pulled into small pieces
For the Vanilla Buttercream:
- 2 cups (4 sticks) unsalted butter, softened
- 6–7 cups powdered sugar
- 1/4 cup heavy cream or milk
- 2 tsp vanilla extract
- 1/2 tsp cotton candy extract (optional)
- Pinch of salt
- Gel food coloring (pink, blue, purple)
For Decoration:
- Pastel sprinkles
- Cotton candy (for topping, optional)
- Extra swirls and drama
Equipment:
- Three 8-inch or 9-inch round cake pans
- Parchment paper
- Stand mixer or hand mixer
- Piping bags
- Large round tip or star tip
- Offset spatula
- Cake turntable (helpful but not required)
Instructions
Step 1: Prep Your Pans and Oven
Preheat your oven to 350°F (175°C). This is important. Don’t be a hero and skip this.
Grease three 8-inch or 9-inch round cake pans with butter or cooking spray. Line the bottoms with parchment paper circles. Grease the parchment too. Triple insurance against cake-stuck-in-pan tragedy.
Step 2: Make the Cake Batter
In a medium bowl, whisk together flour, baking powder, and salt. Set aside and resist the urge to taste raw flour.
In a large bowl (or stand mixer with paddle attachment), beat the softened butter and sugar together on medium-high speed for 3-4 minutes until light, fluffy, and pale. This step matters—don’t rush it.
Add eggs one at a time, beating well after each addition. The mixture should look smooth and emulsified, not curdled.
In a measuring cup, combine milk, vanilla extract, and cotton candy extract (if using).
With the mixer on low speed, add the flour mixture and milk mixture alternately, starting and ending with flour. Mix until just combined after each addition. Don’t overmix or your cake will be tough and you’ll be sad.
If you’re adding actual cotton candy pieces, fold them in now. They’ll mostly dissolve but leave flavor and tiny sugar crystals throughout.
Step 3: Color the Batter
Divide the batter evenly among three bowls. Weigh them if you’re precise, eyeball it if you’re confident.
Add gel food coloring to each bowl:
Bowl 1: Pink (start with 1/2 tsp, add more for desired shade)
Bowl 2: Blue (same deal)
Bowl 3: Purple (or leave white, or do another color—you’re the artist)
Fold the color in gently with a spatula until evenly distributed. Don’t overmix—just get it uniform.
Pour each colored batter into its own prepared pan. Smooth the tops with a spatula.
Step 4: Bake
Bake for 25-30 minutes, until a toothpick inserted in the center comes out clean or with just a few moist crumbs. The tops should spring back when lightly pressed.
Don’t overbake or the cake will be dry. Start checking at 25 minutes.
Let the cakes cool in the pans for 10 minutes, then turn them out onto wire racks to cool completely. Peel off the parchment paper.
These MUST be completely cool before frosting or you’ll have a melted buttercream disaster. Be patient. Go watch TikTok or something.
Step 5: Make the Buttercream
In a large bowl (or stand mixer), beat the softened butter on medium speed for 2-3 minutes until creamy and pale.
Add 3 cups of powdered sugar, one cup at a time, beating on low after each addition.
Add heavy cream, vanilla extract, cotton candy extract (if using), and a pinch of salt. Beat on medium until combined.
Add remaining powdered sugar, one cup at a time, until you reach your desired consistency. The frosting should be thick enough to hold its shape but spreadable. If it’s too thick, add more cream (1 tbsp at a time). Too thin? Add more powdered sugar.
Beat on medium-high for 2-3 minutes until light and fluffy.
Step 6: Color the Buttercream
Divide the buttercream into three bowls (or however many colors you want for the outside).
Color each bowl with gel food coloring—pink, blue, and purple (or your chosen colors). Mix until evenly colored.
If you want the swirled effect on the outside, keep the colors separate. If you want a solid color, use one color for the whole thing.
Step 7: Assemble the Cake
Place the first cake layer on your serving plate or cake board. Put a dollop of frosting on the plate first so the cake doesn’t slide around.
Spread a thick layer of buttercream on top (about 1/2 cup). You can use white buttercream between layers and save the colored stuff for outside, or use colored—your call.
Place the second layer on top and repeat the frosting situation.
Add the third layer on top. Make sure everything is level and even. If it’s wonky, trim the tops flat with a serrated knife.
Step 8: Crumb Coat
Apply a thin layer of buttercream all over the entire cake—top and sides. This is the crumb coat. It doesn’t need to look pretty; it’s just trapping crumbs so your final layer is clean.
Refrigerate for 30 minutes to let the crumb coat set. This step is optional but makes the final frosting so much easier.
Step 9: Final Frosting and Swirls
For the swirled pastel look, you have options:
Method 1 (Piping Bag Swirl): Put each colored buttercream into a separate piping bag. Cut the tips off the bags. Place all three bags into one larger piping bag fitted with a large round or star tip. Pipe swirls all over the cake, creating a watercolor effect.
Method 2 (Spatula Swirl): Dollop different colored buttercream randomly all over the cake. Use an offset spatula to spread and swirl, blending colors slightly but keeping them distinct.
Method 3 (Rustic Patches): Spread one color at a time in patches, slightly blending where they meet for a soft ombre effect.
Work your way around the cake, covering the entire surface. The beauty is in the imperfection—embrace the messy, dreamy look.
Step 10: Decorate and Destroy
Top with pastel sprinkles, going heavy or light depending on your vibe.
If you’re using cotton candy for decoration, add it right before serving—it dissolves quickly from moisture.
Pipe extra buttercream swirls or rosettes on top for dimension and drama.
Stand back and admire your work. Take 47 photos. Try not to dive face-first into it.
Notes
This cake is already over-the-top, but here’s how to make it even more extra:
- Serve with vanilla ice cream or whipped cream
- Add fresh berries on the side for adults who pretend to like healthy things
- Pair with pink lemonade or strawberry milk for kids
- Cut into small slices—this is SWEET
- Serve at room temperature for best flavor and texture
- Present on a cake stand for maximum impact
- Prep Time: 45 Minutes
- Cook Time: 35 Minutes
- Cuisine: American
Nutrition
- Calories: 520 kcal
- Sugar: ~52g
- Sodium: ~180mg
- Fat: ~26g
- Carbohydrates: ~68g
- Protein: ~4g


