
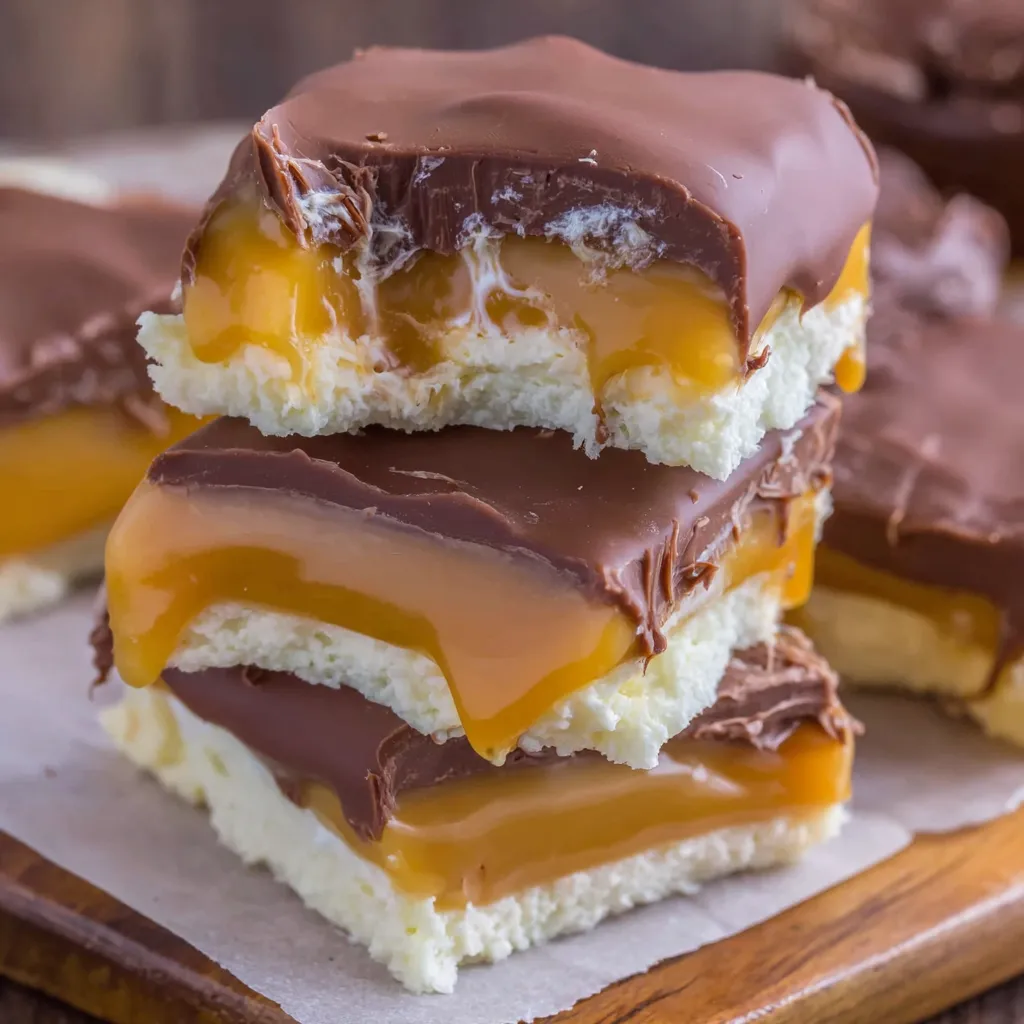
Imagine if you could take those fancy caramel candy bars that cost like $3 each at the checkout line and make them yourself for pennies. Now imagine they taste BETTER than the store-bought ones because you control the quality of every single ingredient. That’s what we’re doing here. Homemade Caramel Candy Bars are buttery shortbread cookies on the bottom, thick gooey caramel in the middle, and smooth milk chocolate on top. They’re like Twix bars and salted caramels had a baby that grew up to be way more sophisticated than either parent. The shortbread is crisp and buttery, the caramel is soft and chewy without pulling out your fillings, and the chocolate is smooth and snappy. I made these for a cookie exchange once and people literally didn’t believe I made them. Someone accused me of repackaging store-bought candy. These bars will make people question your honesty and your free time.
Why You’ll Love This Recipe
Better than store-bought. Seriously. Once you make these, you’ll never look at Twix the same way.
Three perfect layers. Shortbread, caramel, chocolate. The holy trinity of candy bars.
Impressive gift. Package these in a box and people will think you spent a fortune.
Portion control. Cut them however big or small you want. Make them bite-sized or snack-sized.
No corn syrup required. We’re making real caramel with real ingredients. None of that chemical nonsense.
Make-ahead friendly. These keep for weeks and actually taste better after a day or two.
Customize everything. Add nuts, use dark chocolate, sprinkle with sea salt. Make them yours.
The Good Stuff You’ll Need
For the Shortbread Base:
- 2 cups all-purpose flour
- 1/2 cup granulated sugar
- 1/4 tsp salt
- 1 cup (2 sticks) unsalted butter, cold and cubed
- 1 tsp vanilla extract
For the Caramel Layer:
- 1 cup (2 sticks) unsalted butter
- 1 cup light brown sugar, packed
- 1/2 cup light corn syrup (or honey if you’re anti-corn syrup)
- 1 can (14 oz) sweetened condensed milk
- 1 tsp vanilla extract
- 1/2 tsp sea salt (adjust to taste)
For the Chocolate Topping:
- 12 oz milk chocolate chips (or chopped chocolate)
- 2 tbsp coconut oil or butter
- Flaky sea salt for topping (optional but highly recommended)
Equipment:
- 9×13 inch baking pan
- Parchment paper
- Heavy-bottomed saucepan
- Candy thermometer (helpful but not required)
- Offset spatula
- Sharp knife
Let’s Do This
Step 1: Make the Shortbread Base
Preheat your oven to 350°F (175°C). Line a 9×13 inch baking pan with parchment paper, leaving overhang on the sides for easy removal. This is your escape route later.
In a large bowl, whisk together flour, sugar, and salt.
Add the cold cubed butter and work it into the flour mixture with a pastry cutter, fork, or your hands until the mixture looks like coarse crumbs. Some bigger butter pieces are fine.
Add vanilla extract and mix until the dough just comes together when you squeeze it. Don’t overwork it or the shortbread will be tough.
Press the dough evenly into the bottom of your prepared pan. Really press it down—you want it compact. Use the bottom of a measuring cup to get it smooth and even.
Prick the dough all over with a fork (this prevents bubbling). Don’t skip this or you’ll have weird air pockets.
Bake for 20-25 minutes until lightly golden around the edges. It shouldn’t be brown, just a light golden color.
Let it cool while you make the caramel. Don’t turn off the oven yet.
Step 2: Make the Caramel (The Intimidating Part That’s Actually Easy)
In a heavy-bottomed saucepan, combine butter, brown sugar, corn syrup, and sweetened condensed milk.
Cook over medium heat, stirring constantly with a wooden spoon or heat-resistant spatula. Don’t walk away. Don’t check your phone. Just stand there and stir.
The mixture will bubble and foam. Keep stirring. It’ll take about 8-12 minutes to reach the right consistency.
If you have a candy thermometer, cook until it reaches 240°F (soft ball stage). If you don’t have a thermometer, cook until the mixture turns a deep golden amber color and pulls away from the sides of the pan when you stir.
Remove from heat and stir in vanilla extract and sea salt. The mixture will bubble up—don’t panic.
Pour the hot caramel over the baked shortbread base. Use an offset spatula to spread it evenly, working quickly because it starts to set fast.
Return the pan to the oven and bake for another 12-15 minutes. This helps set the caramel and creates better layers.
Remove from oven and let cool at room temperature for at least 2 hours, or refrigerate for 1 hour until the caramel is completely set and firm to the touch.
Step 3: Add the Chocolate Layer
Once the caramel is completely set (this is crucial—don’t rush it), make the chocolate topping.
In a microwave-safe bowl, combine chocolate chips and coconut oil. Microwave in 30-second intervals, stirring between each, until completely melted and smooth. Usually takes about 1.5 minutes total.
Pour the melted chocolate over the set caramel layer. Use an offset spatula to spread it evenly across the entire surface. Work quickly before it starts to set.
If using flaky sea salt, sprinkle it over the wet chocolate immediately. Don’t go crazy—a light sprinkle is perfect.
Let the chocolate set at room temperature for about an hour, or refrigerate for 30 minutes if you’re impatient.
Step 4: Cut Into Bars
Once the chocolate is completely set, use the parchment paper overhang to lift the entire slab out of the pan. Place it on a cutting board.
Use a large, sharp knife to cut into bars. For clean cuts, wipe the knife with a warm, damp cloth between each cut. This prevents dragging and creates professional-looking edges.
Cut into whatever size you want. I usually do 24 bars (4 rows by 6 rows), but you can make them bigger or smaller.
If the knife is dragging through the caramel, warm it under hot water, dry it, and try again.
Step 5: Admire and Try Not to Eat Them All
Arrange on a pretty plate or in a gift box lined with parchment paper.
Store in an airtight container with parchment between layers if stacking.
Try to share. This is difficult but important for maintaining relationships.
Serving Suggestions
These are perfect as-is, but here’s how to serve them:
- Serve chilled for firmer caramel, room temp for chewier texture
- Pair with coffee or hot chocolate
- Package in clear cellophane bags tied with ribbon for gifts
- Arrange in a candy dish for parties
- Cut into tiny squares for a dessert platter
- Serve with vanilla ice cream for over-the-top indulgence
Switch It Up
Dark Chocolate: Use dark chocolate instead of milk chocolate for a more grown-up flavor.
Salted Caramel: Increase the sea salt in the caramel to 1 tsp for extra salty-sweet contrast.
Pecan Turtle Bars: Add 1 cup chopped pecans to the caramel layer before baking.
Pretzel Shortbread: Replace 1/2 cup flour with 1/2 cup crushed pretzels in the shortbread base.
White Chocolate: Use white chocolate for the topping instead of milk chocolate.
Peanut Butter Layer: Spread 1/2 cup peanut butter over the shortbread before adding caramel.
Espresso Chocolate: Add 1 tbsp instant espresso powder to the melted chocolate.
Coconut Caramel: Add 1 cup toasted coconut to the caramel layer (hello, Samoa vibes).
Storage and Make-Ahead Tips
These actually get better with time as the flavors meld, which is rare and beautiful.
Room temperature: Store in an airtight container for up to 1 week in a cool, dry place. They’ll stay chewy and perfect.
Refrigerate: Keep in the fridge for up to 3 weeks. The caramel gets firmer when cold. Let sit at room temp for 10 minutes before eating.
Freeze: Wrap bars individually in plastic wrap, then store in freezer bags for up to 3 months. Thaw at room temp for 30 minutes.
Make-ahead strategy: Make the shortbread base one day, add caramel the next day, top with chocolate the third day. Spread out the work.
Gift giving: These ship well if packed properly. Use a sturdy box with parchment between layers.
Hot weather: If it’s hot, store these in the fridge. The chocolate can melt and the caramel can get too soft at room temp above 75°F.
Why This Works So Damn Well
The magic of these candy bars is in the balance of textures and the quality of each layer working together. The shortbread base provides a buttery, crisp foundation that doesn’t get soggy from the caramel. Using cold butter and not overworking the dough creates a tender, crumbly texture that melts in your mouth.
The caramel is the star of the show. Cooking it to the right temperature (240°F) creates a soft, chewy texture that’s firm enough to cut cleanly but soft enough to bite through easily. Too low and it’s gooey and messy. Too high and it’s hard and pulls out your teeth. That sweet spot at 240°F is perfection.
Baking the caramel after spreading it over the shortbread serves multiple purposes. It helps the layers bond together so they don’t slide apart when you cut them. It also allows any excess moisture to evaporate, creating a firmer set. This step is the difference between professional candy bars and amateur attempts.
The sweetened condensed milk in the caramel adds richness and helps create that perfect chewy texture. It also prevents the caramel from crystallizing, which would make it grainy instead of smooth. The corn syrup or honey serves the same purpose—it’s an invert sugar that keeps things smooth.
Adding coconut oil to the chocolate creates a thinner consistency that’s easier to spread and gives a glossy finish. It also helps the chocolate stay slightly softer, making it easier to bite through without cracking.
Letting each layer cool completely before adding the next is crucial. Warm caramel melts chocolate. Soft caramel doesn’t hold its shape when you cut. Patience is annoying but necessary.
When to Make These
Holiday gifts: Package these in decorative boxes and watch people lose their minds.
Bake sales: Price these high. They’re worth it and they’ll sell out.
Cookie exchanges: Bring these and everyone will remember you forever.
Office treats: Bring these to work and become Employee of the Month.
Care packages: These ship beautifully and last for weeks.
Special occasions: Birthday parties, anniversaries, Tuesday—any day is candy bar day.
Making extra money: Seriously, people will pay you for these.
Questions People Actually Ask
Q: Do I really need a candy thermometer? A: No, but it helps. If you don’t have one, cook the caramel until it’s deep golden amber and coats the back of a spoon thickly.
Q: My caramel is too soft and won’t set. What happened? A: You didn’t cook it long enough. It needs to reach 240°F or the proper color/consistency. If it’s already on the bars, you can carefully scrape it off, recook it, and try again.
Q: The caramel is too hard and hurts my teeth. Help! A: You overcooked it. Next time, pull it off the heat at 240°F or when it’s a lighter golden color. You can’t fix hard caramel.
Q: My layers are sliding apart when I cut them. Why? A: You didn’t bake the caramel layer after spreading it. That step helps everything bond. Also make sure each layer is completely cool before cutting.
Q: Can I skip the corn syrup? A: You can substitute honey or golden syrup. Don’t skip it entirely—it prevents crystallization and keeps the caramel smooth.
Q: The chocolate is blooming (white streaks). Did I ruin them? A: No, they’re fine. Bloom happens when chocolate is exposed to temperature changes. It doesn’t affect taste, just appearance.
Q: How do I get clean cuts? A: Use a large, sharp knife. Warm it under hot water, dry it, and cut. Wipe and rewarm between each cut. Refrigerate the bars for easier cutting.
Q: Can I use salted butter? A: You can, but reduce or skip the added salt in both the shortbread and caramel or they’ll be too salty.
Q: My shortbread is tough, not crumbly. What went wrong? A: You overmixed the dough or baked it too long. Handle the dough gently and just until it comes together.
Print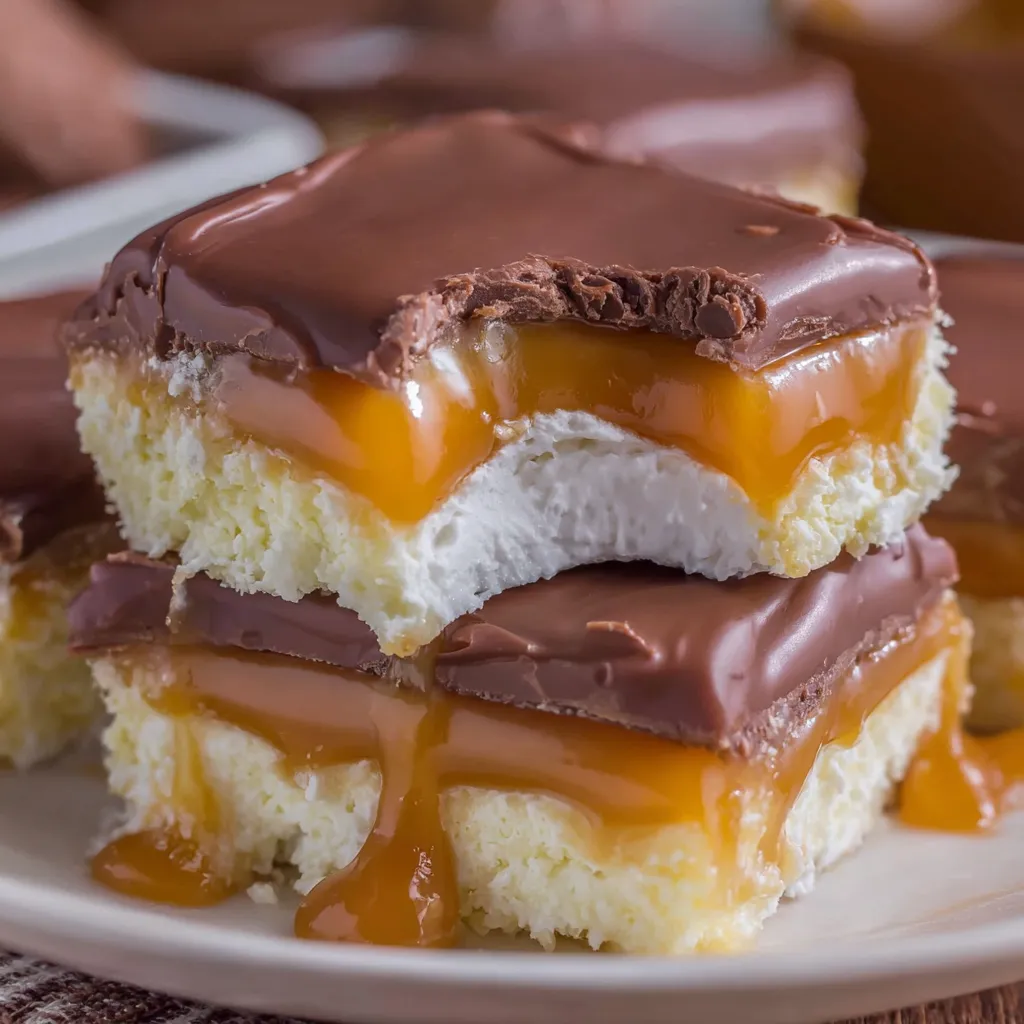
Homemade Milky Way Bars
- Total Time: 1 hour 10 minutes
- Yield: 24 bars 1x
Description
Imagine if you could take those fancy caramel candy bars that cost like $3 each at the checkout line and make them yourself for pennies. Now imagine they taste BETTER than the store-bought ones because you control the quality of every single ingredient. That’s what we’re doing here. Homemade Caramel Candy Bars are buttery shortbread cookies on the bottom, thick gooey caramel in the middle, and smooth milk chocolate on top. They’re like Twix bars and salted caramels had a baby that grew up to be way more sophisticated than either parent. The shortbread is crisp and buttery, the caramel is soft and chewy without pulling out your fillings, and the chocolate is smooth and snappy. I made these for a cookie exchange once and people literally didn’t believe I made them. Someone accused me of repackaging store-bought candy. These bars will make people question your honesty and your free time.
Ingredients
For the Shortbread Base:
- 2 cups all-purpose flour
- 1/2 cup granulated sugar
- 1/4 tsp salt
- 1 cup (2 sticks) unsalted butter, cold and cubed
- 1 tsp vanilla extract
For the Caramel Layer:
- 1 cup (2 sticks) unsalted butter
- 1 cup light brown sugar, packed
- 1/2 cup light corn syrup (or honey if you’re anti-corn syrup)
- 1 can (14 oz) sweetened condensed milk
- 1 tsp vanilla extract
- 1/2 tsp sea salt (adjust to taste)
For the Chocolate Topping:
- 12 oz milk chocolate chips (or chopped chocolate)
- 2 tbsp coconut oil or butter
- Flaky sea salt for topping (optional but highly recommended)
Equipment:
- 9x13 inch baking pan
- Parchment paper
- Heavy-bottomed saucepan
- Candy thermometer (helpful but not required)
- Offset spatula
- Sharp knife
Instructions
Preheat your oven to 350°F (175°C). Line a 9×13 inch baking pan with parchment paper, leaving overhang on the sides for easy removal. This is your escape route later.
In a large bowl, whisk together flour, sugar, and salt.
Add the cold cubed butter and work it into the flour mixture with a pastry cutter, fork, or your hands until the mixture looks like coarse crumbs. Some bigger butter pieces are fine.
Add vanilla extract and mix until the dough just comes together when you squeeze it. Don’t overwork it or the shortbread will be tough.
Press the dough evenly into the bottom of your prepared pan. Really press it down—you want it compact. Use the bottom of a measuring cup to get it smooth and even.
Prick the dough all over with a fork (this prevents bubbling). Don’t skip this or you’ll have weird air pockets.
Bake for 20-25 minutes until lightly golden around the edges. It shouldn’t be brown, just a light golden color.
Let it cool while you make the caramel. Don’t turn off the oven yet.
In a heavy-bottomed saucepan, combine butter, brown sugar, corn syrup, and sweetened condensed milk.
Cook over medium heat, stirring constantly with a wooden spoon or heat-resistant spatula. Don’t walk away. Don’t check your phone. Just stand there and stir.
The mixture will bubble and foam. Keep stirring. It’ll take about 8-12 minutes to reach the right consistency.
If you have a candy thermometer, cook until it reaches 240°F (soft ball stage). If you don’t have a thermometer, cook until the mixture turns a deep golden amber color and pulls away from the sides of the pan when you stir.
Remove from heat and stir in vanilla extract and sea salt. The mixture will bubble up—don’t panic.
Pour the hot caramel over the baked shortbread base. Use an offset spatula to spread it evenly, working quickly because it starts to set fast.
Return the pan to the oven and bake for another 12-15 minutes. This helps set the caramel and creates better layers.
Remove from oven and let cool at room temperature for at least 2 hours, or refrigerate for 1 hour until the caramel is completely set and firm to the touch.
Once the caramel is completely set (this is crucial—don’t rush it), make the chocolate topping.
In a microwave-safe bowl, combine chocolate chips and coconut oil. Microwave in 30-second intervals, stirring between each, until completely melted and smooth. Usually takes about 1.5 minutes total.
Pour the melted chocolate over the set caramel layer. Use an offset spatula to spread it evenly across the entire surface. Work quickly before it starts to set.
If using flaky sea salt, sprinkle it over the wet chocolate immediately. Don’t go crazy—a light sprinkle is perfect.
Let the chocolate set at room temperature for about an hour, or refrigerate for 30 minutes if you’re impatient.
Once the chocolate is completely set, use the parchment paper overhang to lift the entire slab out of the pan. Place it on a cutting board.
Use a large, sharp knife to cut into bars. For clean cuts, wipe the knife with a warm, damp cloth between each cut. This prevents dragging and creates professional-looking edges.
Cut into whatever size you want. I usually do 24 bars (4 rows by 6 rows), but you can make them bigger or smaller.
If the knife is dragging through the caramel, warm it under hot water, dry it, and try again.
Arrange on a pretty plate or in a gift box lined with parchment paper.
Store in an airtight container with parchment between layers if stacking.
Try to share. This is difficult but important for maintaining relationships.
Notes
These are perfect as-is, but here’s how to serve them:
- Serve chilled for firmer caramel, room temp for chewier texture
- Pair with coffee or hot chocolate
- Package in clear cellophane bags tied with ribbon for gifts
- Arrange in a candy dish for parties
- Cut into tiny squares for a dessert platter
- Serve with vanilla ice cream for over-the-top indulgence
- Prep Time: 30 minutes
- Cook Time: 40 minutes
Nutrition
- Calories: ~220 kcal
- Sugar: ~18g
- Sodium: ~110mg
- Fat: ~13g
- Carbohydrates: ~26g
- Protein: ~2g


