
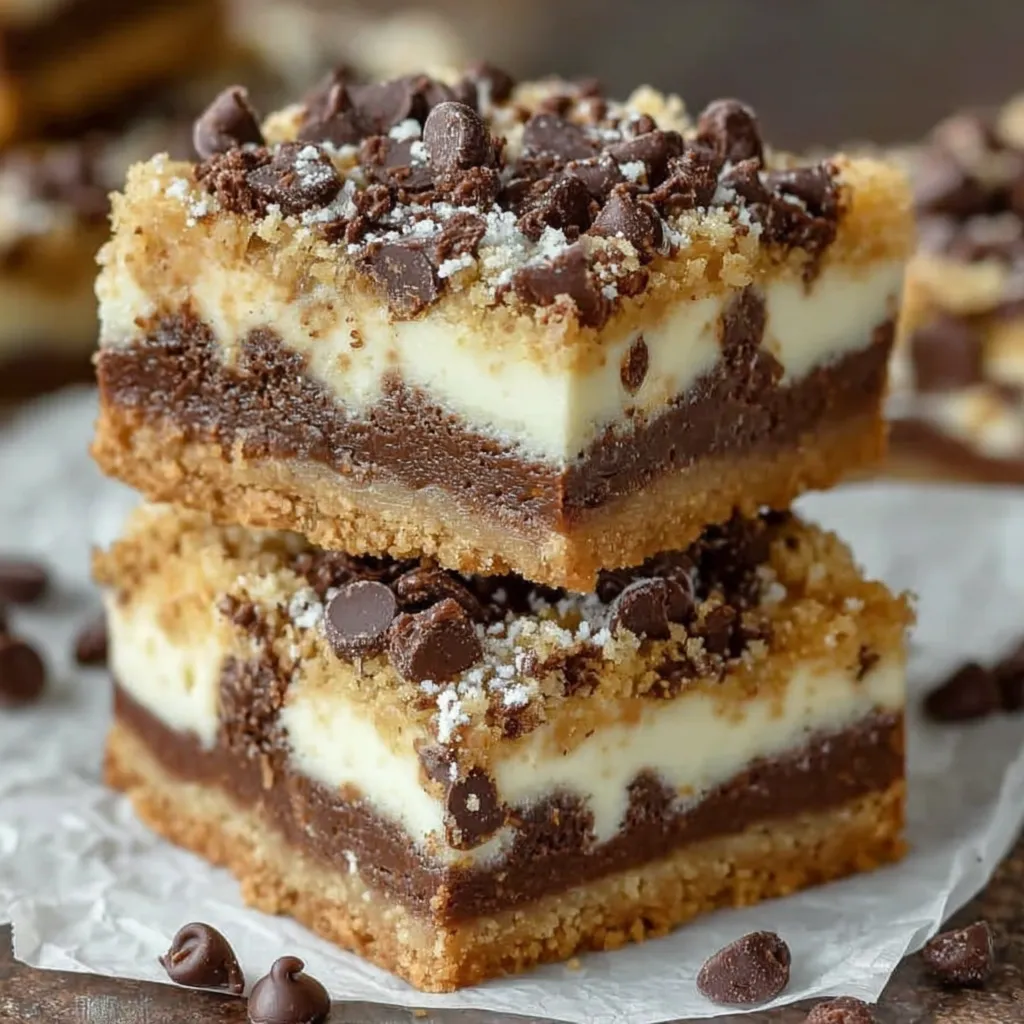
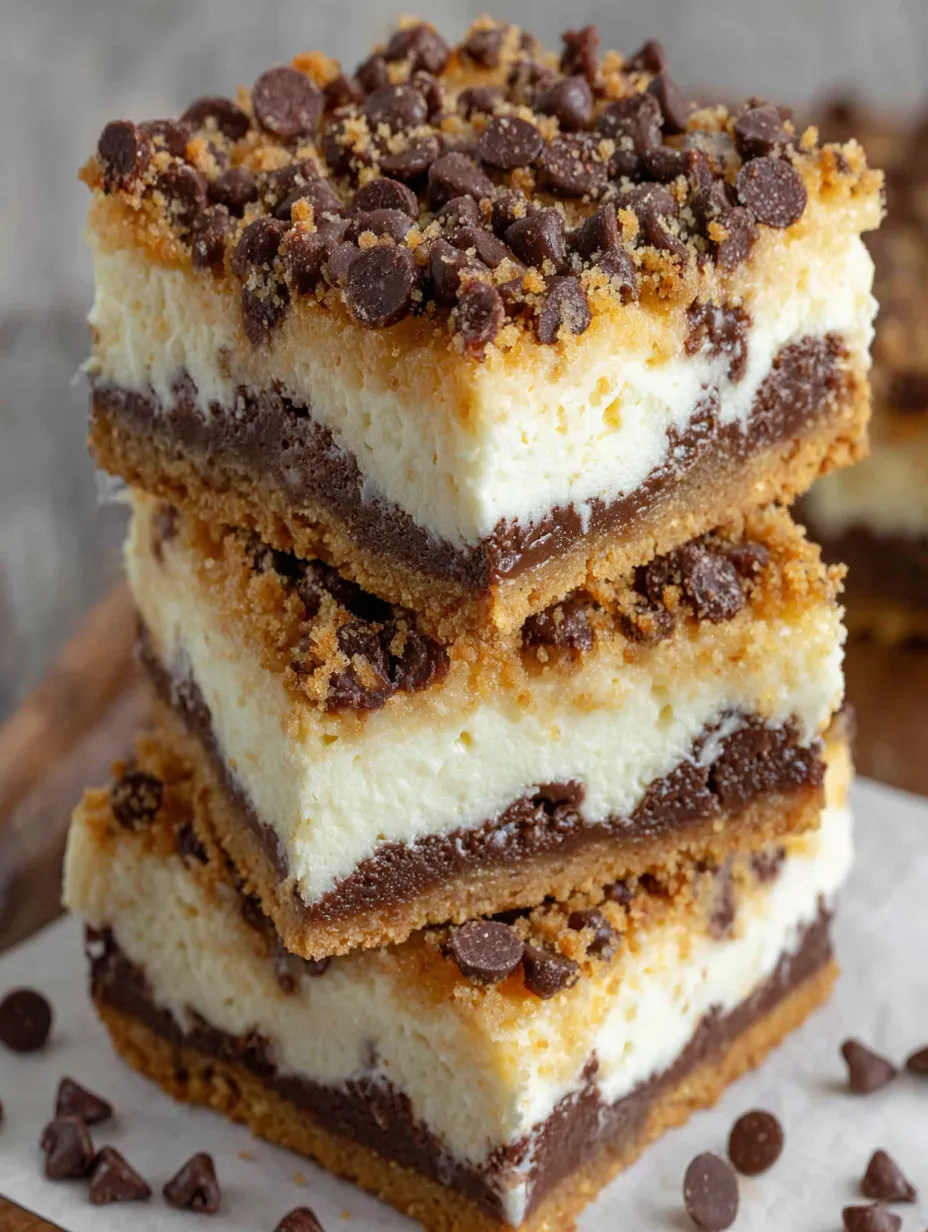
Okay, so imagine if you could eat raw cookie dough without the guilt or salmonella risk, but then someone decided to layer it with chocolate ganache, put it on a golden graham cracker crust, and top it with even more chocolate chips. That’s what we’re dealing with here. Chocolate Chip Cookie Dough Bars are basically three layers of pure indulgence—a buttery, crunchy crust on the bottom, a thick layer of rich chocolate ganache or fudge in the middle, and a generous slab of eggless, safe-to-eat cookie dough on top, all finished with a shower of mini chocolate chips. They’re no-bake, which means you can make these when it’s too hot to turn on the oven or when you just don’t feel like actual baking. I brought these to a potluck once and grown adults were sneaking back for thirds. Someone asked if I’d bought them from a fancy bakery. Another person demanded I text them the recipe immediately. These bars inspire shameless behavior and aggressive recipe requests.
Why You’ll Love This Recipe
No baking required. Your oven can stay off. It’s summer-friendly, lazy-friendly, and “I don’t feel like actual cooking” friendly.
Safe cookie dough. No eggs, no risk, all the raw cookie dough eating you’ve dreamed of since childhood.
Three amazing layers. Crunchy crust, fudgy chocolate, and cookie dough. Each bite is textural perfection.
Make-ahead hero. These need to chill anyway, so they’re perfect for prepping the day before.
Crowd pleaser. I’ve never met anyone who doesn’t lose their mind over these. Not once.
Customizable. Want peanut butter cookie dough? Do it. Different crust? Go for it. These are your bars.
The Good Stuff You’ll Need
For the Crust:
- 2 cups graham cracker crumbs (about 16 full crackers)
- 1/3 cup granulated sugar
- 1/2 cup (1 stick) unsalted butter, melted
- Pinch of salt
For the Chocolate Layer:
- 2 cups chocolate chips (semi-sweet or milk chocolate)
- 1 can (14 oz) sweetened condensed milk
- 2 tbsp unsalted butter
- 1 tsp vanilla extract
- Pinch of salt
For the Cookie Dough Layer:
- 1/2 cup (1 stick) unsalted butter, softened
- 3/4 cup packed brown sugar
- 1/4 cup granulated sugar
- 1/4 cup milk (whole milk works best)
- 2 tsp vanilla extract
- 1/4 tsp salt
- 1 1/2 cups all-purpose flour (heat-treated, see instructions)
- 1 cup mini chocolate chips (plus more for topping)
For Topping:
- 1/2 cup mini chocolate chips
- Flaky sea salt (optional but highly recommended)
Equipment:
- 9×13 inch baking pan
- Parchment paper or aluminum foil
- Medium saucepan
- Large mixing bowl
- Hand mixer or wooden spoon
- Baking sheet (for heat-treating flour)
Let’s Do This
Step 1: Prep Your Pan
Line a 9×13 inch pan with parchment paper or aluminum foil, leaving overhang on the sides. This makes it easy to lift the bars out for cutting.
Spray lightly with cooking spray even over the parchment—it helps everything release cleanly.
Step 2: Make the Crust
In a medium bowl, mix graham cracker crumbs, sugar, and salt.
Pour in melted butter and stir until the mixture looks like wet sand and holds together when squeezed.
Press firmly and evenly into the bottom of your prepared pan. Use the bottom of a measuring cup or glass to really pack it down.
Pop it in the fridge while you make the next layer.
Step 3: Heat-Treat Your Flour (Important!)
This makes the flour safe to eat raw. Don’t skip this step.
Spread your flour in an even layer on a baking sheet.
Bake at 350°F for 5-7 minutes, stirring halfway through, until it reaches 165°F on a thermometer. Or just bake for 5 minutes—the heat kills any potential bacteria.
Let it cool completely before using. You can do this step days ahead and store in an airtight container.
Step 4: Make the Chocolate Layer
In a medium saucepan over low heat, combine chocolate chips, sweetened condensed milk, and butter.
Stir constantly until everything is melted and smooth. Don’t rush this—low and slow prevents burning.
Remove from heat and stir in vanilla and salt.
Pour the chocolate mixture over the chilled crust, spreading it evenly with a spatula.
Refrigerate for 30-45 minutes until the chocolate layer is set. It should be firm to the touch, not sticky.
Step 5: Make the Cookie Dough Layer
In a large bowl, beat softened butter, brown sugar, and granulated sugar together until light and fluffy—about 2-3 minutes with a hand mixer or 5 minutes by hand.
Add milk, vanilla, and salt. Mix until well combined.
Add the cooled, heat-treated flour and mix on low speed until incorporated. The mixture will be thick like cookie dough.
Fold in the mini chocolate chips.
The dough should be scoopable but thick. If it’s too dry, add milk one tablespoon at a time. If it’s too wet, add a bit more flour.
Step 6: Assemble the Final Layer
Drop spoonfuls of cookie dough all over the set chocolate layer.
Gently press and spread the cookie dough into an even layer. Use your hands or a spatula—it doesn’t have to be perfect. A slightly rustic look is charming.
If the cookie dough is too sticky, wet your hands slightly or use a piece of parchment paper on top to help spread it evenly.
Step 7: Top and Chill
Sprinkle the top generously with mini chocolate chips. Press them in lightly so they stick.
Optional but amazing: Sprinkle with flaky sea salt.
Cover and refrigerate for at least 4 hours or overnight until firm. These need to be properly chilled to cut cleanly.
Step 8: Cut and Serve
Use the parchment overhang to lift the entire slab out of the pan onto a cutting board.
Use a sharp knife to cut into bars. For clean cuts, wipe the knife with a damp cloth between slices.
Cut into 16-24 bars depending on how generous (or restrained) you’re feeling.
Serve cold or at room temperature. Both are delicious.
Try not to eat half the pan before sharing. This is a legitimate struggle.
Serving Suggestions
These are basically perfect as-is, but here are some ideas:
- Serve with a glass of cold milk (obviously)
- Warm slightly and top with vanilla ice cream
- Drizzle with chocolate or caramel sauce
- Pair with hot coffee for a dessert coffee break
- Package individually for lunchbox treats or gifts
- Serve on a dessert board with other no-bake treats
Switch It Up
Peanut Butter Cookie Dough: Replace half the butter in the cookie dough with peanut butter and use peanut butter chips.
Cookies and Cream: Use Oreo crumbs for the crust and mix crushed Oreos into the cookie dough layer.
S’mores Bars: Add mini marshmallows to the cookie dough and use a chocolate graham cracker crust.
Salted Caramel: Swirl caramel sauce into the chocolate layer and top with sea salt.
Mint Chocolate Chip: Add mint extract to the cookie dough and use a mix of chocolate and mint chips.
Brownie Bottom: Replace the crust with a thin layer of baked brownies for extra chocolate intensity.
White Chocolate Raspberry: Use white chocolate in the middle layer and add freeze-dried raspberries to the cookie dough.
Nutella Layer: Swirl Nutella into the chocolate layer before it sets.
Brown Butter Cookie Dough: Brown the butter before making the cookie dough layer for nutty depth.
Storage and Make-Ahead Tips
These store beautifully and are actually better the next day once flavors meld.
Refrigerate: Store in an airtight container in the fridge for up to 1 week. Keep them chilled for best texture.
Freeze: Cut into bars, wrap individually in plastic wrap, then store in a freezer bag for up to 3 months. Thaw in the fridge for a few hours before eating.
Make ahead: These are perfect for making 1-2 days in advance. They need time to set anyway, so plan accordingly.
Room temperature: These can sit out for 2-3 hours for serving, but store in the fridge otherwise or they’ll get soft.
Gift packaging: These travel well. Layer between parchment in a tin or box for gift-giving.
Why This Works So Damn Well
No-bake desserts work because of proper chilling. The fridge does all the setting work that the oven usually does. Each layer needs time to firm up before adding the next, which creates distinct, clean layers.
Heat-treating the flour is essential for food safety. Raw flour can contain bacteria just like raw eggs. Five minutes in the oven makes it completely safe to eat.
The graham cracker crust needs enough butter to hold together but not so much that it’s greasy. The sugar adds sweetness and helps it bind.
Sweetened condensed milk creates the perfect fudgy chocolate layer. It’s already sweet and thick, so when combined with chocolate, it sets into a dense, truffle-like texture without needing to cook it.
The cookie dough needs brown sugar for that authentic cookie dough flavor and chewy texture. The milk adds moisture and makes it scoopable rather than crumbly.
Mini chocolate chips distribute more evenly throughout the cookie dough and on top. Regular chips work but mini chips give better coverage.
Chilling time is non-negotiable. These need at least 4 hours to set properly. If you try to cut them too early, the layers slide apart and it’s a melty mess.
Using parchment paper makes removal and cutting so much easier. You can lift the whole thing out, cut on a board, and avoid scratching your pan.
When to Make These
Summer Desserts: When it’s too hot to turn on the oven but you still want something impressive.
Potlucks: These travel well and look professional. Guaranteed to disappear first.
Bake Sales: Price these high. People will pay it. They look bakery-quality.
Kids’ Parties: Safe cookie dough that kids can actually eat? Parent win.
Movie Night: Make a pan, cut into bars, and enjoy throughout the week.
Holiday Cookie Trays: Add these for variety among all the baked cookies.
Questions People Actually Ask
Q: Do I really have to heat-treat the flour? A: Yes, unless you buy flour that’s already heat-treated (like specific “edible cookie dough” flour). Raw flour can contain bacteria. It only takes 5 minutes—just do it.
Q: Can I use a different crust? A: Absolutely. Vanilla wafer crumbs, Oreo crumbs, or even shortbread cookie crumbs all work great.
Q: My chocolate layer won’t set. What happened? A: It might need more time in the fridge, or your kitchen is too warm. Give it at least 45 minutes and make sure your fridge is cold enough.
Q: The cookie dough layer is too hard to spread. Help! A: Let it sit at room temperature for 5-10 minutes to soften slightly. Or wet your hands and press it into place instead of spreading with a spatula.
Q: Can I use dark chocolate instead? A: Yes, but dark chocolate is less sweet. You might want to add a tablespoon or two of sugar to the chocolate layer.
Q: My bars are too soft to cut. What do I do? A: Freeze them for 30 minutes, then cut while partially frozen. They’ll slice cleanly and then you can let them thaw slightly before eating.
Q: Can I make these gluten-free? A: Use gluten-free graham crackers for the crust and certified gluten-free flour (heat-treated) for the cookie dough layer.
Q: The layers are sliding apart when I cut them. Why? A: They weren’t chilled long enough, or you’re cutting them at room temperature. Chill thoroughly and cut cold for best results.
Q: Can I add nuts? A: Definitely. Add chopped walnuts or pecans to the cookie dough layer or sprinkle on top with the chocolate chips.
PrintChocolate Chip Cookie Dough Bars
- Total Time: 55 minutes
- Yield: 16–24 bars 1x
- Diet: Vegetarian
Description
Okay, so imagine if you could eat raw cookie dough without the guilt or salmonella risk, but then someone decided to layer it with chocolate ganache, put it on a golden graham cracker crust, and top it with even more chocolate chips. That’s what we’re dealing with here. Chocolate Chip Cookie Dough Bars are basically three layers of pure indulgence—a buttery, crunchy crust on the bottom, a thick layer of rich chocolate ganache or fudge in the middle, and a generous slab of eggless, safe-to-eat cookie dough on top, all finished with a shower of mini chocolate chips. They’re no-bake, which means you can make these when it’s too hot to turn on the oven or when you just don’t feel like actual baking. I brought these to a potluck once and grown adults were sneaking back for thirds. Someone asked if I’d bought them from a fancy bakery. Another person demanded I text them the recipe immediately. These bars inspire shameless behavior and aggressive recipe requests.
Ingredients
For the Crust:
- 2 cups graham cracker crumbs (about 16 full crackers)
- 1/3 cup granulated sugar
- 1/2 cup (1 stick) unsalted butter, melted
- Pinch of salt
For the Chocolate Layer:
- 2 cups chocolate chips (semi-sweet or milk chocolate)
- 1 can (14 oz) sweetened condensed milk
- 2 tbsp unsalted butter
- 1 tsp vanilla extract
- Pinch of salt
For the Cookie Dough Layer:
- 1/2 cup (1 stick) unsalted butter, softened
- 3/4 cup packed brown sugar
- 1/4 cup granulated sugar
- 1/4 cup milk (whole milk works best)
- 2 tsp vanilla extract
- 1/4 tsp salt
- 1 1/2 cups all-purpose flour (heat-treated, see instructions)
- 1 cup mini chocolate chips (plus more for topping)
For Topping:
- 1/2 cup mini chocolate chips
- Flaky sea salt (optional but highly recommended)
Equipment:
- 9x13 inch baking pan
- Parchment paper or aluminum foil
- Medium saucepan
- Large mixing bowl
- Hand mixer or wooden spoon
- Baking sheet (for heat-treating flour)
Instructions
Line a 9×13 inch pan with parchment paper or aluminum foil, leaving overhang on the sides. This makes it easy to lift the bars out for cutting.
Spray lightly with cooking spray even over the parchment—it helps everything release cleanly.
In a medium bowl, mix graham cracker crumbs, sugar, and salt.
Pour in melted butter and stir until the mixture looks like wet sand and holds together when squeezed.
Press firmly and evenly into the bottom of your prepared pan. Use the bottom of a measuring cup or glass to really pack it down.
Pop it in the fridge while you make the next layer.
This makes the flour safe to eat raw. Don’t skip this step.
Spread your flour in an even layer on a baking sheet.
Bake at 350°F for 5-7 minutes, stirring halfway through, until it reaches 165°F on a thermometer. Or just bake for 5 minutes—the heat kills any potential bacteria.
Let it cool completely before using. You can do this step days ahead and store in an airtight container.
In a medium saucepan over low heat, combine chocolate chips, sweetened condensed milk, and butter.
Stir constantly until everything is melted and smooth. Don’t rush this—low and slow prevents burning.
Remove from heat and stir in vanilla and salt.
Pour the chocolate mixture over the chilled crust, spreading it evenly with a spatula.
Refrigerate for 30-45 minutes until the chocolate layer is set. It should be firm to the touch, not sticky.
In a large bowl, beat softened butter, brown sugar, and granulated sugar together until light and fluffy—about 2-3 minutes with a hand mixer or 5 minutes by hand.
Add milk, vanilla, and salt. Mix until well combined.
Add the cooled, heat-treated flour and mix on low speed until incorporated. The mixture will be thick like cookie dough.
Fold in the mini chocolate chips.
The dough should be scoopable but thick. If it’s too dry, add milk one tablespoon at a time. If it’s too wet, add a bit more flour.
Drop spoonfuls of cookie dough all over the set chocolate layer.
Gently press and spread the cookie dough into an even layer. Use your hands or a spatula—it doesn’t have to be perfect. A slightly rustic look is charming.
If the cookie dough is too sticky, wet your hands slightly or use a piece of parchment paper on top to help spread it evenly.
Sprinkle the top generously with mini chocolate chips. Press them in lightly so they stick.
Optional but amazing: Sprinkle with flaky sea salt.
Cover and refrigerate for at least 4 hours or overnight until firm. These need to be properly chilled to cut cleanly.
Use the parchment overhang to lift the entire slab out of the pan onto a cutting board.
Use a sharp knife to cut into bars. For clean cuts, wipe the knife with a damp cloth between slices.
Cut into 16-24 bars depending on how generous (or restrained) you’re feeling.
Serve cold or at room temperature. Both are delicious.
Try not to eat half the pan before sharing. This is a legitimate struggle.
Notes
These are basically perfect as-is, but here are some ideas:
- Serve with a glass of cold milk (obviously)
- Warm slightly and top with vanilla ice cream
- Drizzle with chocolate or caramel sauce
- Pair with hot coffee for a dessert coffee break
- Package individually for lunchbox treats or gifts
- Serve on a dessert board with other no-bake treats
- Prep Time: 20 minutes
- Cook Time: 35 minutes
- Category: dessert
- Method: baking
- Cuisine: American
Nutrition
- Calories: ~320 kcal
- Sugar: ~32g
- Sodium: ~140mg
- Fat: ~16g
- Carbohydrates: ~42g
- Protein: ~3g


