
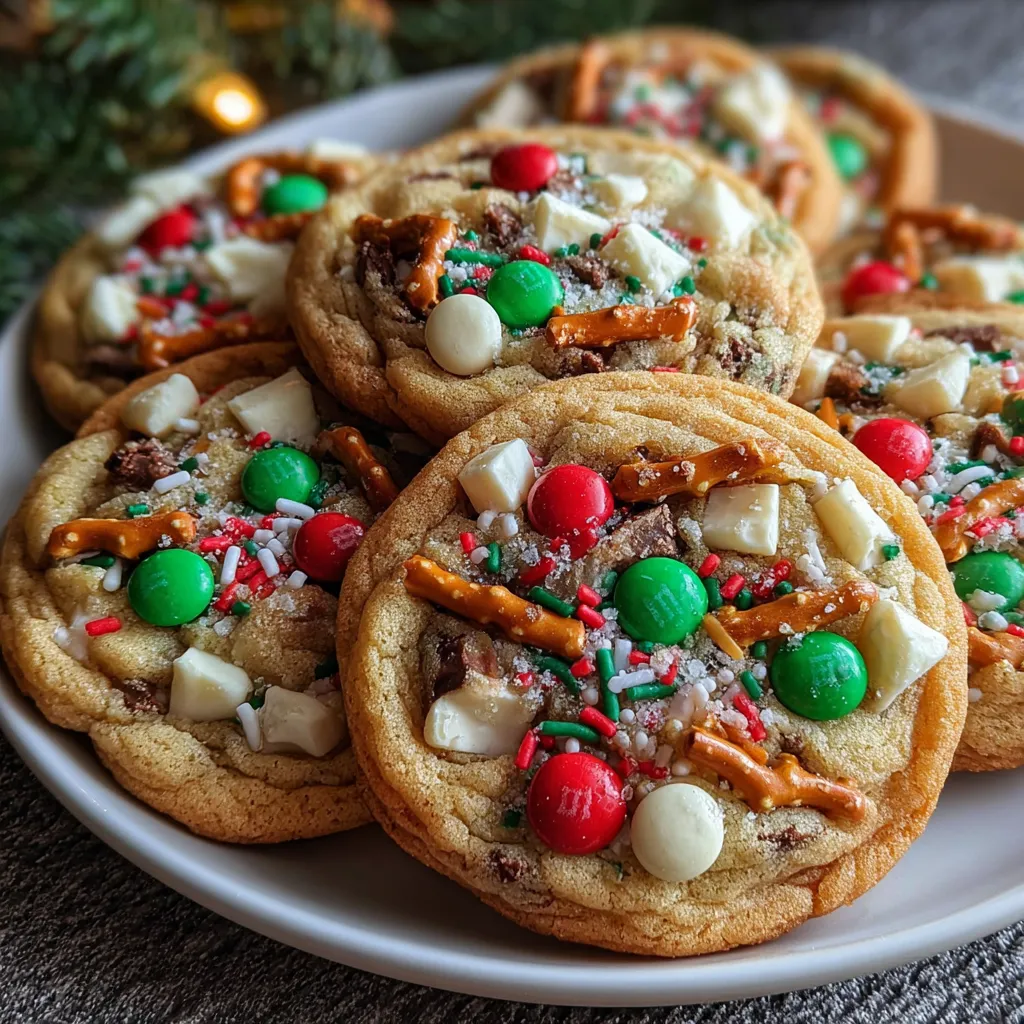
Imagine taking every good thing in your pantry—chocolate chips, pretzels, potato chips, M&Ms, toffee bits, whatever random snacks are hanging out in your cabinet—and throwing them all into one cookie. That’s the vibe here. These Kitchen Sink Christmas Cookies are basically what happens when you can’t decide what kind of cookie to make, so you just say “screw it” and make them all at once. They’re sweet, salty, crunchy, chewy, chocolatey, and completely unpredictable in the best way possible. Every bite is different because the mix-ins are everywhere. I made these for a cookie swap last December and people were trying to reverse-engineer the recipe like it was some kind of NASA formula. My sister took one bite and said “this tastes like organized chaos” and honestly that’s the perfect description. My neighbor’s kid picked out all the M&Ms first and still asked for another cookie. These cookies make people forget about every other cookie on the table.
Why You’ll Love This Recipe
Use what you have. Got random candy from Halloween? Leftover baking chips? That bag of pretzels you opened once? Throw it in. This is the ultimate pantry cleanout cookie.
Sweet and salty perfection. The combo of chocolate and salty snacks is scientifically proven to be irresistible. Probably. I didn’t fact-check that but it feels true.
No two cookies are the same. Every cookie is a unique snowflake of deliciousness. Kids love playing “spot the ingredients.”
Huge batch. This recipe makes like 4-5 dozen cookies. Perfect for gift-giving, parties, or just eating them all week (no judgment).
Crowd-pleaser guaranteed. Picky eaters can pick out what they don’t like and still have plenty to enjoy. Everyone finds something they love.
Conversation starter. People WILL ask what’s in these. They’ll want the recipe. You’ll feel like a baking celebrity.
Holiday festive AF. Red and green M&Ms, Christmas sprinkles, or festive candy makes them look like holiday cheer exploded in your kitchen.
The Good Stuff You’ll Need
For the Cookie Base:
- 1 cup (2 sticks) unsalted butter, softened
- 1 cup brown sugar, packed
- 1/2 cup granulated sugar
- 2 large eggs, room temperature
- 2 tsp vanilla extract
- 2 1/2 cups all-purpose flour
- 1 tsp baking soda
- 1 tsp baking powder
- 1 tsp salt
- 1/2 tsp cinnamon (optional but adds warmth)
For the Kitchen Sink Mix-Ins (about 4-5 cups total—go wild):
Choose your adventure! Use a mix of at least 5-6 of these:
- 1 cup semi-sweet chocolate chips
- 1 cup milk chocolate chips
- 1/2 cup white chocolate chips
- 1 cup M&Ms (holiday colors if you’re feeling festive)
- 3/4 cup crushed pretzels (not too fine—you want chunks)
- 3/4 cup crushed potato chips (seriously, trust me)
- 1/2 cup toffee bits (Heath bits are perfect)
- 1/2 cup butterscotch chips
- 1/2 cup peanut butter chips
- 1/2 cup chopped pecans or walnuts
- 1/2 cup shredded coconut
- 1/2 cup mini marshmallows (add these AFTER baking if you want them melty)
- 1/3 cup crushed graham crackers
- 1/3 cup crushed Oreos
- 1/4 cup holiday sprinkles
- 1/4 cup crushed candy canes or peppermint pieces
- 1/4 cup Rice Krispies cereal (adds crunch)
Equipment:
- Stand mixer or hand mixer
- Large mixing bowls
- Cookie scoops (2-tablespoon size is perfect)
- Baking sheets
- Parchment paper or silicone mats
- Wire cooling racks
- Your bravery
Let’s Do This
Step 1: Prep Your Mix-Ins Like a Boss
This is where you get to be creative and use what you have. The goal is about 4-5 cups of mix-ins total.
If you’re using pretzels or potato chips, crush them by hand into a bowl. You want pieces about the size of chocolate chips—some bigger chunks are fine. Don’t pulverize them into dust. We need texture.
If you’re using candy canes, put them in a ziplock bag and smash with a rolling pin. Very therapeutic. Crush them into pea-sized pieces.
Chop any nuts if they’re not already chopped.
Mix all your chosen add-ins together in a large bowl. Admire the beautiful chaos. Take a picture because it looks insane and amazing.
Set aside. Resist eating handfuls of the mix. Or don’t resist. I’m not your boss.
Step 2: Make the Cookie Dough
Preheat your oven to 350°F (175°C). Line your baking sheets with parchment paper. Don’t skip the parchment—these cookies can stick and you’ll cry.
In a medium bowl, whisk together flour, baking soda, baking powder, salt, and cinnamon. Set aside.
In your stand mixer bowl (or large bowl with hand mixer), beat the softened butter with both sugars on medium-high speed for 3-4 minutes. You want it light, fluffy, and pale. This is crucial for soft cookies. Don’t rush it.
The butter needs to be ROOM TEMPERATURE. If it’s cold, you’ll have lumps. If it’s melted, your cookies will spread like pancakes. Room temp means you can press your finger into it easily but it’s not greasy.
Add eggs one at a time, beating well after each addition. Scrape down the bowl between additions.
Mix in vanilla extract.
With the mixer on low, gradually add the flour mixture. Mix until JUST combined—you should still see a few flour streaks. Overmixing = tough cookies.
Now dump in your entire bowl of mix-ins. Use a wooden spoon or sturdy spatula to fold everything together. This will feel chaotic and wonderful. You want everything evenly distributed but it’s okay if some areas have more of certain things.
The dough will be thick, chunky, and barely holding itself together. This is correct. If you can see the dough base, you’re good. If it’s all mix-ins and no dough, you went too hard—add 2-3 tablespoons more flour.
Step 3: Scoop and Bake
Using a cookie scoop (or two spoons), scoop out dough balls about 2 tablespoons each. These are big cookies—we’re going for statement pieces here.
Place them on your prepared baking sheets, spacing them about 3 inches apart. They WILL spread. Don’t crowd them or you’ll have one giant cookie blob. Which honestly might be delicious but isn’t the goal.
Optional pro move: Press a few extra M&Ms, chocolate chips, or pretty toppings onto the top of each dough ball before baking. This makes them look professionally decorated and gives you control over what shows on top.
Bake for 11-13 minutes. They should look barely set in the center and golden brown on the edges. They’ll look underdone—THAT’S WHAT YOU WANT. They continue cooking on the hot pan after you remove them.
DO NOT OVERBAKE. Nobody likes a dry, crunchy kitchen sink cookie. We want chewy centers.
Let them cool on the baking sheet for 5 minutes. They’ll firm up and be easier to move.
Transfer to wire racks to cool completely. Or eat one warm and burn your mouth because you have no self-control. I get it.
Step 4: Bask in the Glory
Arrange your cookies on a platter. Marvel at the chunky, colorful chaos.
Take photos for Instagram. Use hashtags. Become cookie famous.
Share with friends, family, or coworkers. Accept compliments graciously.
Watch people try to figure out what’s in them. Refuse to give specifics. Maintain mystery. Tell them “it’s a secret family recipe” even though you just threw everything together.
Serving Suggestions
These cookies are already a full experience, but here’s how to make them even better:
- With milk: Obviously. Ice-cold milk is mandatory with these.
- Ice cream sandwiches: Put vanilla ice cream between two cookies. Game over.
- Gift boxes: Pack them in decorative tins with tissue paper for impressive homemade gifts
- Cookie platters: Mix them with other simpler cookies so they’re the star
- Crumbled over ice cream: Break them up and use as ice cream topping
- Lunchbox treats: Kids will be the coolest in school with these
- Coffee pairing: The salt and chocolate are perfect with strong coffee
Switch It Up
Peanut Butter Base: Replace 1/2 cup butter with 1/2 cup peanut butter for PB flavor
Gluten-Free: Use 1:1 gluten-free flour blend (Bob’s Red Mill works great)
Salted Caramel Version: Add 1/2 cup caramel bits and sprinkle with flaky sea salt before baking
S’mores Style: Use graham cracker pieces, chocolate chips, and mini marshmallows
Trail Mix Cookies: Use dried cranberries, raisins, nuts, and chocolate chips
Birthday Cake Version: Add 1/4 cup rainbow sprinkles and white chocolate chips
Tropical Sink: Use coconut, macadamia nuts, white chocolate, and dried pineapple
Breakfast Cookie: Add oats, dried fruit, nuts, and reduce the chocolate
Red Velvet Sink: Add 2 tbsp cocoa powder and use white chocolate chips and red M&Ms
Storage and Make-Ahead Tips
The dough is actually super freezer-friendly, which makes these perfect for emergency cookie needs.
Room temperature: Store in an airtight container for up to 5 days. Put a slice of bread in the container to keep them soft—the cookies absorb moisture from the bread. Weird trick, but it works.
Refrigerated: They’ll keep for up to 2 weeks in the fridge in an airtight container. Let them come to room temp before eating for best texture.
Freezing dough: Scoop the dough into balls, freeze on a baking sheet until solid, then transfer to a freezer bag. They’ll keep for 3 months. Bake from frozen—just add 2-3 minutes to the bake time.
Freezing baked cookies: Once completely cool, freeze in airtight containers or freezer bags for up to 3 months. Thaw at room temperature for an hour.
Make-ahead timeline:
- 3 months ahead: Make and freeze dough balls
- 2 weeks ahead: Bake and freeze cookies
- 1 week ahead: Bake and store at room temperature
- 2 days ahead: Perfect timing—they’ll still be fresh and soft
- Day of: They’ll be at peak texture but still warm from the oven
Gift-giving tip: These ship really well! Pack them in tins with parchment between layers. They’re sturdy enough to survive the mail.
Why This Works So Damn Well
The magic of kitchen sink cookies is in the contrast and variety. Every bite hits different flavor and texture notes, which keeps your brain interested and prevents palate fatigue.
The butter-sugar base creates a classic soft cookie structure. Creaming the butter and sugar incorporates air, which gives you that chewy texture. The combination of brown sugar (which has molasses for moisture and chewiness) and white sugar (which promotes spreading and crispness) creates the perfect balance.
The high ratio of mix-ins to dough means every bite is packed with stuff. You’re essentially creating a vehicle for all those ingredients to stick together. The cookie dough is the glue.
Salt is crucial here—it enhances sweetness and makes chocolate taste more chocolatey. The salty snacks (pretzels, chips) create contrast that makes the sweet stuff taste even better. Your taste buds get excited because they can’t predict what’s coming next.
Slightly underbaking is key because the cookies continue to cook on the hot pan after you pull them out. This technique is called “carryover cooking.” It prevents dry, overbaked cookies and keeps the centers soft and chewy.
The variety of mix-ins means you get different textures: melty chocolate, crunchy pretzels, crispy chips, chewy toffee. Textural contrast is one of the main things that makes food interesting and delicious.
When to Make These
Christmas Cookie Exchanges: These are always the first to disappear. Make extra.
Holiday Parties: Brings the wow factor without being fussy or elegant. Fun party cookies.
Bake Sales: Price these high. They look impressive and sell fast.
Teacher Gifts: Way better than a gift card. Teachers will remember you forever.
Neighborhood Treats: Make a huge batch and gift to neighbors. Instant popularity.
Cookie Decorating Alternative: For people who hate decorating, this is your cookie. No frosting required.
Pantry Cleanout Day: Got random ingredients expiring? Kitchen sink cookies to the rescue.
Stress Baking: When you need to bake but can’t decide what to make, this is the answer.
Super Bowl Parties: Sweet and salty snacks in cookie form. Perfect game day food.
Questions People Actually Ask
Q: Do I HAVE to use all those mix-ins?
A: Nope! Use at least 4-5 cups of whatever mix-ins you want. The “kitchen sink” name means throw in what you have. There are no rules, only suggestions.
Q: My cookies spread way too much and became pancakes. What happened?
A: Your butter was too warm, your oven wasn’t hot enough, or you didn’t chill the dough. If your dough seems really soft and greasy, chill it for 30 minutes before scooping.
Q: My cookies are dry and cakey. Help!
A: You overbaked them or overmixed the dough. These need to look underdone when you pull them out. Also, make sure you’re measuring flour correctly—fluff it first, then spoon it into the measuring cup and level it off.
Q: Can I add even MORE mix-ins?
A: I mean… you CAN, but at some point the dough can’t hold everything together. 5 cups of mix-ins is already pushing it. If you want more, add an extra 1/4 cup flour to help bind everything.
Q: My cookies are falling apart. What did I do wrong?
A: Too many mix-ins, not enough dough. Add 2-3 tablespoons more flour. Also, make sure you’re letting them cool on the pan for 5 minutes—they need time to set.
Q: Can I use salted butter instead of unsalted?
A: Sure, just reduce the added salt to 1/2 tsp. But unsalted butter gives you more control over the saltiness.
Q: What if I don’t have potato chips?
A: Skip them or use crushed corn chips, Fritos, or even Ritz crackers. Any salty, crunchy snack works. Or just add more pretzels.
Q: These seem really random. Is there a method to the madness?
A: The method is chaos! But yes—you want a mix of chocolate (sweet), salty snacks (contrast), and maybe something crunchy (texture). Beyond that, go wild. You can’t really mess this up unless you add something truly bizarre like pickles. Actually… don’t give me ideas.
Q: My kids want to help. Can they?
A: YES. This is the perfect kid-friendly recipe. Let them choose mix-ins, dump them in the bowl, and help scoop the dough. They’ll feel like mad scientists. Just supervise the oven part.
Q: Can I make these smaller?
A: Sure, use a 1-tablespoon scoop instead and bake for 9-11 minutes. You’ll get more cookies but they’re less impressive. These are supposed to be big statement cookies.
Print
Kitchen Sink Christmas Cookies
- Total Time: 32 minutes
- Yield: 36 cookies 1x
Description
Imagine taking every good thing in your pantry—chocolate chips, pretzels, potato chips, M&Ms, toffee bits, whatever random snacks are hanging out in your cabinet—and throwing them all into one cookie. That’s the vibe here. These Kitchen Sink Christmas Cookies are basically what happens when you can’t decide what kind of cookie to make, so you just say “screw it” and make them all at once. They’re sweet, salty, crunchy, chewy, chocolatey, and completely unpredictable in the best way possible. Every bite is different because the mix-ins are everywhere. I made these for a cookie swap last December and people were trying to reverse-engineer the recipe like it was some kind of NASA formula. My sister took one bite and said “this tastes like organized chaos” and honestly that’s the perfect description. My neighbor’s kid picked out all the M&Ms first and still asked for another cookie. These cookies make people forget about every other cookie on the table.
Ingredients
For the Cookie Base:
- 1 cup (2 sticks) unsalted butter, softened
- 1 cup brown sugar, packed
- 1/2 cup granulated sugar
- 2 large eggs, room temperature
- 2 tsp vanilla extract
- 2 1/2 cups all-purpose flour
- 1 tsp baking soda
- 1 tsp baking powder
- 1 tsp salt
- 1/2 tsp cinnamon (optional but adds warmth)
For the Kitchen Sink Mix-Ins (about 4-5 cups total—go wild):
Choose your adventure! Use a mix of at least 5-6 of these:
- 1 cup semi-sweet chocolate chips
- 1 cup milk chocolate chips
- 1/2 cup white chocolate chips
- 1 cup M&Ms (holiday colors if you’re feeling festive)
- 3/4 cup crushed pretzels (not too fine—you want chunks)
- 3/4 cup crushed potato chips (seriously, trust me)
- 1/2 cup toffee bits (Heath bits are perfect)
- 1/2 cup butterscotch chips
- 1/2 cup peanut butter chips
- 1/2 cup chopped pecans or walnuts
- 1/2 cup shredded coconut
- 1/2 cup mini marshmallows (add these AFTER baking if you want them melty)
- 1/3 cup crushed graham crackers
- 1/3 cup crushed Oreos
- 1/4 cup holiday sprinkles
- 1/4 cup crushed candy canes or peppermint pieces
- 1/4 cup Rice Krispies cereal (adds crunch)
Equipment:
- Stand mixer or hand mixer
- Large mixing bowls
- Cookie scoops (2-tablespoon size is perfect)
- Baking sheets
- Parchment paper or silicone mats
- Wire cooling racks
- Your bravery
Instructions
This is where you get to be creative and use what you have. The goal is about 4-5 cups of mix-ins total.
If you’re using pretzels or potato chips, crush them by hand into a bowl. You want pieces about the size of chocolate chips—some bigger chunks are fine. Don’t pulverize them into dust. We need texture.
If you’re using candy canes, put them in a ziplock bag and smash with a rolling pin. Very therapeutic. Crush them into pea-sized pieces.
Chop any nuts if they’re not already chopped.
Mix all your chosen add-ins together in a large bowl. Admire the beautiful chaos. Take a picture because it looks insane and amazing.
Set aside. Resist eating handfuls of the mix. Or don’t resist. I’m not your boss.
Preheat your oven to 350°F (175°C). Line your baking sheets with parchment paper. Don’t skip the parchment—these cookies can stick and you’ll cry.
In a medium bowl, whisk together flour, baking soda, baking powder, salt, and cinnamon. Set aside.
In your stand mixer bowl (or large bowl with hand mixer), beat the softened butter with both sugars on medium-high speed for 3-4 minutes. You want it light, fluffy, and pale. This is crucial for soft cookies. Don’t rush it.
The butter needs to be ROOM TEMPERATURE. If it’s cold, you’ll have lumps. If it’s melted, your cookies will spread like pancakes. Room temp means you can press your finger into it easily but it’s not greasy.
Add eggs one at a time, beating well after each addition. Scrape down the bowl between additions.
Mix in vanilla extract.
With the mixer on low, gradually add the flour mixture. Mix until JUST combined—you should still see a few flour streaks. Overmixing = tough cookies.
Now dump in your entire bowl of mix-ins. Use a wooden spoon or sturdy spatula to fold everything together. This will feel chaotic and wonderful. You want everything evenly distributed but it’s okay if some areas have more of certain things.
The dough will be thick, chunky, and barely holding itself together. This is correct. If you can see the dough base, you’re good. If it’s all mix-ins and no dough, you went too hard—add 2-3 tablespoons more flour.
Using a cookie scoop (or two spoons), scoop out dough balls about 2 tablespoons each. These are big cookies—we’re going for statement pieces here.
Place them on your prepared baking sheets, spacing them about 3 inches apart. They WILL spread. Don’t crowd them or you’ll have one giant cookie blob. Which honestly might be delicious but isn’t the goal.
Optional pro move: Press a few extra M&Ms, chocolate chips, or pretty toppings onto the top of each dough ball before baking. This makes them look professionally decorated and gives you control over what shows on top.
Bake for 11-13 minutes. They should look barely set in the center and golden brown on the edges. They’ll look underdone—THAT’S WHAT YOU WANT. They continue cooking on the hot pan after you remove them.
DO NOT OVERBAKE. Nobody likes a dry, crunchy kitchen sink cookie. We want chewy centers.
Let them cool on the baking sheet for 5 minutes. They’ll firm up and be easier to move.
Transfer to wire racks to cool completely. Or eat one warm and burn your mouth because you have no self-control. I get it.
Arrange your cookies on a platter. Marvel at the chunky, colorful chaos.
Take photos for Instagram. Use hashtags. Become cookie famous.
Share with friends, family, or coworkers. Accept compliments graciously.
Watch people try to figure out what’s in them. Refuse to give specifics. Maintain mystery. Tell them “it’s a secret family recipe” even though you just threw everything together.
Notes
These cookies are already a full experience, but here’s how to make them even better:
- With milk: Obviously. Ice-cold milk is mandatory with these.
- Ice cream sandwiches: Put vanilla ice cream between two cookies. Game over.
- Gift boxes: Pack them in decorative tins with tissue paper for impressive homemade gifts
- Cookie platters: Mix them with other simpler cookies so they’re the star
- Crumbled over ice cream: Break them up and use as ice cream topping
- Lunchbox treats: Kids will be the coolest in school with these
- Coffee pairing: The salt and chocolate are perfect with strong coffee
- Prep Time: 20 minutes
- Cook Time: 12 minutes
Nutrition
- Calories: ~180 kcal
- Sugar: ~14g
- Sodium: ~150mg
- Carbohydrates: ~23g
- Protein: ~2g


