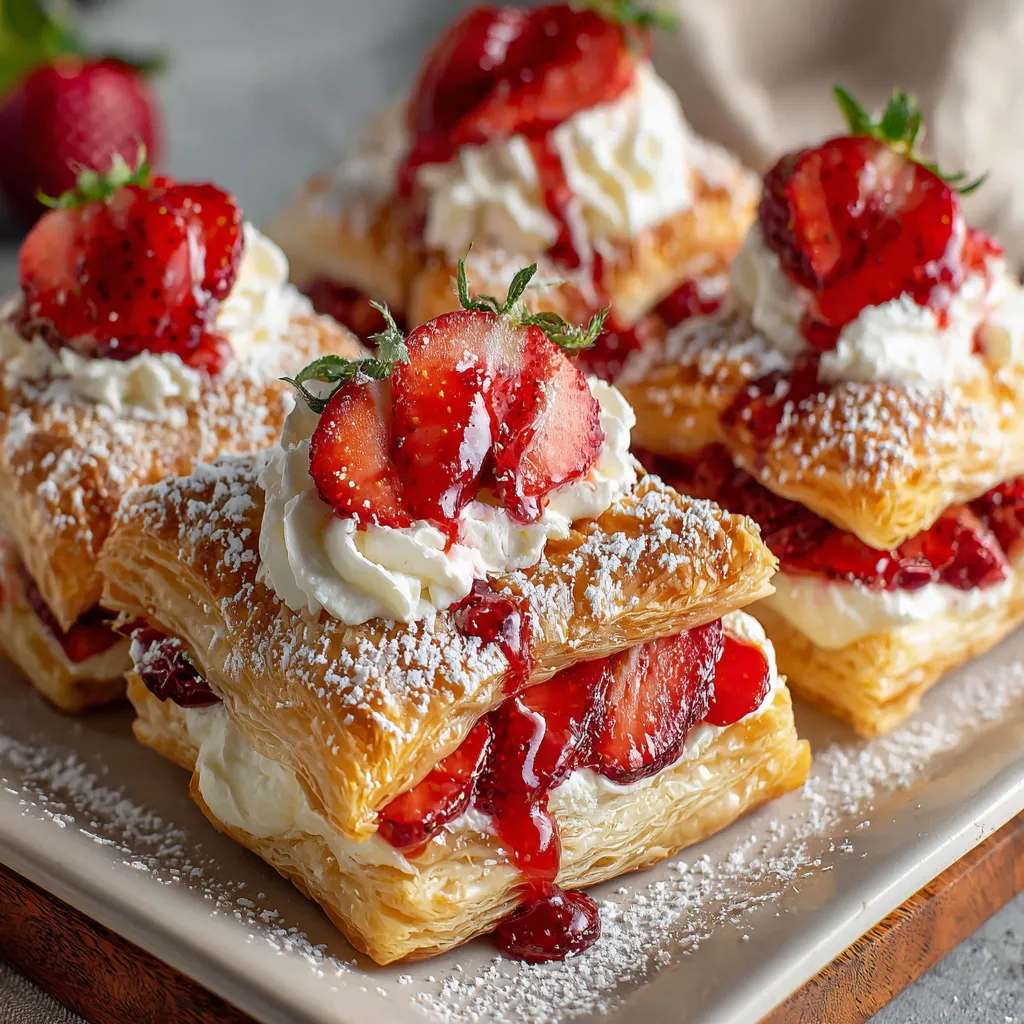
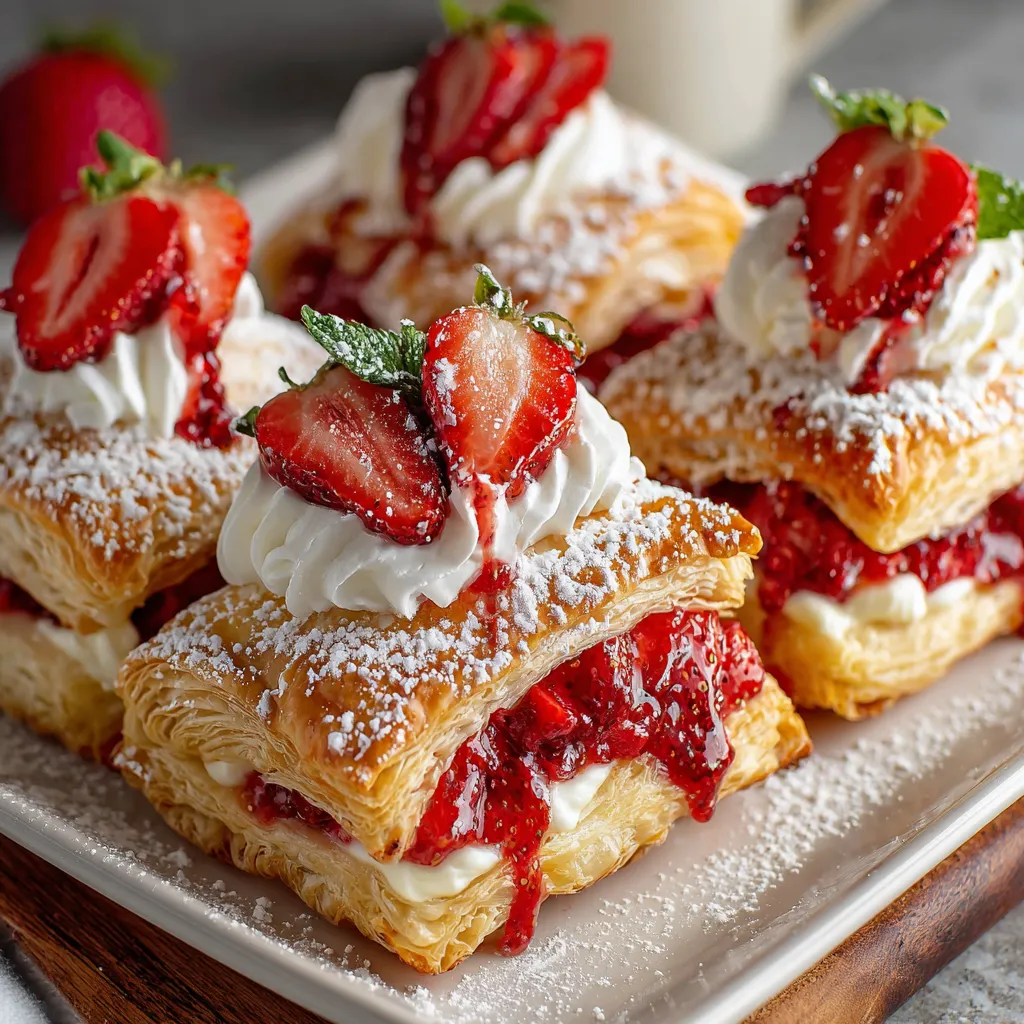
Picture this: golden, crispy layers of puff pastry that shatter when you bite into them, filled with sweet vanilla cream and topped with juicy, perfectly ripe strawberries. That’s it. That’s the whole vibe. These Strawberry Flaky Puff Pastries are basically what happens when a fancy French bakery and your grandma’s strawberry shortcake have a baby, and that baby is GORGEOUS. I’m talking hundreds of delicate, buttery layers that flake all over your shirt (worth it), a luscious pastry cream that tastes like vanilla clouds, and fresh strawberries that make the whole thing taste like summer even in the middle of February. I brought these to a brunch last spring and three people asked where I bought them. When I said I made them, one friend literally said “I need to reevaluate our entire friendship because I didn’t know you had these powers.” My neighbor saw me carrying them to my car and asked if she could just… have one. These pastries make people forget their manners and their diets.
Why You’ll Love This Recipe
Bakery vibes at home. That golden, flaky, professional-looking pastry? You made it. Feel smug about it.
Texture heaven. Crispy pastry + silky cream + juicy fruit = the kind of bite that makes you close your eyes and sigh.
Customizable as hell. Strawberries today, peaches tomorrow, mixed berries next week. One base, infinite possibilities.
Easier than croissants. You’re using store-bought puff pastry (no judgment, I do too), which means 90% of the hard work is already done.
Portion control built-in. Individual pastries mean no awkward slicing at the table. Grab and go.
Impressive without stress. Looks like you spent all day. Actually takes like an hour. Don’t tell anyone.
The Good Stuff You’ll Need
For the Puff Pastries:
- 2 sheets frozen puff pastry (17.3 oz package), thawed
- 1 large egg + 1 tbsp water (for egg wash)
- 2 tbsp granulated sugar (for sprinkling)
For the Vanilla Pastry Cream:
- 2 cups whole milk
- 1/2 cup granulated sugar
- 1/4 cup cornstarch
- 4 large egg yolks
- 2 tbsp unsalted butter
- 2 tsp vanilla extract (use the good stuff)
- Pinch of salt
For the Topping:
- 1 lb fresh strawberries, hulled and sliced
- 2 tbsp granulated sugar (optional, if berries aren’t sweet)
- 1 tsp lemon juice
- Powdered sugar for dusting
- Fresh mint leaves (optional, for fancy points)
Equipment:
- Baking sheets
- Parchment paper
- Whisk and saucepan
- Pastry brush
- Sharp knife or pizza cutter
Let’s Do This
Step 1: Make That Pastry Cream First
Trust me, you want this chilled and ready before you even think about baking.
In a medium saucepan, heat the milk over medium heat until it just starts to steam. Don’t let it boil—we’re not making hot chocolate here.
While that’s warming, whisk together sugar, cornstarch, egg yolks, and salt in a bowl until smooth and pale yellow. This takes about 2 minutes. Your arm will get a workout.
Now here’s the tricky part: slowly pour about 1/2 cup of the hot milk into the egg mixture while whisking constantly. This is called tempering and it prevents your eggs from scrambling. Nobody wants sweet scrambled eggs in their pastry.
Pour the tempered egg mixture back into the saucepan with the remaining milk. Whisk like your life depends on it.
Cook over medium heat, whisking constantly, until the mixture thickens and starts to bubble. This takes 3-5 minutes. You’ll feel it get noticeably thicker—almost pudding-like. Once it bubbles for about 30 seconds, you’re good.
Remove from heat and immediately whisk in the butter and vanilla. The butter makes it glossy and rich.
Pour the pastry cream into a clean bowl. Press plastic wrap directly onto the surface—this prevents that gross skin from forming on top.
Refrigerate for at least 2 hours, but 4 hours or overnight is better. It needs to be completely cold and set. Do not skip this step or you’ll have runny cream sliding off your pastries like a sad, delicious disaster.
Step 2: Prep Those Strawberries
Hull and slice your strawberries about 1/4 inch thick. Not too thin or they’ll get mushy, not too thick or they’ll slide off.
If your strawberries aren’t super sweet (taste one—it’s research), toss them in a bowl with 2 tbsp sugar and 1 tsp lemon juice. Let them sit at room temperature for 15-20 minutes to macerate. They’ll release their juices and taste amazing.
If your strawberries are already perfect and sweet, just slice them and move on with your blessed life.
Step 3: Prepare the Puff Pastry
Preheat your oven to 400°F (200°C). Line two baking sheets with parchment paper.
Unfold your thawed puff pastry sheets on a lightly floured surface. If they’re cracking, let them sit for 5-10 minutes—they’re too cold.
Cut each sheet into 6 rectangles (about 3×5 inches each). You’ll have 12 total pastries. You can also cut them into squares or circles if you’re feeling fancy. Use a sharp knife or pizza cutter and make clean cuts—don’t drag the knife or you’ll seal the edges and they won’t puff properly.
Place the rectangles on your prepared baking sheets, spacing them about 2 inches apart. They’ll puff up and expand.
Optional but recommended: Using a sharp knife, score a border about 1/2 inch from the edge of each rectangle. Don’t cut all the way through—just lightly score the surface. This creates a frame that puffs higher than the center, making a little well for your cream and berries.
Whisk together the egg and water to make your egg wash. Brush it over the entire surface of each pastry. This gives you that gorgeous golden color.
Sprinkle each pastry with a little granulated sugar. This adds crunch and sweetness.
Prick the center of each pastry (inside your scored border) a few times with a fork. This keeps the center from puffing up too much so you have room for filling.
Step 4: Bake Until Golden and Perfect
Bake for 15-20 minutes until the pastries are puffed, golden brown, and crispy. They should look like they belong in a Parisian bakery window.
Rotate the baking sheets halfway through if your oven has hot spots (most do).
If the centers puffed up anyway despite your fork pricks (it happens), just press them down gently with the back of a spoon while they’re still warm. Be gentle—they’re flaky and delicate.
Let them cool on the baking sheets for 5 minutes, then transfer to a wire rack to cool completely. They need to be completely cool before you add the cream or it’ll melt and slide off.
Step 5: Assemble This Beautiful Thing
Right before serving—and I mean RIGHT before, like 30 minutes max—it’s time to assemble.
Give your chilled pastry cream a good whisk to smooth it out. It might look a little lumpy from sitting in the fridge, but whisking will fix that.
You can either pipe or spoon the cream onto the pastries. Piping looks fancier. Spooning is easier and gets the job done.
If piping: Transfer the pastry cream to a piping bag fitted with a large round or star tip. Pipe a generous amount into the center of each pastry, staying within your scored border.
If spooning: Just spoon a nice dollop (about 2-3 tablespoons) onto each pastry and spread it gently.
Arrange the sliced strawberries on top of the cream. You can fan them out in a pretty pattern or just pile them on—both work. I like overlapping them slightly in rows because it looks professional and I’m trying to impress people.
Dust the whole thing with powdered sugar using a fine-mesh sieve. This isn’t just for looks—it adds a touch of sweetness and makes everything look dreamy.
Add a tiny mint leaf on top if you’re feeling extra. It adds color and makes you look like you know what you’re doing.
Step 6: Serve Immediately and Accept Compliments
Seriously, serve these within an hour of assembly. The pastry cream and strawberry juices will make the pastry soggy if they sit too long. You want maximum flake and crunch.
Arrange them on a pretty platter. Take a photo because they’re gorgeous and you deserve internet validation.
Serve with coffee, tea, or champagne if you’re fancy like that.
Watch people’s faces light up when they take that first bite. Bask in the glory.
Serving Suggestions
These are already pretty perfect, but here’s how to make them even better:
- Brunch spread: Serve alongside fresh fruit salad, yogurt, and coffee for a killer brunch
- Afternoon tea: These are MADE for tea parties. Add some finger sandwiches and feel British
- Dessert platter: Mix them with other pastries for a fancy dessert table
- Mother’s Day/Easter: These scream spring celebration
- With ice cream: Add a scoop of vanilla ice cream on the side for extra decadence
- Chocolate drizzle: Melt some dark chocolate and drizzle it over the top for chocolate-covered strawberry vibes
Switch It Up
Mixed Berry: Use a combo of strawberries, blueberries, raspberries, and blackberries
Peach Cream: Swap strawberries for sliced peaches in summer
Chocolate Pastry Cream: Add 1/4 cup cocoa powder to the pastry cream for chocolate lovers
Lemon Cream: Add 2 tbsp lemon zest and 2 tbsp lemon juice to the pastry cream for lemon cream puffs vibes
Nutella Layer: Spread a thin layer of Nutella under the pastry cream for hazelnut chocolate goodness
Almond Cream: Add 1/2 tsp almond extract to the pastry cream and sprinkle with toasted sliced almonds
Balsamic Strawberries: Toss the strawberries with a tiny drizzle of balsamic vinegar and black pepper for a grown-up version
Glaze Instead: Skip the powdered sugar and brush the berries with warmed apricot jam for a glossy finish
Storage and Make-Ahead Tips
Here’s the thing: these are best eaten fresh. But life happens, so here’s how to make it work.
Pastry cream: Make it up to 3 days ahead. Keep it covered in the fridge. Whisk before using.
Baked pastries: These can be baked up to 1 day ahead. Store in an airtight container at room temperature. They’ll lose some crispness but you can refresh them in a 350°F oven for 5 minutes.
Assembled pastries: DO NOT assemble more than 1 hour before serving. The cream and fruit will make everything soggy. I learned this the hard way at a party where I assembled them 3 hours early and they turned into sad, floppy messes.
Leftovers: If you somehow have leftovers (doubtful), store them covered in the fridge. Eat within 24 hours. They won’t be crispy anymore but they’ll still taste good. Embrace the soggy pastry life.
Freezing: You can freeze the baked, unfilled pastries for up to 1 month. Thaw at room temperature and crisp in the oven before filling.
Why This Works So Damn Well
The magic here is in the contrast. Puff pastry is made of hundreds of layers of dough and butter. When it bakes, the water in the butter creates steam, which forces the layers apart and creates that incredible flakiness. You want it crispy and golden, which is why high heat (400°F) is crucial.
The pastry cream is a classic French crème pâtissière—a cooked custard thickened with cornstarch. The cornstarch stabilizes the eggs so they can be cooked to a higher temperature without curdling, creating a thick, sliceable cream that holds its shape. The cornstarch also means it stays stable at room temperature for a few hours, unlike regular custard.
Fresh strawberries add moisture, sweetness, and that fresh fruit brightness that cuts through the richness of the butter and cream. The sugar and lemon juice draw out their natural juices and intensify the flavor.
The combination works because you’ve got rich (butter, cream), sweet (pastry, cream, berries), tangy (lemon, berries), and textural contrast (crispy, creamy, juicy). Every bite hits different notes.
The key is keeping everything separate until the last minute. Crispy pastry hates moisture. Once you add wet cream and juicy berries, the clock is ticking. That’s why timing matters so much with this recipe.
When to Make This
Mother’s Day Brunch: Mom will cry. In a good way.
Easter Celebration: Spring vibes in pastry form.
Baby/Bridal Showers: Elegant, pretty, portable. Perfect shower food.
Birthday Breakfast: Start someone’s birthday right with fresh pastries.
Summer Picnics: Make everything except assembly, then put it together at the picnic.
Fancy Breakfast in Bed: Nothing says “I love you” like homemade pastries.
Weekend Treat: Sometimes you just need to feel fancy on a Sunday morning.
Questions People Actually Ask
Q: Can I use phyllo dough instead of puff pastry?
A: Totally different texture, but yes, you can. Phyllo will be crispier and more delicate. You’ll need to brush each layer with butter and stack them, which is more work. Stick with puff pastry unless you’re feeling adventurous.
Q: My puff pastry didn’t puff. What happened?
A: A few possibilities: 1) Your oven wasn’t hot enough. Puff pastry needs high heat. 2) You sealed the edges when cutting—always use a sharp knife with clean cuts. 3) Your pastry was too warm before baking—it should be cold. 4) You opened the oven door too early and let the steam escape.
Q: The pastry cream has lumps. Did I ruin it?
A: Probably not! Just strain it through a fine-mesh sieve while it’s still warm. Most lumps will smooth out. If it’s really scrambled-egg lumpy, the heat was too high.
Q: Can I use frozen strawberries?
A: Fresh is really better here. Frozen strawberries release too much water and will make everything soggy faster. If you MUST use frozen, thaw them completely, drain really well, and pat dry with paper towels.
Q: How do I keep the pastries crispy longer?
A: You can’t really. It’s physics—moisture from the cream and fruit will soften the pastry. Your best bet is to assemble right before serving and accept that leftovers won’t be crispy.
Q: Can I make these without eggs in the pastry cream?
A: That’s… not really pastry cream anymore. You could use instant vanilla pudding as a shortcut, but it won’t have the same rich, silky texture. If you have an egg allergy, look for an egg-free custard recipe specifically.
Q: Store-bought puff pastry feels like cheating.
A: First of all, it’s not a competition. Second, making puff pastry from scratch takes 6+ hours and requires serious skill. Store-bought is excellent. Julia Child used it. If it’s good enough for Julia, it’s good enough for you.
Q: These seem fancy. Are they hard?
A: They LOOK fancy. They’re actually pretty straightforward. If you can make pudding and bake something, you can make these. Don’t let Instagram perfection intimidate you. Your first batch might be a little messy. They’ll still taste amazing.
Print
Strawberry Flaky Puff Pastry
- Total Time: 50 minutes
- Yield: 12 pastries 1x
Description
Picture this: golden, crispy layers of puff pastry that shatter when you bite into them, filled with sweet vanilla cream and topped with juicy, perfectly ripe strawberries. That’s it. That’s the whole vibe. These Strawberry Flaky Puff Pastries are basically what happens when a fancy French bakery and your grandma’s strawberry shortcake have a baby, and that baby is GORGEOUS. I’m talking hundreds of delicate, buttery layers that flake all over your shirt (worth it), a luscious pastry cream that tastes like vanilla clouds, and fresh strawberries that make the whole thing taste like summer even in the middle of February. I brought these to a brunch last spring and three people asked where I bought them. When I said I made them, one friend literally said “I need to reevaluate our entire friendship because I didn’t know you had these powers.” My neighbor saw me carrying them to my car and asked if she could just… have one. These pastries make people forget their manners and their diets.
Ingredients
For the Puff Pastries:
- 2 sheets frozen puff pastry (17.3 oz package), thawed
- 1 large egg + 1 tbsp water (for egg wash)
- 2 tbsp granulated sugar (for sprinkling)
For the Vanilla Pastry Cream:
- 2 cups whole milk
- 1/2 cup granulated sugar
- 1/4 cup cornstarch
- 4 large egg yolks
- 2 tbsp unsalted butter
- 2 tsp vanilla extract (use the good stuff)
- Pinch of salt
For the Topping:
- 1 lb fresh strawberries, hulled and sliced
- 2 tbsp granulated sugar (optional, if berries aren’t sweet)
- 1 tsp lemon juice
- Powdered sugar for dusting
- Fresh mint leaves (optional, for fancy points)
Equipment:
- Baking sheets
- Parchment paper
- Whisk and saucepan
- Pastry brush
- Sharp knife or pizza cutter
Instructions
Step 1: Make That Pastry Cream First
Trust me, you want this chilled and ready before you even think about baking.
In a medium saucepan, heat the milk over medium heat until it just starts to steam. Don’t let it boil—we’re not making hot chocolate here.
While that’s warming, whisk together sugar, cornstarch, egg yolks, and salt in a bowl until smooth and pale yellow. This takes about 2 minutes. Your arm will get a workout.
Now here’s the tricky part: slowly pour about 1/2 cup of the hot milk into the egg mixture while whisking constantly. This is called tempering and it prevents your eggs from scrambling. Nobody wants sweet scrambled eggs in their pastry.
Pour the tempered egg mixture back into the saucepan with the remaining milk. Whisk like your life depends on it.
Cook over medium heat, whisking constantly, until the mixture thickens and starts to bubble. This takes 3-5 minutes. You’ll feel it get noticeably thicker—almost pudding-like. Once it bubbles for about 30 seconds, you’re good.
Remove from heat and immediately whisk in the butter and vanilla. The butter makes it glossy and rich.
Pour the pastry cream into a clean bowl. Press plastic wrap directly onto the surface—this prevents that gross skin from forming on top.
Refrigerate for at least 2 hours, but 4 hours or overnight is better. It needs to be completely cold and set. Do not skip this step or you’ll have runny cream sliding off your pastries like a sad, delicious disaster.
Step 2: Prep Those Strawberries
Hull and slice your strawberries about 1/4 inch thick. Not too thin or they’ll get mushy, not too thick or they’ll slide off.
If your strawberries aren’t super sweet (taste one—it’s research), toss them in a bowl with 2 tbsp sugar and 1 tsp lemon juice. Let them sit at room temperature for 15-20 minutes to macerate. They’ll release their juices and taste amazing.
If your strawberries are already perfect and sweet, just slice them and move on with your blessed life.
Step 3: Prepare the Puff Pastry
Preheat your oven to 400°F (200°C). Line two baking sheets with parchment paper.
Unfold your thawed puff pastry sheets on a lightly floured surface. If they’re cracking, let them sit for 5-10 minutes—they’re too cold.
Cut each sheet into 6 rectangles (about 3×5 inches each). You’ll have 12 total pastries. You can also cut them into squares or circles if you’re feeling fancy. Use a sharp knife or pizza cutter and make clean cuts—don’t drag the knife or you’ll seal the edges and they won’t puff properly.
Place the rectangles on your prepared baking sheets, spacing them about 2 inches apart. They’ll puff up and expand.
Optional but recommended: Using a sharp knife, score a border about 1/2 inch from the edge of each rectangle. Don’t cut all the way through—just lightly score the surface. This creates a frame that puffs higher than the center, making a little well for your cream and berries.
Whisk together the egg and water to make your egg wash. Brush it over the entire surface of each pastry. This gives you that gorgeous golden color.
Sprinkle each pastry with a little granulated sugar. This adds crunch and sweetness.
Prick the center of each pastry (inside your scored border) a few times with a fork. This keeps the center from puffing up too much so you have room for filling.
Step 4: Bake Until Golden and Perfect
Bake for 15-20 minutes until the pastries are puffed, golden brown, and crispy. They should look like they belong in a Parisian bakery window.
Rotate the baking sheets halfway through if your oven has hot spots (most do).
If the centers puffed up anyway despite your fork pricks (it happens), just press them down gently with the back of a spoon while they’re still warm. Be gentle—they’re flaky and delicate.
Let them cool on the baking sheets for 5 minutes, then transfer to a wire rack to cool completely. They need to be completely cool before you add the cream or it’ll melt and slide off.
Step 5: Assemble This Beautiful Thing
Right before serving—and I mean RIGHT before, like 30 minutes max—it’s time to assemble.
Give your chilled pastry cream a good whisk to smooth it out. It might look a little lumpy from sitting in the fridge, but whisking will fix that.
You can either pipe or spoon the cream onto the pastries. Piping looks fancier. Spooning is easier and gets the job done.
If piping: Transfer the pastry cream to a piping bag fitted with a large round or star tip. Pipe a generous amount into the center of each pastry, staying within your scored border.
If spooning: Just spoon a nice dollop (about 2-3 tablespoons) onto each pastry and spread it gently.
Arrange the sliced strawberries on top of the cream. You can fan them out in a pretty pattern or just pile them on—both work. I like overlapping them slightly in rows because it looks professional and I’m trying to impress people.
Dust the whole thing with powdered sugar using a fine-mesh sieve. This isn’t just for looks—it adds a touch of sweetness and makes everything look dreamy.
Add a tiny mint leaf on top if you’re feeling extra. It adds color and makes you look like you know what you’re doing.
Step 6: Serve Immediately and Accept Compliments
Seriously, serve these within an hour of assembly. The pastry cream and strawberry juices will make the pastry soggy if they sit too long. You want maximum flake and crunch.
Arrange them on a pretty platter. Take a photo because they’re gorgeous and you deserve internet validation.
Serve with coffee, tea, or champagne if you’re fancy like that.
Watch people’s faces light up when they take that first bite. Bask in the glory.
Notes
These are already pretty perfect, but here’s how to make them even better:
- Brunch spread: Serve alongside fresh fruit salad, yogurt, and coffee for a killer brunch
- Afternoon tea: These are MADE for tea parties. Add some finger sandwiches and feel British
- Dessert platter: Mix them with other pastries for a fancy dessert table
- Mother’s Day/Easter: These scream spring celebration
- With ice cream: Add a scoop of vanilla ice cream on the side for extra decadence
- Chocolate drizzle: Melt some dark chocolate and drizzle it over the top for chocolate-covered strawberry vibes
- Prep Time: 30 minutes
- Cook Time: 20 minutes
Nutrition
- Calories: ~280 kcal
- Sugar: ~14g
- Sodium: ~150mg
- Fat: ~15g
- Carbohydrates: ~32g
- Protein: ~5g


