
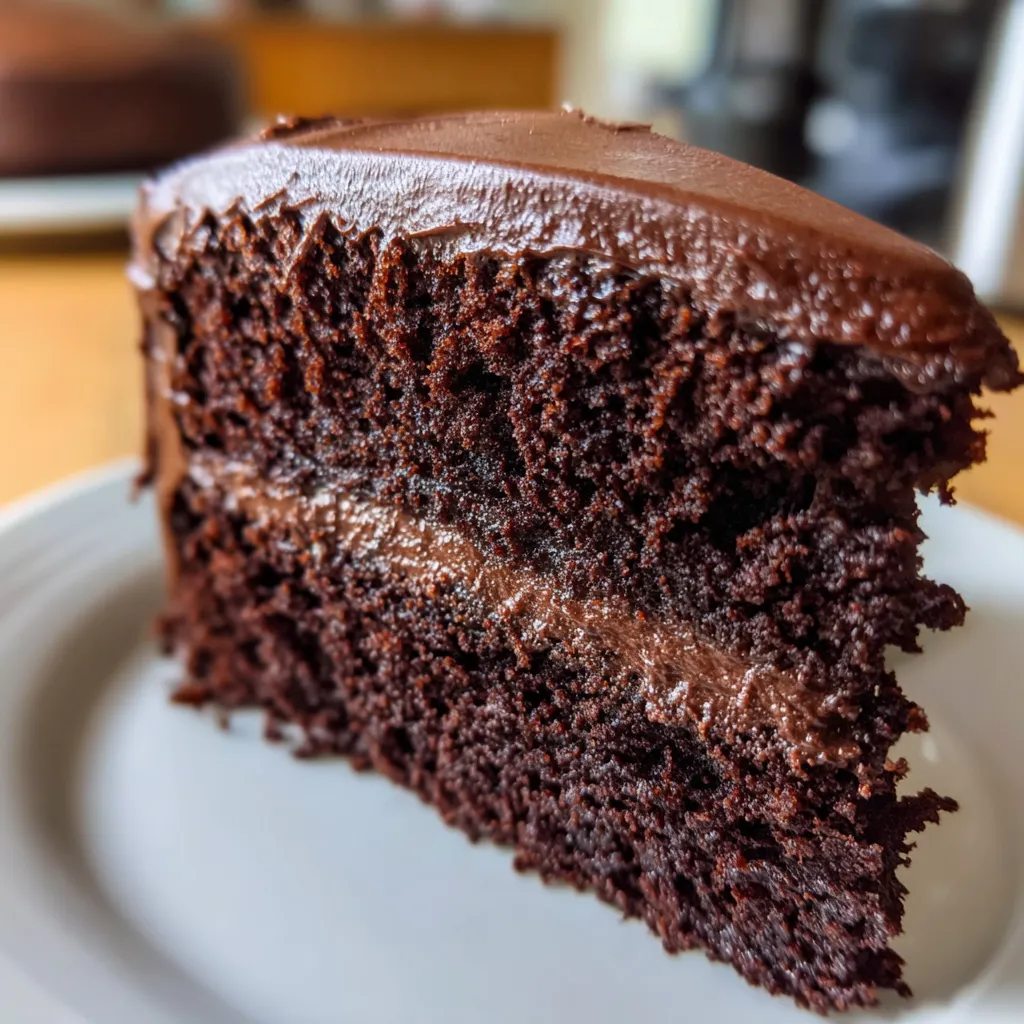
Listen, I don’t throw around words like “ultimate” lightly, but this chocolate cake has EARNED that title. This is the kind of cake that makes people stop mid-conversation, fork frozen in mid-air, eyes closed in pure bliss. We’re talking ridiculously moist, deeply chocolatey layers that practically melt on your tongue, slathered with the silkiest, dreamiest chocolate buttercream frosting you’ve ever experienced. This isn’t some dry, disappointing box-mix situation—this is the real deal. The kind of cake that makes grown adults ask for seconds before they’ve finished their first slice. I made this for my friend’s graduation party and someone literally asked if they could have the recipe tattooed on their arm. That’s not a normal reaction to cake, but this isn’t a normal cake.
Why You’ll Love This Recipe
Stupid moist. Like, almost concerningly moist. The secret? Coffee. Don’t worry, it doesn’t taste like coffee—it just makes the chocolate taste like chocolate on steroids.
One-bowl wonder. The cake batter comes together in one bowl. No creaming butter, no complicated steps. Just dump, mix, pour, bake.
Frosting goals. That chocolate buttercream is so smooth and fluffy, you could literally eat it with a spoon. (I won’t judge.)
Foolproof. Even if you’ve never baked a cake in your life, this one’s got your back. It’s basically impossible to mess up.
Makes everyone love you. Bring this to any gathering and you’ll instantly become everyone’s favorite person.
Room temperature stable. That frosting holds up beautifully at room temp, so no stress about keeping it refrigerated at parties.
The Good Stuff You’ll Need
For the Cake:
- 2 cups all-purpose flour
- 2 cups granulated sugar
- 3/4 cup unsweetened cocoa powder (the good stuff, not the dusty old container in your pantry from 2015)
- 2 tsp baking soda
- 1 tsp baking powder
- 1 tsp salt
- 2 large eggs, room temperature
- 1 cup whole milk, room temperature
- 1 cup vegetable oil (or melted coconut oil)
- 2 tsp vanilla extract
- 1 cup freshly brewed hot coffee (or hot water if you’re weird about coffee)
For the Frosting:
- 1 1/2 cups (3 sticks) unsalted butter, softened to room temp (seriously, don’t rush this)
- 1 cup unsweetened cocoa powder
- 5 cups powdered sugar (yeah, it’s a lot, but trust me)
- 1/2 cup whole milk or heavy cream
- 2 tsp vanilla extract
- 1/4 tsp salt
Let’s Do This
Step 1: Prep Your Situation
Preheat oven to 350°F (175°C). This is important—don’t put your cake in a cold oven like a monster.
Grease and flour two 9-inch round cake pans, or line the bottoms with parchment paper circles. This is your insurance policy against cake-stuck-in-pan tragedy.
Step 2: Make the Magical Cake Batter
In a large bowl, whisk together flour, sugar, cocoa powder, baking soda, baking powder, and salt. Get all those dry ingredients cozy with each other.
Add eggs, milk, oil, and vanilla. Mix with an electric mixer on medium speed for about 2 minutes until smooth. Scrape down the sides of the bowl because there’s always some rebel flour hiding there.
Reduce speed to low and carefully add the hot coffee. The batter will be THIN—like, suspiciously thin. Don’t panic. This is correct. This is what makes it so moist.
Step 3: Bake These Bad Boys
Divide batter evenly between your prepared pans. They’ll be pretty full, which is fine.
Bake for 30-35 minutes. You’ll know they’re done when a toothpick inserted in the center comes out clean or with just a few moist crumbs. The tops should spring back when lightly pressed.
Let them cool in the pans for 10 minutes, then turn out onto wire racks to cool completely. And I mean COMPLETELY. Warm cake + frosting = melty disaster.
Step 4: Make That Frosting
Beat softened butter on medium-high speed for about 3 minutes until it’s pale and fluffy. Your arm will get tired if using a hand mixer, but it’s worth it.
Add cocoa powder and mix on low until combined. It’ll look dry and crumbly—keep going.
Add powdered sugar one cup at a time, alternating with splashes of milk. Beat well after each addition.
Add vanilla and salt. Beat on high speed for about 3 minutes until the frosting is light, fluffy, and absolutely gorgeous.
If it’s too thick, add more milk a tablespoon at a time. Too thin? Add more powdered sugar. You’re the boss of this frosting.
Step 5: Assemble This Masterpiece
Place one cake layer on your serving plate. If the top is domed, trim it flat with a serrated knife. Eat the scraps. Baker’s tax.
Spread about 1 to 1 1/2 cups of frosting on top of the first layer. Go all the way to the edges.
Place second layer on top, flat side up. Press down gently.
Spread a thin “crumb coat” of frosting all over the cake to seal in the crumbs. Refrigerate for 15-30 minutes to let it set.
Apply the rest of the frosting, making it as smooth or swirly as you want. Get creative. Make it pretty. Or don’t. It’s gonna taste amazing either way.
Step 6: Serve and Accept Praise
Let the cake sit at room temperature for about 30 minutes before slicing so the frosting softens slightly.
Use a long, sharp knife and wipe it clean between cuts for perfect slices.
Serve with a glass of cold milk or a cup of coffee. Or just eat it straight with your hands. I’m not your mom.
Serving Suggestions
Honestly, this cake needs nothing, but if you want to be extra:
- Fresh berries on the side for a pop of color
- A scoop of vanilla ice cream melting into it
- Whipped cream for people who need their chocolate less intense
- A drizzle of chocolate ganache because why not
- Sea salt flakes on top for that fancy bakery look
Switch It Up
Triple Layer Cake: Use three 8-inch pans instead of two 9-inch pans for a taller, more dramatic cake.
Cupcakes: Make about 30 cupcakes. Bake for 18-20 minutes. Perfect for parties.
Sheet Cake: Pour into a 9×13 pan and bake for 35-40 minutes. Less pretty, same delicious.
Mint Chocolate: Add 1/2 tsp peppermint extract to the frosting for a minty twist.
Mocha Cake: Add 2 tbsp instant espresso powder to the batter for coffee-chocolate magic.
Peanut Butter Frosting: Use peanut butter buttercream instead for a Reese’s situation.
Add Mix-ins: Fold chocolate chips into the batter before baking. Because more chocolate is always the answer.
Make-Ahead Tips
This cake is actually great for making ahead—the flavors get even better as it sits.
Bake the cake layers up to 2 days ahead. Wrap tightly in plastic wrap and store at room temp.
Frosting can be made 3 days ahead. Store covered in the fridge, then bring to room temp and re-whip before using.
The fully frosted cake keeps at room temperature (covered) for 3 days or refrigerated for up to a week.
You can freeze unfrosted cake layers wrapped tightly for up to 3 months. Thaw overnight in the fridge before frosting.
Why This Works So Damn Well
This chocolate cake works because it breaks the traditional “rules” of cake-making in all the right ways. That thin, almost soup-like batter? That’s oil and coffee working together to create an incredibly moist crumb that stays tender for days. Most cakes use butter, which can make them dry. Oil keeps things soft and moist. The coffee amplifies the chocolate flavor without making it taste like coffee—it’s like turning up the volume on chocolate.
The baking soda and baking powder combo gives you the perfect rise and that tender, fluffy texture. The cocoa powder is bloom-free because you’re not blooming it in hot liquid first—you’re just mixing everything together, which actually works better for this style of cake. Simple is sometimes superior.
And that frosting? It’s an American buttercream that’s been cocoa-fied into chocolate heaven. The key is beating the hell out of that butter first to incorporate air, then beating it again after everything’s added. That’s what makes it so light and spreadable instead of greasy or heavy.
This is proof that you don’t need fancy techniques or expensive ingredients to make something spectacular. Just good ratios, smart ingredient choices, and a little bit of love.
When to Make This
Birthday Cake MVP: This is THE birthday cake. Kids love it, adults love it, everyone loves it.
Bad Day Antidote: Sometimes you just need to bake and eat chocolate cake. This is that cake.
Celebration Cake: Graduation, promotion, new job, survived Monday—all valid reasons.
Bake Sale Domination: This will sell out before anything else. Charge accordingly.
Date Night Dessert: Want to impress someone? This cake says “I have my life together” even if you don’t.
Just Because: You don’t need a reason to make chocolate cake. Live your life.
Questions People Actually Ask
Q: Can I use hot water instead of coffee? A: Yes, but the coffee really does make the chocolate taste better. Even if you hate coffee, you won’t taste it in the cake. But if you’re absolutely opposed, hot water works fine.
Q: My cake sank in the middle. What happened? A: Your oven temp might be off, or you opened the oven door too early. Use an oven thermometer and don’t open that door until at least 25 minutes in.
Q: Can I use Dutch-process cocoa instead of natural cocoa? A: Absolutely. Dutch-process gives you a darker color and slightly different flavor, but both work great.
Q: The frosting is grainy. Help! A: That means the butter wasn’t soft enough or the powdered sugar wasn’t fully incorporated. Keep beating—it’ll smooth out. If not, add a tablespoon of milk and beat some more.
Q: Can I make this dairy-free? A: Yes! Use non-dairy milk in the cake and non-dairy butter in the frosting. The cake texture might be slightly different but still delicious.
Q: How do I get perfect, smooth frosting? A: Use an offset spatula, dip it in hot water occasionally, and take your time. Or embrace the rustic swirly look—it’s trendy anyway.
Print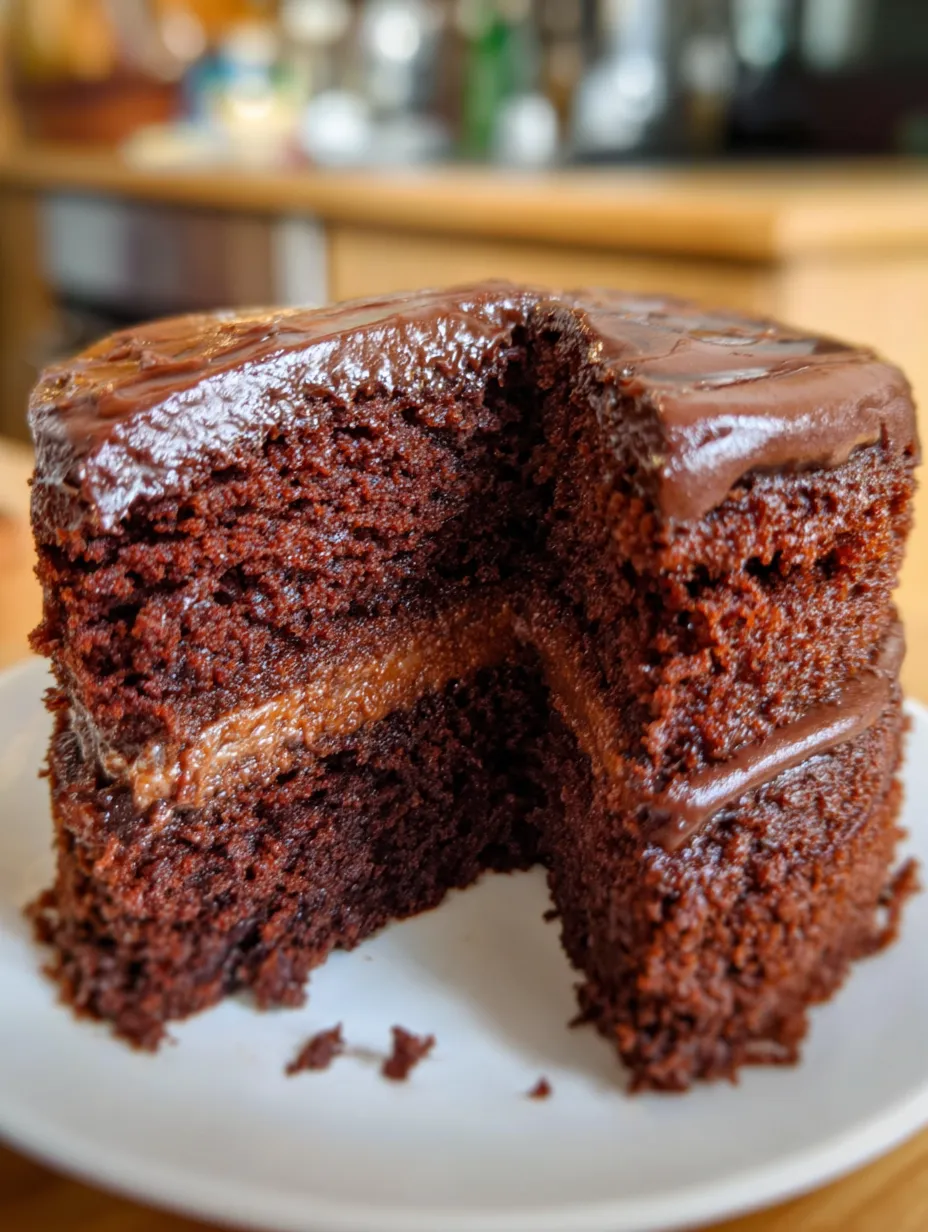
The Ultimate Chocolate Cake
- Total Time: 55 minutes
- Yield: 12–16 slices 1x
Description
Listen, I don’t throw around words like “ultimate” lightly, but this chocolate cake has EARNED that title. This is the kind of cake that makes people stop mid-conversation, fork frozen in mid-air, eyes closed in pure bliss. We’re talking ridiculously moist, deeply chocolatey layers that practically melt on your tongue, slathered with the silkiest, dreamiest chocolate buttercream frosting you’ve ever experienced. This isn’t some dry, disappointing box-mix situation—this is the real deal. The kind of cake that makes grown adults ask for seconds before they’ve finished their first slice. I made this for my friend’s graduation party and someone literally asked if they could have the recipe tattooed on their arm. That’s not a normal reaction to cake, but this isn’t a normal cake.
Ingredients
For the Cake:
- 2 cups all-purpose flour
- 2 cups granulated sugar
- 3/4 cup unsweetened cocoa powder (the good stuff, not the dusty old container in your pantry from 2015)
- 2 tsp baking soda
- 1 tsp baking powder
- 1 tsp salt
- 2 large eggs, room temperature
- 1 cup whole milk, room temperature
- 1 cup vegetable oil (or melted coconut oil)
- 2 tsp vanilla extract
- 1 cup freshly brewed hot coffee (or hot water if you’re weird about coffee)
For the Frosting:
- 1 1/2 cups (3 sticks) unsalted butter, softened to room temp (seriously, don’t rush this)
- 1 cup unsweetened cocoa powder
- 5 cups powdered sugar (yeah, it’s a lot, but trust me)
- 1/2 cup whole milk or heavy cream
- 2 tsp vanilla extract
- 1/4 tsp salt
Instructions
Step 1: Prep Your Situation
Preheat oven to 350°F (175°C). This is important—don’t put your cake in a cold oven like a monster.
Grease and flour two 9-inch round cake pans, or line the bottoms with parchment paper circles. This is your insurance policy against cake-stuck-in-pan tragedy.
Step 2: Make the Magical Cake Batter
In a large bowl, whisk together flour, sugar, cocoa powder, baking soda, baking powder, and salt. Get all those dry ingredients cozy with each other.
Add eggs, milk, oil, and vanilla. Mix with an electric mixer on medium speed for about 2 minutes until smooth. Scrape down the sides of the bowl because there’s always some rebel flour hiding there.
Reduce speed to low and carefully add the hot coffee. The batter will be THIN—like, suspiciously thin. Don’t panic. This is correct. This is what makes it so moist.
Step 3: Bake These Bad Boys
Divide batter evenly between your prepared pans. They’ll be pretty full, which is fine.
Bake for 30-35 minutes. You’ll know they’re done when a toothpick inserted in the center comes out clean or with just a few moist crumbs. The tops should spring back when lightly pressed.
Let them cool in the pans for 10 minutes, then turn out onto wire racks to cool completely. And I mean COMPLETELY. Warm cake + frosting = melty disaster.
Step 4: Make That Frosting
Beat softened butter on medium-high speed for about 3 minutes until it’s pale and fluffy. Your arm will get tired if using a hand mixer, but it’s worth it.
Add cocoa powder and mix on low until combined. It’ll look dry and crumbly—keep going.
Add powdered sugar one cup at a time, alternating with splashes of milk. Beat well after each addition.
Add vanilla and salt. Beat on high speed for about 3 minutes until the frosting is light, fluffy, and absolutely gorgeous.
If it’s too thick, add more milk a tablespoon at a time. Too thin? Add more powdered sugar. You’re the boss of this frosting.
Step 5: Assemble This Masterpiece
Place one cake layer on your serving plate. If the top is domed, trim it flat with a serrated knife. Eat the scraps. Baker’s tax.
Spread about 1 to 1 1/2 cups of frosting on top of the first layer. Go all the way to the edges.
Place second layer on top, flat side up. Press down gently.
Spread a thin “crumb coat” of frosting all over the cake to seal in the crumbs. Refrigerate for 15-30 minutes to let it set.
Apply the rest of the frosting, making it as smooth or swirly as you want. Get creative. Make it pretty. Or don’t. It’s gonna taste amazing either way.
Step 6: Serve and Accept Praise
Let the cake sit at room temperature for about 30 minutes before slicing so the frosting softens slightly.
Use a long, sharp knife and wipe it clean between cuts for perfect slices.
Serve with a glass of cold milk or a cup of coffee. Or just eat it straight with your hands. I’m not your mom.
Notes
Honestly, this cake needs nothing, but if you want to be extra:
- Fresh berries on the side for a pop of color
- A scoop of vanilla ice cream melting into it
- Whipped cream for people who need their chocolate less intense
- A drizzle of chocolate ganache because why not
- Sea salt flakes on top for that fancy bakery look
- Prep Time: 20 minutes
- Cook Time: 35 minutes
Nutrition
- Calories: ~520 kcal
- Fat: ~26g
- Carbohydrates: ~71g
- Protein: ~5g


