
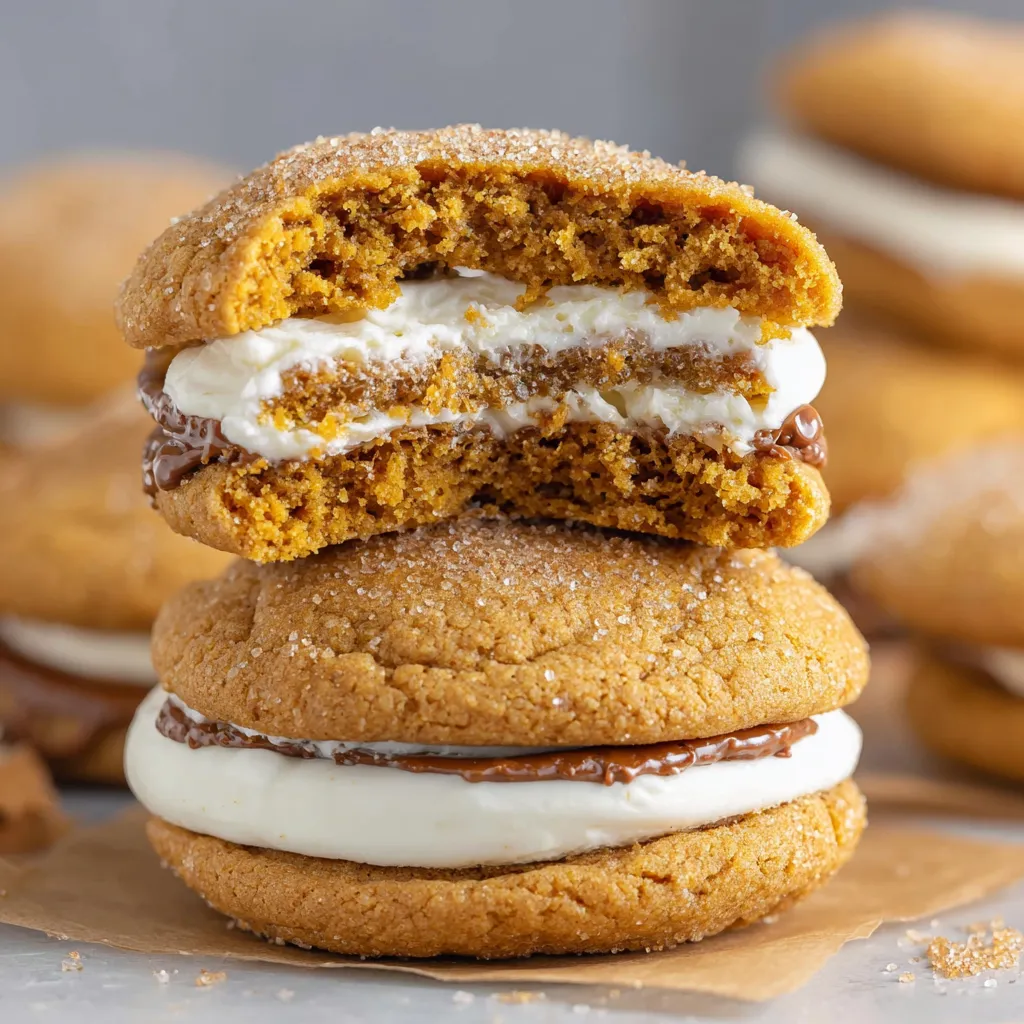
Someone had the brilliant idea that regular pumpkin cookies were nice, but what if you stuffed them with tangy cream cheese filling and rolled them in sparkly cinnamon sugar to create individual portions of autumn heaven? Pumpkin Cheesecake Cookies are what happens when soft pumpkin spice cookies meet cream cheese filling meets “I’m going to make these so irresistible you’ll eat three before realizing what happened” baking genius. They’re pillowy soft, warmly spiced, filled with creamy sweetness, and coated in that crackly cinnamon sugar exterior that makes every bite feel like a celebration.
This isn’t some complicated patisserie project that requires pastry bags and perfect technique. This is “make cookie dough, make cream cheese filling, wrap dough around filling, roll in sugar, bake until puffy” simplicity that results in something that looks like you went to culinary school. The cookie is tender and cakey with all those cozy fall spices. The cream cheese filling is tangy and sweet and stays perfectly creamy inside. The cinnamon sugar coating adds crunch and sparkle and makes them look bakery-level professional.
This is fall festival energy in cookie form. It’s what happens when you take two beloved desserts—pumpkin cookies and cheesecake—and marry them into something that’s somehow better than both. It’s the cookie that makes people stop mid-conversation to ask where you bought them, and then lose their minds when you say you made them.
Why These Pumpkin Cheesecake Cookies Are About to Dominate Your Fall Baking
- Two desserts in one bite — Pumpkin cookie meets cheesecake filling in perfect harmony
- Soft and pillowy texture — Like biting into a cloud made of autumn
- Make-ahead friendly — Dough can be made and frozen for months
- Impressive presentation — That cinnamon sugar coating screams “professional baker”
- Crowd-pleaser guaranteed — Even people who claim they don’t like pumpkin love these
- Perfect fall flavor — All the spices without being overwhelming
- Room temperature stable — The filling doesn’t need refrigeration once baked
The Stuff You Need
For the Cream Cheese Filling:
- 8 oz cream cheese, softened to room temperature (crucial for smooth filling)
- 1/4 cup granulated sugar
- 1 teaspoon vanilla extract
- Pinch of salt
For the Pumpkin Cookie Dough:
- 2 3/4 cups all-purpose flour
- 2 teaspoons baking powder
- 1/2 teaspoon baking soda
- 1/2 teaspoon salt
- 2 teaspoons ground cinnamon
- 1 teaspoon ground ginger
- 1/2 teaspoon ground nutmeg
- 1/4 teaspoon ground cloves
- 1/4 teaspoon ground allspice (optional but adds depth)
- 1/2 cup (1 stick) unsalted butter, softened
- 1 cup granulated sugar
- 1/2 cup packed light brown sugar
- 1 cup pumpkin puree (not pumpkin pie filling)
- 1 large egg, room temperature
- 2 teaspoons vanilla extract
For the Cinnamon Sugar Coating:
- 1/2 cup granulated sugar
- 2 teaspoons ground cinnamon
- Optional: 1 tablespoon coarse sugar for extra sparkle
Optional But Highly Recommended:
- Maple extract instead of vanilla (for extra fall vibes)
- Extra cinnamon sugar for rolling after baking (double coating)
- Caramel drizzle on top (because why not)
- Cream cheese frosting drizzle (even more cheesecake flavor)
- Pumpkin pie spice blend instead of individual spices
- A dusting of powdered sugar (for snow-dusted look)
Special Equipment:
- Electric mixer or hand mixer
- Cookie scoop or ice cream scoop (for uniform sizing)
- Baking sheets lined with parchment paper
- Small bowl for cinnamon sugar
- Wire cooling rack
- Patience (for letting the filling chill)
Let’s Make These Cookies That’ll Make You the Hero of Fall
Step 1: The Filling Foundation
Make the cream cheese filling first because it needs to chill. In a medium bowl, beat the softened cream cheese with an electric mixer on medium speed for 2-3 minutes until completely smooth and fluffy with no lumps. Add the sugar, vanilla, and salt. Beat for another 1-2 minutes until well combined and silky. Taste it—it should be sweet, tangy, and make you want to eat it all with a spoon. Cover the bowl with plastic wrap and refrigerate for at least 2 hours, but preferably overnight. It needs to be firm enough to scoop and hold its shape.
Step 2: The Dry Ingredients Mix
In a medium bowl, whisk together the flour, baking powder, baking soda, salt, cinnamon, ginger, nutmeg, cloves, and allspice. Whisk it really well to ensure the spices are evenly distributed throughout the flour. Set this aside and feel good about your organizational skills. The smell of all those spices together should make your kitchen smell like fall already.
Step 3: The Butter and Sugar Situation
In a large bowl using an electric mixer, beat the softened butter, granulated sugar, and brown sugar together on medium-high speed for 3-4 minutes until light and fluffy. The mixture should look pale and creamy and have increased in volume. Scrape down the sides of the bowl halfway through. This creaming process is what gives the cookies their soft, cakey texture, so don’t rush it.
Step 4: The Pumpkin Addition
Add the pumpkin puree, egg, and vanilla extract to the butter mixture. Beat on medium speed until well combined and smooth—about 1-2 minutes. The mixture might look slightly curdled or separated—this is normal with pumpkin. Don’t panic. It’ll come together when you add the dry ingredients. Make sure you’re using pure pumpkin puree, not pumpkin pie filling which is already sweetened and spiced.
Step 5: The Dough Assembly
Add the dry ingredients to the wet ingredients in three additions, mixing on low speed until just combined after each addition. Don’t overmix—stop as soon as you don’t see any more flour streaks. The dough will be soft, sticky, and very pumpkin-colored. This is correct. Cover the bowl with plastic wrap and refrigerate for at least 1 hour. Chilled dough is easier to handle and less likely to spread too much during baking.
Step 6: The Cinnamon Sugar Prep
While the dough chills, mix the granulated sugar and cinnamon together in a small bowl. Stir it well so the cinnamon is evenly distributed throughout the sugar. Set this aside. When you’re ready to bake, preheat your oven to 350°F and line two baking sheets with parchment paper.
Step 7: The Assembly Process (The Fun Part)
Remove the chilled cream cheese filling from the fridge. Use a small cookie scoop or spoon to portion out about 1 tablespoon of filling. Roll it into a ball between your palms. Place the cream cheese balls on a plate and keep them cold while you work. Now scoop about 2 tablespoons of cookie dough (a medium cookie scoop works perfectly). Flatten the dough in your palm into a disc about 3 inches wide.
Step 8: The Stuffing Technique
Place a cream cheese ball in the center of the flattened cookie dough disc. Carefully wrap the dough around the filling, pinching the edges together to seal it completely. Make sure there are no cracks or holes where the filling can leak out. Roll it gently between your palms to smooth it into a ball. The filling should be completely enclosed in dough with no visible cream cheese.
Step 9: The Sugar Rolling
Roll each stuffed cookie ball generously in the cinnamon sugar mixture, coating it completely on all sides. Don’t be shy—you want a good coating of that sparkly cinnamon sugar. Place the coated balls on the prepared baking sheets, spacing them about 3 inches apart. They will spread and puff up during baking. Gently press down on each ball to flatten it slightly into a thick disc shape.
Step 10: The Baking Magic
Bake for 12-15 minutes until the cookies are puffy, the edges are set, and the tops look dry but still soft. They should spread into thick, pillowy rounds. Don’t overbake—you want them to still look slightly underdone in the center. They’ll continue cooking on the hot pan after you remove them from the oven. The cinnamon sugar coating should be slightly crackled and sparkly.
Step 11: The Cooling Patience
Let the cookies cool on the baking sheet for 5 minutes before transferring them to a wire rack. This cooling time is crucial—moving them too soon and they might break or leak filling. Once they’re firm enough to move, transfer them carefully to the cooling rack. If you want extra cinnamon sugar coating, roll the warm cookies in more cinnamon sugar immediately after transferring them to the rack.
Step 12: The Moment of Truth
Once the cookies are cool enough to handle (but still slightly warm is best), take a bite. Break through that crackly cinnamon sugar exterior. Feel the soft, cakey pumpkin cookie give way easily. Discover the creamy, tangy cream cheese filling in the center that stayed perfectly soft and didn’t leak everywhere. Taste all those warm fall spices balanced by the sweet-tangy filling. Notice how the cookie stays soft for hours, even days. Realize you’ve just made something that belongs in a fancy bakery case but came from your own kitchen. Immediately reach for another one.
Pro Tips From Someone Who’s Mastered These Cookies
Chill Everything: Cold dough and cold filling are essential for easy handling and preventing spread.
Seal Completely: Make sure there are no cracks in the dough or the filling will leak out during baking.
Don’t Overfill: Too much filling will burst through. One tablespoon is the sweet spot.
Flatten Slightly: Pressing the balls down before baking gives them that perfect thick, chewy shape.
Don’t Overbake: Pull them when they look slightly underdone. They firm up as they cool.
Room Temperature Cream Cheese: Cold cream cheese won’t mix smoothly and will have lumps.
Measure Pumpkin Correctly: Pack it into the measuring cup and level it off for accuracy.
Switch It Up (Because Variety Keeps Things Interesting)
Maple Cream Cheese Filling: Add 2 tablespoons maple syrup to the cream cheese filling for deeper fall flavor.
White Chocolate Drizzle: Drizzle melted white chocolate over cooled cookies for extra sweetness and visual appeal.
Ginger Snap Version: Add 1/4 cup molasses to dough and increase ginger for spicier cookies.
Caramel Stuffed: Add a small caramel candy in the center with the cream cheese filling.
Chocolate Chip Addition: Mix mini chocolate chips into the cookie dough for chocolate lovers.
Pecan Praline: Roll in chopped pecans mixed with the cinnamon sugar before baking.
Pumpkin Spice Latte: Add 1 tablespoon instant espresso powder to the dough for coffee flavor.
Mini Versions: Make smaller cookies with less filling for bite-sized treats perfect for cookie trays.
Make-Ahead Magic
The Filling: Make up to 5 days ahead. Store covered in the fridge. Scoop into balls and freeze for easier assembly.
The Cookie Dough: Make and refrigerate up to 3 days ahead, or freeze for up to 3 months.
Stuffed But Unbaked: Assemble completely, freeze on a baking sheet, then transfer to a freezer bag. Bake from frozen, adding 2-3 minutes.
Fully Baked: Bake completely and store in an airtight container for up to 5 days. They stay incredibly soft.
Cream Cheese Balls: Roll filling into balls and freeze for up to 1 month. Use straight from freezer when assembling.
Storage Real Talk
Room Temperature: Store in an airtight container for 5-7 days. They stay soft and delicious.
Refrigerated: Can be refrigerated for up to 10 days. Bring to room temperature before serving for best texture.
Frozen: Freeze baked cookies for up to 3 months. Thaw at room temperature for 2 hours.
Stacking: Place parchment paper between layers to prevent sticking.
The Softness Secret: Add a slice of bread to the container. It keeps cookies soft for days.
Perfect Pairings
Hot Coffee: The bitterness balances the sweet cookies perfectly. Dunk if you dare.
Spiced Chai Latte: The warm spices complement the pumpkin spice beautifully.
Cold Milk: Classic pairing. The richness needs milk to cut through it.
Apple Cider: Hot or cold, it’s the ultimate fall beverage pairing.
Vanilla Ice Cream: Make an ice cream sandwich. Fall dessert excellence.
Nothing: These are perfect on their own. Self-contained autumn bliss.
The Science of Stuffed Cookie Success
The cream cheese filling needs to be firm before assembly or it will be impossible to handle and will leak during baking. Chilling solidifies the fat in the cream cheese, making it scoopable and stable.
Pumpkin puree adds moisture to the cookies, which is why they stay incredibly soft for days. The puree also makes the dough stickier, which is why chilling is essential for workability.
The combination of baking powder and baking soda creates lift and spread while keeping the cookies tender. Too much leavening and they’d puff too much and crack. Too little and they’d be dense.
Rolling in cinnamon sugar before baking creates that signature crackled, sparkly exterior. The sugar caramelizes slightly during baking, adding texture and visual appeal.
When to Make These Pumpkin Cheesecake Cookies
Fall Gatherings: These scream autumn and make people happy. Period.
Thanksgiving Dessert: An alternative to pie that’s easier to serve and eat.
Halloween Parties: Orange color is festive. Flavor is crowd-pleasing.
Cookie Swaps: These will be the most requested recipe at the exchange.
Bake Sales: Charge premium prices. These look and taste expensive.
Care Packages: Ship them to college students or friends. They travel well and arrive as joy.
Cozy Weekends: When you need your house to smell like fall and taste even better.
Why These Work So Damn Well
Pumpkin Cheesecake Cookies work because they combine two beloved flavors—pumpkin spice and cheesecake—into one perfectly portable package. The soft, cakey pumpkin cookie provides the warm, spiced comfort of fall. The tangy cream cheese filling adds richness and surprise. The cinnamon sugar coating adds texture and sweetness. Together, they create something greater than the sum of their parts.
They’re also just fun to make. There’s something satisfying about wrapping cookie dough around filling and watching it bake into perfect pillowy rounds. The cinnamon sugar coating makes them look professional. The cream cheese center makes them special. The fact that they stay soft for days makes them practical.
This is the kind of cookie that makes people ask for the recipe before they’ve even finished eating it. It’s fall baking at its finest—impressive enough to share, easy enough to make regularly, delicious enough to eat way too many. Sometimes the best cookies are the ones that surprise you with a hidden center of deliciousness.
Questions People Always Ask
Q: Can I use pumpkin pie filling instead of pumpkin puree? A: No. Pumpkin pie filling is sweetened and pre-spiced. Use pure pumpkin puree only.
Q: My filling leaked out during baking. What happened? A: The dough wasn’t sealed completely or you overfilled them. Use less filling and seal tightly.
Q: Can I make these without the cream cheese filling? A: Yes, but they won’t be cheesecake cookies anymore—just delicious pumpkin cookies.
Q: The dough is too sticky to work with. Help? A: Chill it longer. You can also lightly flour your hands when shaping.
Q: Can I freeze the assembled, unbaked cookies? A: Yes! Freeze on a baking sheet, then store in a freezer bag. Bake from frozen, adding a couple minutes.
Q: Do these need to be refrigerated? A: No. Once baked, the filling is stable at room temperature for up to a week.
Q: Can I use Greek yogurt instead of sour cream in the cookies? A: No sour cream is in the cookies—only in the filling if you want to substitute some cream cheese. The cookies use pumpkin for moisture.
Q: Why are my cookies flat instead of puffy? A: Your dough was too warm or you overmixed. Chill the dough thoroughly before baking.
Print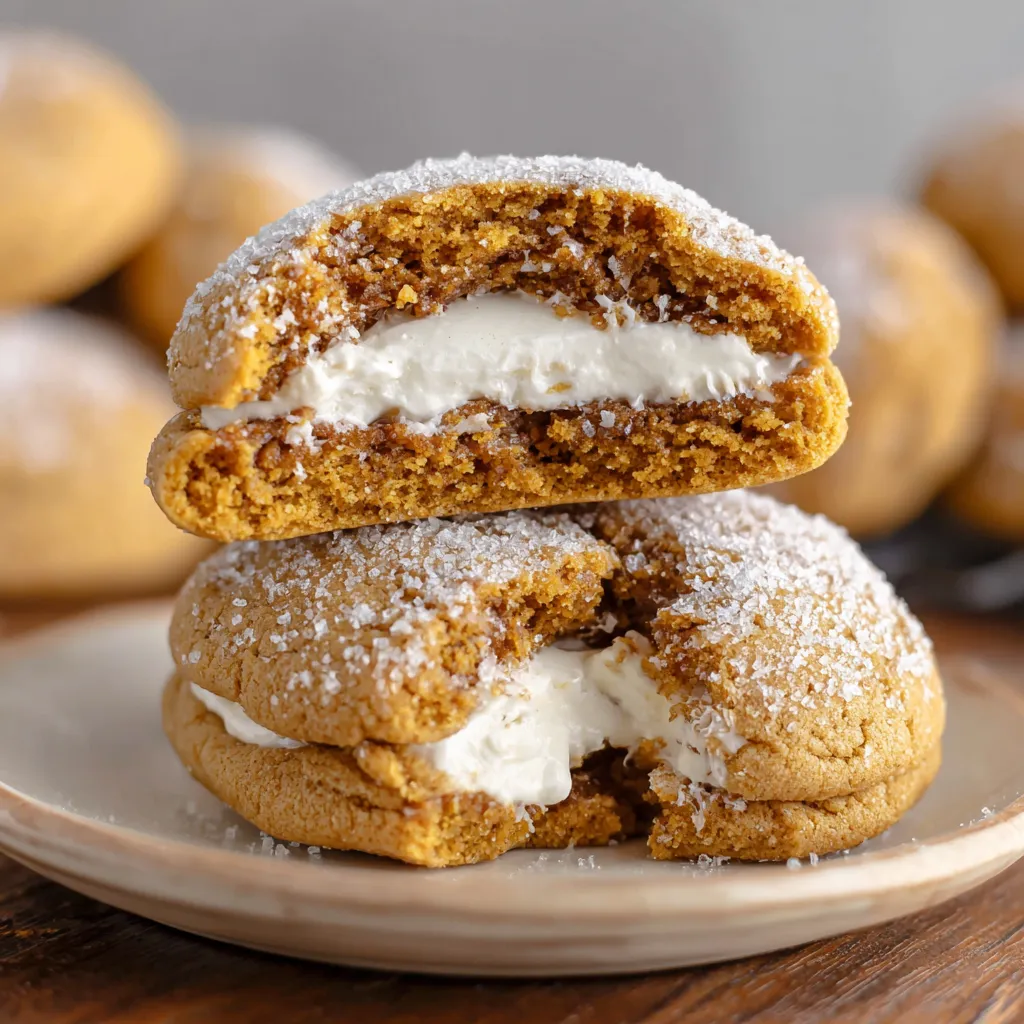
Pumpkin Cheesecake Cookies
- Total Time: 16 minute
- Yield: 24 cookies 1x
Description
Someone had the brilliant idea that regular pumpkin cookies were nice, but what if you stuffed them with tangy cream cheese filling and rolled them in sparkly cinnamon sugar to create individual portions of autumn heaven? Pumpkin Cheesecake Cookies are what happens when soft pumpkin spice cookies meet cream cheese filling meets “I’m going to make these so irresistible you’ll eat three before realizing what happened” baking genius. They’re pillowy soft, warmly spiced, filled with creamy sweetness, and coated in that crackly cinnamon sugar exterior that makes every bite feel like a celebration.
This isn’t some complicated patisserie project that requires pastry bags and perfect technique. This is “make cookie dough, make cream cheese filling, wrap dough around filling, roll in sugar, bake until puffy” simplicity that results in something that looks like you went to culinary school. The cookie is tender and cakey with all those cozy fall spices. The cream cheese filling is tangy and sweet and stays perfectly creamy inside. The cinnamon sugar coating adds crunch and sparkle and makes them look bakery-level professional.
Ingredients
For the Cream Cheese Filling:
- 8 oz cream cheese, softened to room temperature (crucial for smooth filling)
- 1/4 cup granulated sugar
- 1 teaspoon vanilla extract
- Pinch of salt
For the Pumpkin Cookie Dough:
- 2 3/4 cups all-purpose flour
- 2 teaspoons baking powder
- 1/2 teaspoon baking soda
- 1/2 teaspoon salt
- 2 teaspoons ground cinnamon
- 1 teaspoon ground ginger
- 1/2 teaspoon ground nutmeg
- 1/4 teaspoon ground cloves
- 1/4 teaspoon ground allspice (optional but adds depth)
- 1/2 cup (1 stick) unsalted butter, softened
- 1 cup granulated sugar
- 1/2 cup packed light brown sugar
- 1 cup pumpkin puree (not pumpkin pie filling)
- 1 large egg, room temperature
- 2 teaspoons vanilla extract
For the Cinnamon Sugar Coating:
- 1/2 cup granulated sugar
- 2 teaspoons ground cinnamon
- Optional: 1 tablespoon coarse sugar for extra sparkle
Optional But Highly Recommended:
- Maple extract instead of vanilla (for extra fall vibes)
- Extra cinnamon sugar for rolling after baking (double coating)
- Caramel drizzle on top (because why not)
- Cream cheese frosting drizzle (even more cheesecake flavor)
- Pumpkin pie spice blend instead of individual spices
- A dusting of powdered sugar (for snow-dusted look)
Special Equipment:
- Electric mixer or hand mixer
- Cookie scoop or ice cream scoop (for uniform sizing)
- Baking sheets lined with parchment paper
- Small bowl for cinnamon sugar
- Wire cooling rack
- Patience (for letting the filling chill)
Instructions
Step 1: The Filling Foundation
Make the cream cheese filling first because it needs to chill. In a medium bowl, beat the softened cream cheese with an electric mixer on medium speed for 2-3 minutes until completely smooth and fluffy with no lumps. Add the sugar, vanilla, and salt. Beat for another 1-2 minutes until well combined and silky. Taste it—it should be sweet, tangy, and make you want to eat it all with a spoon. Cover the bowl with plastic wrap and refrigerate for at least 2 hours, but preferably overnight. It needs to be firm enough to scoop and hold its shape.
Step 2: The Dry Ingredients Mix
In a medium bowl, whisk together the flour, baking powder, baking soda, salt, cinnamon, ginger, nutmeg, cloves, and allspice. Whisk it really well to ensure the spices are evenly distributed throughout the flour. Set this aside and feel good about your organizational skills. The smell of all those spices together should make your kitchen smell like fall already.
Step 3: The Butter and Sugar Situation
In a large bowl using an electric mixer, beat the softened butter, granulated sugar, and brown sugar together on medium-high speed for 3-4 minutes until light and fluffy. The mixture should look pale and creamy and have increased in volume. Scrape down the sides of the bowl halfway through. This creaming process is what gives the cookies their soft, cakey texture, so don’t rush it.
Step 4: The Pumpkin Addition
Add the pumpkin puree, egg, and vanilla extract to the butter mixture. Beat on medium speed until well combined and smooth—about 1-2 minutes. The mixture might look slightly curdled or separated—this is normal with pumpkin. Don’t panic. It’ll come together when you add the dry ingredients. Make sure you’re using pure pumpkin puree, not pumpkin pie filling which is already sweetened and spiced.
Step 5: The Dough Assembly
Add the dry ingredients to the wet ingredients in three additions, mixing on low speed until just combined after each addition. Don’t overmix—stop as soon as you don’t see any more flour streaks. The dough will be soft, sticky, and very pumpkin-colored. This is correct. Cover the bowl with plastic wrap and refrigerate for at least 1 hour. Chilled dough is easier to handle and less likely to spread too much during baking.
Step 6: The Cinnamon Sugar Prep
While the dough chills, mix the granulated sugar and cinnamon together in a small bowl. Stir it well so the cinnamon is evenly distributed throughout the sugar. Set this aside. When you’re ready to bake, preheat your oven to 350°F and line two baking sheets with parchment paper.
Step 7: The Assembly Process (The Fun Part)
Remove the chilled cream cheese filling from the fridge. Use a small cookie scoop or spoon to portion out about 1 tablespoon of filling. Roll it into a ball between your palms. Place the cream cheese balls on a plate and keep them cold while you work. Now scoop about 2 tablespoons of cookie dough (a medium cookie scoop works perfectly). Flatten the dough in your palm into a disc about 3 inches wide.
Step 8: The Stuffing Technique
Place a cream cheese ball in the center of the flattened cookie dough disc. Carefully wrap the dough around the filling, pinching the edges together to seal it completely. Make sure there are no cracks or holes where the filling can leak out. Roll it gently between your palms to smooth it into a ball. The filling should be completely enclosed in dough with no visible cream cheese.
Step 9: The Sugar Rolling
Roll each stuffed cookie ball generously in the cinnamon sugar mixture, coating it completely on all sides. Don’t be shy—you want a good coating of that sparkly cinnamon sugar. Place the coated balls on the prepared baking sheets, spacing them about 3 inches apart. They will spread and puff up during baking. Gently press down on each ball to flatten it slightly into a thick disc shape.
Step 10: The Baking Magic
Bake for 12-15 minutes until the cookies are puffy, the edges are set, and the tops look dry but still soft. They should spread into thick, pillowy rounds. Don’t overbake—you want them to still look slightly underdone in the center. They’ll continue cooking on the hot pan after you remove them from the oven. The cinnamon sugar coating should be slightly crackled and sparkly.
Step 11: The Cooling Patience
Let the cookies cool on the baking sheet for 5 minutes before transferring them to a wire rack. This cooling time is crucial—moving them too soon and they might break or leak filling. Once they’re firm enough to move, transfer them carefully to the cooling rack. If you want extra cinnamon sugar coating, roll the warm cookies in more cinnamon sugar immediately after transferring them to the rack.
Step 12: The Moment of Truth
Once the cookies are cool enough to handle (but still slightly warm is best), take a bite. Break through that crackly cinnamon sugar exterior. Feel the soft, cakey pumpkin cookie give way easily. Discover the creamy, tangy cream cheese filling in the center that stayed perfectly soft and didn’t leak everywhere. Taste all those warm fall spices balanced by the sweet-tangy filling. Notice how the cookie stays soft for hours, even days. Realize you’ve just made something that belongs in a fancy bakery case but came from your own kitchen. Immediately reach for another one.
Notes
Chill Everything: Cold dough and cold filling are essential for easy handling and preventing spread.
Seal Completely: Make sure there are no cracks in the dough or the filling will leak out during baking.
Don’t Overfill: Too much filling will burst through. One tablespoon is the sweet spot.
Flatten Slightly: Pressing the balls down before baking gives them that perfect thick, chewy shape.
- Prep Time: 30 minutes
- Cook Time: 12-15 minutes
Nutrition
- Calories: ~165 kcal
- Fat: ~7g
- Carbohydrates: ~24g
- Protein: ~3g


