
Someone looked at traditional red chili and thought “what if we made it white, added chicken, and loaded it with green chiles and white beans?” and honestly, that person deserves a award for creative thinking. This is creamy, hearty, slightly spicy chili that’s loaded with tender chicken, white beans, green chiles, and just enough heat to make things interesting. It’s what happens when you combine the comfort of chicken soup with the heartiness of chili and stop being a purist about what color chili should be. It’s the kind of meal that makes you forget red chili exists for at least one dinner.
This isn’t some watery chicken soup pretending to be chili. This is thick, creamy, substantial chili that happens to be white instead of red. The chicken gets shredded into tender pieces. The beans make it hearty. The green chiles and jalapeños add layers of heat. The cream or sour cream makes it luxurious. The toppings—cheese, avocado, cilantro, lime—make every bowl different and exciting.
This is one-pot comfort food that works year-round. It’s what happens when you want something warming and filling but also want to eat it with tortilla chips. It’s dinner that tastes like you tried hard but actually came together in 45 minutes.
Why This White Chicken Chili Is About to Become Your Go-To Comfort Meal
- One-pot wonder — Everything cooks in one pot, minimal cleanup
- 45-minute dinner — From start to eating in less than an hour
- Crowd-pleaser guarantee — Even non-chili people love this
- Meal prep champion — Makes a huge batch, freezes beautifully
- Customizable heat — Make it mild for kids or spicy for heat lovers
- Toppings make it special — Load it up and make it your own
The Stuff You Need
For the Chili Base:
- 2 tablespoons olive oil or butter
- 1 large onion, diced
- 4 cloves garlic, minced
- 2 jalapeños, seeded and diced (leave seeds for more heat)
- 1.5 lbs boneless, skinless chicken breasts (or thighs for more flavor)
- 2 cans (4 oz each) diced green chiles
- 4 cups chicken broth (good quality makes a difference)
- 3 cans (15 oz each) white beans (Great Northern, cannellini, or navy beans)
- 1 teaspoon ground cumin
- 1 teaspoon dried oregano
- 1/2 teaspoon ground coriander
- 1/2 teaspoon cayenne pepper (adjust to taste)
- 1/2 teaspoon smoked paprika (adds depth)
- Salt and pepper to taste
For Creaminess:
- 1 cup heavy cream or half-and-half
- 1 cup sour cream (or Greek yogurt for lighter version)
- 4 oz cream cheese, cubed (optional but makes it extra creamy)
For Topping (The Fun Part):
- 2 cups shredded Monterey Jack or Mexican blend cheese
- 1 avocado, diced
- Fresh cilantro, chopped
- Lime wedges
- Sour cream or Greek yogurt
- Sliced jalapeños (pickled or fresh)
- Tortilla chips or strips
- Diced tomatoes
- Sliced green onions
- Hot sauce (always)
Optional But Highly Recommended:
- 1 can (15 oz) white corn, drained
- 1 poblano pepper, roasted and diced
- 1 tablespoon lime juice (brightens everything)
- Fresh or pickled jalapeño slices for serving
- Cornstarch slurry (1 tablespoon cornstarch + 2 tablespoons water) if you want it thicker
Special Equipment:
- Large Dutch oven or heavy-bottomed pot
- Wooden spoon for stirring
- Two forks for shredding chicken
- Ladle for serving
- Your favorite soup bowls
Let’s Make This Chili That’ll Have Everyone Coming Back for Seconds
Step 1: The Aromatics Foundation
Heat the olive oil or butter in a large Dutch oven or heavy pot over medium heat. Add the diced onion and cook for 5-7 minutes until softened and translucent. Don’t rush this—the onions are building flavor. Add the minced garlic and diced jalapeños, cook for another 1-2 minutes until fragrant. Your kitchen should smell amazing already.
Step 2: The Chicken Addition
Season the chicken breasts with salt and pepper on both sides. Nestle them into the pot with the onions and garlic. They don’t need to be browned—they’ll cook in the liquid. If you want extra flavor, you can brown them for 2-3 minutes per side first, but it’s optional.
Step 3: The Liquid and Bean Addition
Add the chicken broth, diced green chiles (with their liquid), and drained white beans to the pot. Stir everything together. The chicken should be mostly submerged in liquid. If it’s not, add a bit more broth or water.
Step 4: The Spice Situation
Add the cumin, oregano, coriander, cayenne pepper, smoked paprika, salt, and black pepper. Stir to distribute the spices throughout the liquid. Bring everything to a boil over medium-high heat, then reduce to a simmer.
Step 5: The Simmering Process
Cover the pot and let it simmer for 20-25 minutes until the chicken is cooked through and tender. The internal temperature should reach 165°F. If you’re using chicken thighs, they might need an extra 5 minutes. Check occasionally and give it a stir.
Step 6: The Chicken Shredding
Remove the cooked chicken from the pot and place it on a cutting board. Using two forks, shred the chicken into bite-sized pieces. Don’t make it too fine—you want chunks, not threads. Return the shredded chicken to the pot and stir it in.
Step 7: The Cream Addition
Reduce heat to low. Stir in the heavy cream, sour cream, and cream cheese cubes (if using). Let the cream cheese melt into the chili, stirring occasionally. This is when the chili transforms from brothy to creamy. If you’re adding corn, toss it in now. Let everything simmer together for 5-10 minutes so the flavors meld.
Step 8: The Consistency Check
The chili should be thick and creamy but still spoonable. If it’s too thin, let it simmer uncovered for 10 more minutes to reduce. If it’s too thick, add a splash more broth or cream. If you want it even thicker, make a cornstarch slurry (1 tablespoon cornstarch mixed with 2 tablespoons water), stir it in, and simmer for 2-3 minutes until thickened.
Step 9: The Taste and Adjust
This is your moment. Taste the chili. Does it need more salt? More heat? More cumin? A squeeze of lime juice? Adjust now. The chili should be creamy, slightly spicy, savory, with layers of flavor from the spices and chiles. Get it exactly how you want it.
Step 10: The Topping Bar Setup
Set out all your toppings in small bowls. This is the best part—everyone customizes their own bowl. Shredded cheese is mandatory. Everything else is negotiable but highly encouraged. The more toppings, the better.
Step 11: The Serving
Ladle the hot chili into bowls. Don’t be shy with the portions—this is hearty stuff. Let people load up their bowls with toppings. The cheese should melt into the hot chili. The avocado adds creaminess. The lime brightens everything. The tortilla chips add crunch. The cilantro adds freshness.
Step 12: The Eating Experience
Take a spoonful and make sure you get chicken, beans, and broth in one bite. Notice how creamy it is without being too heavy. Taste the layers of heat from the jalapeños and green chiles—warming but not overwhelming. Feel the heartiness from the beans. Crunch on a tortilla chip. Squeeze lime over everything. Go back for seconds immediately because this is the kind of chili that demands it.
Pro Tips From Someone Who Makes This Weekly
Don’t Skip the Sauté: Building flavor with onions, garlic, and jalapeños at the start makes all the difference.
Use Good Broth: Cheap broth makes cheap-tasting chili. Use quality chicken broth or stock.
Chicken Thighs Over Breasts: Thighs are juicier and more flavorful. They’re harder to overcook.
Don’t Boil After Adding Cream: Keep it at a low simmer once cream is added or it might separate.
Adjust Spice Level: Start with less heat, taste, add more. You can always add spice but can’t take it away.
Make It Ahead: This tastes even better the next day after flavors meld. Make it in advance.
Fresh Lime Is Key: Squeeze fresh lime juice right before serving. It brightens the whole bowl.
Switch It Up (Because Variety Keeps Things Interesting)
Slow Cooker Version: Sauté aromatics first, then transfer everything (including raw chicken) to slow cooker. Cook on low 6-8 hours. Shred chicken, stir in cream, serve.
Instant Pot White Chili: Sauté in the pot, add everything except cream, pressure cook on high for 12 minutes. Quick release, shred chicken, stir in cream.
Spicy Version: Add more jalapeños, use hot salsa verde, add cayenne, top with hot sauce.
Loaded White Chili: Add bacon, corn, poblanos, and cream cheese. Go all in.
Lighter Version: Use Greek yogurt instead of sour cream and heavy cream. Skip the cream cheese. Still delicious.
Tex-Mex Style: Add a can of Rotel tomatoes, taco seasoning, and top with queso fresco.
Verde White Chili: Add salsa verde and tomatillos. Use cilantro lime chicken.
Make-Ahead Magic
Full Batch: Make the entire chili 2-3 days ahead. Store in the fridge, reheat gently on the stovetop.
Freeze It: Freezes beautifully for up to 3 months. Cool completely, portion into containers, freeze. Thaw overnight in fridge.
Slow Cooker Prep: Prep all ingredients the night before. In the morning, throw everything in the slow cooker, turn it on, come home to dinner.
The Toppings: Prep toppings ahead—shred cheese, chop cilantro, dice avocado (toss in lime juice to prevent browning).
Storage Real Talk
Refrigerated: Keeps for 4-5 days in an airtight container. Reheats beautifully.
Reheating: Reheat gently on the stovetop over medium-low heat, stirring occasionally. Add a splash of broth if it’s too thick. Microwave works too—stir halfway through.
Freezing: The cream may separate slightly when frozen and thawed, but a good stir fixes it. Alternatively, freeze without the cream and add it when reheating.
The Chili Thickens: It gets thicker as it sits. Thin with broth or cream when reheating.
Perfect Pairings
Cornbread: Sweet cornbread with butter. This is the classic pairing.
Tortilla Chips: For scooping and dipping. Essential.
Quesadillas: Make cheese quesadillas on the side. Dip them in the chili.
Mexican Rice: Serve chili over cilantro lime rice for extra heartiness.
Simple Green Salad: Something light and fresh to balance the richness.
Cold Beer or Margaritas: If you’re serving this to adults, pair accordingly.
The Science of Creamy Chili
The white beans break down slightly during cooking, releasing starch that naturally thickens the chili. The cream and sour cream add fat that creates body and richness while mellowing the heat from the chiles and jalapeños. Cream cheese adds extra thickness and tangy creaminess.
The cumin, oregano, and coriander are traditional chili spices that work in both red and white versions. They add earthy, warm notes. The green chiles provide flavor and mild heat without overwhelming the dish. The jalapeños add fresh heat that you can control by seeding them or leaving seeds in.
Simmering allows flavors to meld and develop. The chicken absorbs the spices and chile flavors while releasing its own savory notes into the broth. The overnight rest intensifies everything as flavors continue to develop.
When to Make This White Chicken Chili
Chilly Weather Comfort: When you need something warm, filling, and comforting.
Game Day Feast: Make a huge pot, set out toppings, let people serve themselves.
Meal Prep Sunday: Make a big batch, eat all week for lunch or dinner.
Potluck Champion: Bring this in a slow cooker on warm. People will love you.
Weeknight Dinner: Fast enough for a Tuesday, special enough to feel like you tried.
When You’re Sick: Warm, comforting, slightly spicy. Chicken soup’s cooler cousin.
Why This Works So Damn Well
White Chicken Chili works because it takes the heartiness of traditional chili and lightens it up without sacrificing substance. The creamy base makes it feel indulgent while the lean chicken keeps it from being too heavy. The white beans provide protein and fiber. The green chiles and jalapeños add complexity and heat without overwhelming.
It’s also endlessly customizable. Make it mild for kids, spicy for adults. Load it with toppings or eat it plain. Serve it over rice or with chips. Make it in a pot, slow cooker, or Instant Pot. It adapts to your needs and equipment.
This is what happens when you stop being rigid about what chili should be and just focus on what tastes good. Red chili is great. White chicken chili is also great. Both can exist. Sometimes change is delicious.
Questions People Always Ask
Q: Can I use rotisserie chicken? A: Absolutely! Use 3-4 cups shredded rotisserie chicken. Add it near the end with the cream. Saves time and tastes great.
Q: Can I make this without cream? A: You can use all sour cream or Greek yogurt, but it won’t be as rich. Add at the very end off heat to prevent curdling.
Q: My chili is too spicy. How do I fix it? A: Add more cream, sour cream, or a diced potato (simmer until soft). Dairy and starch neutralize heat.
Q: Can I use canned chicken? A: You can, but fresh or rotisserie tastes way better. Canned chicken is mushy and weird.
Q: What if I don’t have green chiles? A: Use a jar of salsa verde or roasted poblano peppers. The flavor will be different but still good.
Q: Is this soup or chili? A: It’s chili. Fight me. It’s thick, hearty, and has beans. The color doesn’t matter.
Q: Can I make this vegetarian? A: Skip the chicken, use vegetable broth, add more beans and vegetables. It’s more like white bean chili but still delicious.
Print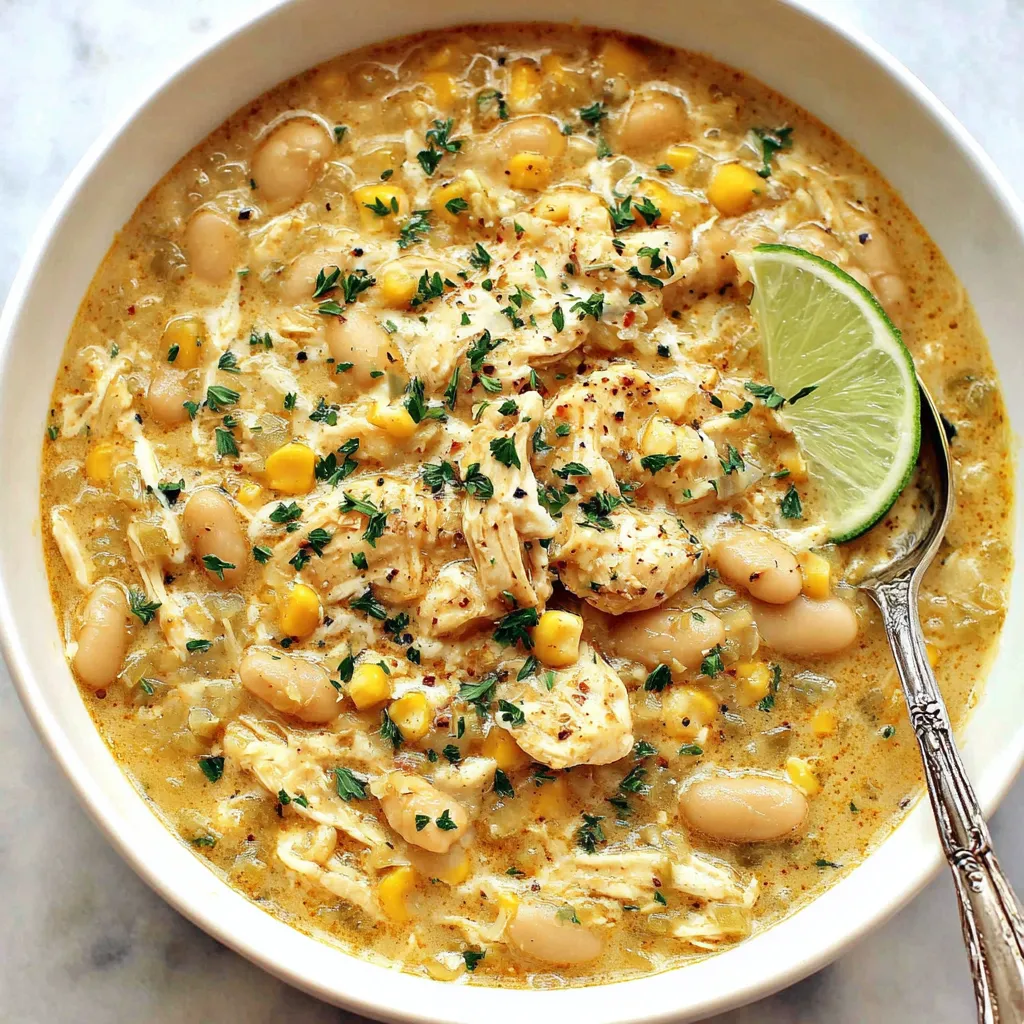
White Chicken Chili
- Total Time: 4 minute
- Yield: 8 servings 1x
Description
Someone looked at traditional red chili and thought “what if we made it white, added chicken, and loaded it with green chiles and white beans?” and honestly, that person deserves a award for creative thinking. This is creamy, hearty, slightly spicy chili that’s loaded with tender chicken, white beans, green chiles, and just enough heat to make things interesting. It’s what happens when you combine the comfort of chicken soup with the heartiness of chili and stop being a purist about what color chili should be. It’s the kind of meal that makes you forget red chili exists for at least one dinner.
This isn’t some watery chicken soup pretending to be chili. This is thick, creamy, substantial chili that happens to be white instead of red. The chicken gets shredded into tender pieces. The beans make it hearty. The green chiles and jalapeños add layers of heat. The cream or sour cream makes it luxurious. The toppings—cheese, avocado, cilantro, lime—make every bowl different and exciting.
This is one-pot comfort food that works year-round. It’s what happens when you want something warming and filling but also want to eat it with tortilla chips. It’s dinner that tastes like you tried hard but actually came together in 45 minutes.
Ingredients
For the Chili Base:
- 2 tablespoons olive oil or butter
- 1 large onion, diced
- 4 cloves garlic, minced
- 2 jalapeños, seeded and diced (leave seeds for more heat)
- 1.5 lbs boneless, skinless chicken breasts (or thighs for more flavor)
- 2 cans (4 oz each) diced green chiles
- 4 cups chicken broth (good quality makes a difference)
- 3 cans (15 oz each) white beans (Great Northern, cannellini, or navy beans)
- 1 teaspoon ground cumin
- 1 teaspoon dried oregano
- 1/2 teaspoon ground coriander
- 1/2 teaspoon cayenne pepper (adjust to taste)
- 1/2 teaspoon smoked paprika (adds depth)
- Salt and pepper to taste
For Creaminess:
- 1 cup heavy cream or half-and-half
- 1 cup sour cream (or Greek yogurt for lighter version)
- 4 oz cream cheese, cubed (optional but makes it extra creamy)
For Topping (The Fun Part):
- 2 cups shredded Monterey Jack or Mexican blend cheese
- 1 avocado, diced
- Fresh cilantro, chopped
- Lime wedges
- Sour cream or Greek yogurt
- Sliced jalapeños (pickled or fresh)
- Tortilla chips or strips
- Diced tomatoes
- Sliced green onions
- Hot sauce (always)
Optional But Highly Recommended:
- 1 can (15 oz) white corn, drained
- 1 poblano pepper, roasted and diced
- 1 tablespoon lime juice (brightens everything)
- Fresh or pickled jalapeño slices for serving
- Cornstarch slurry (1 tablespoon cornstarch + 2 tablespoons water) if you want it thicker
Special Equipment:
- Large Dutch oven or heavy-bottomed pot
- Wooden spoon for stirring
- Two forks for shredding chicken
- Ladle for serving
- Your favorite soup bowls
Instructions
Heat the olive oil or butter in a large Dutch oven or heavy pot over medium heat. Add the diced onion and cook for 5-7 minutes until softened and translucent. Don’t rush this—the onions are building flavor. Add the minced garlic and diced jalapeños, cook for another 1-2 minutes until fragrant. Your kitchen should smell amazing already.
Season the chicken breasts with salt and pepper on both sides. Nestle them into the pot with the onions and garlic. They don’t need to be browned—they’ll cook in the liquid. If you want extra flavor, you can brown them for 2-3 minutes per side first, but it’s optional.
Add the chicken broth, diced green chiles (with their liquid), and drained white beans to the pot. Stir everything together. The chicken should be mostly submerged in liquid. If it’s not, add a bit more broth or water.
Add the cumin, oregano, coriander, cayenne pepper, smoked paprika, salt, and black pepper. Stir to distribute the spices throughout the liquid. Bring everything to a boil over medium-high heat, then reduce to a simmer.
Cover the pot and let it simmer for 20-25 minutes until the chicken is cooked through and tender. The internal temperature should reach 165°F. If you’re using chicken thighs, they might need an extra 5 minutes. Check occasionally and give it a stir.
Remove the cooked chicken from the pot and place it on a cutting board. Using two forks, shred the chicken into bite-sized pieces. Don’t make it too fine—you want chunks, not threads. Return the shredded chicken to the pot and stir it in.
Reduce heat to low. Stir in the heavy cream, sour cream, and cream cheese cubes (if using). Let the cream cheese melt into the chili, stirring occasionally. This is when the chili transforms from brothy to creamy. If you’re adding corn, toss it in now. Let everything simmer together for 5-10 minutes so the flavors meld.
The chili should be thick and creamy but still spoonable. If it’s too thin, let it simmer uncovered for 10 more minutes to reduce. If it’s too thick, add a splash more broth or cream. If you want it even thicker, make a cornstarch slurry (1 tablespoon cornstarch mixed with 2 tablespoons water), stir it in, and simmer for 2-3 minutes until thickened.
This is your moment. Taste the chili. Does it need more salt? More heat? More cumin? A squeeze of lime juice? Adjust now. The chili should be creamy, slightly spicy, savory, with layers of flavor from the spices and chiles. Get it exactly how you want it.
Set out all your toppings in small bowls. This is the best part—everyone customizes their own bowl. Shredded cheese is mandatory. Everything else is negotiable but highly encouraged. The more toppings, the better.
Ladle the hot chili into bowls. Don’t be shy with the portions—this is hearty stuff. Let people load up their bowls with toppings. The cheese should melt into the hot chili. The avocado adds creaminess. The lime brightens everything. The tortilla chips add crunch. The cilantro adds freshness.
Take a spoonful and make sure you get chicken, beans, and broth in one bite. Notice how creamy it is without being too heavy. Taste the layers of heat from the jalapeños and green chiles—warming but not overwhelming. Feel the heartiness from the beans. Crunch on a tortilla chip. Squeeze lime over everything. Go back for seconds immediately because this is the kind of chili that demands it.
Notes
Don’t Skip the Sauté: Building flavor with onions, garlic, and jalapeños at the start makes all the difference.
Use Good Broth: Cheap broth makes cheap-tasting chili. Use quality chicken broth or stock.
Chicken Thighs Over Breasts: Thighs are juicier and more flavorful. They’re harder to overcook.
Don’t Boil After Adding Cream: Keep it at a low simmer once cream is added or it might separate.
Adjust Spice Level: Start with less heat, taste, add more. You can always add spice but can’t take it away.
Make It Ahead: This tastes even better the next day after flavors meld. Make it in advance.
Fresh Lime Is Key: Squeeze fresh lime juice right before serving. It brightens the whole bowl.
- Prep Time: 15 minutes
- Cook Time: 35-40 minutes
Nutrition
- Calories: ~385 kcal
- Fat: ~18g
- Carbohydrates: ~26g
- Protein: ~32g


