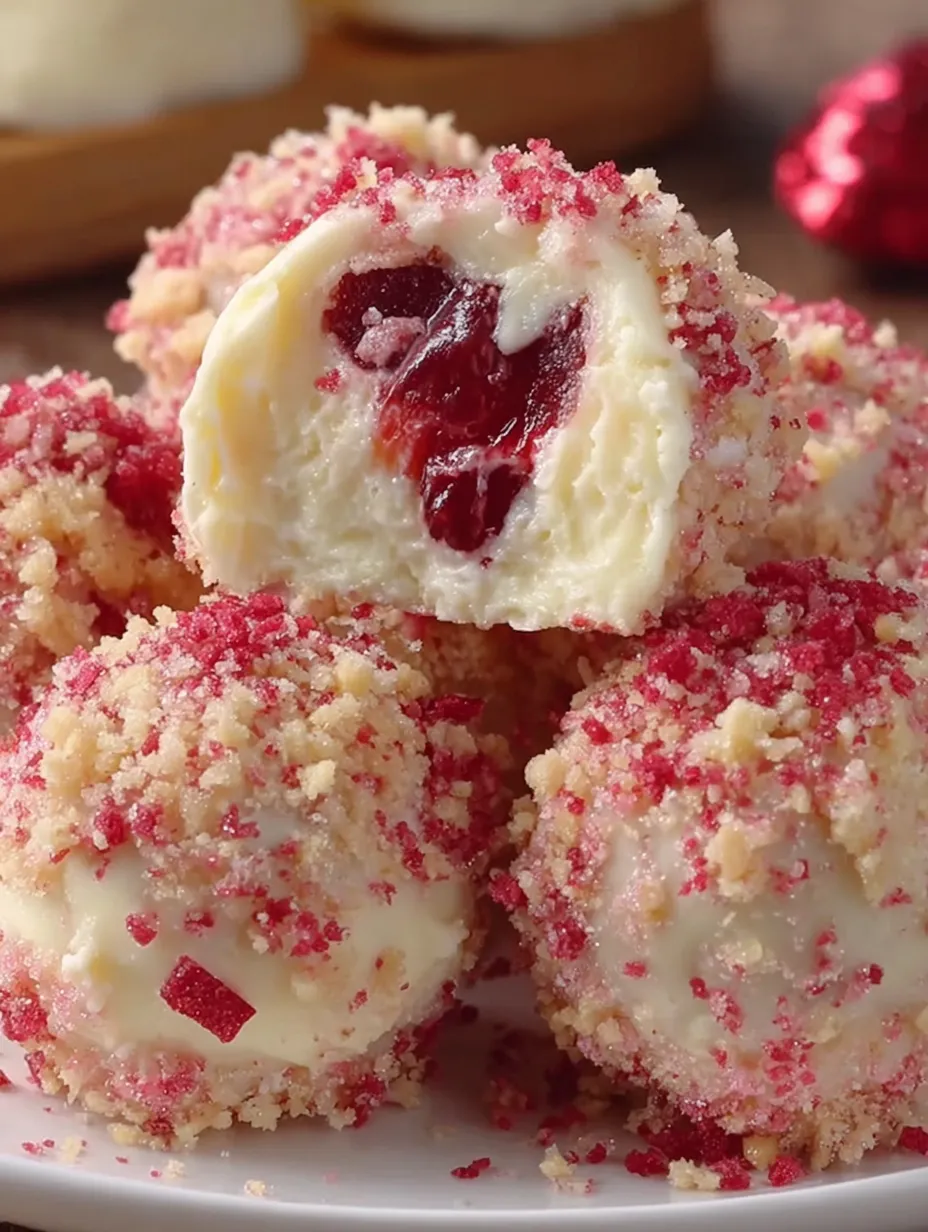
Someone figured out that if you take creamy cheesecake filling, dip it in white chocolate, roll it in crushed strawberry shortcake cookies, and create individual portions of pure bliss, you get something that makes people lose all self-control at parties. Strawberry Crunch Cheesecake Bites are what happens when no-bake cheesecake meets that nostalgic ice cream truck coating meets “I’m going to make these so addictive you’ll eat six before realizing what happened” portion control. They’re creamy, crunchy, sweet, tangy, and look like you spent hours making fancy truffles when really you just mixed, rolled, dipped, and crushed.
This isn’t some complicated pastry project that requires a culinary degree. This is “make cheesecake filling, freeze it into balls, dip in chocolate, roll in cookie crumbs, become the hero of every gathering” simplicity that results in something that looks professionally made. The cheesecake center is rich and tangy. The white chocolate coating is sweet and smooth. The strawberry crunch exterior is crispy, nostalgic, and adds that signature texture everyone remembers from childhood ice cream bars.
This is dessert table dominance in bite-sized form. It’s what happens when you take a beloved flavor combination and make it shareable, portable, and impossible to eat just one. It’s the kind of treat that makes people ask if you run a bakery from your kitchen.
Why These Cheesecake Bites Are About to Ruin Store-Bought Desserts Forever
- No-bake magic — The only heat involved is melting chocolate. Summer-friendly and easy
- Make-ahead superstar — Actually needs to be made ahead. Freezer is your friend
- Portion-controlled (sort of) — Individual bites make sharing easier, even if you don’t want to
- Crowd-pleaser status — Kids love them. Adults love them. Everyone asks for the recipe
- Customizable coating — Swap flavors, colors, and textures to match any theme
- Impressive presentation — Looks like you ordered them from a fancy bakery
- Freezer-friendly — Make a huge batch and have instant dessert for weeks
The Stuff You Need
For the Cheesecake Filling:
- 16 oz cream cheese, softened to room temperature (this is crucial)
- 1/2 cup powdered sugar
- 1/4 cup sour cream (adds tang and creaminess)
- 1 teaspoon vanilla extract
- Pinch of salt (enhances all the flavors)
- 1/2 cup graham cracker crumbs (gives structure and flavor)
- Optional: 2 tablespoons freeze-dried strawberries, crushed (for extra strawberry flavor)
For the Coating:
- 16 oz white chocolate chips or white chocolate melting wafers
- 2 tablespoons coconut oil or vegetable shortening (makes the chocolate smoother and easier to work with)
- Pink or red food coloring (optional, for that signature pink coating)
For the Strawberry Crunch:
- 12-15 Golden Oreos or vanilla sandwich cookies
- 3-4 cups freeze-dried strawberries (the secret ingredient)
- 2 tablespoons melted butter (helps it clump)
- 2 tablespoons strawberry gelatin powder (optional but adds color and flavor)
Optional But Highly Recommended:
- Graham cracker crumbs for rolling before dipping (helps chocolate stick)
- Extra freeze-dried strawberries for garnish
- White chocolate drizzle for decoration
- Fresh strawberries for serving alongside
- Gold leaf or edible glitter (if you’re feeling extra)
- Mini cupcake liners for serving
Special Equipment:
- Electric mixer or hand mixer
- Small cookie scoop or melon baller (for uniform sizing)
- Food processor (for the crunch coating)
- Baking sheets lined with parchment paper
- Fork or dipping tool (for chocolate coating)
- Patience (freezing time is non-negotiable)
Let’s Make These Bites That’ll Disappear Faster Than You Can Say “Strawberry Crunch”
Step 1: The Cream Cheese Situation
Let your cream cheese sit at room temperature for at least 1 hour before starting. This is non-negotiable. Cold cream cheese will be lumpy and refuse to mix smoothly. If you forgot and need it now, microwave it in 10-second intervals until soft but not melted. In a large bowl using an electric mixer, beat the softened cream cheese on medium-high speed for 2-3 minutes until it’s completely smooth, fluffy, and no lumps remain. Scrape down the sides of the bowl halfway through.
Step 2: The Filling Assembly
Add the powdered sugar, sour cream, vanilla extract, and salt to the cream cheese. Beat on medium speed until completely smooth and combined—about 2 minutes. The mixture should look like thick frosting. Scrape down the sides again. Add the graham cracker crumbs (and freeze-dried strawberry powder if using) and mix on low speed until just incorporated. Don’t overmix. Taste it—it should be sweet, tangy, and make you want to eat it all with a spoon. Resist.
Step 3: The Firming Up
Cover the bowl with plastic wrap and refrigerate the cheesecake mixture for 1-2 hours until it’s firm enough to scoop and roll. If you’re impatient, stick it in the freezer for 30-45 minutes, but watch it closely—you want it firm, not frozen solid. This step is crucial because warm, soft filling is impossible to work with.
Step 4: The Rolling Process
Line a baking sheet with parchment paper. Once the mixture is firm, use a small cookie scoop (about 1 tablespoon) to portion out the filling. Roll each portion between your palms into smooth balls. Work quickly because your hands will warm the mixture. If it gets too soft, stick your hands under cold water, dry them, and continue. If the mixture gets too soft overall, pop it back in the fridge for 15 minutes. You should get about 30-35 balls depending on size.
Step 5: The Deep Freeze
Place all the rolled cheesecake balls on the lined baking sheet. Freeze for at least 2 hours, but preferably 3-4 hours or overnight. They need to be rock solid before dipping or they’ll fall apart in the melted chocolate. This is not the time to rush. Go watch a movie. Read a book. Take a nap. The freezer will do its job.
Step 6: The Crunch Creation
While the balls freeze, make the strawberry crunch coating. In a food processor, pulse the Golden Oreos until they’re fine crumbs. Add the freeze-dried strawberries and pulse until everything is finely crushed but not powder—you want some texture. Transfer to a bowl and stir in the melted butter and strawberry gelatin powder (if using). The mixture should look like pink, slightly clumpy crumbs that smell like summer and childhood memories. Set aside.
Step 7: The Chocolate Melting
Place the white chocolate chips and coconut oil in a microwave-safe bowl. Microwave in 30-second intervals, stirring between each interval, until completely smooth and melted. Don’t rush this—burnt chocolate is grainy and unusable. The mixture should be thin enough to coat easily but thick enough to cling to the balls. If you want pink coating, add a few drops of food coloring and stir until uniform.
Step 8: The Dipping Dance
Remove the frozen cheesecake balls from the freezer. Work with 5-6 at a time, keeping the rest frozen. Drop a ball into the melted white chocolate. Use a fork to roll it around and coat it completely, then lift it out, tapping the fork gently on the edge of the bowl to let excess chocolate drip off. You want a thin, even coating—not a thick shell that overwhelms the cheesecake.
Step 9: The Crunch Application
While the chocolate is still wet, immediately roll the coated ball in the strawberry crunch mixture. Use your hands to gently press the crumbs into the chocolate so they stick well. The crumbs should cover the entire surface. Place the finished bite back on the parchment-lined baking sheet. Repeat with the remaining balls, working in small batches so the chocolate doesn’t set before you add the crunch.
Step 10: The Setting Time
Once all the bites are coated and crunched, return the baking sheet to the refrigerator for at least 30 minutes to let the chocolate set completely. You can also freeze them for faster setting—15-20 minutes. The coating should be firm and the crunch should be stuck on solidly. If any bare spots appeared during the process, dab a bit of melted chocolate on them and add more crunch.
Step 11: The Optional Fancy Touch
If you want to get extra, drizzle some melted white chocolate over the finished bites in a zigzag pattern. Add a small piece of freeze-dried strawberry on top while the drizzle is still wet. Sprinkle with edible glitter if you’re feeling fancy. Let the drizzle set for 10 minutes in the fridge. Now they look like they came from a high-end dessert shop.
Step 12: The Moment of Truth
Remove one bite from the fridge. Take a bite through the crunchy strawberry coating, through the smooth white chocolate shell, into the creamy, tangy cheesecake center. Notice how the textures work together—crispy, smooth, creamy, all in perfect harmony. Taste the strawberry flavor that’s both nostalgic and sophisticated. Feel the cold, refreshing creaminess coat your mouth. Realize you’ve just made something that people will beg you to bring to every party. Immediately eat another one because they’re portion-controlled and that means you can have multiple servings, right?
Pro Tips From Someone Who’s Perfected These Bites
Room Temperature Cream Cheese: This is the most important step. Lumpy filling ruins everything.
Freeze Solid: Don’t skip or rush the freezing time. Soft balls fall apart when dipped.
Work in Batches: Only take out a few balls at a time. They soften quickly at room temperature.
Thin Chocolate Coating: Too much chocolate makes them too sweet and hides the cheesecake.
Press the Crunch: Really press those crumbs into the wet chocolate so they don’t fall off later.
Keep Cold: Store in the fridge or freezer. They get soft and messy at room temperature.
Uniform Size: Use a cookie scoop for evenly-sized bites that look professional.
Switch It Up (Because Variety Is Delicious)
Oreo Crunch: Replace strawberry crunch with crushed Oreos. Classic cookies and cream vibes.
Lemon Crunch: Use lemon gelatin and crushed vanilla wafers for lemon cheesecake bites.
Birthday Cake: Add sprinkles to the filling and roll in crushed funfetti cookies.
Chocolate Lover’s: Use dark chocolate coating and roll in crushed chocolate cookies.
Peanut Butter: Add 1/4 cup peanut butter to the filling, coat in chocolate, roll in crushed peanut butter cookies.
Blueberry Crunch: Use freeze-dried blueberries and blue gelatin instead of strawberry.
Pumpkin Spice: Add pumpkin puree and spices to filling, roll in crushed gingersnaps.
Matcha Green Tea: Add matcha powder to filling, coat in white chocolate, roll in crushed vanilla cookies.
Make-Ahead Magic
The Filling: Make the cheesecake filling 3 days ahead. Store covered in the fridge.
Rolled Balls: Roll into balls and freeze for up to 2 weeks before coating.
Fully Assembled: Make completely 1 week ahead. Store in an airtight container in the fridge or freezer.
The Crunch Coating: Make the strawberry crunch 1 week ahead. Store in an airtight container at room temperature.
Freeze for Months: Fully assembled bites freeze beautifully for up to 3 months. No quality loss.
Storage Real Talk
Refrigerated: Keep for 5-7 days in an airtight container. Best texture when cold.
Frozen: Store for up to 3 months. They’re actually delicious eaten frozen.
Room Temperature: They’ll get soft and messy after 30 minutes. Keep them cold until serving.
Serving Temperature: Let them sit out for 5-10 minutes before serving so they’re not rock hard.
Individual Storage: Place in mini cupcake liners to prevent sticking and for easy grabbing.
Perfect Pairings
Fresh Strawberries: Serve alongside for people who want “healthy” fruit with their dessert.
Champagne or Prosecco: The bubbles and acidity cut through the richness beautifully.
Cold Milk: Classic pairing. Dunk them if you dare.
Hot Coffee: The bitterness balances the sweet coating perfectly.
Vanilla Ice Cream: Make it a dessert plate situation with these as the topper.
Nothing: These are perfect on their own. Self-contained excellence.
The Science of Cheesecake Bite Success
Freezing the cheesecake balls before dipping creates a temperature differential that allows the chocolate to set quickly upon contact, creating a thin, even shell. If the filling were warm or soft, it would melt into the chocolate and create a mess.
The graham cracker crumbs in the filling provide structure and prevent it from being too soft. They also add flavor and a slight texture that keeps it interesting.
Freeze-dried strawberries are crucial because they’re completely dehydrated. Fresh or frozen strawberries would make the coating soggy. The freeze-drying process concentrates the flavor while removing moisture.
The coconut oil in the chocolate coating lowers the melting point and makes it easier to work with, creating a thinner, smoother shell that sets with a slight snap.
When to Make These Strawberry Crunch Cheesecake Bites
Birthday Parties: Kids and adults both lose their minds over these.
Baby Showers: Pink coating makes them perfect for celebrations.
Valentine’s Day: Romantic, shareable, and strawberry-flavored. Perfect match.
Bridal Showers: Elegant enough for fancy events, fun enough to not be boring.
Summer BBQs: Refreshing, cold, and easy to serve outdoors.
Bake Sales: These sell out in minutes. Make extra.
Holiday Cookie Trays: Something different among all the standard cookies.
Anytime: You don’t need an excuse to make something this good.
Why These Work So Damn Well
Strawberry Crunch Cheesecake Bites work because they hit every dessert button: creamy, crunchy, sweet, tangy, cold, and nostalgic. The texture combination is perfect—you get that satisfying crunch followed by smooth chocolate and then creamy cheesecake. The flavor is familiar (everyone remembers those strawberry ice cream bars) but elevated with real cheesecake instead of cheap ice cream.
They’re also just fun to make and eat. Rolling the balls is meditative. Dipping them in chocolate feels fancy. Watching the crunch coating stick is satisfying. And eating them is pure joy—especially when you see other people’s faces light up when they bite into one.
This is the kind of dessert that makes you look like a genius even though the technique is simple. The presentation is impressive, the flavor is crowd-pleasing, and the individual portions mean everyone can try one (or five) without committing to a giant slice of cheesecake. Sometimes the best desserts are the ones that deliver maximum impact with reasonable effort.
Questions People Always Ask
Q: Can I use regular chocolate instead of white chocolate? A: Yes, but it won’t look like the classic strawberry crunch coating. Milk chocolate works great though.
Q: My cream cheese filling is too soft to roll. Help? A: Refrigerate it longer or add 2-3 more tablespoons of graham cracker crumbs to firm it up.
Q: Where do I find freeze-dried strawberries? A: Baking aisle, snack aisle, or online. Target, Walmart, and Trader Joe’s usually have them.
Q: Can I skip the freezing step? A: No. The balls need to be frozen solid or they’ll fall apart when you dip them in warm chocolate.
Q: The chocolate coating is too thick. What do I do? A: Add more coconut oil, one teaspoon at a time, until it’s thinner and easier to work with.
Q: Can I use milk chocolate or dark chocolate? A: Absolutely. Dark chocolate makes them less sweet. Milk chocolate is delicious too.
Q: How long can these sit out at a party? A: About 30-45 minutes before they start getting soft. Keep them cold until serving time.
Q: Can I make these without a food processor? A: Yes. Crush the cookies and strawberries in a zip-top bag with a rolling pin. Takes longer but works.
Print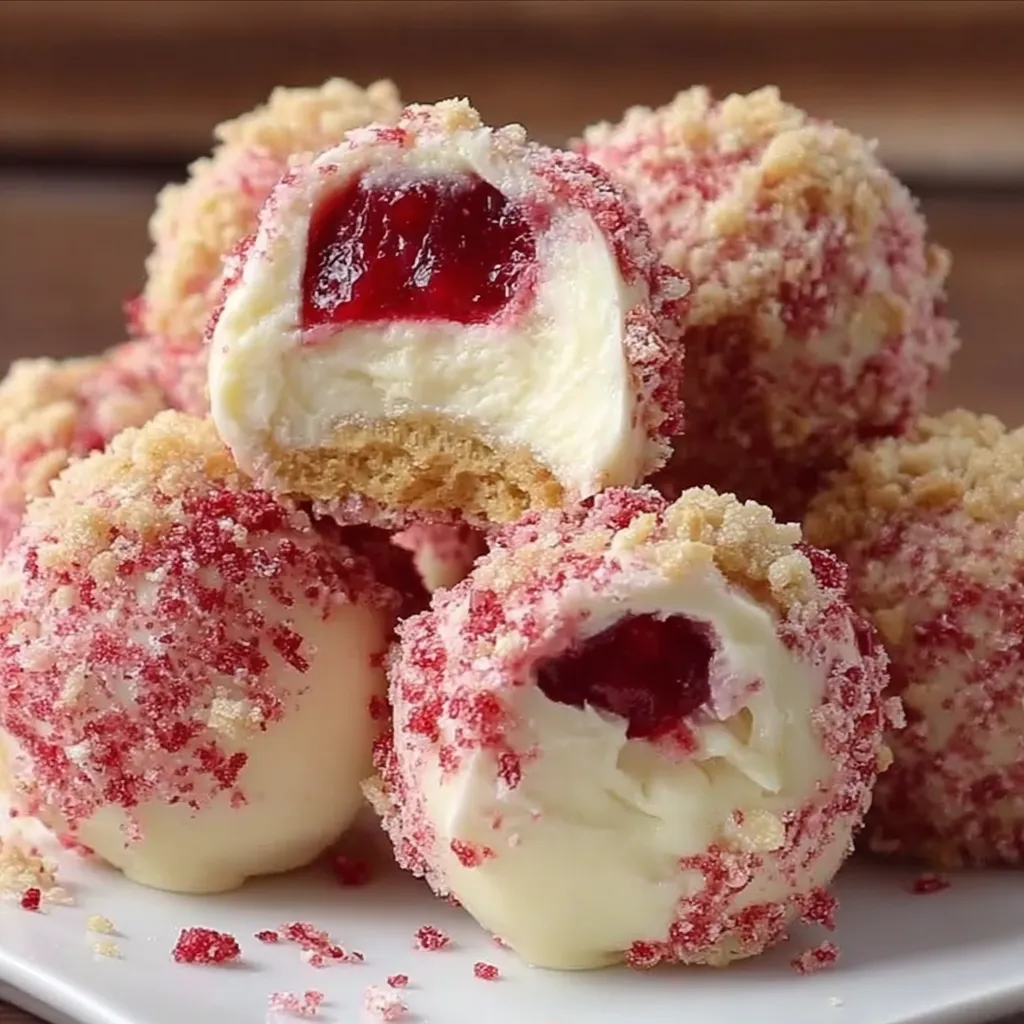
Strawberry Crunch Cheesecake Bites
- Total Time: 30 minutes
- Yield: 30–35 bites 1x
Description
Someone figured out that if you take creamy cheesecake filling, dip it in white chocolate, roll it in crushed strawberry shortcake cookies, and create individual portions of pure bliss, you get something that makes people lose all self-control at parties. Strawberry Crunch Cheesecake Bites are what happens when no-bake cheesecake meets that nostalgic ice cream truck coating meets “I’m going to make these so addictive you’ll eat six before realizing what happened” portion control. They’re creamy, crunchy, sweet, tangy, and look like you spent hours making fancy truffles when really you just mixed, rolled, dipped, and crushed.
This isn’t some complicated pastry project that requires a culinary degree. This is “make cheesecake filling, freeze it into balls, dip in chocolate, roll in cookie crumbs, become the hero of every gathering” simplicity that results in something that looks professionally made. The cheesecake center is rich and tangy. The white chocolate coating is sweet and smooth. The strawberry crunch exterior is crispy, nostalgic, and adds that signature texture everyone remembers from childhood ice cream bars.
This is dessert table dominance in bite-sized form. It’s what happens when you take a beloved flavor combination and make it shareable, portable, and impossible to eat just one. It’s the kind of treat that makes people ask if you run a bakery from your kitchen.
Ingredients
For the Cheesecake Filling:
- 16 oz cream cheese, softened to room temperature (this is crucial)
- 1/2 cup powdered sugar
- 1/4 cup sour cream (adds tang and creaminess)
- 1 teaspoon vanilla extract
- Pinch of salt (enhances all the flavors)
- 1/2 cup graham cracker crumbs (gives structure and flavor)
- Optional: 2 tablespoons freeze-dried strawberries, crushed (for extra strawberry flavor)
For the Coating:
- 16 oz white chocolate chips or white chocolate melting wafers
- 2 tablespoons coconut oil or vegetable shortening (makes the chocolate smoother and easier to work with)
- Pink or red food coloring (optional, for that signature pink coating)
For the Strawberry Crunch:
- 12–15 Golden Oreos or vanilla sandwich cookies
- 3–4 cups freeze-dried strawberries (the secret ingredient)
- 2 tablespoons melted butter (helps it clump)
- 2 tablespoons strawberry gelatin powder (optional but adds color and flavor)
Optional But Highly Recommended:
- Graham cracker crumbs for rolling before dipping (helps chocolate stick)
- Extra freeze-dried strawberries for garnish
- White chocolate drizzle for decoration
- Fresh strawberries for serving alongside
- Gold leaf or edible glitter (if you’re feeling extra)
- Mini cupcake liners for serving
Special Equipment:
- Electric mixer or hand mixer
- Small cookie scoop or melon baller (for uniform sizing)
- Food processor (for the crunch coating)
- Baking sheets lined with parchment paper
- Fork or dipping tool (for chocolate coating)
- Patience (freezing time is non-negotiable)
Instructions
Step 1: The Cream Cheese Situation
Let your cream cheese sit at room temperature for at least 1 hour before starting. This is non-negotiable. Cold cream cheese will be lumpy and refuse to mix smoothly. If you forgot and need it now, microwave it in 10-second intervals until soft but not melted. In a large bowl using an electric mixer, beat the softened cream cheese on medium-high speed for 2-3 minutes until it’s completely smooth, fluffy, and no lumps remain. Scrape down the sides of the bowl halfway through.
Step 2: The Filling Assembly
Add the powdered sugar, sour cream, vanilla extract, and salt to the cream cheese. Beat on medium speed until completely smooth and combined—about 2 minutes. The mixture should look like thick frosting. Scrape down the sides again. Add the graham cracker crumbs (and freeze-dried strawberry powder if using) and mix on low speed until just incorporated. Don’t overmix. Taste it—it should be sweet, tangy, and make you want to eat it all with a spoon. Resist.
Step 3: The Firming Up
Cover the bowl with plastic wrap and refrigerate the cheesecake mixture for 1-2 hours until it’s firm enough to scoop and roll. If you’re impatient, stick it in the freezer for 30-45 minutes, but watch it closely—you want it firm, not frozen solid. This step is crucial because warm, soft filling is impossible to work with.
Step 4: The Rolling Process
Line a baking sheet with parchment paper. Once the mixture is firm, use a small cookie scoop (about 1 tablespoon) to portion out the filling. Roll each portion between your palms into smooth balls. Work quickly because your hands will warm the mixture. If it gets too soft, stick your hands under cold water, dry them, and continue. If the mixture gets too soft overall, pop it back in the fridge for 15 minutes. You should get about 30-35 balls depending on size.
Step 5: The Deep Freeze
Place all the rolled cheesecake balls on the lined baking sheet. Freeze for at least 2 hours, but preferably 3-4 hours or overnight. They need to be rock solid before dipping or they’ll fall apart in the melted chocolate. This is not the time to rush. Go watch a movie. Read a book. Take a nap. The freezer will do its job.
Step 6: The Crunch Creation
While the balls freeze, make the strawberry crunch coating. In a food processor, pulse the Golden Oreos until they’re fine crumbs. Add the freeze-dried strawberries and pulse until everything is finely crushed but not powder—you want some texture. Transfer to a bowl and stir in the melted butter and strawberry gelatin powder (if using). The mixture should look like pink, slightly clumpy crumbs that smell like summer and childhood memories. Set aside.
Step 7: The Chocolate Melting
Place the white chocolate chips and coconut oil in a microwave-safe bowl. Microwave in 30-second intervals, stirring between each interval, until completely smooth and melted. Don’t rush this—burnt chocolate is grainy and unusable. The mixture should be thin enough to coat easily but thick enough to cling to the balls. If you want pink coating, add a few drops of food coloring and stir until uniform.
Step 8: The Dipping Dance
Remove the frozen cheesecake balls from the freezer. Work with 5-6 at a time, keeping the rest frozen. Drop a ball into the melted white chocolate. Use a fork to roll it around and coat it completely, then lift it out, tapping the fork gently on the edge of the bowl to let excess chocolate drip off. You want a thin, even coating—not a thick shell that overwhelms the cheesecake.
Step 9: The Crunch Application
While the chocolate is still wet, immediately roll the coated ball in the strawberry crunch mixture. Use your hands to gently press the crumbs into the chocolate so they stick well. The crumbs should cover the entire surface. Place the finished bite back on the parchment-lined baking sheet. Repeat with the remaining balls, working in small batches so the chocolate doesn’t set before you add the crunch.
Step 10: The Setting Time
Once all the bites are coated and crunched, return the baking sheet to the refrigerator for at least 30 minutes to let the chocolate set completely. You can also freeze them for faster setting—15-20 minutes. The coating should be firm and the crunch should be stuck on solidly. If any bare spots appeared during the process, dab a bit of melted chocolate on them and add more crunch.
Step 11: The Optional Fancy Touch
If you want to get extra, drizzle some melted white chocolate over the finished bites in a zigzag pattern. Add a small piece of freeze-dried strawberry on top while the drizzle is still wet. Sprinkle with edible glitter if you’re feeling fancy. Let the drizzle set for 10 minutes in the fridge. Now they look like they came from a high-end dessert shop.
Step 12: The Moment of Truth
Remove one bite from the fridge. Take a bite through the crunchy strawberry coating, through the smooth white chocolate shell, into the creamy, tangy cheesecake center. Notice how the textures work together—crispy, smooth, creamy, all in perfect harmony. Taste the strawberry flavor that’s both nostalgic and sophisticated. Feel the cold, refreshing creaminess coat your mouth. Realize you’ve just made something that people will beg you to bring to every party. Immediately eat another one because they’re portion-controlled and that means you can have multiple servings, right?
Notes
Room Temperature Cream Cheese: This is the most important step. Lumpy filling ruins everything.
Freeze Solid: Don’t skip or rush the freezing time. Soft balls fall apart when dipped.
Work in Batches: Only take out a few balls at a time. They soften quickly at room temperature.
Thin Chocolate Coating: Too much chocolate makes them too sweet and hides the cheesecake.
Press the Crunch: Really press those crumbs into the wet chocolate so they don’t fall off later.
Keep Cold: Store in the fridge or freezer. They get soft and messy at room temperature.
Uniform Size: Use a cookie scoop for evenly-sized bites that look professional.
- Prep Time: 30 minutes
Nutrition
- Calories: ~110 kcal
- Fat: ~7g
- Carbohydrates: ~11g
- Protein: ~2g