
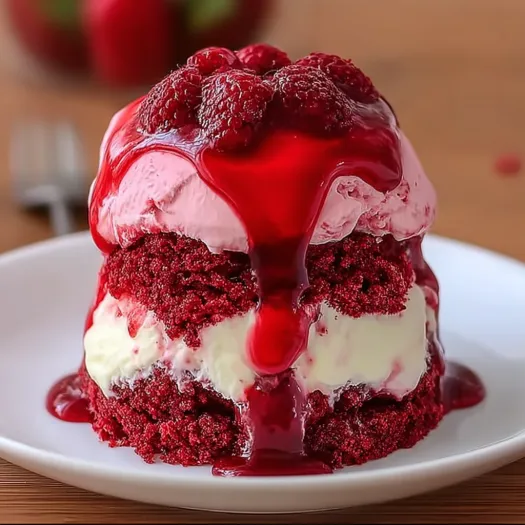
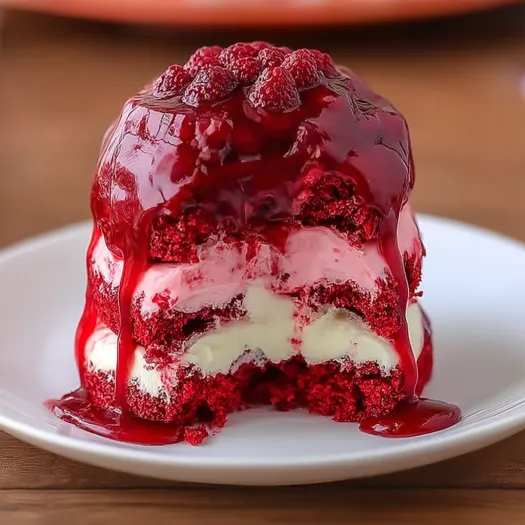
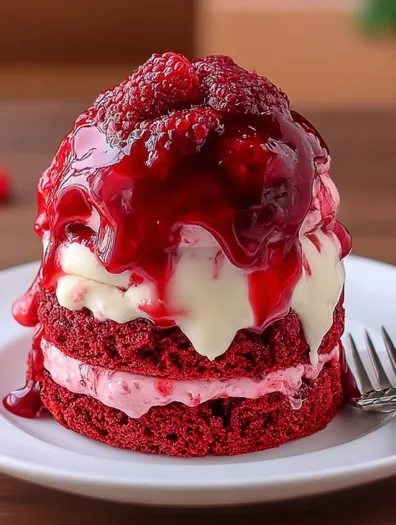
So you want to absolutely traumatize your Halloween guests while simultaneously giving them the best dessert of their lives? Meet the Moist Red Velvet Brain Cake — the dessert that’ll have people questioning your sanity and begging for the recipe in the same breath. This thing looks like something straight out of a zombie apocalypse but tastes like heaven had a baby with a Southern bakery. We’re talking ultra-moist red velvet cake sculpted into a realistic brain shape, covered in “bloody” raspberry glaze that’s so good you’ll want to lick it off the serving plate. I made this for a Halloween party once and my neighbor literally screamed when she saw it, then proceeded to eat three slices. That’s the power of horror food done right.
Why You’ll Love This Recipe
- Guaranteed to be the most memorable dessert at any party
- Actually tastes incredible — not just a gimmicky gross-out food
- Uses a brain-shaped pan that you’ll find excuses to use year-round
- Perfect conversation starter (and ender, depending on your crowd)
- Way easier than it looks to pull off
- Instagram gold — prepare for the comments and reactions
The Good Stuff You’ll Need
For the Red Velvet Brain:
- 2 1/2 cups all-purpose flour
- 1 1/2 cups granulated sugar
- 3 tbsp unsweetened cocoa powder
- 1 tsp baking soda
- 1 tsp salt
- 2 large eggs, room temperature
- 1 1/2 cups vegetable oil
- 1 cup buttermilk, room temperature
- 2 tbsp red food coloring (don’t go cheap here)
- 1 tbsp white vinegar
- 1 tsp vanilla extract
For the “Bloody” Raspberry Glaze:
- 2 cups fresh or frozen raspberries
- 1/2 cup granulated sugar
- 2 tbsp cornstarch
- 1 tbsp lemon juice
- 2-3 drops red food coloring (optional, for extra drama)
For Assembly:
- Brain-shaped cake pan (Nordic Ware makes a good one)
- Cooking spray and flour for the pan
- Extra raspberry glaze for serving
Let’s Do This
Step 1: Prep Your Creepy Pan
Preheat oven to 350°F (175°C).
Generously spray your brain pan with cooking spray — get into every groove and crevice.
Dust with flour, tap out excess. This step is crucial unless you want brain surgery to remove stuck cake.
Step 2: Mix That Red Velvet Magic
In a large bowl, whisk together flour, sugar, cocoa powder, baking soda, and salt.
In another bowl, whisk eggs, then add oil, buttermilk, food coloring, vinegar, and vanilla. Whisk until smooth.
Pour wet ingredients into dry ingredients and mix until just combined — don’t overmix or you’ll have a tough brain (gross but true).
Step 3: Bake Your Brain
Pour batter into prepared brain pan, filling about 2/3 full.
Bake for 35-45 minutes, or until a toothpick inserted into the thickest part comes out with just a few moist crumbs.
Let cool in pan for 15 minutes, then carefully invert onto a wire rack. This part requires patience — rushing leads to brain casualties.
Step 4: Make the “Blood”
While cake cools, combine raspberries and sugar in a saucepan over medium heat.
Cook until raspberries break down and release their juices (about 5 minutes).
Mix cornstarch with 2 tbsp water to make a slurry, then stir into raspberry mixture.
Cook until thickened, about 2-3 minutes. Strain if you want it smooth, or leave chunky for texture.
Stir in lemon juice and food coloring if using. Let cool slightly.
Step 5: The Gross-Out Assembly
Place your brain cake on serving platter.
Drizzle raspberry “blood” all over the brain, letting it pool in the crevices and drip down the sides.
Don’t be shy — the messier, the better. Think crime scene chic.
Let some of the glaze drip onto the serving plate for maximum horror effect.
Step 6: Serve and Watch the Reactions
Cut with a sharp knife and prepare for the gasps, screams, and inevitable phone cameras.
Serve each slice with extra “blood” on the side because people will want more.
Serving Suggestions
- Serve on a dark plate or platter for maximum creepy factor
- Add some plastic spiders or Halloween decorations around the base
- Dim the lights and use candles for atmospheric serving
- Pair with “zombie punch” or other themed drinks
- Have napkins ready — this gets messy in the best way
Switch It Up
Chocolate Brain: Skip the red food coloring and add extra cocoa for a chocolate version.
Vanilla Brain: Use vanilla cake mix and add food coloring for a different flavor profile.
Mini Brains: Use brain-shaped molds to make individual servings.
Different “Blood”: Try strawberry sauce, cherry sauce, or even chocolate ganache for variety.
Glow-in-the-Dark: Add some tonic water to the glaze for a subtle glow under blacklights.
Pro Tips for Brain Success
- Room temperature ingredients are key for the perfect texture
- Don’t skip the vinegar — it reacts with the baking soda for extra fluffiness
- The brain pan has deep grooves, so really get that cooking spray in there
- Let the cake cool completely before glazing or the “blood” will just soak in
- Make the glaze a day ahead — it gets thicker and more blood-like overnight
Storage and Make-Ahead Tips
- Cake can be made up to 2 days ahead and stored covered at room temperature
- Glaze keeps in the fridge for up to a week
- Don’t glaze until ready to serve or it will lose the dramatic dripping effect
- Leftover glazed cake keeps covered in the fridge for 3-4 days
Questions People Actually Ask
Q: Where do I find a brain-shaped pan? A: Amazon, Williams Sonoma, or any baking supply store. Nordic Ware makes the best one. It’s worth the investment for the reactions alone.
Q: Can I make this without the brain pan? A: You could use two bundt pans and sculpt/carve, but honestly, just get the brain pan. Your future Halloween-loving self will thank you.
Q: Is this actually scary or just gross? A: It’s more shocking than terrifying. The realistic look gets people, but once they taste it, they’re converted.
Q: Can I make this less red? A: Sure, but then it’s just velvet cake, not red velvet. The color is part of the whole creepy appeal.
Q: What if my brain cracks when I remove it from the pan? A: Brain surgery! Use the glaze to “glue” pieces back together — it’ll look even more realistic that way.
PrintMoist Red Velvet Brain Cake
- Total Time: 1 minute
- Yield: 12–15 slices 1x
Description
So you want to absolutely traumatize your Halloween guests while simultaneously giving them the best dessert of their lives? Meet the Moist Red Velvet Brain Cake — the dessert that’ll have people questioning your sanity and begging for the recipe in the same breath. This thing looks like something straight out of a zombie apocalypse but tastes like heaven had a baby with a Southern bakery. We’re talking ultra-moist red velvet cake sculpted into a realistic brain shape, covered in “bloody” raspberry glaze that’s so good you’ll want to lick it off the serving plate. I made this for a Halloween party once and my neighbor literally screamed when she saw it, then proceeded to eat three slices. That’s the power of horror food done right.
Ingredients
For the Red Velvet Brain:
- 2 1/2 cups all-purpose flour
- 1 1/2 cups granulated sugar
- 3 tbsp unsweetened cocoa powder
- 1 tsp baking soda
- 1 tsp salt
- 2 large eggs, room temperature
- 1 1/2 cups vegetable oil
- 1 cup buttermilk, room temperature
- 2 tbsp red food coloring (don’t go cheap here)
- 1 tbsp white vinegar
- 1 tsp vanilla extract
For the “Bloody” Raspberry Glaze:
- 2 cups fresh or frozen raspberries
- 1/2 cup granulated sugar
- 2 tbsp cornstarch
- 1 tbsp lemon juice
- 2–3 drops red food coloring (optional, for extra drama)
For Assembly:
- Brain-shaped cake pan (Nordic Ware makes a good one)
- Cooking spray and flour for the pan
- Extra raspberry glaze for serving
Instructions
Preheat oven to 350°F (175°C).
Generously spray your brain pan with cooking spray — get into every groove and crevice.
Dust with flour, tap out excess. This step is crucial unless you want brain surgery to remove stuck cake.
In a large bowl, whisk together flour, sugar, cocoa powder, baking soda, and salt.
In another bowl, whisk eggs, then add oil, buttermilk, food coloring, vinegar, and vanilla. Whisk until smooth.
Pour wet ingredients into dry ingredients and mix until just combined — don’t overmix or you’ll have a tough brain (gross but true).
Pour batter into prepared brain pan, filling about 2/3 full.
Bake for 35-45 minutes, or until a toothpick inserted into the thickest part comes out with just a few moist crumbs.
Let cool in pan for 15 minutes, then carefully invert onto a wire rack. This part requires patience — rushing leads to brain casualties.
While cake cools, combine raspberries and sugar in a saucepan over medium heat.
Cook until raspberries break down and release their juices (about 5 minutes).
Mix cornstarch with 2 tbsp water to make a slurry, then stir into raspberry mixture.
Cook until thickened, about 2-3 minutes. Strain if you want it smooth, or leave chunky for texture.
Stir in lemon juice and food coloring if using. Let cool slightly.
Place your brain cake on serving platter.
Drizzle raspberry “blood” all over the brain, letting it pool in the crevices and drip down the sides.
Don’t be shy — the messier, the better. Think crime scene chic.
Let some of the glaze drip onto the serving plate for maximum horror effect.
Cut with a sharp knife and prepare for the gasps, screams, and inevitable phone cameras.
Serve each slice with extra “blood” on the side because people will want more.
Notes
- Serve on a dark plate or platter for maximum creepy factor
- Add some plastic spiders or Halloween decorations around the base
- Dim the lights and use candles for atmospheric serving
- Pair with “zombie punch” or other themed drinks
- Have napkins ready — this gets messy in the best way
- Prep Time: 20 minutes
- Cook Time: 35-45 minutes
Nutrition
- Calories: ~385 kcal
- Fat: ~18g
- Carbohydrates: ~54g
- Protein: ~4g


