
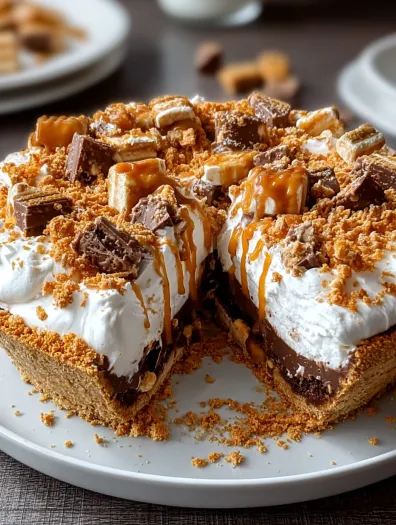
Listen, if you’re a Butterfinger fanatic, you’re about to lose your entire mind. This Butterfinger Pie is basically what would happen if someone took your favorite candy bar, turned it into the most decadent no-bake pie imaginable, and then made it even better with layers of creamy peanut butter filling and crushed candy bar goodness. We’re talking a chocolate cookie crust, a rich peanut butter cream filling loaded with crushed Butterfingers, topped with fluffy whipped cream and even more candy bar pieces because we don’t believe in holding back. This is the kind of dessert that makes people stop mid-conversation and just stare at you like you’ve performed actual magic. Fair warning: this pie is dangerously addictive and will probably ruin regular desserts for you forever.
Why You’ll Love This Recipe
- No baking required — your oven gets to take a break
- Tastes like eating Butterfinger candy bars in pie form (because that’s basically what it is)
- The peanut butter and chocolate combo hits every single sweet tooth craving
- Impressive enough for special occasions but easy enough for random Tuesday cravings
- Make-ahead friendly — actually gets better after chilling overnight
- Kid-approved but sophisticated enough that adults will fight over the last slice
- Uses simple ingredients but delivers maximum wow factor
- Perfect for when you want to be the dessert hero at any gathering
The Good Stuff You’ll Need
For the Chocolate Cookie Crust:
- 30 chocolate sandwich cookies (like Oreos), crushed
- 6 tbsp butter, melted
- 2 tbsp granulated sugar
- Pinch of salt
For the Peanut Butter Butterfinger Filling:
- 8 oz cream cheese, room temperature
- 1 cup creamy peanut butter
- 1 cup powdered sugar
- 1 tsp vanilla extract
- 1 1/2 cups heavy cream, divided
- 8-10 regular-sized Butterfinger candy bars, crushed (save some for topping)
- 1/4 tsp salt
For the Whipped Cream Topping:
- 1 1/2 cups heavy cream
- 1/4 cup powdered sugar
- 1 tsp vanilla extract
For the Final Glory:
- 3-4 extra Butterfinger bars, crushed for topping
- Chocolate shavings or mini chocolate chips (optional but pretty)
- Caramel sauce for drizzling (optional but amazing)
Tools You’ll Need:
- 9-inch pie pan
- Electric mixer (hand or stand mixer)
- Food processor for crushing cookies and candy (or a rolling pin and some anger)
Let’s Do This
Step 1: Make That Cookie Crust
Preheat oven to 350°F (yes, we’re baking the crust even though the pie is no-bake).
Crush your chocolate cookies in a food processor until you have fine crumbs. You can also put them in a zip-top bag and go to town with a rolling pin.
Mix cookie crumbs with melted butter, sugar, and salt until it holds together when pressed.
Press firmly into bottom and up sides of a 9-inch pie pan. Use the bottom of a measuring cup to make it smooth and even.
Bake for 10 minutes, then let it cool completely. This step makes the crust hold together better.
Step 2: Crush Those Butterfingers
Put your Butterfinger bars in a zip-top bag and crush them with a rolling pin or meat mallet. You want a mix of chunks and smaller pieces for texture.
Set aside about 1/2 cup of the nicest-looking pieces for topping the pie.
Step 3: Make the Peanut Butter Base
In a large bowl, beat cream cheese until light and fluffy (about 2-3 minutes with an electric mixer).
Add peanut butter, powdered sugar, vanilla, and salt. Beat until smooth and well combined.
Step 4: Whip That Cream
In a separate bowl, whip 1 1/2 cups heavy cream until soft peaks form. Don’t overbeat or you’ll make butter.
Gently fold about half of the whipped cream into the peanut butter mixture to lighten it.
Then fold in the remaining whipped cream until just combined — we want to keep it fluffy.
Step 5: Add the Candy Magic
Gently fold in most of the crushed Butterfingers, leaving some for the top.
The filling should be light, fluffy, and loaded with candy bar pieces.
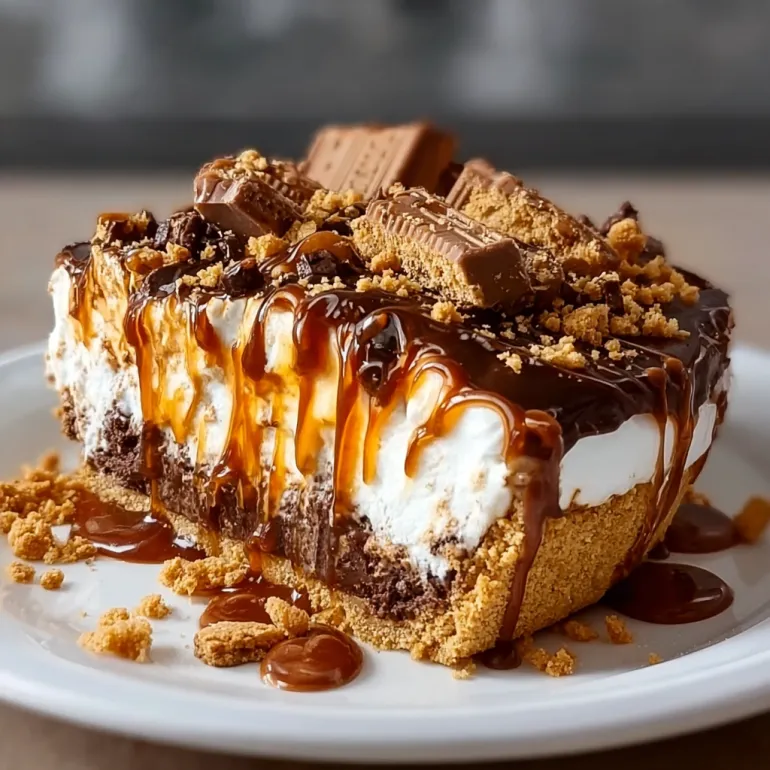
Step 6: Assemble This Beauty
Spoon the filling into your cooled chocolate crust, spreading it evenly.
Use an offset spatula to smooth the top, or just embrace the rustic look.
Cover with plastic wrap and refrigerate for at least 4 hours, but overnight is even better.
Step 7: Top It Off Like a Boss
About an hour before serving, make your whipped cream topping.
Whip 1 1/2 cups heavy cream with powdered sugar and vanilla until soft peaks form.
Spread or pipe over the chilled pie.
Top with reserved crushed Butterfingers, chocolate shavings, and a drizzle of caramel sauce if you’re feeling extra.
Step 8: Serve and Watch Minds Get Blown
Use a sharp knife dipped in warm water to cut clean slices.
Serve immediately and watch people’s faces light up with pure joy.
Serving Suggestions
Serve with a tall glass of cold milk because this is rich, rich stuff.
A cup of strong coffee pairs beautifully with all that peanut butter and chocolate.
Drizzle individual slices with chocolate or caramel sauce for extra indulgence.
A small scoop of vanilla ice cream on the side never hurt anyone.
Switch It Up
Different Candy Bars: Try this with Snickers, Reese’s cups, or Heath bars instead.
Oreo Crust: Make an Oreo crust by using just the cookie part (no filling) for a different chocolate flavor.
Peanut Butter Crust: Mix crushed peanut butter cookies with butter for the crust.
Mini Pies: Make individual servings in tartlet pans for parties.
Frozen Version: Freeze the pie for a few hours before serving for an ice cream pie experience.
Extra Chocolate: Add some melted chocolate to the filling for double chocolate goodness.
Make-Ahead Tips
This pie is actually better when made a day ahead — the flavors meld and the texture gets perfect.
You can make the crust up to 3 days ahead and store covered at room temperature.
The filling can be made and pied up to 2 days ahead — just add the whipped cream topping before serving.
Crushed Butterfingers can be done days ahead and stored in an airtight container.
Questions People Actually Ask
Q: Can I use crunchy peanut butter instead of creamy? A: You can, but creamy gives a smoother texture. If you use crunchy, maybe use slightly less crushed candy to avoid texture overload.
Q: What if I can’t find Butterfinger bars? A: You can use other peanut butter chocolate candy bars, or even make your own with peanut butter toffee bits.
Q: Can I use store-bought whipped topping? A: Fresh whipped cream tastes so much better, but Cool Whip works in a pinch.
Q: How long does this keep? A: It’s best within 2-3 days, covered in the fridge. The crust might get a little soft after that.
Q: Can I freeze this pie? A: Yes! It actually makes a great frozen pie. Just thaw for about 30 minutes before serving.
Q: What’s the best way to crush the candy bars? A: Put them in the freezer for 30 minutes first, then crush in a food processor or with a rolling pin in a sealed bag.
Print
Butterfinger Pie
- Total Time: 30 minutes
Description
Listen, if you’re a Butterfinger fanatic, you’re about to lose your entire mind. This Butterfinger Pie is basically what would happen if someone took your favorite candy bar, turned it into the most decadent no-bake pie imaginable, and then made it even better with layers of creamy peanut butter filling and crushed candy bar goodness. We’re talking a chocolate cookie crust, a rich peanut butter cream filling loaded with crushed Butterfingers, topped with fluffy whipped cream and even more candy bar pieces because we don’t believe in holding back. This is the kind of dessert that makes people stop mid-conversation and just stare at you like you’ve performed actual magic. Fair warning: this pie is dangerously addictive and will probably ruin regular desserts for you forever.
Ingredients
For the Chocolate Cookie Crust:
- 30 chocolate sandwich cookies (like Oreos), crushed
- 6 tbsp butter, melted
- 2 tbsp granulated sugar
- Pinch of salt
For the Peanut Butter Butterfinger Filling:
- 8 oz cream cheese, room temperature
- 1 cup creamy peanut butter
- 1 cup powdered sugar
- 1 tsp vanilla extract
- 1 1/2 cups heavy cream, divided
- 8–10 regular-sized Butterfinger candy bars, crushed (save some for topping)
- 1/4 tsp salt
For the Whipped Cream Topping:
- 1 1/2 cups heavy cream
- 1/4 cup powdered sugar
- 1 tsp vanilla extract
For the Final Glory:
- 3–4 extra Butterfinger bars, crushed for topping
- Chocolate shavings or mini chocolate chips (optional but pretty)
- Caramel sauce for drizzling (optional but amazing)
Tools You’ll Need:
- 9-inch pie pan
- Electric mixer (hand or stand mixer)
- Food processor for crushing cookies and candy (or a rolling pin and some anger)
Instructions
Preheat oven to 350°F (yes, we’re baking the crust even though the pie is no-bake).
Crush your chocolate cookies in a food processor until you have fine crumbs. You can also put them in a zip-top bag and go to town with a rolling pin.
Mix cookie crumbs with melted butter, sugar, and salt until it holds together when pressed.
Press firmly into bottom and up sides of a 9-inch pie pan. Use the bottom of a measuring cup to make it smooth and even.
Bake for 10 minutes, then let it cool completely. This step makes the crust hold together better.
Put your Butterfinger bars in a zip-top bag and crush them with a rolling pin or meat mallet. You want a mix of chunks and smaller pieces for texture.
Set aside about 1/2 cup of the nicest-looking pieces for topping the pie.
In a large bowl, beat cream cheese until light and fluffy (about 2-3 minutes with an electric mixer).
Add peanut butter, powdered sugar, vanilla, and salt. Beat until smooth and well combined.
In a separate bowl, whip 1 1/2 cups heavy cream until soft peaks form. Don’t overbeat or you’ll make butter.
Gently fold about half of the whipped cream into the peanut butter mixture to lighten it.
Then fold in the remaining whipped cream until just combined — we want to keep it fluffy.
Gently fold in most of the crushed Butterfingers, leaving some for the top.
The filling should be light, fluffy, and loaded with candy bar pieces.
Spoon the filling into your cooled chocolate crust, spreading it evenly.
Use an offset spatula to smooth the top, or just embrace the rustic look.
Cover with plastic wrap and refrigerate for at least 4 hours, but overnight is even better.
About an hour before serving, make your whipped cream topping.
Whip 1 1/2 cups heavy cream with powdered sugar and vanilla until soft peaks form.
Spread or pipe over the chilled pie.
Top with reserved crushed Butterfingers, chocolate shavings, and a drizzle of caramel sauce if you’re feeling extra.
Use a sharp knife dipped in warm water to cut clean slices.
Serve immediately and watch people’s faces light up with pure joy.
Notes
Serve with a tall glass of cold milk because this is rich, rich stuff.
A cup of strong coffee pairs beautifully with all that peanut butter and chocolate.
Drizzle individual slices with chocolate or caramel sauce for extra indulgence.
A small scoop of vanilla ice cream on the side never hurt anyone.
- Prep Time: 30 minutes
Nutrition
- Calories: ~650 kcal
- Carbohydrates: ~55g
- Protein: ~12g


