

What the heck is this?
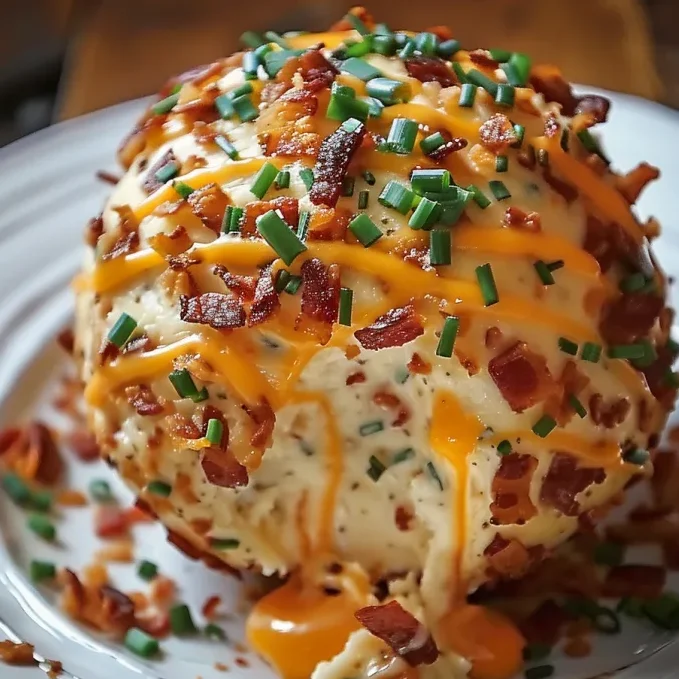
Remember those cheese balls your mom used to make for every holiday gathering? Well, we took that nostalgic goodness and gave it a serious glow-up. These Bacon Ranch Cheese Ball Bites are everything you loved about the classic, but in perfectly portioned, pop-in-your-mouth spheres that are basically impossible to resist. We’re talking cream cheese heaven loaded with ranch flavor, studded with crispy bacon bits, and rolled in even MORE bacon because why the hell not? They’re like little handheld clouds of comfort that disappear faster than your New Year’s resolutions. Fair warning: people will literally fight over the last one, so maybe make a double batch and save yourself the drama.
Why You’ll Love This Recipe
- All the nostalgia, none of the mess of a giant cheese ball
- Bacon AND ranch — it’s like they were made for each other
- Perfect bite-sized portions (no weird cheese ball etiquette required)
- Make-ahead friendly because stress-free entertaining is the goal
- Everyone will think you’re way fancier than you actually are
- Great for any occasion from game day to fancy dinner parties
- Basically addictive — consider yourself warned
The Good Stuff You’ll Need
For the Cheese Ball Base:
- 16 oz cream cheese, softened (don’t skip this step or you’ll hate your life)
- 1 cup sharp cheddar cheese, shredded
- 1/2 cup sour cream
- 1 packet (1 oz) ranch dressing mix
- 1/4 cup chives, finely chopped
- 2 tbsp Worcestershire sauce
- 1 tsp garlic powder
- 1/2 tsp onion powder
- 1/4 tsp black pepper
For the Coating:
- 12 strips bacon, cooked crispy and crumbled
- 1/2 cup extra sharp cheddar, shredded
- 2 tbsp fresh chives, chopped
For Serving:
- Crackers (Ritz, water crackers, or whatever makes you happy)
- Fresh vegetables if you want to pretend this is healthy
- More bacon bits because people are greedy
Let’s Do This
Step 1: Bacon Prep (The Most Important Step) Cook your bacon until it’s perfectly crispy — we’re talking shatter-when-you-touch-it crispy. Drain on paper towels and crumble into small pieces. Try not to eat all of it while you’re working. I’m not judging, but save some for the recipe.
Step 2: Mix the Magic In a large bowl, beat the softened cream cheese until it’s fluffy and smooth. Add sour cream, ranch packet, Worcestershire, and all the seasonings. Mix until combined, then fold in the shredded cheddar, chives, and about half of your bacon bits.
Step 3: Taste Test (Quality Control) This is crucial. Taste the mixture and adjust — more ranch? More bacon? More cheese? You’re the boss here. It should taste like the best ranch dip you’ve ever had, but thicker.
Step 4: Chill Out Cover and refrigerate for at least 2 hours, or until firm enough to roll. This step is non-negotiable — warm cheese mixture is impossible to work with.
Step 5: Roll Call Using a small cookie scoop or your hands, roll the mixture into 1-inch balls. Place them on a parchment-lined baking sheet. Don’t worry if they’re not perfect — rustic is charming.
Step 6: Coat and Conquer Mix your remaining bacon bits with the extra cheddar and chives. Roll each ball in this mixture, pressing gently so it sticks. They should look like little bacon-studded gems.
Step 7: Final Chill Pop them back in the fridge for another 30 minutes to firm up. Then serve and watch people lose their minds.
Serving Suggestions
- Arrange on a platter with an assortment of crackers
- Serve alongside fresh vegetables for the health-conscious guests
- Drizzle with a little melted cheese or ranch for extra indulgence
- Pair with a crisp white wine or cold beer
Switch It Up
Different Flavors: Try everything bagel seasoning instead of bacon, or go wild with jalapeños and pepper jack.
Herb Garden: Fresh dill, parsley, and green onions make a lighter, brighter version.
Spicy Kick: Add some hot sauce or cayenne to the base mixture for heat lovers.
Mini Cheese Ball Bar: Make different flavored batches and let people mix and match.
Make-Ahead Tips
- These actually get better after sitting overnight in the fridge
- You can make them up to 3 days ahead and store covered
- Freeze the balls before coating, then coat when ready to serve
- The base mixture can be made a week ahead and rolled when needed

Questions People Actually Ask
Q: Can I make one big cheese ball instead? A: Sure, but then you lose the cute factor and the perfect portion control. Plus, people get weird about double-dipping with big cheese balls.
Q: What if my cream cheese is too cold? A: Microwave it for 15-20 seconds at a time until soft. Cold cream cheese will make lumpy, sad cheese balls.
Q: Can I use turkey bacon? A: You can, but regular bacon is what makes these special. Don’t compromise on the good stuff.
Q: How long do these keep? A: Up to a week in the fridge, but good luck making them last that long.
Q: Can I make them dairy-free? A: There are some decent dairy-free cream cheese options out there, but honestly, this isn’t the recipe to go dairy-free on.
PrintBacon Ranch Cheese Ball Bites: The Party Snack That Ends All Other Party Snacks
- Total Time: 45 minutes
- Yield: Makes about 24 bites 1x
Description
Remember those cheese balls your mom used to make for every holiday gathering? Well, we took that nostalgic goodness and gave it a serious glow-up. These Bacon Ranch Cheese Ball Bites are everything you loved about the classic, but in perfectly portioned, pop-in-your-mouth spheres that are basically impossible to resist. We’re talking cream cheese heaven loaded with ranch flavor, studded with crispy bacon bits, and rolled in even MORE bacon because why the hell not? They’re like little handheld clouds of comfort that disappear faster than your New Year’s resolutions. Fair warning: people will literally fight over the last one, so maybe make a double batch and save yourself the drama.
Ingredients
For the Cheese Ball Base:
- 16 oz cream cheese, softened (don’t skip this step or you’ll hate your life)
- 1 cup sharp cheddar cheese, shredded
- 1/2 cup sour cream
- 1 packet (1 oz) ranch dressing mix
- 1/4 cup chives, finely chopped
- 2 tbsp Worcestershire sauce
- 1 tsp garlic powder
- 1/2 tsp onion powder
- 1/4 tsp black pepper
For the Coating:
- 12 strips bacon, cooked crispy and crumbled
- 1/2 cup extra sharp cheddar, shredded
- 2 tbsp fresh chives, chopped
For Serving:
- Crackers (Ritz, water crackers, or whatever makes you happy)
- Fresh vegetables if you want to pretend this is healthy
- More bacon bits because people are greedy
Instructions
Step 1: Bacon Prep (The Most Important Step) Cook your bacon until it’s perfectly crispy — we’re talking shatter-when-you-touch-it crispy. Drain on paper towels and crumble into small pieces. Try not to eat all of it while you’re working. I’m not judging, but save some for the recipe.
Step 2: Mix the Magic In a large bowl, beat the softened cream cheese until it’s fluffy and smooth. Add sour cream, ranch packet, Worcestershire, and all the seasonings. Mix until combined, then fold in the shredded cheddar, chives, and about half of your bacon bits.
Step 3: Taste Test (Quality Control) This is crucial. Taste the mixture and adjust — more ranch? More bacon? More cheese? You’re the boss here. It should taste like the best ranch dip you’ve ever had, but thicker.
Step 4: Chill Out Cover and refrigerate for at least 2 hours, or until firm enough to roll. This step is non-negotiable — warm cheese mixture is impossible to work with.
Step 5: Roll Call Using a small cookie scoop or your hands, roll the mixture into 1-inch balls. Place them on a parchment-lined baking sheet. Don’t worry if they’re not perfect — rustic is charming.
Step 6: Coat and Conquer Mix your remaining bacon bits with the extra cheddar and chives. Roll each ball in this mixture, pressing gently so it sticks. They should look like little bacon-studded gems.
Step 7: Final Chill Pop them back in the fridge for another 30 minutes to firm up. Then serve and watch people lose their minds.
Notes
- Arrange on a platter with an assortment of crackers
- Serve alongside fresh vegetables for the health-conscious guests
- Drizzle with a little melted cheese or ranch for extra indulgence
- Pair with a crisp white wine or cold beer
- Prep Time: 30 minutes
- Cook Time: 15 minutes
Nutrition
- Calories: ~85 Per Bite
- Protein: ~3g Per Bite


