What the heck is this?
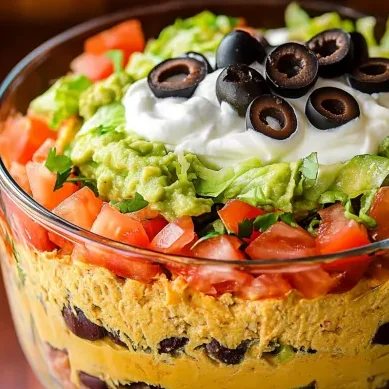
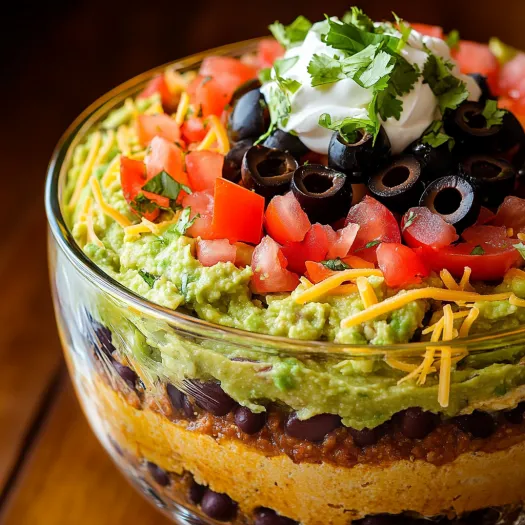
Let’s talk about the dip that has been dominating potlucks, tailgates, and taco nights since the ‘80s and never, ever lets you down. 7 Layer Dip is the cold, creamy, crunchy, zesty, cheesy masterpiece that stacks up seven distinct and delicious layers in one glorious scoopable dish. You start with spiced-up refried beans at the base, layer on guacamole, sour cream, salsa, shredded cheese, fresh veggies, and salty black olives for the win. You serve it with a mountain of tortilla chips, and boom—it’s gone in 20 minutes. Maybe less. It’s got color, texture, BIG flavor, and you don’t even have to turn on the stove.
This dish is basically the unofficial mascot of casual gatherings. No matter where you serve it, it’s the first thing people dive into and the one dish everyone asks for the recipe for. Best part? You can prep it in advance, customize the layers, and scale it up for a crowd or down for a solo “yes-I’m-just-eating-dip-for-dinner” situation.
Why You’ll Love This Recipe
Let’s start with the obvious: no cooking required. This is the kind of recipe that looks impressive and tastes amazing but is dead simple to make. Plus, it’s fully customizable—tweak the layers based on your preferences or dietary needs. It’s vegetarian-friendly as written, but you can easily add seasoned meat or plant-based protein. It’s cool and refreshing with enough spice and tang to keep you dipping nonstop. The texture combo is unbeatable: creamy guac, smooth sour cream, chunky salsa, crisp veggies, and melty cheese on top. It also travels like a dream, so it’s perfect for any event where you want to show up and win the snack game.
The Good Stuff You’ll Need
Base Layer:
1 (16 oz) can refried beans (regular or vegetarian)
1 tablespoon taco seasoning (store-bought or homemade—cumin, paprika, chili powder, garlic powder)
Creamy Layers:
1 cup guacamole (homemade or thick store-bought)
1 cup sour cream (or Greek yogurt for a protein boost)
Salsa & Cheese Layers:
¾ cup salsa or pico de gallo (drain off excess liquid to prevent sogginess)
1½ cups shredded Mexican blend cheese or cheddar (or a combo—get fancy)
Topper Layers:
½ cup chopped fresh tomatoes (roma or cherry tomatoes work well)
½ cup chopped green onions (white and green parts)
¼ cup sliced black olives (or more if you’re Team Olive)
Optional Garnishes:
Sliced jalapeños
Fresh chopped cilantro
Shredded iceberg or romaine lettuce
Diced red onion
A drizzle of hot sauce or taco sauce
Let’s Do This
Get your base ready: In a bowl, mix the refried beans with taco seasoning until smooth and well combined. Spread it evenly into the bottom of a clear glass 8×8 baking dish, trifle dish, or shallow serving platter. Press it down firmly—it’s the foundation, after all.
Layer the guac: Carefully spoon the guacamole on top of the beans. Drop it in dollops across the surface, then gently spread it out with a spatula so you don’t mix it with the beans.
Spread the sour cream: Same method—dollop, then smooth. Keep it light and fluffy to avoid collapsing the layers underneath.
Add the salsa: Spoon on your drained salsa or pico de gallo. Try to use a slotted spoon if it’s juicy, or else your beautiful dip may turn into a soggy mess by hour two.
Cheese time: Sprinkle that shredded cheese all over. Go edge to edge. You want a full blanket of cheesy goodness.
Top it off: Now comes the fun part. Scatter chopped tomatoes, green onions, and olives across the top. Add jalapeños or cilantro if you’re feeling wild. You can even do this part artistically if you want to get extra with it.
Chill and serve: Pop the whole dish in the fridge for at least 30 minutes so the layers firm up a bit and the flavors mingle. Serve cold with lots of tortilla chips, pita chips, or even crunchy veggies for dipping.
Serving Suggestions
You really can’t go wrong with this as your party appetizer, but it’s also awesome as a lunch spread with crackers and raw veggies, or even used as a filling for burritos or quesadillas. Hosting a build-your-own nacho bar? Set this out as the ultimate topping. Want to make it dinner? Spoon some into lettuce wraps and pretend you’re being healthy. Add a side of margaritas and call it a night.
Switch It Up
Add meat: Brown up some taco-seasoned ground beef, shredded chicken, or plant-based crumble and add it over the beans or in place of them.
Make it spicy: Stir some hot sauce or chopped jalapeños into your sour cream, or use a spicy salsa layer.
Go vegan: Use vegan refried beans, plant-based sour cream and cheese, and skip the dairy for a fully vegan-friendly dip that still slaps.
Change the beans: Swap in black beans, pinto beans, or mashed chickpeas for a twist.
Try a different cheese: Shredded pepper jack, crumbled queso fresco, or even a nacho cheese drizzle work here. You can’t mess this up.
Make-Ahead Tips
7 Layer Dip is perfect for prepping ahead. Assemble up to 24 hours in advance, cover tightly with plastic wrap, and store in the fridge. Just hold off on adding the top garnishes (like tomatoes, onions, and olives) until right before serving if you want them to stay extra fresh and crunchy. This dip doesn’t freeze well, so keep it refrigerated and aim to eat it within 2–3 days (not that you’ll have leftovers).

Questions People Actually Ask
Do I need to use a glass dish? Not technically, but it does look cooler since you can see the layers. Plus, it’s easier to scoop when it’s in a shallow dish.
Can I double the recipe? Oh yeah. Use a 9×13 pan if you’re feeding a crowd. Or make two batches and keep one hidden in the fridge for later.
What chips are best? Go for thick, sturdy tortilla chips. Thin ones will break under the pressure of all this glory. Also works with pita chips, bagel chips, or sliced bell peppers if you want a veggie option.
Can I make individual servings? Yes! Layer the dip into small clear cups or mason jars for adorable, mess-free individual portions—perfect for parties or picnics.
7 Layer Dip: The Ultimate Tex-Mex Party Powerhouse That Steals the Show Every. Single. Time.
- Total Time: 50 minutes
- Yield: 8–10 hungry partygoers 1x
Description
This dish is basically the unofficial mascot of casual gatherings. No matter where you serve it, it’s the first thing people dive into and the one dish everyone asks for the recipe for. Best part? You can prep it in advance, customize the layers, and scale it up for a crowd or down for a solo “yes-I’m-just-eating-dip-for-dinner” situation.
Ingredients
Base Layer:
1 (16 oz) can refried beans (regular or vegetarian)
1 tablespoon taco seasoning (store-bought or homemade—cumin, paprika, chili powder, garlic powder)
Creamy Layers:
1 cup guacamole (homemade or thick store-bought)
1 cup sour cream (or Greek yogurt for a protein boost)
Salsa & Cheese Layers:
¾ cup salsa or pico de gallo (drain off excess liquid to prevent sogginess)
1½ cups shredded Mexican blend cheese or cheddar (or a combo—get fancy)
Topper Layers:
½ cup chopped fresh tomatoes (roma or cherry tomatoes work well)
½ cup chopped green onions (white and green parts)
¼ cup sliced black olives (or more if you’re Team Olive)
Optional Garnishes:
Sliced jalapeños
Fresh chopped cilantro
Shredded iceberg or romaine lettuce
Diced red onion
A drizzle of hot sauce or taco sauce
Instructions
Get your base ready: In a bowl, mix the refried beans with taco seasoning until smooth and well combined. Spread it evenly into the bottom of a clear glass 8×8 baking dish, trifle dish, or shallow serving platter. Press it down firmly—it’s the foundation, after all.
Layer the guac: Carefully spoon the guacamole on top of the beans. Drop it in dollops across the surface, then gently spread it out with a spatula so you don’t mix it with the beans.
Spread the sour cream: Same method—dollop, then smooth. Keep it light and fluffy to avoid collapsing the layers underneath.
Add the salsa: Spoon on your drained salsa or pico de gallo. Try to use a slotted spoon if it’s juicy, or else your beautiful dip may turn into a soggy mess by hour two.
Cheese time: Sprinkle that shredded cheese all over. Go edge to edge. You want a full blanket of cheesy goodness.
Top it off: Now comes the fun part. Scatter chopped tomatoes, green onions, and olives across the top. Add jalapeños or cilantro if you’re feeling wild. You can even do this part artistically if you want to get extra with it.
Chill and serve: Pop the whole dish in the fridge for at least 30 minutes so the layers firm up a bit and the flavors mingle. Serve cold with lots of tortilla chips, pita chips, or even crunchy veggies for dipping.
Notes
You really can’t go wrong with this as your party appetizer, but it’s also awesome as a lunch spread with crackers and raw veggies, or even used as a filling for burritos or quesadillas. Hosting a build-your-own nacho bar? Set this out as the ultimate topping. Want to make it dinner? Spoon some into lettuce wraps and pretend you’re being healthy. Add a side of margaritas and call it a night.
- Prep Time: 20 minutes
Nutrition
- Calories: ~280 kcal per serving
- Fat: ~18g
- Carbohydrates: ~20g
- Protein: ~8g